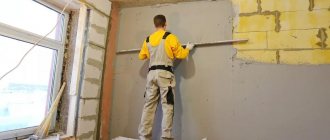
Modern technologies improve the characteristics of housing and its operation. Plastering clay walls has many advantages, making it very comfortable to be in such a house.
Modern eco-houses are durable and strong. They retain heat well in winter, and feel cool in the summer heat. When choosing clay walls, owners should be prepared for the fact that they will have to take into account a lot of nuances, because not everything is as simple as it might seem at first glance.
Advantages and disadvantages of introducing clay
Clay has been one of the main building materials for many centuries ago. At the moment, its use in construction work is not so relevant. But the positive properties of this material demonstrate that its implementation is justified in almost everything.
1. Clay is a material of natural origin. Its natural deposits are huge, and getting to them with your own hands, without resorting to the services of expensive equipment, is completely possible. In addition to clay, you will also need sand and sawdust. But these materials are also inexpensive and available.
2. Clay does not cause reactions in allergy sufferers.
3. Walls plastered with a clay-sand substance amazingly absorb water vapor and odors, thereby maintaining a better level of humidity in the room and promoting natural air filtration.
4. This natural material, combined with environmental friendliness, has good thermal insulation qualities. In a house where the main component of the walls is clay, it is not hot in the summer, but comfortable and warm in the winter.
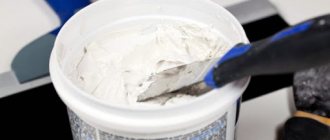
5. To finish clay walls, ordinary gypsum putty can be used. Later you can glue wallpaper and paint in the same way as on walls made of other materials.
Clay walls also have some disadvantages:
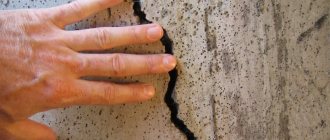
- Being a material that strongly absorbs water, clay requires a special approach to waterproofing. Otherwise, condensation, leaking pipes or roofs, high groundwater levels and other sources of dampness will kill the clay wall, no matter what it is covered with.
- The clay itself is a loose and free-flowing base. When working with it, you should adhere to certain rules and not force it to dry for a long time. All this significantly increases the time required to complete repair work.
When starting to finish clay walls, you should study the specifics of the work and keep them in mind during the repair process. This article will examine the main issue of finishing clay walls - putty, and provide a detailed summary of puttying clay walls. But before you start, you need to go through a preliminary step.
DIY clay plaster: application and composition
The choice of clay as a finishing material is associated with its characteristics. As well as the possibilities of its use, if the inherent disadvantages of the material allow it.
In this context, it is advisable to consider the technical characteristics and features of clay plasters.
Advantages
Clay plaster has several unique benefits. The main one is ease of application. Do-it-yourself clay plaster is applied most successfully, because other binders are more “capricious”.
But there are other attractive characteristics:
- Cheapness. An indisputable fact even for ready-made clay mixtures. And if you import directly from the quarry and prepare it yourself, you can get them almost free.
This also includes decorative clay plaster.
- Moisture capacity. The main technical, construction advantage.
Clay absorbs moisture from the air in relatively large quantities and, with changes in humidity in the room, maintains a microclimate that is comfortable for humans.
When the balance is restored, clay plaster gradually releases water molecules, smoothing out the sharpness of humidity changes.
- Thermal conductivity.
- Adsorption. Plastering with clay is healing, it interacts with active substances and binds them. In other words, clay plasters absorb harmful substances without “releasing” them back into the room.
This property has been adopted by allergy sufferers, who feel much better in a house with clay plaster.
- The elasticity of clay rocks allows them to plaster heated structures (stoves, fireplaces, heating panels, chimneys).
- Environmentally friendly. Natural sedimentary minerals do not contain harmful substances.
Clay is used for plastering damp (but not damp) rooms, as an environmentally friendly material and for laying and finishing stoves and fireplaces.
Flaws
In general, any properties can be called neutral. Under certain conditions they can become advantages or disadvantages.
- Moisture capacity. Saturation with water molecules changes the structure of the clay. This entails a change in its technical characteristics:
- Strength and hardness are reduced;
- Swelling leads to an increase in volume and mass;
- Soaking violates the integrity of the formation, which changes its geometric configuration - it becomes deformed;
- Shrinkage is a consequence of swelling. The clay is so plastic that it shrinks gradually and does not break. However, sudden drying can cause destruction (cracks, craquelure). Clay mortar for plastering walls is used with filler, which increases the strength of the layer.
- Thermal conductivity. For comparison: cement-sand plaster – 1.2 (W/m2K), cement – 0.93, lime plaster – 0.698, gypsum – 0.3. Clay – 0.7-0.9. A little “warmer” than cement. However, this property is used when finishing heating panels - the better the plaster conducts heat, the higher the heat transfer of the stove.
Lime is one and a half times less thermally conductive and gypsum is 3 times less thermally conductive and better protects the wall from heat loss. True, with an insignificant thickness of the plaster, this indicator is not important.
The main drawback is durability. Clay plaster is relatively soft, easily scratched and chipped (compared to cement).
Clay plasters are not hard enough compared to cement plasters and are “colder” than gypsum plasters. They are not suitable for finishing plinths, but can be used in combination with other binders.
There are many varieties of clays, depending on their mineral composition and the amount of impurities. In Russia, the most common are red and white.
What immediate tools and materials are needed?
When starting to repair and decorate clay walls, you will need the following tools:
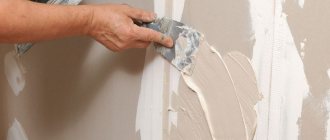
- Set of spatulas, trowel, trowel. It is better to choose which tool for puttying clay walls is more ergonomic using the trial method. Some people find it more convenient to use spatulas, while others are used to working with a scourer or other equipment.
- Buckets for mixing clay-sand mortar and putty.
- A construction mixer and a shovel will be indispensable when producing large volumes of finishing mixtures.
- Knife for filling cracks and trimming serpyanka.
- A construction stapler can be useful for securing a meter grid to the wall.
- To find out the evenness of surfaces can be a building level and rule, a plumb line and threads.
The materials needed are:
- Putty for clay walls requires a starting and final putty (depending on what kind of coating is planned to be applied at the end of puttying).
- Reinforcement nylon mesh with a small cell. A narrow serpyanka is needed to strengthen cracks, and a meter-long one will be applied over the entire surface of the wall.
- To adjust the walls using a clay-sand mortar, you need one part clay, two or three parts sand, and water. In addition, if desired, you can add a little sawdust or small grass to reinforce the consistency. To increase plasticity and thermal insulation, the forefathers also added horse manure to the clay. The smear came out strong, even, with a small fraction. The composition should brew well and the mixture should resemble thick, homogeneous sour cream. In addition, you can use a mixture of clay, sand and gypsum in a ratio of 1:4:1/4.
Nuances
Some aspects of repairing clay ceilings are worth mentioning separately. You can start with the fact that the clay on which the putty will be applied is a very absorbent material. Therefore, the consumption of primer and impregnation can be significantly higher than when working with standard coatings. Do not skimp on the primer and process the surfaces several times.
Reinforcing mesh can be used not only in cases with significant defects. It will help to better fix the putty on the plane, so you can use it even when working with minor damage. The mesh will only make the applied coating stronger and will allow you not to worry about the strength of the finish in the future.
Even in cases where a mesh is used, do not apply the first composition too thickly. The main thing is that the mixture dries as quickly as possible, without having time to saturate the base surface too much with moisture. Otherwise, the patch will not adhere very securely. It’s better to make one more, “extra” pass than to get a poorly made repair.
Preparing clay walls
First, you need to remove all old coverings. This applies to both whitewashing and various paints and wallpapers. To facilitate the process of removing old coatings, the walls can be wetted. The swollen top layer of clay will be easy to clean.
The technical features of clay wall smears are that this base is relatively soft and free-flowing.
Before you start leveling the walls with putty, check the clay surface for damage. To do this, tap the wall with the handle of a trowel or spatula. A dull sound and slight movement will reveal places where the clay has moved away and may collapse. To prevent the new renovation from having to be redone because a piece of the wall has fallen off, it is better to remove the unsafe area in advance.
If there are cracks in the clay smear, you need to perform the following steps:
- Using a spatula, knife or trowel, clear the edges of the crack at an angle of 40-5 degrees to a depth of at least 1 centimeter.
- Treat with primer and allow to dry thoroughly.
- Using pressing movements, fill the crack with starting putty or a clay-sand mixture.
- Apply the serpyanka so that it completely covers the fault.
- Cover the top with a layer of putty, pressing the mesh into the mixture.
- Leave the corrected areas until completely dry.
Moreover, in this case, while the clay plaster is done at the highest level, the walls are even and smooth, the components of the composition are kept in perfect proportion, it is necessary to prepare the clay walls for applying putty.
The clay base needs to be strengthened. To do this, use a deep penetration primer. Penetrating into the coating to a depth of up to a centimeter, the primer, when dry, perfectly glues the particles of the loose base, preventing them from disintegrating and preventing excess water from passing through. At the same time, priming the clay walls increases the level of adhesion of the base to the next finishing layer, and prevents the formation of mold, since for the most part, priming consistencies include disinfectant additives. It is also necessary to treat with a primer those places that have been cleaned of weak parts. Before applying putty, you need to prime the clay twice, thoroughly drying any layer.
How to prepare clay.
The lumps are crushed, sifted through a coarse sieve, and filled with water for 1-2 days. To speed up the soaking process, the trough can be placed in the sun and covered with film so that the mixture warms up but does not dehydrate. The viscosity of hot water is lower; it penetrates better into rock particles.
Obtaining fine clay.
The quality of clay (including moisture holding capacity) depends on dispersion. Therefore, old masters advise preparing clay for future use: it is poured into shafts (not more than a meter in height) and moistened. In winter, as the mass freezes, it swells and becomes loose. This material is more flexible, more pleasant and easier to work with, and produces fewer cracks. This is especially important when creating decorative, glossy clay plaster.
For plastering stoves, it is better to use dispersed clays, ground by hand or by defrosting. The thickness of the finishing of the heating shield should be minimal so that the brick can release heat without hindrance.
Making the walls even
An important step will be to determine the evenness of the surfaces. In dilapidated buildings, it is quite common to see walls that are far from the standard. Some were initially erected without leveling, others were smeared by not very experienced craftsmen. Ultimately, carrying out modern renovations in a room with these walls will result in significant expenses for leveling. Based on this, before starting work, determine the degree of evenness of the walls and ceilings, using a building level, usually plumb lines and threads stretched along vertical marks. Experienced builders use special laser levels to determine planes.
As mentioned above, different consistencies can be used to adjust clay walls. This can be a clay-sand mixture, a lime-clay solution (clay, sand, lime dough in a ratio of 6:15:2), a clay-gypsum mixture. But it is more convenient to level clay walls with putty.
The layer of starting putty should not be more than 1.5 cm, despite the fact that the most acceptable layer for gypsum plaster is three cm per application. Based on this, experts recommend correcting deeper bulges using clay mixtures, or using drywall for leveling.
Important! Plastering or repairing defects on clay walls can only be done with lighter substances than clay. So, cement mortar is not suitable for this purpose. It will not be able to adhere properly to clay and will quickly fall off.
What clay is suitable for plaster?
When preparing the components of a clay mortar for plastering walls, pay attention to whether the clay is greasy, how plastic it is, and the degree of contamination with foreign or large inclusions. Skinny clay is not used in clay plaster. It is possible to prepare a plaster mortar from clay:
- light, with plasticity up to 0.27;
- heavy – plasticity above 0.27,
However, the latter are rarely used, since heavy material cracks over the years due to changes in temperature. There are situations when a deposit, in simple terms, “faints.” Material with this level of radioactivity is unsuitable for plastering work.
Fat content and its definition
The granulometric composition of the mineral varies widely. Natural material can be fatty (a large number of clay and silt particles), lean (a large number of sandy particles), normal. The fat content of clay for plaster and the proportions of the composition are determined experimentally. To select the correct clay composition for plastering, experimental batches are mixed separately (with volumetric ratios of clay- sand):
- From each batch, roll a 3-4 centimeter ball, then drop it from a height
1 meter on a hard surface. A ball made from a fatty composition will be greatly flattened (cracks will form when drying), while a ball made from a thin composition will fall apart (the strength of the plaster coating will be low). A composition from which the ball was not severely damaged and did not crumble when dropped is suitable for plaster coating.
- The second way to determine the fat content of a solution is to flatten such a ball to a height half the original height. Ideally, shallow cracks should appear along the edges of the cake. If the solution is greasy, then the edges remain intact; if the solution is thin, deep cracks form.
- From each batch, roll out flagella with a diameter of 15 mm and a length of 20 cm. Wrap the flagella around the handle of a shovel (or other object with a diameter of 5 cm). If there are no cracks or there are few of them and they are small, then the composition is suitable.
- Take a test batch of solution onto a trowel moistened with water. After which the trowel is turned so that the mixture flows from it. The fat content of the solution is judged by the mark left on the instrument. Dry will not leave a mark, oily will leave a lot of sticking, normal will leave narrow small stripes.
- dispersion of the material (the smaller the component fractions, the more plastic),
- mineralogical composition.
Sand is added to fatty solutions; in lean solutions, the amount of added sand is reduced.
Obtaining fine clay
In terms of plasticity, clay material has five gradations: from highly plastic to non-plastic. This indicator depends on:
It will not be possible to use the elutriation method used by artists for construction purposes, so they use the “old-fashioned” method. The excavated clay material is laid out on the site in shafts 1 m high, moistened, and left in the open for the winter. Frozen rock becomes loose and plastic. This material is well suited for decorative finishing, as well as for coating stoves.
To properly level the walls, you need to putty them.
How to putty clay walls?
Let's move directly to the puttying process. Before starting to putty, the master already knows how the end result will look.
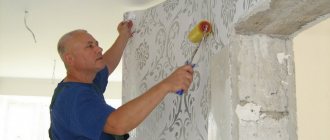
Wallpaper will be glued.
If the final finishing of the room is planned with wallpaper, then reinforcing mesh may not be applied to the entire surface of the wall. After completing the two-time primer and each layer has completely dried within 20-4 hours, the defects are corrected. It is enough to place a narrow serpyanka on problem areas and cover the entire surface of the walls with a layer of starting putty (gypsum plaster). We wait later, when the starting layer is completely dry.
Important! You should not rush, as poorly dried clay walls (saturated with moisture from the putty) will be able to collapse during future processing.
After drying, use a spatula to clean out any bulges in the putty and protruding parts. For thick wallpaper, final putty for clay walls is not necessary. The non-woven base holds well and prevents the putty from cracking. But it is worth emphasizing that the next time, when the wallpaper is removed, the putty may fall behind along with the canvas, such is the nature of the clay.
To avoid this, it is necessary to apply a reinforcing mesh before applying putty before painting.
There will be putty for painting.
Puttying for painting on clay walls is somewhat risky. If, due to temperature changes or excess moisture, the clay cracks, it will immediately appear on the painted surface. There are 2 ways to prevent a similar situation:
Method 1
When planning to paint the walls, you may want to stick some wallpaper to match the painting. A dense base will not react to small cracks that may appear in the clay. The texture of wallpaper for painting quite often looks more profitable in the interior than just plain walls.
Method 2
The best option for strengthening putty on clay walls is to use nylon reinforcing mesh. To secure it to a clay wall, you can use a construction stapler. Rolling the roll down from the ceiling, the mesh is nailed to the wall with staples. The disadvantage of this method is that the mesh ends up folded and the staples will be able to protrude above the surface.
Such inconveniences can be avoided by using the gluing method:
- Apply a thin layer of starting putty to the wall;
- Place the edge of the mesh near the ceiling and move the spatula down and to the sides, pressing the mesh into the putty, stick it to the wall;
- Having perfectly straightened one strip of meter-long serpyanka, overlap the next one by two to three cm and repeat the function;
- Having paved the entire surface of the wall, apply another smoothing layer of starting putty.
Later we will tell you how to make putty for painting on clay walls:
- After the layer has completely dried within 20-4 hours, for good performance it is recommended to apply another smoothing layer of starting gypsum putty;
- After complete drying, the starting coating should be thoroughly cleaned with an abrasive net for grouting the putty;
- Before applying the final putty, it is recommended to apply a primer and allow to dry;
- The final putty is applied in a thin layer, and after drying is sanded.
Important! When cleaning the putty surface for painting, it is recommended to use a portable light source. By placing it close to the surface at different angles, all bulges will be clearly visible.
- Before painting, many craftsmen recommend priming the final layer again, but experience says that it is better to paint without priming, so the water-based paint is moderately absorbed into the putty, forming an identically uniform layer.
Putty is one of the main technological processes in repair. By doing it correctly, the repairman makes the repair half the success. Clay walls are not a hindrance to a beautiful and modern interior, and in some respects they have advantages over other building materials.
All of the above can be consolidated by viewing the story below, “Putting clay walls.” The video talks about the sequence of work on puttying clay walls.
Having done all the work, adhering to the tips given in the article, repair work in a house with clay walls will be simple, and the result will be of excellent quality.
Creating a rough finish
Sawdust is the key to the strength and reliability of plaster for wall finishing. Their absence is compensated for by attaching a nylon reinforcing mesh to the surface of clay walls. The reinforcement is secured with mortar, excluding the use of nails, which violate the integrity of the walls, thereby worsening the reliability of the structure. It’s easier to work with an assistant who will coordinate the work of the master and show areas that require improvement. The process involves performing several stages:
- preparing tools in the form of a spatula or grater board;
- plaster is applied to the hand tool and pressed tightly against the wall;
- movements are carried out from the bottom up, trying to smear the composition thinly and evenly;
- Levelness is checked using a building level. If irregularities are detected, they are eliminated;
- for smooth walls, 1 cm of plaster layer is left, otherwise you will have to apply 3 to 5 cm of the mixture.
When treating large rooms with clay walls, simplify your work by installing beacons for plastering walls. This will speed up the process of applying the material and increase the quality. After finishing the walls with a rough layer, the walls are left to dry for 4-6 weeks. A one-centimeter layer of plaster dries in 5 days. Experts do not recommend using hair dryers or heaters to speed up the process. To prevent the natural drying process from taking too long, it is better to carry out the work in the summer. The initial finishing begins in May-June, depending on the climatic zones of the country.
Despite the obvious advantages, clay plaster also has disadvantages:
Elimination of irregularities and cracks
After the wall has been treated with a primer, the damaged clay plaster is repaired. Seal existing cracks and restore areas from which peeling pieces were removed.
Plastering on clay is done with a clay solution prepared in the following proportions: 1 part clay, 2.5 parts sand, sawdust as a binding material.
The cracks are widened to a depth of 1 cm, the sides are formed at an angle of 45 degrees.
Clay is soaked in water for a day
The clay is soaked in water for a day to make it plastic. Add the dry ingredients, then add water to create a solution with a creamy consistency.
Clay plaster is applied in several ways:
- using mesh - serpyanka as a base for plaster;
- using the same mortar from which the walls are made.
Use a spatula to apply the solution to the damaged area.
Rub the plaster over the clay using movements in all directions: along, across, down, up. Then rub with a grater. When the surface is dry, apply two coats of primer again. For clay, you cannot use plaster solutions made from ingredients other than clay. The cement mortar will not hold, as it does not adhere well to the clay and does not allow the surface to breathe, which leads to the destruction of the lower layer. To learn how to plaster clay walls using mesh, watch this video:
For plastering on mesh, you can use any putty.
Aligning walls using the rule without beacons
Without beacons, leveling the walls with gypsum plaster is also carried out. It is not always necessary to guide the rule with beacons if the walls only need to be slightly leveled and they are relatively flat.
Plastering walls without beacons
You need to prepare the wall according to the algorithm above, after which the work is carried out as follows:
- A rule is placed on the wall to identify defects.
- If there are bumps on the wall, they are knocked down using different devices. The holes are filled with plaster.
- The plaster is stretched along the wall to smooth out differences.
- Similar actions are carried out along the entire wall.
- Next, a rule of twice as long is used to finally level the wall.
- At the end, the wall is sanded and finishing material can be laid.
To level walls near a fireplace or stove, it is recommended to use cement-based clay plasters; clay is a flexible material that allows it to retain heat and will not crack. You can also use tiles and clinker. The cladding and design can be varied; if it is a bathroom, then tile or panel material will do. If desired, the walls can be aged if the apartment or private house is made in the appropriate style.
Ceiling differences can be leveled using plasterboard by creating a frame. For kitchens and wet rooms, the stove must be moisture resistant. In general, cardboard and plaster can be used for bathrooms and toilets, but it is better to give preference to plaster, especially since such rooms are often small and the work is carried out quickly.
After priming, it is necessary to restore areas of the walls where weak plaster was removed, and also to repair cracks. To work you will need the following tools:
- solution container;
- container with water;
- putty knife;
- wide grater;
- construction knife for jointing cracks;
- shovel or construction mixer for mixing the solution.
An important rule for plastering: areas should be plastered with the same plaster that is used to plaster the entire wall. Therefore, we prepare clay plaster for clay walls. The solution will consist of the following parts:
- clay 1 part;
- sand 2-3 parts;
- water (until the solution becomes similar in consistency to sour cream);
- sawdust or straw (as a reinforcing component of the solution).
The indicated proportions are approximate, since the clay may already contain sand. Therefore, first you need to prepare 2-3 different solutions little by little and test them on a small area of the wall. You can experiment in small areas while the primer dries on the rest of the surface.
Soak the clay in water the day before use, it should soak and become plastic.
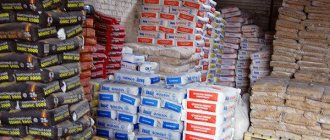
There is ready-made clay plaster available in stores, we recommend using it. There, the components of the mortar are most accurately selected, plastering will be easier and the finished surface will be stronger.
We embroider the cracks with a knife at 45 degrees on each side, 1 centimeter deep. Using a spatula, apply clay mortar to the crack and level it. Movements should be along the crack and across so that the crack is filled completely.
Applying plaster
On the areas where the old plaster has fallen off, we apply the mortar with a spatula (we don’t throw it on, as is the case with cement-sand mortar, but just apply it), and then level it with a construction float. The movements should be in different directions, pull the solution up, down, left and right. Clay is a very plastic material, so this process will not be difficult.
Upon completion of work, wait for the plaster to dry completely. Apply primer to newly plastered areas.