Reading time: 5 minutes No time?
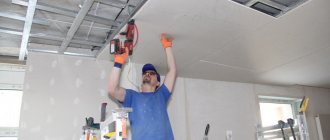
Changes in layout do not always involve major construction. It is quite possible to get by with a lightweight and easy-to-install false wall made of affordable and easily decorated material. An example of such a material is drywall. Today in the review by the editors of HouseСhief.ru we will talk about how to make false walls from plasterboard with your own hands and what you need to know for this.
A lightweight plasterboard structure will help zone the room
Read in the article
Tasks of false walls made of plasterboard
A false wall is not just a partition. Her tasks are much more difficult. This design looks like an ordinary wall in appearance, and at the same time it can be used for zoning or even separating part of the room for special functions. For example, allocating a children’s area in a studio apartment. In a separate room, the child will sleep better; he will not be disturbed by the TV and noise in the kitchen.
Another area of application for such surfaces is the creation of niches for radiators.
You can completely hide the radiator behind a partition, but the heat loss will be too great
False walls are installed in the bathroom to hide unsightly plumbing and sewerage units. And in order to have free access to communications for repairs, hatches and covers are left on the boxes.
Plasterboard structures are indispensable when leveling uneven walls is unreasonably expensive, or when repairs need to be done in a short time
Wall with shelf and drawer
If the partition includes shelves, their frame will consist of guide profiles. If necessary, you can fill the space with jumpers at a certain pitch. The frames are fixed to adjacent surfaces on three sides. The frames of the shelves should be reinforced with jumpers from the rack profile.
If the shelves are 60 cm long, it is better to place the jumper in the center. This will make the shelves stronger. They will be able to withstand heavy loads. The sheathing of the shelves is carried out according to the same principle as in the case of the rest of the frame.
What kind of drywall is used for false walls?
GCR is a universal building material that is used not only for walls, but also for ceilings, ventilation shafts and many other objects. It consists of a gypsum board covered with a cardboard jacket.
Manufacturers add various modifying additives to the gypsum mixture, giving the sheets special properties.
Simple gypsum boards for domestic premises
These sheets do not differ in any special properties and can be used in rooms with normal temperature levels and humidity up to 70%. The color of the cardboard on them is gray, and the marking is simply “GKL”. Even a beginner can install a false wall made of such plasterboard.
Moisture-resistant gypsum boards for false plasterboard walls in the bathroom
To achieve moisture-resistant properties, silicone granules and an antifungal compound are added to the gypsum mixture. The outside of the sheet is covered in a special cardboard that is resistant to moisture.
Despite these properties, professional builders recommend additionally protecting gypsum boards with a waterproof coating: paint, tiles or PVC. This material is intended for bathrooms, toilets and kitchens, it is green in color and marked “GKLV”.
The photo shows false plasterboard walls in the bathroom.
Fireproof sheets for special purposes
This version of fire-resistant products marked “GKLO” is used in the construction of ventilation shafts, cladding of electrical panels and installation of heating boilers, and leveling the walls of production workshops. This drywall is gray, with “GKLO” written on it in red.
Features of drywall
Why is it worth making your own shelves from plasterboard? The thing is that this material has many advantages, because it is one of those rare materials that, due to its hygienic qualities, is absolutely safe and ideal for decorating interior spaces with your own hands.
Advantages
Pros of drywall:
- does not contain toxic substances harmful to health, hypoallergenic;
- has soundproofing properties;
- fire resistant;
- non-flammable and fireproof;
- is able to breathe - absorb moisture or release it, which allows you to create comfortable climatic conditions in the room;
- easy to process - easy to cut;
- easy to install.
Flaws
Cons of drywall:
- the material does not withstand prolonged exposure to humidity and becomes deformed;
- requires careful installation, especially when it comes to complex geometric structures - sloppy execution can lead to deformation of the structure;
- the material does not like impacts and falls of heavy objects and can be damaged.
Important : plasterboard shelves require the use of special fasteners in order to increase their load capacity and stability. Inside the structures, especially if they are shelves for household appliances and a TV, it is worth placing a mortgage in the form of a sheet of plywood.
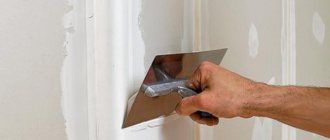
Plasterboard structures require decorative design after assembly. Drywall should not be left as is. Shelves and other products made from it must be painted. The seams between the sheets of drywall are masked carefully. To do this, the seams are taped and covered with putty, achieving the illusion of a single whole. If the putty work is done carelessly, the seams will be visible and the product will lose its aesthetic appearance.
Varieties
Drywall can be:
Waterproof drywall contains substances that prevent mold and mildew from growing on it. From this plasterboard you can make your own shelves for the bathroom and loggia. Again, we must take into account that moisture-resistant drywall will become wet and deformed if it is exposed to water for a long time. Therefore, the shelves should be out of reach of water. And they must be covered with moisture-resistant paint or ceramic tiles. The latter reliably protects the drywall from getting wet.
There is a particularly durable drywall - tongue-and-groove. It even has seismic resistance, so it can be used to make shelves of special strength for heavy equipment. However, such drywall is expensive and is not sold everywhere.
Strengths and weaknesses of plasterboard walls
Let's start with the fact that drywall, no matter what marking is on it, is a lightweight and relatively plastic material that can be used for various structures.
Among the advantages of this building material it is worth noting:
- the ability to form perfectly smooth surfaces in the horizontal and vertical directions;
- the ability to form curved curved parts of different levels of complexity;
- excellent breathability, maintaining a normal atmosphere in the room;
- safety and hypoallergenic;
- high heat-insulating and noise-absorbing properties;
- fire resistance;
- simplicity and speed of installation, low weight;
- affordable price;
- possibility of almost any finishing.
For your information! If it will take you at least a couple of days to install a full-fledged brick wall, then a plasterboard false wall can be made in a few hours.
This material also has disadvantages. The main one is fragility.
Such walls sometimes cannot withstand even a ball hit
In addition, regular plasterboard absorbs moisture. And one more significant nuance - you cannot hang a shelf or any other significant piece of furniture on such a wall. At best, a small mirror or painting to complete the design.
How to dismantle plasterboard walls?
One of the important features of gypsum plasterboard structures is the possibility of quick and not too dusty dismantling. This procedure can be done in two ways:
- With preservation of material.
- No saving.
Dismantling without preservation has the sole purpose of destroying the existing structure. It is produced quite simply - the gypsum board is broken through and removed, the metal elements are disassembled and all materials are removed from the room.
If you need to save the material for recycling, then the structures must be disassembled in the reverse order of assembly:
- All foreign objects in the room must be protected from dust with plastic wrap.
- First of all, you need to remove the doors, lamps and other decorative elements.
- Remove tape or corners from the seams and corners of the sheets.
- Clean the putty from the screw locations.
- Remove the sheets and disassemble the metal frame.
Attention! When disassembling, be aware of the electrical wiring inside the structure. If possible, it should be unplugged.
Careful disassembly of the structure may not damage the materials at all, providing the opportunity for reuse.
Sequence of installation of a gypsum plasterboard wall on a metal frame
The cost of installing a false plasterboard wall is not that high, but why pay someone if you can do it yourself?
Wooden or metal structures are used as a frame for the false wall.
Metal ones are more elegant, durable and perfectly smooth. We’ll dwell on them to talk about the nuances of installation.
What you need for work
To work, a home craftsman will need a set of common repair tools:
- a screwdriver or electric screwdriver with a pair of batteries so as not to waste extra time on charging;
- an electric drill with a hammer drill for drilling concrete walls;
- a sharp construction knife or a well-sharpened kitchen knife with a wide and thin blade;
- special scissors for cutting metal profiles. If you don’t have them, it’s better to buy them, because the profile will have to be trimmed.
Don’t forget marking tools: tape measure, level, pencil and cord
To make a false wall, you will need the plasterboard itself, a metal profile for the posts and guides, dowels for fixing the frame to the support and self-tapping screws for installing the plasterboard. Mineral wool is usually used for sound insulation. To finish the surface, it is first primed and puttied. The methods of decorating such a surface can be any: wallpapering, decorative plaster or painting.
How to make false walls from plasterboard: video instructions
The process of installing drywall is clearly demonstrated in this video on how to make a false wall from drywall with your own hands:
Procedure for installing a metal frame
Installation of a false wall
As an example, we suggest you consider the option of arranging a wall with sliding interior doors, which you can do yourself.
Marking the mounting brackets
The assembly of a metal frame for such a structure should be carried out in the following sequence:
- First of all, the supporting surfaces of the floor and ceiling are marked for guide profiles;
- then follows the marking of the mounting locations for the brackets installed on the main walls;
- after this, the brackets and guide profiles are attached to the positions prepared for them in accordance with the markings made;
- and at the end of the assembly, vertical posts are installed along the level marking line, defining the position of the door posts and the plane of the upcoming finishing.
Assembling a frame from a metal profile
It is clear that when preparing the frame, space must be provided for a sliding door hidden in the thickness of the wall being mounted. Fastenings for the door structure must be installed in advance, which makes it possible to subsequently adjust the movement of the door leaf along its guides.
A little about how to make a false plasterboard wall for sliding doors
Sliding doors are a very popular modern interior design technique. They save a lot of space and also allow you to zone a room in a couple of seconds. If there is a need to install these, for example, in a studio apartment, use a false wall.
The difficulty is that you need to build a wall from floor to ceiling and install a structure with sliding panels into it. To do this, after careful calculations of the dimensions of the opening, a false wall frame is first made, then door guides and limiters are attached to it.
The final stage is covering the frame and installing the door leaf
Two options for installing sliding doors yourself
Plasterboard putty for wallpaper: recommendations for choosing materials and carrying out work
Do-it-yourself sliding interior doors can be made in different ways, or rather, for different rooms. Plus, the size of the budget plays a significant role; it’s one thing to assemble doors for a small summer house with seasonal living, and quite another to make sliding interior doors for a city apartment.
Option No. 1. A good door for an apartment
In this case, we will learn how to properly install sliding doors on rollers with our own hands.
You should immediately forget about homemade mechanisms; we are only talking about installing ready-made systems. Of course, such designs are sold with a description, but there are nuances that are not in the description.
To install sliding interior doors with your own hands, you need the following tool:
- Hammer or electric drill with impact function;
- Hydraulic level;
- Bubble level;
- Screwdriver;
- Roulette;
- Set of open-end wrenches (from No. 5 and above);
- Manual frezer;
- Wood hacksaw;
- Hacksaw for metal;
- Pencil;
- Hammer.
We assume that the door is made from ready-made components, that is, we have a door leaf, guides, rollers, stops and other door fittings. The only thing you will need to buy additionally is a wooden block 50x50 or 50x70 mm.
Even before assembling the sliding door and even before going to the store for components, you need to make sure of the following fundamental things:
- Check how smooth your opening is; if there is a skew, take a wide blade (with a margin);
- Make sure the wall can support the load. It is better for an amateur to work with a brick or concrete wall; leave foam concrete and plasterboard false walls to professionals;
- Absolutely all finishing must be completed. Door assembly is done at the very end.
How to make a compartment door with your own hands:
There are many models of rollers; we are interested in mechanisms on a supporting platform with the ability to adjust the gap between the blade and the guide profile.
Wide platforms are mounted on the edge of the door leaf, but if the door leaf is more than 80 cm, then you can step back from the corner by 1/6 of the door width.
Using a tape measure, we calculate the center and, attaching a roller platform to the end of the canvas, mark the entry points of the screws.
You shouldn’t immediately drive the screws according to the markings; you don’t know what quality the slab is; when screwing the screw in “live”, it may crack. Therefore, first drill holes, the drill diameter is about 2 mm. Next, apply the bar and screw in the screws.
Now insert the carrier plate itself, equipped with a rod for the roller, into the grooves of the roller bar. In this case, the plate is fixed to the bar by screwing the rod a couple of turns (open-end wrenches will come in handy here).
As you can see in the photo, the rod is equipped with a thread; we need to screw the rollers onto this thread. Of course, there is a possibility of adjustment, but the thread must enter the roller by at least 3 - 4 turns. It’s better to count the revolutions so that they are approximately equal on all rollers.
In order not to work in the dark later, it is better to embed handles and locks right away, especially when it comes to hidden handles, as in the photo. All such grooves in the canvas are cut with a hand router.
We are done with the rollers and fittings, now we move on to installing the guide bar. The guide bar itself is metal, we will attach it to a wooden block
It is important here how to calculate the cross-section and length of the bar
Don’t be alarmed, for the calculation we only need a tape measure and a pencil. If your doorway is simply plastered, without platbands, then you can take a 50x50 mm block. The platbands will take up at least 10 - 15 mm, so you need to take a 50x70 mm block for them.
As for the length of the bar, it is calculated as 2 times the width of the door leaf, plus another 50 mm for the stoppers.
Now we lay the guide on the block and fasten it with self-tapping screws in increments of about 200 mm. The holes in the guide are drilled subtly, that is, so that the screw head does not protrude from above, otherwise the roller will begin to cling to it when moving.
Next we hang the structure. A professional only needs to take one measurement, after which the craftsmen attach the timber separately, and then attach the doors to it. It is better for an amateur to try on assembled doors; to do this, we insert the rollers into the guide.
To make the measurement more accurate, you need to insert a wedge, preferably more than one, between the door and the guide bar.
You need to put a mark on the wall above the block and move upward from this mark by at least 7 mm, plus the thickness of the carpets, if any are planned.
Holes in the block must be drilled immediately. The step depends on what exactly you will hang the structure on. For anchor bolts with a cross-section of 6–8 mm, a pitch of 50–70 cm is sufficient, and for long self-tapping screws with plastic dowels, holes are drilled at a distance of no more than 25 cm.
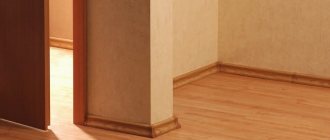
Features of installing false walls made of plasterboard for radiators
Protruding radiators look unsightly. Many designers prefer to hide them in false plasterboard walls near the window, behind decorative grilles. This looks very aesthetically pleasing, but, to be honest, it leads to heat loss. But since beauty requires sacrifice, so be it.
To create a niche, exactly the same frame is made from a metal profile. It is mounted on a load-bearing wall in such a way as to bring the surface of the box to the level with the battery.
Afterwards the frame is sutured with gypsum board
To reduce heat loss, the inside of the niche is covered with heat-reflecting material. After applying the finish, all that remains is to install a metal or plastic decorative grille that will hide the radiator.
Such designs completely change the interior
Do it yourself (instructions)
The basis of any plasterboard shelf is the frame. Otherwise, the shelf will not be a supporting structure. Only the metal frame makes the shelf strong and stable. The frame is assembled from a metal profile with your own hands using self-tapping screws. The metal profile is cut with a grinder to a certain length, according to the dimensions of the future shelf.
Mark the locations of the shelves on the wall. After this, the assembled frame, which is an exact copy of the structure of the shelf itself, is fixed to the wall with self-tapping screws.
Important : if you need a particularly strong shelf, then you need to use thick plasterboard with a thickness of 18 mm or more. In this case, butterfly screws are used instead of self-tapping screws. Traverses and frames will also strengthen the structure.
To create volume on the shelf, guides are attached. These are slats in the longitudinal and transverse directions. If the shelf is expected to support a weight of 15 kg, then it is better to use additional floor supports or ceiling cables.
After this, you need to cover the frame with plasterboard. Sheathing begins with vertical parts. Drywall is fastened with self-tapping screws, trying to accurately fit the parts. The joints are then covered with tape and carefully puttied. It is necessary to ensure that after applying and leveling the putty, the joints are completely invisible and the surface appears perfectly smooth. If the joints are visible, you need to repeat the operation and treat the area with sandpaper.
Important : the greater the expected load on the shelf, the more often it is necessary to attach a sheet of drywall to the profile. The joints of the sheets are located in the middle of the profiles and covered with reinforced mesh.
If you plan to organize the illumination of a shelf made by yourself, then the holes for the lamps must be made before installing the drywall.
Once the shelves are assembled, you can paint them with any paint of your choice that matches the concept of the room.
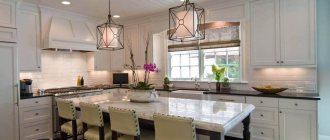
Photo examples of false walls in the interior of a room
The shape, shaped surface and other features of gypsum plasterboard false walls depend only on the design project. The possibilities of the material are almost limitless; it can be used in the living room, bedroom, nursery, and kitchen. Examples of photos of false plasterboard walls:
It is often necessary to redesign premises, change the location of partitions and walls, and with them the location of communications. To hide new utility lines laid, you can use an element such as a false plasterboard wall. Assembling such a structure requires a minimum of time and cost, but it is imperative to adhere to the correct technology.
Full contents of the material
Using drywall: pros and cons
Drywall is a universal material. Its properties provide much more possibilities than it seems at first glance. Advantages of the material:
- Possibility to replace expensive furniture.
- Thermal insulation. A layer of drywall effectively retains heat; if necessary, it can be reinforced with a layer of mineral wool or other insulation.
- Light weight. It does not load the walls or create excessive pressure on the floors, although some structures look heavy and massive.
- Fire safety. Only the cardboard layer can burn, which will not ignite on its own and will not cause a fire.
- Smooth smooth surface. Perfectly corrects or masks defects in walls and surfaces.
- Flexibility. Oddly enough, drywall can be bent, giving structures smooth shapes. Of course, to do this you need to know how to do it, you will need certain skills, but they are quite simple.
- Water resistance. There are specially manufactured grades of drywall that are resistant to moisture.
- Environmental friendliness and safety of the material.
- Low price.
Such properties characterize the material from the most positive side, but there are also disadvantages :
- Fragility. A sheet of drywall can be broken; it cracks under deforming loads. The problem can be solved, but this circumstance must be taken into account during design.
- Poor sound insulation. The seemingly massive structure is hollow, it resonates, all sounds penetrate through it quite easily, which sometimes creates certain inconveniences. To solve the problem, insulators are used - mineral wool or similar materials.
- Weak load-bearing capacity. If you need to hang shelves, wall cabinets or a TV on a plasterboard wall, you need to worry about reinforcement in advance using a double layer of material or install a supporting metal structure in the right place on the back side.
The shortcomings of drywall can be compensated for, the main thing is to know about them and take this into account during design work.
Why are false walls needed?
An element such as a false plasterboard wall should not be confused with partitions and piers assembled using a similar technology. The objectives of this design are completely different. In addition to the fact that various communication lines are hidden under their surface, they also serve other purposes:
- Creating niches from plasterboard and recesses on the surface of the walls, where bookshelves, household appliances can be located, or to cover heating radiators.
- In the bathroom, in addition to hiding water pipes behind a false wall, you can hide a water heater.
- In the kitchen, when creating such structures, washing machines, microwave ovens, heating radiators and cupboards can be placed in niches.
- Also, without resorting to assembling full walls, they assemble a partition that closes the bedroom from the living room.
It is only important to correctly fit such a wall into the interior and assemble the structure in compliance with the technology.
Work algorithm
You can make a false wall from plasterboard by familiarizing yourself with the algorithm for carrying out the work. It will involve the use of guides and rack profiles. Ceiling profiles will also be needed, due to which the wall will be attached to the ceiling and have more impressive strength.
It will be possible to lay communications or soundproofing material inside the created frame. The top of the lathing is sheathed with plasterboard sheets, which can be finished with decorative material. But before that, the sheets are prepared. To do this, it is necessary to smooth out the unevenness with putty, and also coat the base with a primer. The last stage is necessary to remove dust from the drywall and improve its adhesive properties.
Preparation
To make a false wall, it is recommended to prepare a certain set of tools, namely:
- perforator;
- screwdriver;
- grinder;
- drywall knife;
- metal scissors;
- building level;
- marker;
- roulette;
- marking cord.
Without this minimum, it will not be possible to make a false wall from plasterboard. The master may need additional tools during the process.
First you need to clean the adjacent surfaces. They must be dried and treated with antiseptics. It is also important to calculate the amount of drywall that needs to be purchased. To do this, you should determine the area of the future partition, find out the area of one sheet of plasterboard and divide the first value by the second. To the above figure you need to add about 15%, which will go to trimmings. It is important to consider that the sheet material will be installed on both sides, so its quantity should also be doubled.
Attention! In order to make the partition more soundproof and eliminate the transmission of noise from neighbors, sealing tape should be used. It must be laid between the new structure and adjacent surfaces, such as the floor and walls.
It is better to start installing a gypsum plasterboard wall after completing all the rough work in the room. It is good if the flooring is laid after the partition is in place. This also applies to wall decoration.
Preliminary marking
Markings on the floor can be done with a long ruler, additionally using a construction corner. The line should be perfectly straight, because this will determine how correctly the guide profile will be strengthened. On this line you should mark the position of the doorway, if it is provided for in the project.
A false wall may have a small width and a curved design in order to exclude the presence of an opening in the center, because it is not so easy to make it. At this stage, you need to roughly imagine where the shelves and drawers will be located, if they are needed.
Using a Laser Level
The advantage of this device is that you won’t have to use a stepladder or crawl on the floor when marking. Using a laser beam, it will be necessary to make a projection into the place where the partition will be located. Along the projection beam, using a tapping cord or pencil, it is necessary to draw lines along the ceiling, floor and walls.
In order to form the angle of the future partition, the device should be switched to the projection mode of perpendicular planes. One of the rays must be aligned with the line marked at the previous stage. To mark the partition in the area of other adjacent walls, repeat the procedure.
Marking using a square and level
Having determined the first extreme point of the position of the future partition at the junction of the wall and the floor, you can connect it to the counter point on the opposite wall. To do this, you need to measure exactly the same distance from the parallel wall as at the starting point of the partition. Using a square, vertical lines are transferred to the walls. Their position to the ceiling can be checked using a building level. Additionally, you can check the marking line on the wall using a plumb line.
Work on the frame
You can make a frame by fixing the guides to the ceiling and floor. If necessary, they are also attached to the sides. To do this, use dowels installed at a distance of 500 mm from each other. Holes are pre-drilled for them.
If the project provides for side guides, they should be connected to the floor and ceiling profiles. To do this, you can use small self-tapping screws. When making a frame from a profile, the next step will be to install rack rails. For this purpose, direct hangers are used. They are mounted on the wall. Impact dowels should be used for this. The pitch between the racks can be 600 mm. There should be 3 slats per sheet of drywall. Profiles and hangers should be connected with fleas. To strengthen the wall you will need lintels. They will be made from rack profiles - they must first be cut, removing the shelves for fixing to the frame.
Solid false wall
A solid wall must have a strong connection not only in the area of the floor and walls, but also on top. A damper tape is laid at the joints around the perimeter, which will provide greater insulation. The main base of the solid partition will be rack profiles that are inserted into the guides. When choosing the size of these elements, you should take into account the thickness of the drywall and the complexity of the architectural shape of the partition. To ensure the reliability of the wall, it is better to use longer profiles, which, if necessary, can be cut into separate elements. This option is preferable to connecting short profiles together.
The rack profiles are first attached to the floor. Then the fixation is carried out along the wall. In this case, you need to move towards the ceiling. In order to ensure accurate installation of these elements, the level of height difference should be determined. Footrests are used if necessary. Then the structure turns out perfectly smooth.
False wall with window opening
Having examined the options for false walls, you can see that the made partitions sometimes also have window openings. In order to build in such an addition, you should use CD profiles, which are located under the vertical and horizontal plasterboard joints. Two additional profiles should be placed along the edge of the future opening. A jumper should be installed above the window. The central profiles need to be moved under the edge of the opening. This is done to ensure that the step between the elements does not exceed 600 mm. A UD profile must be installed under the space under the window. This also applies to the perimeter of the wall.
Installation of drywall and finishing work
To strengthen the drywall onto the frame, self-tapping screws and a screwdriver are used. The length of the fastener should be 20 mm or more. A distance of 250 mm should be maintained between fastening points. It is necessary to start installing sheet material from the bottom corner. In this case, it is necessary to navigate along the guide profile. After this, the sheet is attached to the top and then to the frame posts. It is finished with a primer and then puttied. The dried layer is primed again and then covered with wallpaper.
Purpose and advantages of the design
Interior decoration of a room involves not only decorative repairs. In some cases, a complete replacement of the plaster coating on the walls or the construction of additional elements, such as partitions or arches, is required. In modern construction, plasterboard is increasingly used for this purpose, which saves not only money, but also time.
In the decoration of rooms, a false wall performs several functions:
- Aligns the walls around the perimeter of the room.
- Serves as a decorative partition.
- It is part of the dividing element when constructing arched openings.
When erecting false walls, you can additionally insulate or soundproof the room. It can also disguise various communications, such as sewer, gas and water pipes, heating radiators, and electrical wires. Making a false wall from plasterboard with your own hands is much easier and more practical than knocking down old plaster and re-plastering the walls.
Pros of shelves
Shelves made of plasterboard are appropriate in any room. They can be done:
To place the shelves, do the following:
The most important advantage of DIY plasterboard shelves is that they can have a wide variety of shapes. Everything in this case depends solely on the general concept of the room and the imagination of the shelf creator.
Drywall is valuable precisely because a shelf from it can be made into any intricate shape, including radial semicircular structures and complex geometric shapes. This allows you to create unusual exclusive interiors with your own hands.
Design of plasterboard partitions
In order for a plasterboard partition to fit into the interior, it needs to be properly decorated and the optimal shape selected for it. In small apartments it is not recommended to install complex structures because they take up a lot of space.
To decorate partitions you can use:
- wooden panels;
- glass;
- wallpaper;
- tiles;
- paint.
The most budget option is painting and wallpaper. Installing glass inserts and tiling will take longer and cost more.
Form
Drywall is easy to install, so you can make partitions of any shape from it. Square or rectangular ones are often built, but other types are also found.
So, the living room and kitchen can be separated by a decorative wall with wavy edges. The partition can be made flat, semicircular or in the shape of a triangle. It is advisable to come up with an original design and bring to life the most unexpected idea.
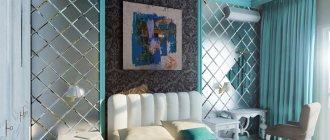
Glass inserts
To prevent the partition from obstructing the spread of light throughout the room, glass can be inserted into it. Depending on the project, regular, matte or colored are used.
Glass inserts can occupy most of the area of the entire partition, or can be made in the form of small windows. To make the partition look elegant, install additional lighting for the inserts and connect it to a separate switch. If you fix yellow or brown glass, then when the backlight is turned on, the room will be filled with warm light. To make the inserts look like windows, place artificial flowers in them in vases or pots.
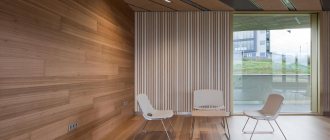
Wood paneling
The final stage is the design of the partition. In order for it to fit organically into the interior, you need to choose a suitable decorative material for it. Natural wood never goes out of style. If your interior is made in country, Provence or loft style, use wooden panels to cover the partition.
In this case, a regular lining will do. It can be sanded well and varnished. It is best to use acrylic paint to decorate wood paneling. For a loft, gray or blue is suitable, for Scandinavian - white, for Provence - olive, pink or turquoise.
Painting
The plasterboard partition can be painted. Just seal the joints of the sheets well and cover the screw heads with putty. When the preparatory work is completed, it is better to cover the structure with white water-based emulsion, and then paint it in any color.
Manufacturers offer a huge selection of paints that differ not only in color, but also in characteristics and service life. And if you don’t find a suitable shade in the rich palette offered, you can make tinting for a specific project.
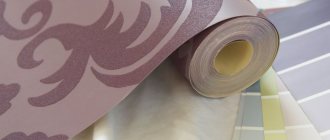
Wallpapering
The most budget-friendly decoration option is wallpapering the partition. Even a person without experience can cope with this work. You can choose paper models (they do not last long, but are cheap and easy to glue). For the kitchen it is better to use washable wallpaper - they are not afraid of moisture. Vinyl and non-woven fabrics are also suitable. They are more expensive than paper ones, but they last longer.
For small rooms, choose wallpaper that is plain or has a small pattern. To make the room seem taller, one of the walls can be decorated with canvases with vertical stripes. It is better to avoid using materials with large floral or geometric patterns in Khrushchev-era buildings and studio apartments.
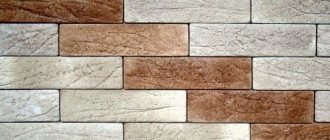
Tiling
On the kitchen side, the false wall can be decorated with ceramic tiles, and on the living room side - with artificial brick or stone. Any of these materials has a special texture and looks more impressive than wallpaper or paint.
It is advisable to choose ceramic tiles the same as for the apron above the work surface, or you can choose something unexpected in a contrasting color. For the kitchen, tiling is the best option. Any dirt can be easily washed off from it, it does not fade (like paint and wallpaper), and has a long service life.