If you want to get maximum expressiveness from the ceiling surface in the kitchen and at the same time save a lot of money, it’s a great idea to make a ceiling in the kitchen from plastic panels. Some believe that such finishing cannot be compared with other, even more expensive, solutions. However, PVC panels have their advantages, and simplified installation is only a quantitatively small visible part of them. Let's try to understand its features, and also study in detail how it all ultimately looks - using 5 photos with options for the best designs in modern interiors and 1 video.
- Requirements for the ceiling in the kitchen;
- Characteristics of the material;
- Advantages and disadvantages of PVC panels;
- Installation features, necessary materials and tools;
- Design features. Examples in interiors;
- Conclusion.
Requirements for the ceiling in the kitchen
The kitchen is a specific type of room. The more complex and multiple the claims against him regarding the organization of the interior. Including the decoration of the ceiling as one of its central elements.
- resistance to constant temperature changes;
- decent moisture resistance;
- easy cleaning from grease stains and soot;
- 100% environmental safety;
- organic integration into the interior.
The first 4 requirements are directly related to the specifics of using the kitchen as a room in which food is prepared every day. As a result, steam and soot constantly rise to the ceiling and settle safely on it. It’s good if after this its performance does not change. What if it's the other way around?
As for integration into the interior, plastic panels on the ceiling allow it to fit perfectly into any stylistic format, without drawing all the attention to itself, but performing exactly the same function in the interior as, say, your kitchen set, from which , we suspect that you sometimes don’t leave for hours.
Preparing for installation - figuring out what to buy
To finish the ceiling with plastic, you need to purchase the required quantity of PVC panels. Standard products have a length of 2.7–3.0 m, a width of 0.25–0.5 m and a thickness of 5 to 10 mm (remember that it is advisable to choose wider and thicker products). It is not difficult to determine the required amount of material. Measure the area of the ceiling surface and divide it by the area of one PVC sheet (the latter value is on the packaging of the panels). And then add another 15 percent of the material to the resulting number. The surplus will be used for scraps and waste in work.
PVC panels for ceilings
We will install the panels on the frame. To manufacture it, you will need rigid metal (marking - UD), which are mounted around the perimeter of the room, and lightweight (CD) profiles, which serve as transverse load-bearing elements. Their number is calculated as follows. Draw a diagram of the ceiling surface to scale (use a squared notebook sheet), put all the necessary profiles on the drawing (take the distance between the transverse strips to be approximately 0.6 m). Consider how many profiles you need in total. You should immediately calculate the number of self-tapping screws with which PVC products will be fixed, as well as dowels (they are needed for installing rigid frame elements).
Material characteristics
Plastic panels did not appear yesterday or even the day before: for quite a long time they have been widely used by specialists for finishing both wall and ceiling surfaces. Made from:
- expanded polystyrene;
- polyvinyl chloride.
The fundamental technological difference between these two sources is not as important for the end user as, say, for a chemist deeply studying this area. However, it is there: polystyrene foam
obtained from a polymer mass by adding carbon dioxide, ultimately achieving plasticity, low density, and low weight of fragments.
As for polyvinyl chloride
, it is made from organic mass by pressing and is equipped with stiffeners for stability and reliability.
Which panels are better to choose?
Experts unanimously claim that the first option is more advantageous for the kitchen due to counteracting biological effects. Simply put, it is not afraid of mold or mildew, and it reliably protects against extraneous noise. However, in practice, both options are widely used, so if you want to make such a ceiling in the kitchen, you can safely use both polystyrene foam and polyvinyl chloride.
Due to the comprehensive offer on the market, you can choose the material of the color you need, and also experiment with the format to your heart’s content.
How to plaster and paint a ceiling
To finish the ceiling yourself using plaster, you must first prepare the surface well. To do this, completely remove the old coating, clean the corners and joints between the slabs. All visible cracks are filled with putty; for deep gaps, cement mortar is used.
Ceiling preparation
The seams between the plates are filled with putty and covered with reinforcing tape. After this, the rough ceiling is wiped from dust and covered with a primer mixture.
Ceiling preparation
Applying plaster
During the finishing process you will need:
- dry gypsum plaster;
- mixing container;
- water;
- aluminum profiles for lighthouses;
- water level;
- rule;
- spatula 15-20 cm wide;
- finishing putty;
- synthetic mesh for reinforcement;
- Sander.
This method is suitable for ceilings with height differences of no more than 5 cm. Beacons are used if the surface is too uneven and experience in such work is minimal. The thickness of the plaster layer should not exceed 5 cm, and it is better to apply the solution in 2-3 thin layers. So, if the unevenness on the ceiling is large, use a water level to determine the lowest point, retreat 10 mm and mark a marking line around the perimeter of the kitchen. Guided by the line, beacon profiles are fixed to the ceiling, the distance between which is 20 cm less than the length of the rule.
Mixing the plaster mixture
Mixing the plaster mixture
According to the instructions, mix the plaster and apply it to the ceiling between the beacons. The excess is removed as a rule, making zigzag movements along the profile. If the base is level, one layer of plaster is enough, but if the defects are still noticeable, a second layer will be required. To do this, a reinforcing mesh is pressed into the wet plaster between the beacons, overlapping the joints by 10-15 cm. Further application of the plaster is carried out after the first layer has dried.
Beacon installation
Ceiling plaster on beacons
Leveling the ceiling using the rule
Mesh for applying the second layer
Finishing plaster and putty
Prices for mixtures for leveling walls and ceilings
Mixtures for leveling walls and ceilings
Finishing
When the ceiling is dry, mix the finishing putty and spread it over the surface with a wide spatula. The layer of putty should be as thin as possible; if necessary, it can be reapplied. Finally, the kitchen ceiling is treated with a grinding machine or a special mesh. The resulting dust is wiped off with a clean and slightly damp cloth.
Painting the ceiling
Preparing for painting
Painting the ceiling
For the kitchen, latex or silicone glossy paint is best. You can also take a matte one, which perfectly hides defects, but soot and grease from a matte surface is more difficult to wash off. For painting, take a paint brush or roller, whichever is more convenient for you. White or light paint is applied in one layer, but paint of a darker shade is better applied in two layers so that the plaster does not show through. At this point, the finishing of the kitchen ceiling is considered complete.
Painting the ceiling
Advantages and disadvantages of PVC panels
Only the lazy do not talk about the advantages of using plastic panels. We are definitely not one of those people and let us once again point out the obvious advantages:
- maintaining its performance characteristics during sudden changes in temperature;
- installation accessible for non-professionals;
- simple care;
- absence of any emissions under the influence of steam and high temperature;
- compliance with all environmental and sanitary standards;
- the ability to choose any color scheme and texture necessary for harmonious integration into the interior;
- undemanding to the quality of the ceiling base;
- hide all pipes, wires and communications well;
- very attractive price.
Another thing is also true: only unprincipled sellers and dishonest manufacturers tend to hush up the shortcomings of this or that material. We also do not belong to these two categories and boldly list to you the disadvantages that are always mentioned in connection with plastic panels:
- susceptibility to mechanical stress;
- inferior in visual appeal to other finishing materials;
- they reduce the height of the ceiling, which is significant if it is not particularly solid anyway.
As you can see, the minuses are still much smaller than the pluses. This allows us to recommend installing a panel ceiling in the kitchen to all those who prefer economical and practical renovations.
How to recognize quality material
First of all, focus your attention on the PVC ceiling panels. Wall panels are thicker, denser, but not light enough for ceiling finishing
A high-quality panel does not deform when pressed or bent, quickly restoring its shape - check this by squeezing the end cut with your fingers.
Also try to bend the edge of the panel - it should not crack, much less break off.
If you notice unevenness, nicks, unclear coating on the panel, a violation of the correct geometric shapes, or feel an unpleasant and pungent odor emanating from it, immediately move on to another type. The presence of each of these points indicates the low quality of the material.
Important: purchase several more panels than you need according to your calculations. They can be useful both during installation and when it is necessary to replace the panel.
Installation features, required materials and tools
Before you begin directly covering the ceiling surface, you need to take all the necessary measurements, purchase materials and begin constructing the so-called sheathing.
What will you need?
Materials:
- plastic panels 25x60 centimeters;
- U-shaped ceiling mount;
- screws for wood or metal (depending on the nature of the frame);
- staples;
- screws;
- dowels;
- wall and ceiling profiles.
Tools:
- drill or screwdriver;
- hammer;
- pliers;
- metal scissors or wood hacksaw;
- level;
- knife;
- marker;
- painting thread.
For ease of understanding, we have laid out the entire installation
ceiling from panels into stages and obtained a visual and accessible technological algorithm in such a simple way:
- prepare the ceiling base, ridding it of crumbling plaster, treating it with an antiseptic, also prepare the room by removing all excess and covering the furniture with film;
- determine the lower point of the frame location and draw a solid line along the entire perimeter of the room - at least 3 cm, optimally - 5-10 centimeters;
- fasten the wall profile according to the mark;
- fasten the fastening strips, and insert skirting boards cut to the required length into their grooves;
- mount the main profiles in increments of at least 50 cm, securing them to the ceiling with a U-shaped fastening;
- Using screws, secure the first panel with a plinth and a fastening strip, fix all subsequent ones in the same way - in the groove of the previous panel, press them tightly together and align them;
- cut the necessary holes with a knife if the features of your interior require it;
- the final panel is cut to the required size and inserted into the recess between the plank and the profile, and then into the empty groove of the previous panel;
- secure the last skirting board and the job is done!
The entire installation process is in the video below.
We also advise you to read the instructions contained in the article: “Installation of PVC panels on the ceiling - instruction article.”
Preparatory work
Before hanging plastic panels on the kitchen ceiling, it is necessary to prepare the base. Before attaching the frame, putty and plaster are knocked off from the main ceiling (not completely, but only peeling fragments).
Then they begin to create a frame for the plastic panels. To do this you need:
- Mark the location of the lower part of the frame - a tubular water level is used for this.
- If you are using a metal frame, then first screw UD profiles to the wall. There must be at least 25 mm between the bottom mark of the frame and the ceiling (base).
- After installing the UD profiles, the main ones are mounted - made of metal or wood. They are attached directly to the ceiling using U-shaped metal fasteners. A distance of less than 70 cm must be maintained between the fastenings. The smaller the set step, the more reliable and rigid the entire structure will be. Self-tapping screws are used to fasten wooden beams, and metal profiles are attached using “fleas”.
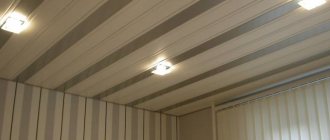
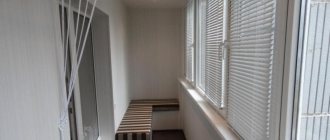
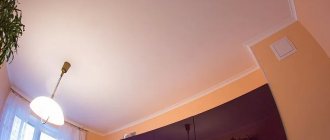
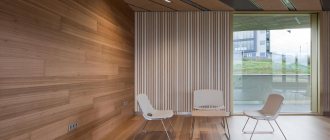
Design features. Examples in interiors
Thanks to the large number of colors, you can decorate the ceiling in the kitchen from PVC panels the way you personally want. However, if you do not have specific ideas about this and you certainly want to know how others have successfully solved the problem of choice, we have selected the most interesting options for using plastic ceiling panels
in a kitchen format, clearly displaying their expressiveness and organic nature.
The most suitable option for a kitchen space is a neutral color scheme with a slight tint of blue, yellow or pink.
- free space visually increases;
- calms and relaxes;
- has tonal versatility.
Examples of how plastic panels on the ceiling of the above shades interact perfectly with the rest of the interior elements.
An unsuccessful solution is too bright, aggressive shades. Avoid red, orange, acidic yellow colors - they will inevitably irritate you and make your kitchen uncomfortable. Of course, sometimes there are exceptions. But you know very well what they are evidence of, right?
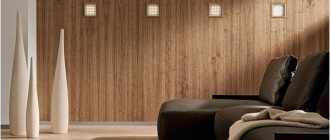
Plastic panels with imitation wood paneling are always beneficial in the interior. They bring an element of naturalness into the room, making the interior homely, warm and incredibly cozy.
If you want to experiment with combinations, then feel free to try: a kitchen ceiling made of multi-colored panels is an interesting and not boring option, but compile only those shades whose interaction is organic. For example, white and beige, pink.
A few more examples of a plastic kitchen ceiling with an interesting design.
Necessary tool
What tools will be needed to carry out work on tiling the kitchen ceiling? Preparing the tools is very important - by stocking up on everything you need in advance, the work can be completed quickly and in the shortest possible time. Among the components you need to stock up on:
- Profiles for the frame;
- PVC baguettes;
- L-shaped profiles;
- Fastening angles;
- Wooden slats or metal profile;
- Metal fasteners type P, for plasterboard ceilings.
The following tools will be needed:
- Plastic dowels and screws;
- Metal staples and stapler;
- Drill and screwdriver;
- Pliers and hammer;
- Hacksaw or metal scissors;
- Square and knife;
- Marker and pencil.
All work will be carried out in the kitchen. This place has a high level of humidity. In order to avoid frequent repairs, the wooden sheathing is treated with a special solution. This will increase the wood's resistance to water. Neglecting this point can cause the PVC plastic panel to “sink”.
How to care for ceiling panels
Ceiling tiles differ precisely in that they are quite easy to clean up, regardless of the level of contamination. We offer you some tips for cleaning your kitchen ceiling and getting rid of grease and dirt.
Panel care
Vinegar is a great grease killer that is also much cheaper than any liquid grease on the market. Mix equal parts hot water and vinegar in a spray bottle. Spray the mixture onto the ceiling and let it work for a few minutes.
Rinse with a damp cloth and then wipe with a dry cloth.
Lemon is another home method. Place the juice of 4 lemons in a saucepan and bring to a boil. The lemon steam will act as a degreaser, softening the dirt on the ceiling so that you can remove it more easily with a damp cloth.
Design selection
What panels will you be pleased to see on your ceiling? Here's what they can be:
- shiny glossy;
- rough matte;
- plain
- colored;
- with contrasting frame;
- with mirror stripes;
- with alternating stripes of different colors;
- marbled;
- under the tree;
- under the skin;
- with an image
- with ornament.
The color scheme and style of your kitchen will help you make the right choice.
For example, if the entire room is predominantly made in one color, PVC panels of a lighter shade will look harmonious. Or, thinner stripes on the ceiling will duplicate the color of the kitchen unit, and those that are thicker will match the color of the walls.
The creation of a holistic space is facilitated by PVC wall panels of the same color and texture. But for some, the same design of walls and ceiling may seem too monotonous and boring.
If your kitchen is located on the sunny side, you can “cool it down” slightly with cool shades of gray or metallic. Otherwise, you should give preference to warmer tones.
Gold or silver, alternating with white, mirror stripes will give your kitchen a sophisticated look and create a harmonious environment, moderately reflecting all interior items. Panels with a pattern can create excessive variegation, but they will look good as inclusions on a plain background.
The main accent on the ceiling can be a beautiful chandelier with stained glass windows. Square, round or a more funky shape, it will not only look great on a plain ceiling, but will also fill your kitchen with an unusual color palette.
What else can tell you the best colors for ceiling panels? The colors of the floor, table and chairs, household appliances, kitchen apron and, of course, your taste preferences.
In addition to the color, you need to choose the width of the panels.
It can vary from 12.5 to 50 cm. Although panels made of wide plastic help create a solid, monolithic space, they are not so convenient to work with, because they are usually less flexible.
The optimal width is 25 cm.
Ceilings in light colors are best suited for the kitchen, which will make it more spacious. The glossy surface creates additional depth and will serve as a pleasant bonus for low rooms.
Taking into account the characteristics of the kitchen, white panels will quickly lose their immaculateness and will require more frequent cleaning.
They might be worth it because... These ceilings look really very beautiful and modern. Panels in light gray, brown or warm yellow (vanilla) shades would be practical for this room.
If PVC panels hide all the curves of the ceiling, then uneven walls can be hidden with molding or ceiling plinth. Plain, in the form of a plank, or decorative, embossed, it will give the transition between the ceiling and the wall a more neat and comfortable look.
What about two-level designs using several types of panels that contrast in color? Contrary to popular belief, this is quite possible, as evidenced by the photos below.
Placed at an acute angle or perpendicular to each other, plastic panels will add volume to the ceiling, divide the kitchen into zones or act as an addition to the interior.
Advantages and disadvantages
If you want to decorate the ceiling with plastic panels, then you should familiarize yourself with their advantages and disadvantages.
First, let's look at what advantages these facing materials can boast of:
- Polyvinyl chloride panels are durable materials. Their service life can reach 20 years or more.
- Such materials do not rot.
- They do not require complex and constant care. You will only need to wipe off any accumulated dust from time to time.
- Plastic panels are perfect for ceiling decoration, as they have soundproofing characteristics.
- Plastic panels are lightweight, so they are easy to work with.
- Plastic ceiling panels are not afraid of temperature changes. Under such conditions they do not deform. Of course, this property applies exclusively to high-quality materials.
- Plastic panels are often used to visually divide living space into functional zones.
- Plastic panels can be classified as universal materials. They can be installed both in city apartments and in private houses.
- It is impossible not to note the rich assortment of these facing materials. Thanks to the large selection, suitable coverings can be selected for an ensemble made in any key.
- Plastic panels can hide imperfections and differences in ceilings.
- Under these facing coatings it will be possible to reliably “hide” electrical wiring and other similar elements.
- PVC coatings have an affordable price. A suitable option can be selected for any wallet.
Plastic panels are not ideal materials. Despite their popularity, such products also have their weaknesses:
- Today, stores sell a lot of materials made from low-quality plastic, which contains toxic substances. These coatings are harmful to health. They are not recommended to be installed in residential premises.
- After installing plastic ceiling coverings, an unpleasant chemical odor may remain in the room. But it is worth noting that not all buyers noticed this defect.
- Plastic is not a breathable material. Due to its presence, air cannot circulate freely, penetrating the ceiling.
- Most plastic sheets contain voids, which often harbor insects, and getting rid of them is a big problem.
- Plastic ceiling panels are not impact-resistant materials. They are susceptible to mechanical damage, so when working with them, you should not apply too much pressure or press on the surface.
- The lion's share of PVC panels does not like the sun's rays. Under their influence, these facing materials may lose their color saturation.
- Plastic is a flammable raw material. When ignited, it emits acrid smoke.
Creating a wireframe
First, using a water level, a line for the future ceiling is drawn on the wall around the perimeter of the room. If you have tiles on the walls, and they were laid level, then this simplifies the work, since you can focus on the seams.
Metal carcass
Before starting work, you need to decide what kind of lamps you plan to use to illuminate the room. If they are overhead, then the distance between the ceiling and the main surface can be minimal.
When using built-in lamps, this distance should be about 10 cm. A UD profile is installed along the perimeter of the room along the intended line, dowels are installed in increments of 40-60 cm.
To speed up the installation, when attaching the profile to the wall, you can use quick-installation dowels, which do not need to be screwed, but driven in with a hammer.
At the next stage, cut the CD profile to the required length; consider how you plan to install the plastic panels, since they are mounted perpendicular to the profile. Sections of the CD profile are installed in the UD profile, and the distance between them should be about 40-60 cm.
In the case when the length of the profile exceeds 150 cm, hangers are used for additional fixation; if it is less, then fixation in the starting strips is sufficient. If you plan to install a chandelier or pendant lamp, then additional profiles are mounted in this place.
Wood
The plastic ceiling in the bathroom can also be mounted on a wooden frame made of wooden beams and slats.
And also using a frameless system, when a wooden sheathing is attached directly to the rough ceiling, provided that it is level and that recessed (spot) lamps will not be installed. For a bathroom, it is not recommended to use wooden beams for the frame, since at high humidity, even after treating them with antiseptics, the service life of such elements will be short.
For a frameless design you will need:
- hammer drill
- saw
- slats
- dowel nails 60 x 6 mm
- fishing line
Step-by-step instruction:
- first, attach the two outer slats with dowels to a concrete slab or with self-tapping screws to a rough wooden ceiling (the distance between the drilling points is 30 cm, 2 cm from the edges);
- stretch the fishing line between them, crosswise;
- install the remaining slats in increments of 40-60 cm
If the ceiling level needs to be lowered to hide unevenness, lay communications or install spotlights, then it is necessary to use a wooden frame.
For this you will need:
- wooden bars 4 X 2.5 cm
- slats
- dowels
- self-tapping screws
- lace
- hammer
- saw
- construction level
Sequence of work:
- we make markings on all walls at the required height;
- the bars are placed at a distance of no more than 80 cm;
- The supporting bars are screwed on top perpendicularly, onto which the PVC panels will be attached.