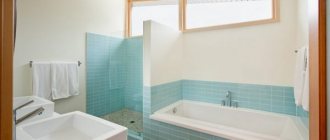
Can I use moisture-resistant drywall in a bathroom?
When professional decorators renovate a room, they select materials that are most suitable for the conditions where they will be used. The bathroom is the most difficult room in the house due to the humid microclimate with temperature changes and insufficient air circulation.
The bathroom finishing is made from moisture-resistant materials that are resistant to fungal and mold microorganisms, for example, tiles or plastic panels. In this article we will tell you whether moisture-resistant cardboard can be used in the bathroom, and also what it is used for.
Which drywall to choose
To level the wall in the bathroom, 2 options of drywall are used:
- GKLV - green. Sheet thickness 12.5 mm. Height and width depend on the manufacturer. This type is used for leveling walls, hiding pipes, and creating a suspended ceiling.
- Fire and moisture resistant GKLVO. This type is produced by Knauf. It has the property of both resisting moisture and not burning. It is also used for leveling walls and ceilings. In those places where there is a danger of fire in the wiring (old) or in a private house the wall is rough, then this type is applicable.
Under tiles
Moisture-resistant gypsum plasterboard sheets are chosen for tiles on the bathroom floor. It is denser and more durable. Sheets with a thickness of 12.5mm are suitable for walls. There are nuances here:
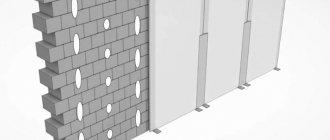
- GKLV cannot be glued in the bathroom. They are mounted on a metal frame. The frame base is made with transverse horizontal profiles. This serves as a reinforcement for the base, capable of supporting the weight of the tiles and the adhesive.
- The joints must be reinforced. To do this, use reinforcing tape and putty for joints. The putty should be moisture resistant. Let’s say Knauf “Uniflot” is universal, “Fugen” is moisture resistant.
- All metal elements - profiles, fasteners, connectors must be galvanized or coated with an anti-corrosion compound.
- Before creating the frame, the rough base is treated with a hydrobarrier.
For painting
Green plasterboard is chosen for painting in the bathroom. Installation is carried out on a frame base. The sequence of work will allow you to make high-quality repairs with a shelf life of up to 15 years.
It is necessary to follow several rules that will ensure the duration of the repair:
- Drywall and its components must be from the same company.
- Before creating the frame, be sure to cover the rough surface with a water barrier.
- All joints are reinforced. All fastening points are covered with moisture-resistant putty for joints.
Before painting, coat the surface with a primer for wet areas. This will protect against moisture and give a beautiful appearance to further finishing.
For alignment to the frame
To level the walls with moisture-resistant plasterboard, you need to create a frame base.
But before that, work on the rough foundation. The entire surface is dried. After this, they are covered with waterproofing material and allowed to dry. The frame base is created from galvanized profiles. It is also necessary to install transverse strips, which will give strength and rigidity to the entire structure.
Fasteners must be treated with an anti-corrosion agent. Mostly they are sold in black.
Drywall is fixed with a chamfer and gaps of 2-3 mm. The joints are covered with reinforcing tape and moisture-resistant putty. The fastening points are also covered.
Alkyd enamel and latex water-based paint for damp areas
Alkyd enamel and oil paint are waterproof. It will reliably protect plasterboard walls from moisture even from the outside. Easy to apply with your own hands and has advantages:
- large selection of colors;
- forms a durable protective film;
- resistant to abrasion;
- may contain anti-fungal and antistatic additives;
- easy to clean;
- retains its appearance for a long time;
- has good adhesion.
It is enough to apply 2 layers of paint on drywall. Depending on the room, you can choose glossy or matte paint.
Among the disadvantages is a strong smell and the walls under it do not breathe.
Latex paint also resists moisture well. It is water-based and harmless. If there are microcracks, it fills them and reinforces the surface. You can get any color by adding coloring pigments yourself or using a tinting machine in a store. Mostly white is used to paint plasterboard ceilings.
These types of paint will protect even moisture-resistant drywall from water. The disadvantage is low vapor permeability. Enamels, oil and latex paints can be used to cover gypsum boards in rooms with good ventilation and when finishing facades covered with plasterboard. The next layer is applied after the previous one has completely dried.
Pipe cladding and communications laying
A peculiarity of the bathroom is the presence of water supply and sewerage pipes, one type of which can interfere with its aesthetics. Most of us wonder how to hide these communications “out of sight.” This problem can be solved very simply - by installing a gypsum plasterboard box, which can be made collapsible or equipped with doors for access to the pipes during their inspection and maintenance.
Before finishing the bathroom with plasterboard, you need to treat all metal water supply and sewerage systems, covering them with a primer and several layers of paint. To avoid the appearance of condensation, which will lead to corrosion, and also to reduce the noise level of water in the pipes, they must be carefully insulated by wrapping them with mineral wool.
The box is installed using the following technology:
GKL surface primer
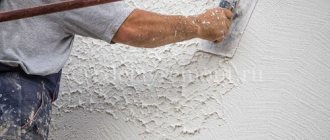
Before laying ceramic tiles, you will need to treat the plasterboard sheets with a primer.
The mixture is applied to solve the following problems:
- decreased level of water absorption;
- strengthening plasterboard fibers;
- preventing the formation of mold and mildew on gypsum board panels;
- creating a protective layer.
It is optimal to choose a deep penetration primer or to supplement the surface treatment with a mastic coating with waterproofing characteristics. When treating large areas, you can mix putty and primer. It is recommended to use an acrylic primer to coat drywall. The composition is environmentally friendly, hardens quickly, lies smoothly on the surface, is durable, and provides a durable coating.
The primer is applied to gypsum plasterboard sheets following the following steps:
- The wall panel is cleaned of old finishing materials, dust and debris. To do this, wipe the base with a damp cloth or sponge.
- The primer mixture is poured into a container, then the roller is immersed in the composition and applied to the wall.
- The mixture is distributed evenly over the surface with a roller. A thin brush is used to treat hard-to-reach spaces.
- After the primer has hardened, you will need to apply an additional layer.
How to sheathe
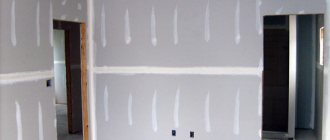
The wall is leveled with plasterboard, which is fixed to a frame made of galvanized profiles. To do this, carry out a strict phased work:
- The surface must be prepared. Dry, clean, cover with waterproofing material.
- After this, precise measurements are taken to calculate the number of required elements.
- The next step is marking. To do this, use a laser level, plumb lines, upholstery cord or marker. It is important to ensure the evenness of the intended stripes.
- The profiles are fixed according to the markings. The guides are attached to the floor and ceiling with dowel nails. Hangers are attached to the wall along the markings in 40 cm increments. The PS (CW) rack profile is fixed to them.
- Between the rack profiles horizontally, with a step of 40 cm, transverse ones are attached. They are cut from a rack profile. Crabs are used for fixation.
Preparing drywall for laying tiles
Before covering the plasterboard walls in the bathroom with ceramic tiles, it is recommended to treat the gypsum board sheets with a deep penetration primer or cover them several times with waterproofing mastic. The primer can be added to the putty if the entire surface will be puttied. To lay tiles in the traditional way, use tile moisture-resistant adhesive.
It is allowed to install plasterboard in a bathroom on a wooden wall, but only if the waterproofing work is done well.
The grout between sheets of drywall should also be made of moisture-resistant material. For additional reliability, the treated seams must be coated with a special varnish after 24 hours.
The use of plasterboard in the bathroom requires the presence of a good ventilation system, which helps prevent condensation from accumulating on all surfaces of the room.
Useful video
Drywall is a universal material in all respects, which is widely used in repair and finishing work. The use of plasterboard in the bathroom is quite popular; it can be laid on concrete as well as on wooden floors after the plasterboard has been prepared for tiles . In addition, even and smooth sheets can be used for leveling ceilings and walls, for arranging niches and arches, as well as for constructing various decorative structures that hide pipes and utilities.
Some people, out of ignorance, are afraid to lay drywall on the bathroom floor. They are afraid of high humidity in this room. In fact, there is absolutely nothing to be afraid of if you know the rules and operating conditions of gypsum plasterboard, and also take into account the recommendations of professionals who know how to properly waterproof plasterboard in a bathroom. With the right approach and following all recommendations, drywall under tiles in the bathroom can be used without any damage.
Required tools and materials
Productive work on gluing tiles to a plasterboard base depends on the timely preparation of tools and materials that should be at hand during work:
- rack building level;
- spatula with different edge relief;
- rubber grout spatula;
- tile cutter;
- additional materials for even installation - plastic crosses and corners;
- a rubber hammer or mallet with a rubber nozzle for laying large tiles;
- jointing, rollers and brushes.
If possible, it is good to use a construction mixer or a drill with an attachment to mix the adhesive.
Preparing drywall for bathroom tiles: what needs to be taken into account?
Mostly, owners of apartments and houses invite specialists to lay tiles. This is a rather labor-intensive process that a beginner may not be able to handle. When laying tiles improperly, unevenness appears on the walls. To avoid them, the wall should be leveled with sheets of plasterboard.
What is drywall
Drywall or gypsum board is also called dry plaster . Depending on its resistance to certain operating conditions, it is divided into several types. In the case of a bathroom, drywall should be able well . It has a greenish tint. It is marked GLKV , which means moisture-resistant plasterboard sheet. Also on each sheet is marked GOST and dimensions in millimeters.
Drywall in the bathroom under tiles has its own characteristics:
- Does not deform when exposed to high humidity.
- Has high strength.
- It does not develop mold.
- a beginner can handle it .
- It can be decorated with tiles, wallpaper or simply painted.
If you properly prepare drywall for tiles, it can last for several decades.
You should buy drywall only from reliable manufacturers. High-quality material must be treated with special antifungal impregnations, then mold will not develop on it.
Useful properties of drywall
GKLV has excellent air permeability and is suitable not only for walls, but also for ceiling surfaces. If you cover the ceiling with plasterboard, then the top can be lined with any material or simply painted in a suitable color.
When processing the ceiling, consider the location of the lamps
In construction stores you can purchase drywall sheets of various sizes. But the most popular is 2500x1200x12.5 mm. It is convenient to mount it as a whole sheet and cut it into the necessary pieces.
Drywall installation
Leveling the walls with plasterboard in the bathroom under the tiles is carried out in two ways: using a frame and self-tapping screws, using glue.
In the first case, it will take more time and effort. This method is not always suitable for small rooms. If you first install the frame, and then attach the drywall with self-tapping screws, you can reduce the size of the room. There is also a gap between the wall and the frame. Moisture gets in, which can lead to mold. To avoid this, you will have to additionally insulate and treat the walls.
Correct installation on the frame, eats up 10 cm
If drywall under the tiles in the bathroom with glue, it will take less time and effort. This option is less expensive. Just attach the sheets to a perfectly flat surface.
In this case, the surface must be flat
Necessary materials
All materials purchased for laying plasterboard in the bathroom must be of good quality. The number of tiles will depend on the intended design options and the size of the room. Sheets are usually laid in two ways: parallel or perpendicular to the walls, diagonally. You will also need:
- Joint tape It makes the connection between the sheets of drywall strong and the surface smooth. It is advisable to purchase a sickle mesh with an adhesive base. It is easy to glue, putty fits well on it.
- Putty. It is desirable that it be from the same manufacturer as the GKLV.
- Primer. It will create an adhesive layer.
- Waterproofing compound and tape. The latter is laid at joints and in areas where there is a lot of moisture.
- Tile adhesive.
- Grout for seams. They all repel moisture, so they are chosen according to composition and color. In corners, instead of grout, it is necessary to use sealant. It is more elastic and does not crack when the building shrinks. The only thing is that you should purchase a sealant designed for rooms with high humidity.
A polymer elastic cuff is placed on the water pipes. You can buy it at the store or make it yourself. Any elastic material is suitable for this.
Also, when laying tiles, calibrated crosses will be required. They allow you to create the same width of joints.
Necessary calculations
In order to calculate the required number of base slats, it is necessary to carry out the following calculations:
- the number of “UD” guides is determined by the formula. First, to the height of the wall multiplied by 2, add its length multiplied by 2. Then we multiply the resulting amount by the correction factor, which is 1.2. We divide this figure by 3 (three meters is the length of one guiding profile). As a result, we will obtain the required number of slats. If the result is not a whole number, round it up;
- The number of rack-mount CDs is calculated using a different formula. Divide the length of the room (the figure is given in cm) by 60 and multiply by the correction factor, which is 1.2. From the resulting value we subtract one and get the number of rack “CDs”. If the value is not an integer, we also round it up.
Determining the number of required jumpers for a drywall frame can be done in several ways. To carry out the required calculations, you need to know the width of the distance between the slats and their number. To do this we need:
- divide the length of the wall by 0.6 (the figure represents the distance between the rack rails, or more precisely, their centers);
Distance between guides
- As a result, we will obtain the number of lintels per span. If the result is a remainder that is only 10 cm, then in this case the bridging rail is not installed in this place at all;
- We multiply the resulting number by the volume of lintels required to install drywall for one span and get the final figure. This is exactly how many bridging slats we need.
The width of the profile is a fixed figure - 5 cm. In the calculations, you need to add an additional 10 cm on each side of the guide. Now we subtract the width of the profile slats from the distance between them and add additional cm. So, we got it: 60-5+20=75. Further:
- multiply the resulting number (75) by the number of jumpers for the entire frame;
- divide the result of multiplication by 300 cm (the length of one guide rail);
- As a result, we get a figure that needs to be rounded up and we get the desired number!
Using another method, you can find out not only the number of guides, but also the required volume of the rack profile.
Note! All vertical slats must be oriented in the same direction, i.e. All of them must be attached on one side (it’s better to orient yourself along the “empty side”).
Below are the following calculations:
- multiply the total number of jumpers by 10 cm (length of the segment);
- We round the resulting figure. Usually it is approximately 300 cm, which is the length of one guide;
- the length of the jumper is then used. Since the distance between the guides is 60 cm, the length of the jumper will be the same. Here you need to subtract a couple of cm, which will go towards fastening. As a result, we get approximately 58 cm;
- multiply the total number of jumpers by 58 and divide by the length of one guide;
- We round the resulting figure and get the number of rack rails.
It is worth remembering that in order to obtain the number of U-shaped hangers for attaching drywall, a slightly different formula is used. It has the following form: multiply the number of rack “CDs” by 5. This type of layout is applicable for any wall structure.