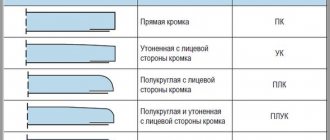
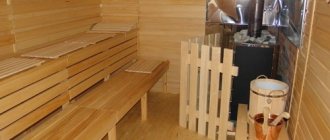
Types of materials
In addition to standard gypsum plasterboard, there are the following types of material:
Moisture-resistant is used in places with high humidity, while fire-resistant is used for other rooms (kitchen, office premises).
GCR is excellent for finishing living rooms, because it is environmentally friendly and, when heated, does not emit poisons. Regulates the microclimate of the room naturally.
GVL is used for durable structures. These are gypsum fiber sheets that are stronger than plasterboard. GVL is made from building gypsum with additives. GVL is an environmentally friendly material for dry construction; it does not have a cardboard shell, like plasterboard. But there are the following disadvantages of using GVL:
- GVL is heavier than gypsum plasterboard;
- costs more.
Finishing
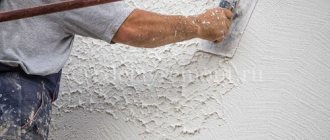
After the step of covering the gypsum board of a wooden structure, the next step is finishing the gypsum board. First you need to process and seal the seams. If a chamfer was not made when sheathing with plasterboard, then grooves about 0.5–0.8 mm deep should be cut with a construction knife at the joints of the sheets. These grooves should be cleared of excess cardboard and treated with primer. A brush is suitable for this type of work. The primer must be completely dry before sealing with reinforced tape and putty can begin.
The putty should be applied in a thin layer, covering not only the seam with the tape, but also the fastening points. After the putty has dried, all excess pebbles and stripes are removed using sandpaper. The sealed seams should be in the same plane with the entire surface (do not protrude).
After the putty has dried, the entire drywall surface should be treated with a primer mixture. This will improve the adhesion of the putty and prevent moisture from penetrating into the plasterboard.
After the surface has been puttyed and completely dry, the entire surface should be sanded using sandpaper.
Now the plasterboard wall based on a wooden frame is completely ready for further decoration.
Characteristics of a wooden frame
GCR fastening to a wooden frame is often used.
A wooden frame is cheaper than a metal frame; it is made from wooden planks and bars; softwood is usually used. Bars with a cross-section of 40*40 centimeters are used at the junction of two layers or where massive objects (mirror or cabinet) will be located on the wall.
Material requirements:
- Wood moisture content ranges from 12 to 18%;
- Fire treatment must comply with the first fire safety group;
- The wall thickness should not exceed 132 mm.
Before use, wooden slats are treated with protective agents against fire and pests, and inspected for the presence of knots and irregularities.
When can you make a frame for gypsum boards from wood?
It is recommended to use a wooden structure under plasterboard sheets:
- In houses made of logs or timber. In this case, the lathing is ideally combined with the wall material due to the same physical properties. It turns out that any change in humidity is compensated. In such conditions, the drywall remains motionless and is not damaged.
- In ordinary apartments with perfectly smooth walls. In this case, the frame made of timber will be a reliable basis for fastening the gypsum board.
Attaching the base
Screwing parts of drywall onto wooden slats should be carried out in residential and dry buildings. The frame is assembled in accordance with the vertical and horizontal levels, otherwise the structure will come out skewed.
Tools for creating a design:
- hammer;
- perforator;
- nails;
- building level;
- self-tapping screws;
- mounting dowels;
- metal corners.
If the structure needs additional insulation, this is done during assembly.
- First, mark the partition on the ceiling using a level, then attach the wooden frame;
- The strapping bars are secured starting from the ceiling. Then comes the floor, and after that comes the walls. It will be easier to work if all the coverings in the building are made of wood (liquid nails or self-tapping screws will do). If the house is made of brick and concrete, then fastening is done with dowels and anchors to the ceiling;
- Having secured the bars to the ceiling, mark them on the floor (at least three marks) and continue fastening the frame.
- After checking the correspondence of the fastenings relative to the ceiling and floor, they begin to mount the base. To do this, it is enough to connect the floor and ceiling guides with vertical bars. The distance between them is maintained at least 40-50 centimeters. It is very important to install these beams well, since the main load will fall on them.
- After installing the verticals, the racks are secured to the corners with self-tapping screws on both sides with 3-4 holes.
Plasterboard walls in a wooden house: preparing the material
Before attaching sheets of drywall to the frame , they need to be cut. When cutting drywall, be careful and careful, use high-quality tools that will ensure your safety.
To cut drywall sheets you will need:
- Long staff or long level;
- Pencil or marker;
- Sharp knife;
- Roulette.
First of all, measure the required length and width of the plasterboard sheet. Next, use a knife to cut through the first layer of paper and break the plasterboard base of the sheet along the cutting line of the cut. Then we cut through the paper of the sheet on the other side, bending it at an angle of 90. and sand the uneven ends with sandpaper or a file.
READ How to switch double-glazed windows to winter mode
When calculating sheet sizes, you need to take into account that you will place them offset.
Before installation, you may encounter problems such as cutouts. They can be on the edge and in the middle of the sheet. If the cutout is located at the edge, use a jigsaw or hacksaw to cut two parallel mowing lines in the direction opposite to the edge and break the sheet of drywall. To make a cut in the middle of the sheet, you need to saw through three mowing lines and break them.
Mounting gypsum boards on the base
Sheathing begins from solid sheets or the largest pieces. They are fastened with self-tapping screws to the beams every 25-30 centimeters.
Facing
When sheathing with material on only one side, insulation is laid and electrical wiring is pulled before installing the top layer.
During installation of the other side, insulation is laid as necessary. It is better to do without pulling cables; if they are still needed, they are placed in a special protective tube.
If the partition has a doorway, increase the number of posts and horizontal lintels.
Tips for beginners:
- When installing the second side of the wall, move the sheet one step so that the structure is strong;
- To avoid problems during fastening, make sure that the gypsum board joints fall exactly in the middle of the vertical posts.
Frame diagram
- The guide bars are attached to the floor and ceiling with screws in increments of 1 meter, but at least 3 fastenings per bar.
- Rack bars are installed between the guides in increments of no more than 60 cm.
- In partitions that will be tiled, the step between the posts should not be more than 40 cm, and the number of layers of drywall should be at least two.
- When attaching drywall, the vertical joints of the sheets must fall on the rack profiles.
It is important that the joints of the first layer of the two sides of the partition should not coincide.
- When facing in two (three) layers, the vertical and horizontal seams of all layers should not coincide, that is, they should be offset.
- For single-layer cladding, under the horizontal joints of the sheets, you need to make a lining from timber. According to technology (!), this support beam should not be attached to the vertical posts.
Isolation
Sometimes it is impossible to do without additionally insulating the structure, especially if it is not just a decorative part of the interior. There is nothing complicated about this, just lay and secure the material.
Structural insulation
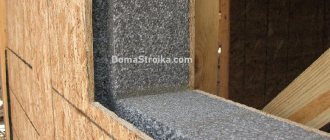
Mineral wool, polystyrene foam or polystyrene foam are suitable for this. The rigid material is already attached to the inside of the lined partition.
Each material has both disadvantages and advantages, it all depends on what the room in which they are used is intended for.
How to cover walls with plasterboard in a wooden house with your own hands
To ensure that covering walls with plasterboard does not cause problems and pleases the eye for a long time, a number of very important points should be taken into account before starting work.
Features of wooden frame:
- First of all, you need to know that if you decide to install drywall on a frame made of wooden blocks, then you need to pay attention to the characteristics of the room in which the work will be carried out. Remember that humidity has a detrimental effect on a frame made of wooden slats.
- Carefully inspect the beams before purchasing: they must be free of cracks, chips and other damage.
- The wood from which the slats and beams are made must comply with fire safety standards.
- Before work, the wood must be impregnated with an antiseptic composition: this will increase its service life. It can be anything, but more often it is recommended to use sodium fluoride.
Wood is an environmentally friendly material that is pleasant to work with. Read more about wooden sheathing here:
Advantages of using gypsum plasterboard
This material has a number of advantages compared to other raw materials:
- low cost and assembly costs;
- little weight;
- quick installation;
- better sound and heat insulation;
- Can be used even in freezing rooms;
- leveling walls;
- installation of drywall does not require additional preparation of the base;
- After installation, little debris and dust remains.
If everything is done correctly, the final touch will be to decorate the wall. And plasterboard structures will last a long time and save a lot of time and money.
Finishing walls in a wooden house with plasterboard: preparation for work
In any construction business you cannot do without special tools. To ensure the job goes smoothly, purchase everything you need in advance. What you need when working with drywall is listed below.
- Drill or screwdriver;
- Hacksaw or jigsaw;
- Roulette;
- Marker or crayon.
- Wooden slats and bars;
- Self-tapping screws;
- Metal corners.
Any finishing work begins, first of all, with cleaning the work surfaces.
The first thing you need to do is remove the old coating from the walls, the remnants of insulation and sound insulation - in short, any objects that may interfere with the work process.
Before work, the walls must be coated with a special primer to prevent the appearance of fungi and mold.
General provisions
Assembling the frame and installing it from individual prepared elements with your own hands directly on the ceiling or on the wall presents some difficulties - it requires constant alignment and adjustment in the horizontal and vertical planes with the constant use of a plumb line, level, building square and rule rail.
If the length and width of the room allow, the enlarged assembly of large fragments of the frame can be done directly on the floor. In this case, it will be much easier to mount the frame, both on the wall and on the ceiling, and align and attach it in the vertical and horizontal planes, respectively.
The horizontal and vertical elements are well connected to each other using pieces of tin metal strip of the required width (25 mm) bent at right angles or through small blocks. Both are secured in the required places with screws.
Installation of frame fragments on the walls and ceiling can be done using wood screws, if the walls and ceiling are wooden, using so-called “plugs”, when a hole is drilled in a brick or stone in the right place, at a predetermined point on the wall, into which it is installed. a wooden chopstick, into which, in turn, a nail is driven through the frame element or a screw is screwed in; instead of a chopstick, a plastic dowel with a metal screw can be
READ Floor insulation with isolon in a wooden house
After installing and leveling the frame, if there are significant bumps and distortions between it and the wall (or ceiling), gaps may form that should be filled with gypsum mortar (if the wood was previously protected with moisture-proof impregnation), use polyurethane foam or wooden wedges and pads together with glue for wood, for example PVA. Otherwise, the wooden frame for plasterboard on the wall (or ceiling) will have increased instability and may be deformed when installing gypsum plasterboard panels.
Wooden sheathing for plasterboard
Greetings to all readers. The popularity and practicality of drywall allowed it to take a leading position among finishing materials. Therefore, I decided to write a series of articles about this universal building material. Today I will tell you how to install wooden sheathing under drywall.
A plasterboard sheet can be indispensable when covering walls or ceilings; it can be used to make arches, niches, partitions of any complexity, a base for a screen under a bathtub, multi-level structures, etc.
In addition, you avoid wet and labor-intensive plastering processes. Installation work on facing with plasterboard sheets reduces the time of work.
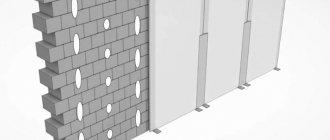
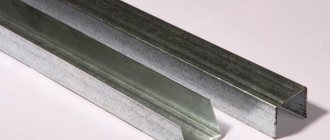
Drywall is mounted on a frame, the material of which can be:
Wooden lathing - should be used only in dry, small rooms with a constant temperature. With an increased percentage of humidity, the wood may warp, and deformation may cause cracks at the drywall seams. The optimal wood moisture content should be in the range of 16-20%. Lathing on the loggia
When you plan to use wallpaper as a finishing touch, this is not so scary, but in the case of painting, deformation of the wood is unacceptable. If this can happen, then why, you ask, am I writing about wooden sheathing? The fact is that wooden blocks may be available, then the sheathing is free. Many of my friends carry out wood lathing in very small rooms (in closets, on a loggia when connecting a loggia with a kitchen, for example) where the profile would have to be cut. So far they haven't complained.
If the area of the room to be finished is small, it is dry and the temperature is stable, then you can safely use wooden sheathing. Like any wooden structure, we treat the bars with wood preservatives.
Metal profile - created specifically for constructing a plasterboard frame. It is perfectly smooth, does not rust, and is not afraid of moisture. There is a very large selection of all kinds of profiles. We'll talk about them in the following articles.
And today we are considering wooden sheathing for drywall, if you have decided to use it.
Processing a wall or partition made of plasterboard in a wooden house
After the installation is completed, the connections between the sheets of drywall and the holes from the screw heads should be processed.
For this we need:
- Putty knife;
- Special putty;
- Reinforced tape or mesh;
- Electric drill with a nozzle for stirring putty.
You need to start work by preparing the putty mixture. We recommend using a special putty to seal the seams. Also choose a spatula that is convenient for work. It should have a flexible blade and a comfortable handle.
To avoid the appearance of cracks in the seams, work should be carried out after establishing a constant temperature and humidity in the room. Read more about this stage of work in the article:
We apply the finished mixture with a spatula to the drywall seams, as if pressing it between them, then cut a piece of tape of the required size and glue it to the treated seam. Process the remaining seams and joints in the same way. To fill the hole from self-tapping screws on drywall, you need to apply a layer of putty to the desired place, smoothing it in different directions. After carrying out all the necessary processes, you can, if you wish, prepare the wall finished with plasterboard for further work. There can be a lot of finishing options, it all depends on your desire, imagination and capabilities.
Construction of a frame made of wooden lathing
- First, I recommend inspecting the surface on which the sheathing will be installed. If it's new construction, then everything is fine. And if the base is old crumbling wall plaster, for example, then the surface under the sheathing should be strengthened.
- Imagine this picture - you have made a renovation, covering the room with plasterboard, and the old plaster behind it will slowly begin to crumble. The situation is unpleasant. To prevent this, beat off the bouncing areas and treat the entire surface with a strengthening primer.
- We make markings for installing sheathing bars under the drywall. The end result should be a lattice mesh. You must align the bars in a vertical and horizontal position.
- We cut the blanks to the required sizes and let them acclimatize in the room being repaired for a couple of days.
- First, we install the lighthouse slats - horizontal - under the ceiling and below 5 centimeters from the floor (for attaching the baseboard). Vertically - in the corners and additionally we mount framing slats at the edges of the openings - door and window.
- The result is a beacon square, installed strictly according to the level at which the intermediate sheathing for drywall will be placed.
- We begin to place the intermediate slats (under the cord) of the sheathing strictly vertically. The cross-section of the slats starts from 50x40mm. We install an additional batten at the joints of the plasterboard sheets. The step is taken from 40 to 60 centimeters.
- If somewhere along the level there are deviations of the sheathing from the vertical, then we correct them by installing pads (plywood, fiberboard, etc.) under the sheathing.
- Using self-tapping screws, we attach the frame bars to the wall in increments of 400-500mm.
- Horizontal intermediate bars - jumpers are placed in the same way between vertical posts, only with a larger step (700 - 1000mm). We also install additional bars in those places where you plan to hang something on the wall, so that they act as a support.
The lathing for the ceiling is done in a similar way. The lighthouse square of your room already exists, so start dancing with the sheathing from it. It is, of course, more convenient to work with walls than with a ceiling, but the entire process of installing the frame is quite simple.
I do not recommend lathing on a wooden ceiling. It is advisable to use a metal profile, then the ceiling will not be subject to possible deformations, and any type of finishing can be done on it.
I can say in conclusion - as many craftsmen as there are, there are so many methods and options for installing the sheathing. If you wish, you can successfully complete all this work yourself.
To level or redevelop living space, partitions made of gypsum plasterboard or plasterboard are used. GCRs benefit from brick and block partitions in that they are lightweight, the installation of such structures is quick and simple, and after completion of the work there is little dirt and dust left. GKL and GVL are economical, have good heat and sound insulation. Gypsum plasterboard sheets (GKL) are a fairly complex composite material. It is made from plaster, cardboard and various additives.
The latter give drywall special qualities. The main ones are high fire safety and excellent sound insulation. In addition, when using plasterboard, a minimum of dirt and waste is generated.
This sets it apart from other construction projects.
Stages of wood preparation before use
To build a partition with your own hands, use coniferous timber beams with different section sizes, the choice of which depends on the cladding method and the height of the partition being built.
Basic requirements, subject to which the structure will last longer:
- The indoor humidity level is less than or equal to 18%;
- For partitions whose height does not exceed 3 meters, the riser is a section of 6x5 cm, the sheathing is 6x4 cm;
- For partitions over 3 m - sheathing and riser with the same cross-section, which is 6x5 cm.
- The choice of gypsum board depends on the height of the partition. The ratio of the height and thickness of the sheet is directly proportional; the higher the structure, the thicker the gypsum board;
- Regardless of the selected height, section and thickness, the step is 60 cm;
- Treatment that reduces the ignition index of the material is carried out in accordance with the requirements of the first fire safety group;
- Fastenings are made using nails, screws, and tenons. Using the latter type of fastener, the connection becomes stronger and will last longer;
- For sound insulation, mineral wool with a thickness of at least 5 cm and no more than 6 cm is used;
- The thickness of the new partition with the highest value is 132 mm and the smallest is 85 mm;
- The insulation index is calculated based on the selected partition thickness. It varies between 41 – 51.
DIY drywall finishing
Before installation begins, the wood lies for a couple of days in the conditions in which the frame will be erected. During this time she will undergo acclimatization.
Chemical treatment is no less important than fire treatment. It is aimed at productively combating various factors of biological origin. Let's consider in detail:
- Mold and mildew render the used lumber unusable, which is fraught with further destruction;
- Natural decay - necrobiosis, decay. Antiseptic treatment prevents these natural processes;
- Insects. Many species of these representatives of the fauna render the material unusable;
- Rodents are no less dangerous. A special composition is able to repel them.
Antiseptic
Antiseptics are a variety of chemical compounds. Due to its effectiveness, preference is given to sodium fluoride. It is a light gray powder that dissolves in hot water. The structure of the bars allows sodium to pass deep. An indisputable priority is the poor washability of the solution; it does not decompose, has no unpleasant odor, is not toxic and does not have a corrosive effect on metal.
Sodium fluoride is also used, to which soda ash is added. This combination turns the first substance into a pure sodium fluoride compound.
Antiseptics with an oily structure are prohibited for use in residential premises. This:
- Anthracene oils;
- Shale;
- Carboniferous;
- Creosote.
They are toxic and can cause considerable harm to people.
Wood damaged by insects
Attaching drywall to a wooden wall
Interior finishing of a wooden house with plasterboard is possible only with the help of a frame. A budget option for old, established buildings and country houses is to install gypsum boards on slats or beams made of softwood. In this case, the sheathing should not be tightly adjacent to the floor and ceiling of the room. The gaps are covered with plinth.
The slats are attached to the wall using a drill and dowels.
Any gap between the wall and the batten should be filled with small particles of drywall. There are also horizontal spacer slats that are mounted between the vertical slats. The spacer rails are mounted at different heights.
This creates a mesh as a base.
- Lay the timber along the wall and draw a line from the outer edge;
- Vertically lean the rack-mounted timber beam, mark at regular intervals the location of the end behind its exit on the floor.
To carry out high-quality fastening of gypsum boards, you will need a standard set of tools: a level, tape measure, marker and chalk for marking fasteners, a drill, a screwdriver, a knife or saw for cutting. Now Russian manufacturers make decent foam, Kudo, Profflex, Technonikol. In Volgograd, Russian foam accounts for about 70% of the market for 2021. If the wall is tilted or rotated, then you will have to use beacons. Use strong thread to create a net that indicates the desired verticality and plane.
Next, the beacons are installed in the right places. They need to be installed so that they touch the thread frame. Then the drywall sheets are attached in the same way as in the first option. After this, secure the problem areas with dowels, and seal the seams with putty and sickle.
To level walls with plasterboard using glue, in addition to gypsum compounds, polyurethane foam and “liquid nails” are usually used. Homemade solutions are also used, for example, based on putty and PVA. The techniques for applying the compositions to the surface of the material being installed differ. To ensure that covering walls with plasterboard does not cause problems and pleases the eye for a long time, a number of very important points should be taken into account before starting work.
To avoid the appearance of cracks in the seams, work should be carried out after establishing a constant temperature and humidity in the room.
Fastening drywall to timber is one of two ways to finish a room on a frame, although it is less common. Assembling the sheathing of a wooden frame under plasterboard involves many nuances that are absent when using a metal profile. Still, the use of wood is possible and does not even lose its relevance, especially when finishing the walls of wooden buildings.
Is it possible to attach plasterboard sheets to wooden beams, and what should you know and take into account when working with such material? The process of attaching drywall to a wooden beam The assembly work begins with marking and fastening the timber, which will serve as guide profiles. The frame for plasterboard on the walls is assembled according to the following algorithm: Such a popular finishing material as gypsum board, in most cases, is attached to a special frame. Usually it is mounted from metal profiles. An alternative option is a sheathing made of wooden beams, which is very easy to assemble with your own hands. But do not be deceived by the ease of manufacture: wood is a capricious material, its use is not always possible.
Let's look at all the features of this design and find out when and how you can make a wooden sheathing for drywall yourself.
In houses with wooden walls, you can install the racks to the base using wood screws. But you still need to drill holes: this eliminates the possibility that the timber will crack.
Both profiles made of galvanized metal sheet and wooden elements - lath, beam, board can serve as a frame structure.
Therefore, this material will be one of the best solutions, with the help of which a wooden ceiling will acquire a new look and add beauty and grace to the room. When installing additional sheets (if the height of the wall exceeds the length of the sheet), an additional block is placed under the seam perpendicular to the posts. Instead, you can use a piece of board or thick (from 12 mm) plywood. The main thing is that the edges of adjacent sheets are attached to a common frame element.
By the way: if necessary, intermediate sanding can be performed after filling the seams and sealing the screws. Its necessity is determined only by the condition of the surface.
We select and prepare wood - we do everything right
It is recommended to build the frame for attaching gypsum boards to the wall from coniferous wood. In this case, the wood must have a moisture content in the range of 12–18%, and also undergo special fire retardant treatment at the manufacturer of the beams or slats. It is also recommended to additionally apply antiseptic agents to wooden products. This treatment will protect the frame from:
- rodents (the smell of antiseptic is good at repelling mice and other living creatures that can damage the structure);
- mold and fungal microorganisms that destroy wood;
- wood-boring insects;
- biological natural decay.
You can do antiseptic protection of wood yourself. For these purposes, you can use sodium fluoride. It is sold as a light gray fine powder. You will need to stir the purchased mixture in well-heated (but not boiling) water (35–40 g of the drug per 1 liter of liquid). Then treat all elements of the future frame for drywall with the resulting composition.
Sodium fluoride for antiseptic protection of wood
Fluoride antiseptic easily penetrates into wooden products and is practically not washed out of them. It is important that it is non-toxic to humans, has no odor, and does not decompose during use. Working with such a composition is simple and safe. An almost complete analogue of fluoride is sodium fluoride. It is allowed to purchase such a drug. But before use you should add a little soda ash (soda ash).
Wooden frame for drywall
Both profiles made of galvanized metal sheet and wooden elements - lath, beam, board can serve as a frame structure. A possible frame for plasterboard made of wood may be preferable to a profile made of metal, since installing plasterboard on a wooden frame with your own hands is not particularly difficult and does not require special skills. Wood can be easily processed - drilled and sawn.
- Direct installation, it can be done using gypsum mortar or special adhesive mastics, if the walls and ceilings have a smooth prepared base
- A wooden or metal frame for drywall should be used if the working surface has distortions, severe waviness, bumpiness and other irregularities
To determine the required number of gypsum board slabs, you should draw a sketch plan for the layout of the walls and ceiling with all door and window openings, slopes and technological niches (for example, for heating radiators). After calculating the working area, its value should be divided by the area that one plasterboard has. The resulting value will need to be increased by 20% (for trimming and unforeseen expenses), which will be the number of panels required. Is it possible to install drywall on a wooden frame? Yes, and besides, this allows you to save on finishing by refusing to purchase rather expensive metal profiles.
However, it is not recommended to use a wooden plasterboard frame when the room has high humidity - in bathrooms, boiler rooms, showers and bathrooms. The use of boards for the manufacture of frame structures in other cases is impractical, as this will lead to excessive consumption of material and an increase in the cost and labor intensity of the work. For cladding concrete, brick, logs, as well as old warped walls and ceilings, it is better to use a frame made of timber under plasterboard.
Covering the frame with gypsum board sheets and finishing work
Installation of gypsum boards on a wooden frame begins from the lower corner of the partition or from the doorway. To do this, use 35 mm wood screws. They are installed in increments of up to 250 mm, retreating from the edges by 10 - 15 mm. In this case, the heads of the screws should be slightly recessed into the sheet material, which is important for high-quality wall finishing.
If cutting is necessary, the drywall is cut with a construction knife, followed by a break at the cut site. The sheets are joined together with factory edges facing each other, and the cut edges are turned towards the walls and ceiling.
After installing the gypsum board on one side of the partition, its internal space for sound insulation is filled with briquettes of mineral wool, polystyrene foam or expanded polystyrene. Electrical and information cables are laid, protected from damage by corrugated tubes. Then the back side of the wall is sheathed.
After covering the frame with plasterboard, it must be primed, and then the joints and screw heads must be well puttied.
The installed plasterboard sheets are treated with a primer. After it dries, all joints and screw heads are covered with a double layer of putty so that an absolutely flat surface is obtained. After two days, it is primed again and wallpaper, ceramic tiles, or any other type of finishing are applied.
Is it possible to attach drywall to wooden blocks?
• GKL on wooden slats is possible (I do this in the attic). • If the ceiling is flat, then you can just use a wooden ceiling (and I have this in my attic). • GKL can simply be attached to the wall with special glue (for gaps).
because “the tree is playing.” This is probably the reason (although it was not stated). It’s not entirely clear - well, let him play, isn’t it secured by several dozen screws? Is it really tearing the leaf?
I really wouldn't want to redo it.
+1. Bookmaker, buy a woodworking machine and you will be happy No, seriously, or rent it - I don’t know how much cheaper, but at least you’ll make even slats. Although for bloopers - the glue doesn’t dry so quickly, it will be quite possible to install it Well, not alone, of course. Z.Y. I wouldn’t want to glue HA to the wall with paint, but knocking down the plaster is so dusty and so much debris that I’d like not to do it. Okay, how to attach the profile?
Standard fasteners will not work, this is not a ceiling, a minimum distance from the wall to the sheet is required. You can’t just attach the UV profile with dowels. Maybe he could put something inside the profile.
How to level walls with plasterboard in a wooden house: installation of plasterboard sheets on a frame
After preparing the drywall, you can proceed directly to attaching it to the sheathing. To do this, we place the sheet close to the slats and secure them with self-tapping screws. One edge of the sheet should be located as close to the wall as possible. The heads of the screws must be below the level of the sheet.
- Screws and self-tapping screws should be made of wood: they are better secured in the wood.
When leveling the walls, monitor the distance between the screws: it should not exceed 25-30 cm.
Formation of the future door
After the installation of the frame is completed, they proceed to the construction of the opening for the door. In order for the work to be done with your own hands efficiently, follow the sequence of actions:
- The risers are mounted on each side of the opening, taking into account the size of the door being installed. The opening is approximately 5 cm wider;
- The risers are reinforced with bars to provide additional rigidity;
- The horizontal partition is mounted a couple of centimeters above the box by connecting to a rail mounted on the ceiling. To do this, take two beams and install them vertically. They serve as a joining place for gypsum boards and provide greater rigidity.
Ready frame
Preparatory stage before installing the sheathing
Preparation for installation of sheathing under drywall is purely symbolic. Before starting work, you need to remove all the furniture from the room and cover the floor with oilcloth. If there is old finish on the walls where you are going to install a wooden frame, you need to get rid of it. Now that everything unnecessary has been removed from the room, you can begin preparing tools and materials.
For an overview of the necessary accessories and components for installing gypsum boards, see here:.
Materials you will need:
- Screws;
- Screwdriver;
- Water or laser level;
- Roulette;
- Chopping thread;
- Wooden slats;
- Hacksaw.
If you have a jigsaw, use it instead of a hacksaw; with such a tool you can quickly cut the slats into the required lengths.
Basically, purchasing the necessary materials and protecting the floor and other surfaces from wood dust is all the preparatory work you need to do.
Is it worth it or not to build it yourself? Expert opinion
The question to build or not to build, although it is reminiscent of Hamlet’s “To be or not to be?” in many respects can be decided after studying the opinions of experts, where you can conditionally attract both truly professionals and those who can boast of a self-built change house.
Professional builders will always be against building such a facility on their own; this is explained by certain difficulties of the work, its labor intensity, and the need to carry out several operations when using non-standard material.
For those who already have experience in assembling such buildings and can share their own experience, both positive and, alas, not entirely, I will assure you that this is quite possible and even needs to be done, well, at least in order to believe in your abilities.
The truth lies somewhere in the middle. For a person who has a clear work plan, knows how to handle basic tools, or at least hold a hammer in his hands, this is quite possible. For those who think that this is irrational, it will be quite normal to buy a ready-made project.
What are the consequences of self-construction? Builder mistakes
When constructing a summer cottage yourself, you must take into account:
- documentation of construction, this is relevant for all types of buildings, both on the land of gardening partnerships and other lands, because the structure does not hang in the air;
- the presence of a project, even the simplest one, but with minimal calculations of materials, it can be corrected at any time, but without calculations the material will have to be constantly purchased;
- the project must take into account the power of the electrical wiring, the placement of heating devices, and support systems, and this should be done primarily by professionals, since incorrect calculation of the cable cross-section can lead to a short circuit in the wiring and a fire.
But professional builders, as a rule, make the following mistakes:
- incorrect placement of the building;
- violation of construction technology;
- poor quality of various operations and works;
Necessary tools and materials for work
To construct a wooden frame for cladding walls and suspended ceilings, you need the following tools:
- level;
- measuring instruments - ruler, tape measure;
- manual or electric wood cutting tools;
- drill, screwdriver;
- hammer.
Tools required for installing drywall on wood sheathing
Materials:
- wooden beam, its size depends on the purpose of constructing the structure - to insulate or soundproof a wall, the profile of the beam must be no less than the thickness of the gasket material by 4-5 cm; for leveling wall cladding - timber section 8.0x2.5 cm for racks (vertical system) or beams (horizontal), 4.0x2.5 cm for spacers;
- for sound insulation - a special gasket;
- plasterboard - depending on the purpose of the room, ordinary, moisture-resistant, fire-resistant;
- reinforcing tape for seams;
- putty;
- primer;
- finishing material.
ATTENTION! When facing plasterboard with slab materials, the lining must be done in 2 layers!
For work at height, you will need a stepladder or scaffolding.
Worker protection is required - clothing, gloves, glasses, respirator, shoes with non-slip soles.
Plasterboard covering uneven walls and ceilings
If the size of the room allows part of the space to be occupied by plasterboard, you can use it to quickly and accurately cover uneven walls and ceilings. For this purpose, a wooden frame is also made, which is attached to building structures.
When covering the wall, you need to repeat all the operations described for installing the lintel, installing the frame close to it. To do this, it is possible to take bars and slats of a smaller cross-section, since they can additionally be attached with brackets or anchor plates to the wall being closed.
Some craftsmen assemble the frame on a flat floor, and only then place it in the right place and secure it. All cavities between the bars are filled with heat-insulating materials. Install drywall on the slats, trying to avoid the presence of joints above the door and window openings, since there will be no supporting vertical posts there.
When installing gypsum boards on the ceiling, the frame bars are attached to the walls strictly horizontally and at the same level. After this, the internal lathing is performed, securing it to the outer bars and to the ceiling slabs. Ceiling plasterboard has a slightly smaller thickness and weight, which makes it easier to install.
This work begins with the installation of the harness. The strapping bars are attached to the floor, ceiling and walls. If the floors are wooden, the task is simplified, since ordinary nails are enough to fasten the bars. With a beam thickness of 60 mm, nails 100 mm long are sufficient.
If the walls are concrete or brick plastered, the strapping is secured with dowels and nails to the wall and floor and with anchors to the ceiling. When covering the partition with plasterboard on the second side, it is necessary to remember that in order to avoid cracking of the frame posts when screwing in a large number of screws at the joints, the joints of the sheets must be separated from the joints of the already installed cladding, shifting them one step to the right or left. After attaching the guide at the top, attach the beam at the bottom. This should be done very carefully, since the evenness of the septum depends on this procedure.
The last beam is fixed to the wall, thereby connecting the floor and ceiling fixed materials. There should be a frame. Metal corners are attached to all internal 90 degree corners. This is an additional fixation of the reliability of the frame. The corner is made independently in the absence of furniture parts.
After carrying out the preparatory work, creating a drawing and markings (described above), you can begin constructing a metal frame from profiles. The racks are installed strictly vertically with their ends close to the horizontal support and ceiling bars of the frame. Fastening is done with self-tapping screws using steel angles or fastening plates intended for assembling rafters. They are designed for heavy loads, so they will ensure reliable communication. At the height of the door frame plus 2 cm, the racks are connected with a horizontal jumper.
If cutting is necessary, the drywall is cut with a construction knife, followed by a break at the cut site. The sheets are joined together with factory edges facing each other, and the cut edges are turned towards the walls and ceiling. Sound insulation of frame partition elements depends on the number of sheathing sheets, the thickness of the insulating material inside and the presence of an air layer.
- Frame partitions consist of vertical posts mounted at equal distances from each other. Inserting an opening will destroy the integrity and require reinforcement of the structure.
- The part of the frame located under the opening will be weakened. It will be necessary to distribute the load - install horizontal crossbars - additional strapping boards.
How to look younger: the best haircuts for those over 30, 40, 50, 60 Girls in their 20s don’t worry about the shape and length of their hair. It seems that youth is created for experiments with appearance and daring curls. However, already last. The most common material for sheathing is plasterboard, which is quite light and cheap.
A frame made of bent profile can be installed under it, which will also reduce the weight of the structure.
Assembling a frame from profiles for a plasterboard partition
For marking you will need a level or laser. It is required to accurately mark horizontal lines on the ceiling and floor, and a strictly vertical stripe on the wall. Fastening points are marked on these lines. You should also mark the boundaries of the doorway. The next step is measurements. All measurements taken around the perimeter, as well as the proposed window and door openings, are applied to the partition drawing. Wires are run into these holes. Wiring must be done in accordance with the electrical diagram. It should be preserved. In areas of switches and sockets, space should be allocated for the box. A set of necessary materials for installing the partition
- Drywall thickness 12.5.
- Damper (sealing) tape.
- Reinforcing tape.
- Mixture Knauf “Fugen”, “Uniflot”.
- Finishing mixture.
- Primer.
Return to Contents Now you should install the vertical posts. They are created from wood of the same section as the harness. The racks are fixed using wood screws. For strength, metal corners are installed. In the area of the planned door, the vertical posts are reinforced (2 knocked down bars).
Frame vs glue
When is it worth installing drywall on a frame, and when is it better to glue it directly to the wall?
Everything is simple here: if the differences, blockages and curvilinearity of the base exceed 40 - 50 millimeters, a frame is necessary. In other cases, glue is preferable: it will again save room space.
There are, however, two more scenarios that will make you lean towards fastening the gypsum board along the sheathing:
- Installation of plasterboard partition. No comments seem to be required here: without a frame, its casing simply has nothing to attach to;
- Laying communications behind the wall cladding - water supply, sewerage, electrical wiring, ventilation ducts, etc. Hiding them behind a false wall is much easier than building a permanent wall.
The water supply risers are placed in a plasterboard box.
In some cases (for example, if we are talking about a panel partition inside an apartment), grooves of significant width and depth are impossible in principle.