Set of socks, Omsa socks
349 ₽ More details
Set of socks, Omsa socks
349 ₽ More details
Grouts
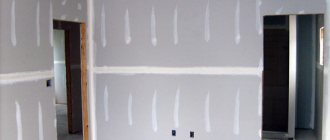
Gypsum plasterboard sheet (GKL), as a rule, is attached to the sheathing; accordingly, the installation of the profile under the plasterboard must be reliable. Often, novice builders buy thin metal PP guides, and some areas on the ceiling are pressed under the weight of the material. To do the job correctly, you need to study finishing technology. The slabs themselves for cladding walls and ceilings are easy to use, and little time is spent on making the frame.
Drywall sheets are attached to a frame made of special profiles
Wooden and metal products
Partitions, walls and ceilings cannot be finished with sheets of plasterboard alone. Therefore, profiles form the main part of the entire structure. There are 2 types of products:
- metal;
- wooden.
In the first case, strips for mounting on gypsum boards have many disadvantages. The material is not in wide demand because manufacturers do not produce it, but it is still used for the installation of sheathing. What disadvantages can you expect if you use wood products:
- low service life;
- rotting of wooden planks when interacting with water;
- such lathing does not shine with strength, so it can become deformed after some time;
- high degree of fire;
- labor-intensive installation of the frame.
This is interesting: the main types of metal profiles.
This video shows how to build a frame from profiles:
Steel structures have undeniable advantages over wooden models. They are several times more expensive, but this is the only negative. Advantages that can be highlighted:
- the rigid and durable sheathing does not deform even after many years of use;
- ease of assembly of the structure;
- the long service life is due to the fact that the material is made of zinc and has sufficiently thick sides so as not to bend under the weight of the sheets;
- There are different types of profiles, both for ceilings and walls.
Of course, the owner will overpay for the purchase of such high-quality building materials, but he will forever forget about the periodic restoration of the hanging product.
Tools
To install drywall in residential or commercial premises, you do not need any complex professional tools. It’s enough that every home “jack of all trades” already has it in his suitcase on the mezzanine. This is the undeniable advantage of drywall - ease of installation and a minimum of accessories for it.
The following tools are required.
Saw or hacksaw. Suitable for cutting wood and synthetic polymer materials. You need such a saw when dividing solid gypsum board sheets into separate pieces of the desired size and shape. In addition to a regular saw, it is better to stock up on a circular saw, as it will be more convenient for it to make long and straight cuts, separating parts of drywall from each other.
- Electric jigsaw and drill. The first tool is needed for cutting out parts of complex shapes, especially if these are not sheets of soft drywall, but parts of a metal frame. A drill, accordingly, will be needed to fasten the sheets to the frame and adhere them to each other. If possible, you can purchase a special attachment for the drill for mixing dry mixtures, since frameless installation with glue will require all this.
- A screwdriver has already become a familiar tool in any apartment. It is needed for installing fasteners when fixing plasterboard parts at the time of assembling the frame, most often from metal profiles. In principle, the same manipulations can be carried out using a drill and screwdriver, but a screwdriver acts more softly, so the chances of breaking a rather fragile drywall structure are reduced significantly.
- It is better to take a special construction knife in order to properly trim the edges of the parts after cutting. However, if you don’t want to spend extra money, use a well-sharpened regular kitchen knife with a thin, long blade if you can.
- Roulette. Both automatic and laser are suitable. You can also use just an ordinary metal one, which is well suited for measuring the profile after marking and cutting into separate parts.
- A plumb line is not required, but is very convenient to use when inspecting the position of the gypsum board sheet in space during wall installation.
- A paint brush, rollers of various shapes and a universal set of spatulas are all you need to properly apply the primer after installing drywall.
- Directly primer mixture or acrylic putty, needed for applying the top layer to a plasterboard sheet in order to prepare for subsequent coating with varnish, paint, wallpaper or decorative plaster.
- Large capacity plastic containers where soil or glue will be mixed. It is advisable to have a separate disposable container for each type of mixture, which you don’t mind throwing away later.
- Emery cloth for smoothing out unevenness so that each subsequent layer lays smoothly and without gaps, because in the future this can affect both the strength of the structure and the formation of mold in areas of poor grouting.
- Insulation placed directly between the wall and a sheet of plasterboard during the construction of partitions or wall finishing for the purpose of insulation and sound insulation. It can be either mineral, created specifically for interaction with drywall, or ordinary glass wool, which also holds heat well.
- Rack and horizontal profiles, fastening brackets and self-tapping screws are absolutely indispensable things when installing a metal frame and stitching individual gypsum board sheets together.
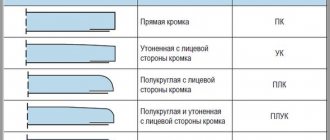
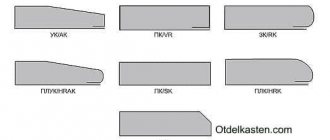
Types of guides
There are profiles for ceilings and walls, but they are structurally similar to each other. Therefore, there are only 2 types: starting and main models. The dimensions of the guides are made according to the standard - 300 cm in length. If the room is large, then there is a special fastener that connects 2 elements at the ends and achieves a size of 600 cm.
The frame for attaching drywall is made from starting and main guide profiles
Profiles marked PP and Ps should be installed for areas of the room with heavy loads. These types of steel strips at the ends are designated by the letters C or P. PN - guide profile (starting). It is used for fastening to walls in a horizontal or vertical position. Then the main metal products are installed into it to form the frame. How evenly they are installed, the coating will be even. Variations of steel profiles for drywall:
- NP - this type is used for walls because it plays the role of a vertical support.
- NP - performs the functions of a ceiling value on which gypsum boards are mounted.
- PP - starting guides are installed under the ceiling along the entire perimeter of the room. The main profiles are attached to them and a suspended ceiling is created.
The NP profile is used for better fixation of drywall on the frame.
There are certain types of material that are used infrequently. If the owner of a country house decides to make complex geometric shapes or protect weak areas of the finish from mechanical damage, then you cannot do without them:
- Corners. After attaching the plasterboard slabs, these parts are installed. They are installed along the entire length of the corner, for example, on partitions. Fix the elements with staples and a stapler. They are rarely used on the ceiling; the exceptions are two- or three-tier structures. In other cases, corners are installed on the walls.
- Half-arcs. These are radius profiles installed in arched openings or other asymmetrical areas of the house. They, like the main types, are secured with screws.
You can do without buying semicircular planks and make them yourself. It is enough to arm yourself with metal scissors, place dashes at equal intervals on the sides of the main flat NP guide and make cuts, not reaching 2 mm from the bottom of the product. Then the structure is bent and mounted to the jumpers. The work won’t take much time and you won’t have to overpay for radius models.
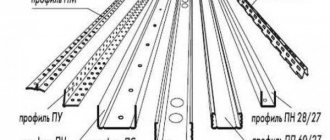
Materials
In the vast majority of cases, preference is given to a frame made of a metal profile. Compared to lathing made of wooden beams, it has many advantages: durability, resistance to the external environment, strength, and a small amount of waste. To install the metal frame, the following types of profiles are used:
- Guide (starting). It is divided into ceiling (marked PNP or UD) and wall or partition (PN or UW).
- Bearing (main, rack-mount). For the construction of vertical posts and horizontal lintels, a wall metal profile for partitions (PS or CW), as well as a ceiling profile (PP or CD), are used.
- Corner (perforated corner). It is used to strengthen the internal and external corners of gypsum plasterboard structures.
- Flexible arched profile (PA). Used when installing arches and other curved structures. However, it can be successfully replaced with a guide by making cuts on the side shelves at certain intervals. This will allow you to easily give it the desired bending radius. The smaller it is, the more often cuts need to be made.
Before installation, various fasteners are purchased in the required quantity:
- Direct hangers. Useful for leveling walls and ceilings.
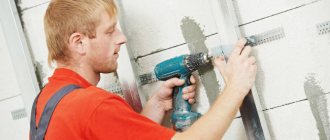
- Dowel-nails. With their help, frame elements are attached to the base surface. The most popular sizes are 6 × 60 mm and 8 × 80 mm. If there is a large layer of plaster, it is recommended to choose longer dowels.
- 9mm metal screws. Popularly called “flea beetles” or “bugs”, they are used when assembling the frame. Some professionals do without them, connecting metal profiles using a cutter.
- Damper tape. It is glued to the profile plane adjacent to the ceilings and walls and provides sound insulation to the structure.
- Additional fastening elements are crab connectors.
Rules for fastening the structure
The lathing is secured to metal hangers. Due to them, a gap is set between the wall or ceiling and the slats. Therefore, the master does not need to level the surface of the ceiling, which significantly speeds up the work process. Several hangers are installed per 1 m². The part looks like a plate, the edges of which are equipped with multiple holes for self-tapping screws.
The frame for plasterboard must be installed on a flat ceiling
The starting guides must be installed on plastic dowels and screws. To securely screw the plank, holes are made in it every 50 cm with a puncher both in the part itself and in the wall. Hammer the plastic fastener and screw in the screw. Other profiles are sold with pre-made holes; they are more suitable for novice builders. Here are recommendations from professionals that will greatly simplify the installation of drywall guides:
- This is the basic rule - regardless of where the drywall will be attached, the slabs are always joined to each other extremely evenly. Even minor differences will complicate further work with putty. For these purposes, use a long level or rule measuring 300 cm.
- The starting guides are installed on a pre-drawn line on the wall. Marks are made on the product at intervals of 50 cm, and the same work is done with the wall. Next, holes are made in the metal strip with a nail, then holes are made in the wall with a hammer drill. Shaking of the attached structure is unacceptable.
- The screws are screwed in at right angles and held with your fingers while working. They are also called “bugs” because they are short in length.
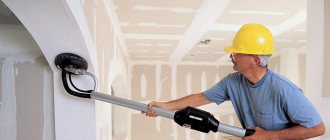
- To tighten fasteners in a hard-to-reach area of the ceiling, for example, under lamps, use an angle attachment on a screwdriver.
To build a frame for drywall in hard-to-reach areas of the ceiling, you should use an angle attachment on a screwdriver - If the countryside property is not insulated from the outside, then after constructing the sheathing and before installing the gypsum board slabs, mineral wool is placed inside the frame and secured with tape or other fasteners.
- According to the technology for installing plasterboard, the profile structure has cells of 50x50 cm. Therefore, in those places where 2 steel strips intersect crosswise, “toads” are attached. They will add rigidity to these weak connections.
You cannot use bent guides to create the frame, as this will affect the evenness of the ceiling or wall.
Main types of shaped fittings
If we talk about how to connect a profile for drywall, level the surface of the frame and create stiffeners, you should also disassemble the main types of shaped fittings - rods, hangers, brackets.
- “Crab” - for a cross connection of PP on one tier.
- Corner connector - designed for angular joining of PP 60X27 from 46 to 179 degrees.
- Direct suspension is the most commonly used element for frame leveling the surface, fixing load-bearing and rack profiles, as well as for installing stiffeners.
- Anchored, fixes the frame to the ceiling for a load-bearing capacity of up to 25 kg.
- Two-level connector - used for longitudinal-transverse connection, on different tiers of the structure, of two profiles - the main one with the guide. Used on two-tier ceilings.
- Vernier - for adjusting the height of the suspensions, as well as fasteners for the drywall profile to the base, which implies load fastenings in the future.
- PP Profile extension for extending ceiling profiles
- To assemble the frame, piercing (LN) and drilling (LB) screws are used, in sizes 9, 11, 16 mm, as well as dowel-nails.
Materials and tools for installing simple ceiling and wall frames
To assemble the simplest wall or ceiling frame, prepare:
- For the ceiling there are metal profiles PNP, PP, for the wall - PN, PS;
- Self-tapping screws, dowels;
- Direct hangers, crabs at joints (as needed).
- Marking thread;
- Level (alcohol), level;
- Standard tape measure;
- Pencil or chalk;
- “Shark” (scissors for cutting metal);
- Screwdriver/electric drill (+ carrying);
- Electric hammer drill for drilling tunnels for dowels when working on concrete and brickwork;
- Ladder.
Marking the room
The frame requires proper marking of the walls. If this is not done, the design will be crooked. List of tools for work:
- chalk-treated cord, the kind sold in hardware stores;
- roulette
- pencil;
- hydraulic level;
- level.
If the master is not sure of the evenness of the ceiling, then he uses a hydraulic level to find the zero point. In the corner of the room, make a mark of 100 cm from the floor. Place one side of the tool on it, and place the second on the opposite corner; when the water levels out, draw a short line with a pencil at its level. The procedure is performed on all sides of the room.
From the ceiling down the wall, measure no more than 10 cm. Place a mark from which to measure the height to the bottom line. The resulting size is transferred to all corners of the room. This is the ideal way to achieve a uniform plane. It is advisable to involve an assistant in the work.
At the level of two marks, pull the cord tightly, grab the material with your hand closer to the middle, pull it away from the surface and release it. As a result, an even imprint will remain, which will serve as a beacon for installing starting profiles. Similar manipulations are performed around the entire perimeter of the room.
To obtain a high-quality frame for drywall, you should strictly follow the instructions
You can use other methods: step back 10 cm from the ceiling and mark this place with a pencil, place a long level at the level of the line and adjust it, then draw a line on top of it, on the edge of which the tool is again placed and similar work is carried out. And they do this until they mark the entire perimeter of the room.
How to install a profile under drywall video
The next stage of installation work is the installation of the guide. To do this, along the marked line, a wooden beam 50x50 mm is attached to the wall using self-tapping screws, the length of which should be 2 times greater than the width of the doorway (Fig. 2).
The beam must be pressed as tightly as possible against the wall, for which you need to use the required number of screws. After the beam is secured, check again that it is horizontal.
- Using a tape measure, measure the height of the leaf from the floor, adding 1.5-2 cm to the resulting value for the gap between the door and the floor, as well as the height of the assembled roller device and guide. Then marks are placed on the wall along which a horizontal line is drawn.
- The door leaf is placed against the opening, a lining of the required thickness is placed under it, after which a horizontal line is drawn along the upper cut of the door.
As a professional craftsman, it is usually sufficient to briefly describe the parameters of all structural elements of the drywall structure. But if you have to deal with this device for the first time, it is better to get visual information. For this purpose, it is advisable to familiarize yourself with the video, which will allow you to delve into the process of selecting fasteners for a dry and visual display of the characteristics of each of them. There are only two sizes of profiles for plasterboard sheets.
The first is used to form a plane, and the second is used to construct a frame. They are separated by the English letters D and W. Structurally, sliding doors consist of a leaf and a frame, which, depending on the type of mechanism used, can be placed at the top or bottom. You shouldn't skimp on this! To quickly and reliably assemble a frame, you need to use a cutter for a plasterboard profile, which does not leave dents when connecting, does not require marking holes, and makes the edges of the product even and smooth. There is no need to use fasteners.
Along the edge, the screws are placed at a distance of 125 mm, about 20 mm from the end of the sheet. The material is attached to the middle profile in increments of 250 mm; marks must be applied on the front side to indicate the location of the screws. At corners, screws should be secured away from the edge, where greater strength exists.
Technique for mounting the frame on the ceiling
The design of the ceiling lathing is almost no different from the wall lathing. Specialists are able to build a product in a room of 20 m² in 1 day. How to do it:
- You need to place a profile for drywall on the drawn lines. First, holes are made in them with a nail, they are applied to the wall, strongly moved to the corner of the room, a hammer drill is inserted into these holes and drilled.
Drawing on the walls for level installation of the frame is done using a nail - Dowels are driven into the material with a hammer. They put a screw there and tighten it with a screwdriver. By the way, it is safer to use a cordless power tool, since a person focused on work may trip over the cord and fall from a height. Fix the plank to the end of the wall, then install another guide and move it to the corner, thereby it will fit into the profile. This process is completed.
- In a room of 3x4 m, accordingly, it is more efficient to mount the profile not along the length of the room, but across it, thus you will not have to lengthen the PP profiles. The material is inserted into the starting guides in increments of 50 cm and connected at the bottom with screws.
- Above the main elements, fasteners (narrow plates with holes) are mounted to the ceiling. The edges of the part are bent and placed against the guide, which is screwed with screws, the remaining ends are bent in the opposite direction. Install hangers in increments of no more than 100 cm.
The frame on the ceiling for plasterboard must have high strength so that the future structure is stable - Jumpers are fixed between the profiles. The material is cut to a length of 58 cm. The main part is 50 cm. Along the edges, cuts are made on the sides 4 cm long, which are pulled to the sides. On the guides attached to the starting ones, lines are created, retreating 50 cm from the wall. The jumper is applied to the marks, screwed on the bottom and sides with self-tapping screws. The remaining part of the sheathing is installed in this way.
- In the areas where the jumpers join the main profile, “crabs” are fixed. The part is installed on top of the cross-shaped connection of the structure, small plates with holes are bent on it and screwed to the guides.
The installation of profiles under drywall is controlled by the building level. Even the slightest differences are categorically unacceptable, especially at the stage where the element is attached to the ceiling. Therefore, it is better to carry out installation together.
Option 2. Partition with door
Door frames are installed together with the partition frame assembly. The place under the door is mounted like this:
- Where the door is installed, vertical posts (PS profile) are placed to the right and left of it. A beam is laid from them to secure the door frame. The beam is rigidly attached to the profile.
- A lintel is made from the PN profile above the door frame and additional racks are placed 20 cm from the opening;
- The door is part of the frame structure, so it must be installed before the sheathing;
- Additional vertical posts must be installed above the door.
Option 3. Partition with a heavy door (25-100 kg)
In this option, mount UA profiles on both sides of the door frame. The rest remains unchanged. Details: Installing a heavy door into a drywall partition.
Creating wall sheathing
Before starting work, specialists level the surface of the room, since the starting ones are installed on them, and as you know, they are considered the basis for the entire structure. Installation of profiles for plasterboard on walls:
- The wall surface is outlined - this applies to the floor and ceiling. They make marks to which the intended cord is applied, pulled back and released. The impact will leave a straight line.
- Starting guides are installed along the floor and ceiling, which are secured with dowels and screws. Profiles are mounted vertically in the corners of two opposite walls. Since the standard height of modern rooms is no more than 300 cm, the bar does not have to be increased by connecting two such elements with fasteners.
- The main profiles are placed vertically in increments of 50 cm and secured with “bug” screws.
- Jumpers are made with trimmed edges 4 cm long on both sides. They are placed in increments of 50 cm. The work is constantly monitored by level. The connections are fastened with “crabs”.
This is interesting: types of metal profiles.
To give the structure rigidity, craftsmen advise using not only hangers, but also pieces of profile. For example, if the distance between the wall and the sheathing is 10 cm, then PP guides are prepared to the same dimensions, the edges of which are cut at one edge, and all parts are bent back. The material is installed in the frame bar, the other end is placed against the wall, in which holes are made and the product is secured with dowels and screws.
The work is finished. It remains to check the quality of installation of the metal profile for drywall. A thread is pulled from the top corner of the wall to the bottom. Attach the second cord, but in the opposite direction, to form a large letter “X”. If there are no significant gaps and the structure does not wobble, then the process of assembling the sheathing with your own hands was successful.
Fasteners
Connecting and fastening elements are also necessary, thanks to which the entire structure acquires additional rigidity.
- The straight CD connector is used to connect two load-bearing profiles into one structural element.
- The cross-shaped CD connector is designed for transverse mounting of load-bearing posts in a single-level structure.
- A two-level CD connector is necessary when fastening elements located at different levels.
- The U-shaped bracket is used to attach load-bearing profiles to the surface of a wall or ceiling at the required distance.
These are just the basic connecting elements; manufacturers offer a much larger assortment designed for a specific type of fastening; for example, for installing a multi-level ceiling frame, there are various suspensions that allow you to create complex planes with your own hands that can support sheets of plasterboard.