There are a great variety of fastening systems and frame structures. We will talk about such a material for the frame as a metal profile for walls. First you need to figure out what it is and decide on its purpose.
A metal profile is a significantly new type of building material intended for installation of lathing when finishing walls, ceilings, roofs, etc. It looks like a chrome-plated metal strip with curved edges and can have different sizes and thicknesses. In construction stores, as a rule, they sell profiles 2 m long and a metal wall thickness of 0.4 mm. The shapes of the profiles are also very varied, and each shape is designed to perform a specific task.
Types of metal profiles
Application of metal profile
In modern construction, structures that use various types of frames are very often used:
- wooden;
- metal;
- combined.
The use of frames is quite diverse. They are used to create a wide range of construction projects.
Covering walls with plasterboard, covering a house with siding - these are just a few examples of using the profile.
The metal frame has a significant advantage over other types of frames, as it has a number of advantages:
- reliable;
- strong;
- does not corrode or rust;
- easy to install;
- does not require pre-treatment.
To create a basic plasterboard structure, you don’t need to use a lot of materials - you just need a profile, sheets of plasterboard and self-tapping screws. That is why this type of finishing has become so popular. The costs of its implementation are insignificant, and the result obtained is excellent.
Separately, it is worth noting the self-tapping screws, since their choice is no less important. The length, shape, type and quantity must clearly correspond to the material of the profile and the wall to which the profile will be attached.
Material for fastening plasterboard sheets to the frame
- TN type self-tapping screws are used to attach plasterboard sheets to a metal frame.
The TN type self-tapping screw is a screw of various lengths made of hardened metal, black, with a sharp tip and a noticeably frequent thread pitch. The TN self-tapping screw has a countersunk head and a cross-shaped slot. The self-tapping screw body has a phosphate coating.
The main application of the TN self-tapping screw is fastening plasterboard sheets to metal frame profiles with a wall thickness of 0.6-0.9 mm. The countersunk head of the self-tapping screw allows it to be recessed well into the front surface of the drywall. The wide thread pitch allows you to securely tighten the sheet of drywall to the frame. Using TN self-tapping screws, you can securely press two sheets of drywall to the profile at once.
- To screw the sheets, it is better to use a special screwdriver for drywall.
To attach sheets to the frame, there are the following fastening methods.
Installation of metal profile
Before starting work, you need to have a clear picture of the future construction. This is necessary to correctly select materials and auxiliary elements. Calculating the consumption of gypsum, calculating the necessary screws, determining the number of profiles - this is the main task when calculating a construction project.
No preparatory work is required before starting to create a metal frame. The fastening scheme levels out all the unevenness of the wall, and they will not affect the final surface. So, how to attach the profile to the wall? Doing this task yourself is not that difficult. Let's consider this issue using the example of creating lathing for plasterboard cladding and its subsequent use.
Tools and materials for installing plasterboard boxes
First you need to select all the necessary tools and materials:
- level;
- pencil;
- roulette;
- grinder or metal scissors;
- screwdriver;
- self-tapping screws;
- Screwdriver Set;
- plumb line;
- drywall;
- putty;
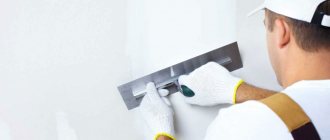
- set of spatulas.
Attaching the profile to the wall
Installing a profile under plasterboard with your own hands should begin with measuring the wall and choosing the step width, i.e. create a schematic diagram of the future design. The first profile is attached in the corner, carefully measured and verified using a plumb line and level. The metal profile itself is fastened to self-tapping screws through U-shaped elements. After fixing the first profile at the distance of the selected step, the second one is installed, the principle of operation is similar, the only feature is the need to compare with the first. Otherwise, if these measures are not followed, the wall may end up crooked or tilted to one side. Figured elements of wall cladding (shelves, rounded corners, etc.) must also be clearly compared with the rest of the structure.
Installing a profile under plasterboard with your own hands must begin directly by screwing the gypsum sheets to the frame. To do this, metal self-tapping screws are used, which fix the sheet directly to the profile using a screwdriver. The next step is the process of puttying the seams and joints. This is necessary to complete and final level the wall. The surface must dry completely, and after that it is ready for further use. For example, there can be a great many options for laying tiles or applying decorative plaster.
Frame for a plasterboard partition
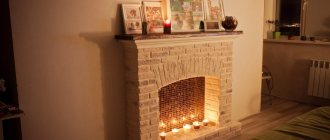
In modern realities, the issue of room insulation is very relevant. Prices for energy use are rising, which forces ordinary citizens to insulate their homes. The creation of plasterboard structures will help in this matter, because... the voids formed between the drywall and the wall can be filled with any type of insulation. By performing these actions, you can solve two pressing issues at once: transform the appearance of the room or facade and insulate it. The completed frame, ready for cladding, is shown in the photo.
Connecting and bending profiles for drywall
Special elements are designed for connection - connectors. Among them are:
- Straight ones, which are used for lengthening.
- Cruciform, used for criss-cross ligaments.
No devices are used to connect the guides and carriers. One is inserted into the other and both are fixed with self-tapping screws.
To connect two profiles in order to increase the overall length, their ends are inserted into a U-shaped straight connector and fixed in it with small self-tapping screws (“bugs” or “seeds”). A cross-shaped connector or “crab” is used when installing a frame that requires increased strength. To connect the slats crosswise, their ends are inserted into the connector, the antennae are bent and screwed to the profiles with self-tapping screws.
If there are no “crabs”, make the connector yourself. To do this, the profile flanges are cut and folded back. Place it on top of the other and connect both slats with self-tapping screws (“bugs”).
The T-shaped connection is made with the same “crab”. The unnecessary part is cut off.
A two-level connector is designed to connect profiles of different levels of the structure. It is bent into a U-shape, connecting elements lying in different planes.
In complex structures, bent load-bearing elements are used. To bend the profile, cuts are made along the edge of the side. After this, it can be easily bent by hand. The higher the frequency of cuts, the greater the bend curvature achieved.
The bend is not load-bearing, but only a guide profile. It should be fixed to the ceiling with self-tapping screws at 25 cm intervals.
Frame of a complex ceiling structure
The choice of insulation for drywall and the thermal insulation process
Drywall is a modern building material made from two paper sheets filled with gypsum. GCR is used in many areas, including as the main element in the thermal insulation of a building indoors. Since the sheet itself has poor thermal insulation, insulating structures use plasterboard insulation, which comes in several types:
- Foam sheets.
- Mineral wool.
An example of drywall insulation using mineral wool
- Polystyrene.
- Basalt wool.
- Izolon.
Each of the listed materials performs a specific function and has its own advantages and disadvantages.
Full contents of the material
What you need to attach drywall to the ceiling
It is difficult to attach sheets of drywall to the ceiling alone, so make sure you have a partner in advance. Many people decide that if the sheet is cut into relatively small pieces, they can do it alone. But a large number of seams horizontally will not make the ceiling beautiful.
When an assistant has been found, give him something like a long mop to work with. An assistant will use this tool to hold the plasterboard while you screw it to the profile. There is also a trick to lifting the sheet the first time.
First, the installer climbs onto the scaffolding, after which an assistant will give him one end of the slab, while he himself begins to lift the other end. When a mop fits between the plaster and the pier, it needs to be inserted. Then the plasterboard board rises to the ceiling.
Choosing insulation for drywall
When choosing the type of insulation, there are many factors to consider, as some materials can only be used in certain conditions. Therefore, before starting construction, it is worth considering the characteristics of all products:
Polystyrene foam is a synthetic material that is made by molding a slab of plastic using high pressure air. Polystyrene foam has a low level of thermal conductivity and good thermal insulation. But the use of such slabs in residential premises is not recommended, since rodents often appear in them, gnawing holes inside the partition and making nests in them;
Option for insulating drywall with foam plastic
Example of insulation with polystyrene boards Basalt wool, a completely non-flammable material, does not undergo deformation when exposed to high temperatures. In many ways, the composition of this material is similar to the composition of mineral wool; their difference lies only in the density of the mat and the adhesive elements used during production. This type of thermal insulation is often used in rooms with increased safety requirements due to its fire-resistant properties;
This is what basalt wool looks like
Many people believe that wood does not need additional thermal insulation, but this is incorrect, since a house built from this material shrinks over time, after which cracks and cracks appear in the joints.
Insulating material inside the room solves the problem by forming an additional protective layer that is not subject to deformation.
The video shows an example of insulating plasterboard walls.
Option 2. Partition with door
Door frames are installed together with the partition frame assembly. The place under the door is mounted like this:
- Where the door is installed, vertical posts (PS profile) are placed to the right and left of it. A beam is laid from them to secure the door frame. The beam is rigidly attached to the profile.
- A lintel is made from the PN profile above the door frame and additional racks are placed 20 cm from the opening;
- The door is part of the frame structure, so it must be installed before the sheathing;
- Additional vertical posts must be installed above the door.
Option 3. Partition with a heavy door (25-100 kg)
In this option, mount UA profiles on both sides of the door frame. The rest remains unchanged. Details: Installing a heavy door into a drywall partition.
Installation of insulation under drywall
Regardless of which insulating material is chosen, the principle of its installation is the same. All work on the construction of such a structure is carried out in several stages:
- Base preparation and marking. At this stage, the load-bearing wall is treated with an antiseptic and fire-fighting compound. If the wall is wooden, then it is additionally sanded with sandpaper. Then the supporting structure is marked.
- Installation of guide profiles. In their role, you can use both metal elements and wooden blocks, but it is worth considering that the latter do not always have a smooth surface.
- According to the dimensions of the selected material, crossbars are mounted with support on guides, which serve as the basis of the entire structure. This profile is attached vertically and horizontally, forming cells of the same size as the heat-insulating mat. All of the listed elements must be level and have a common flat plane.
- Insulation is installed between the profile and the wall. For reliable fixation, you can use mounting adhesive that is applied to the wall. It is important to maintain solidity and avoid free areas between the slabs. If the insulation is performed in several layers, then each of them must be laid in such a way that the next layer overlaps the seam of the previous one.
- After completing the installation of thermal insulation, it is necessary to secure a vapor barrier film over the entire area, which will prevent moisture from entering.
Attached vapor barrier film
Thus, taking into account all the listed factors and the advantages of a particular material, you can decide the issue of choosing insulation.
Suspensions have the peculiarity of extending beyond the profile. That is, protruding “ears” are formed. They need to be bent. This should be done inward so as not to interfere with the installation of gypsum plasterboards. There are two main materials for the construction of the sheathing - wooden beams and metal profiles.
It is the second type of material that is most preferable. Often, instead of a metal profile, wooden blocks are used to create a frame, since they also have low thermal conductivity. Experienced builders, answering the question of how to insulate a wall with plasterboard, do not advise doing this, since the wood can become deformed over time.
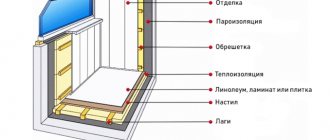
- The loggia or balcony is glazed. And not with ordinary wooden frames with single-layer glass, but with double-glazed windows that provide a reliable level of protection from cold and moisture.
- Not only the walls will be insulated, but also the floor and ceiling of the room.
- For insulation, high-quality moisture-resistant plasterboard is used.
Throw a plumb line from the ceiling to the floor, and mark the places where the vertical profile is attached to the ceiling. Using the first mark, transfer the dimensions to the ceiling surface. To check the correctness of the work, throw a plumb line from the ceiling onto the floor; if the marks match, then the markings do not require adjustment.
Install the second hanger and return the workpiece. Attach the vertical profile to the surface of the guide using metal screws. Fix the top part first and then the bottom.
Please note that the profile height is one centimeter less than the overall height, so care should be taken to have an allowance of 0.5 cm at the top and bottom.
Methods for attaching two sheets of drywall
Two layers of drywall are attached to the frame offset. That is, the joints of the sheets of the top and bottom layers of drywall should not be located on top of each other. The usual offset of sheets is 600 mm. Depending on where the sheets are joined (outside or inside), the drywall is attached differently. This is clearly visible in the photo. Fastening option A is a joint on the inside, fastening option B is a joint of sheets on top (outside) of the structure. Moreover, the vertical step between the fastenings is 300 mm, and the fastenings of the lower and upper sheets are shifted relative to each other.
Internal wall insulation with plasterboard sheets
Drywall can be used to insulate walls from the inside of the room; it can be either wall or moisture resistant. The latter type is used for rooms with high levels of humidity: kitchens or bathrooms. The moisture-resistant type of drywall contains special antiseptic additives (directly in the plaster) with silicone granules.
The cardboard for the shell is impregnated, that is, it has an impregnation that makes it resistant to high humidity. An additional coating in the form of waterproof paints makes it almost completely protected from the effects of water. The foam is attached to a special glue, which is prepared with the addition of water. Each individual piece must fit tightly with the adjacent one.
If gaps form between them, they are filled with polyurethane foam. After the adhesive mixture has dried. The foam is additionally fixed with plastic dowels and umbrellas. In this case, fastening is carried out end-to-end so that the caps fasten adjacent sheets, and 1-2 dowels are hammered in the middle. Wall types of plasterboard are suitable for living rooms where humidity does not exceed the threshold of 70%.
Drywall sheets are marked in blue on a gray surface. It is not always possible to insulate a high-rise building; special equipment is needed. However, insulating the walls from the inside with mineral wool plus plasterboard gives a good result, heat loss is reduced by 20-30%. It is only important to make a thermal insulation layer in the apartment according to the technology.
Marking (diagram) of the partition frame
In the frame diagram of a blind partition, the most important parameter is the pitch between the vertical posts. It depends on the height of the room and the size of the PS profiles used. For example, for single-layer (C111) and two-layer (C112) partitions, the following rules apply:
1. Partition thickness up to 75 mm. PS 50 profiles are used for vertical posts. Guide profiles are correspondingly PN 50.
- With a ceiling height of up to 3 meters, the pitch between the racks is 600 mm (along the axis of the rack);
- At a height of 4 meters, PS pitch is 50 - 400 mm;
- At a height of 5 meters, the PS pitch is 50 - 300 mm.
2. The thickness of the partition is 100 mm. PS 75 profiles are used for vertical posts. Guide profiles are corresponding to PN 75.
- With a ceiling height of up to 3 meters, the pitch between the racks is 600 mm (along the axis of the rack);
- At a height of 4 meters, PS pitch 75 – 400 mm;
- At a height of 5 meters, the PS pitch is 75 - 300 mm.
3. Partition thickness 125 mm. PS 100 profiles are used for vertical posts. Guide profiles are corresponding to PN 100.
- With a ceiling height of up to 3 meters, the pitch between the racks is 600 mm (along the axis of the rack);
- At a height of 4 meters, PS pitch is 100 - 400 mm;
- At a height of 5 meters, the PS pitch is 100 - 300 mm.
Important! According to technology, the height of metal rack profiles should be 10 mm less than the height of the room.
Cladding gypsum board walls on a metal frame: features and installation rules
- A hammer drill with a drill diameter that matches the diameter and length of the dowels; you can use a drill with an impact mechanism.
- Screwdriver with a Phillips bit.
- Building level at least 60 cm long.
- Roulette.
- Rule.
- Plumb.
- Pencil or marker, marking thread.
- Stepladder or scaffolding.
- Hammer, screwdriver, construction knife and a set of replacement blades.
- Metal scissors - necessary for cutting the profile to the required length.
- Thick strong long thread.
The frame structure significantly takes up the usable area of the room, so the more accurate calculations are made, the more optimally the space will be used. The first profile is mounted vertically in this corner. Next, horizontal profiles are screwed to the ceiling and floor along the entire perimeter of the room (also level). To ensure sound insulation, place soundproofing tape between the wall and the profile.
If there is none (and it is very difficult to find it on sale), then you can simply cut strips (4 cm wide) of any insulation without foil. We use a tape measure, pencil, marking thread and level to determine the location of the structure frame. First, we mark a place near the wall where it is possible to make a minimal retreat. The smallest distance that can be set aside is 3 cm (width of the UD guide profile). However, you should remember the need to place wiring and other communications behind profiles and sheets of drywall.
In addition to the obvious aesthetic advantages of using drywall as a finishing material, it is the frame installation method using a metal profile that makes it possible to carry out high-quality insulation of the room, hide communication lines, and soundproof rooms.
Materials
Profiles
Now let’s talk about what types of galvanized profiles can be found on sale.
To assemble battens and frames, only four types are usually used:
| Name | Designation | Dimensions, mm |
| Ceiling | CD | 60x27 |
| Ceiling guide | CW | 28x27 |
| Rack-mounted | UD | 50x50, 75x50, 100x50 |
| Guide | U.W. | 50x40, 75x40, 100x40 |
The length of the guide profiles is 3 meters, rack and ceiling profiles are 3 or 4 meters.
In addition, if desired, you can find in construction stores:
- Corner perforated profile for strengthening the corners of walls and partitions;
From left to right: corner, guide, rack, ceiling and ceiling guide profiles.
- Flexible profile for arches and vaults.
Accessories
Direct hangers are used to attach the ceiling profile to capital structures. The ears of the U-shaped suspension are equipped with perforations and are attached to the side walls of the CD.
Direct suspension. The price of the product is 4 rubles, the estimated load is 40 kilograms, packaging is 100 pieces per bag.
To connect the frame elements to each other, metal screws 9 mm long are used.
Phosphated self-tapping screw for joining sheet metal products.
When installing guide profile hangers to solid walls and ceilings, dowel-screws measuring 6x60 or 8x80 mm are used. The size of the fastener depends, first of all, on the material of the capital structures: longer dowel-screws are useful for thick layers of loose plaster.
Dowel screw for attaching guides and hangers to main walls.
Installation of metal profiles under drywall
Suspensions have the peculiarity of extending beyond the profile. That is, protruding “ears” are formed. They need to be bent. This should be done inward so as not to interfere with the installation of gypsum plasterboards.
On complex surfaces, many builders decide not to install hangers, but this is a gross mistake that will lead to the structure beginning to collapse over time. This happens due to the fact that the metal profiles are connected to each other rigidly and without an interlayer. After some time, cracks will certainly appear in such a ceiling or plasterboard wall. Keep in mind that the distance between the profiles should be the same, approximately 50 cm, for greater reliability.
The work of creating a frame from a metal profile for plasterboard is perceived by many as a very simple undertaking that does not require compliance with certain rules. Because of this, situations arise in which the created surface from gypsum board slabs ends up with numerous shortcomings, to eliminate which a lot of effort and financial costs have to be made.
- The door frame is being assembled. In which, first, the door leaf is hung. To set the necessary gaps (after all, the box is not secured), insert wedges from fiberboard or hardboard.
- Now they begin to place the racks that are adjacent to the doorway. They are placed vertically and reinforced with wooden beams. Apply polyurethane foam and tighten the box with self-tapping screws.
- Corner profile (PU). Maybe external and internal.
- Arched profile (PA). Used to create arches.
- Suspension (U-shaped). Used for fastening structures to walls and ceilings.
- Connector (“Crab”). Very convenient for fastening perpendicular parts together.
- Extension. Connects different profile sections together.
- Dowel and screws (for metal).
Methods of fastening drywall sheets in a structure at an angle of 90⁰
The design with an angle of 90⁰ is quite complex, but the general rules are the same. The pitch between screws is 300mm. The distance from the edge of the sheet to the screw is 10 mm. TN type self-tapping screws with a length of 35 mm or more are used.
In the picture you see a structure with an open corner, which is visible from both the outer and inner corners of the structure.
Choosing the best material for insulating walls from the inside
The thermal conductivity coefficient of plasterboard is 0.15, which is 10 times lower than that of concrete common to residential buildings. Thus, the gypsum board itself copes well with the task of saving heat. But most often, insulation is placed under the drywall, an additional layer of which improves the thermal insulation properties of the walls.
This is possible thanks to the use of a special frame that creates an air gap. Experts consider insulation of external walls more effective. But in multi-storey residential buildings it will be almost impossible to carry out work independently. But the use of plasterboard as insulation allows you to significantly save on hired labor and achieve high thermal insulation properties. At this stage, the most important issue will be the choice of insulation.
Currently used: Each apartment owner must answer the question of how to insulate walls with plasterboard. You need to build on your financial capabilities and your preferences. I would like to give only one piece of advice: if possible, purchase insulation in the form of slabs, not rolls. This will make the work easier and faster.
The slab insulation has a standard width of 60 cm, which corresponds to the mounting step of the frame profile. First, markings are applied along which guide profiles will be fixed for further insulation of the walls. They are fastened using dowels, which are located at a distance of 40 or 60 cm from each other. To avoid the appearance of cold bridges, a special tape is placed under the suspensions and PN. Direct hangers are used as brackets and attached to the stand with self-tapping screws.
GCR can also be attached to the wall using special glue, but this method is only possible if the wall surface has minor defects. But experts advise avoiding direct installation and using a metal frame to insulate the walls with plasterboard. Firstly, this allows you to better retain heat in the room, and secondly, the metal profiles will not dry out over the years and will retain their shape.
Fastening drywall with glue
And this option also occurs. But here the condition is assumed that the mounting surface is smooth. In short, the adhesive method is not always possible in principle.
Installation with glue can be done in three ways:
- Solid. You need, as already mentioned, ideal evenness of the wall. The surface of the sheet is covered with a notched trowel with adhesive putty, which is distributed in longitudinal strips along the perimeter.
- Mayachny. When the height is no more than 2 cm, it is more convenient to attach drywall to a concrete wall, applying glue to the sheets in heaps.
- Plasterboard strips. First, the base is leveled, cleaned of dust, and porous surfaces are primed. Before assembly, holes for sockets are cut in the sheets. Pre-prepared strips or squares of plasterboard are glued to the walls. They are adjustable in level by rule and plumb.
And another common question is how and how to attach gypsum boards to foam plastic. There is this advice: glue the foam with cement glue, and then glue the drywall with the same glue. You can glue the mesh onto foam plastic, and only drywall over the mesh.
Read about ceiling insulation with foam plastic in the material: https://homeli.ru/remont-i-otdelka/potolok/kak-uteplyat-potolok-penoplastom.
Assembling a metal frame for a suspended ceiling in stages
The first stage of work is project development. Even if you are planning a simple single-level ceiling frame made from a plasterboard profile, it is worth drawing the sheathing on paper, to the correct scale. This is the only way to calculate the exact number of required elements. Especially when the layout is more complex than the following example (3 * 4 m room, located perpendicular to the window wall):
- PN (27 * 28 * 3000 mm) – 5 pcs;
- PS (27 * 60 * 4000 mm) – 10 pcs;
- “Crabs” - 26 pcs;
- Straight hangers – 54 pcs;
- Dowel-nails 6 * 40 mm – 150 pcs;
- Self-tapping screws for metal, sharp 3.2 * 13 mm – 350 pcs.
Dowels and screws often fail during installation or turn out to be defective. Therefore, they are purchased with a reserve of 10–30%. Pendants are a universal element, so their supply (10%) will not be superfluous. Most likely, it will not be possible to buy the exact quantity of metal profiles due to the length being a multiple of 3 or 4 meters. Therefore, they are also brought in more than needed.
Drywall, as a rule, is placed so that the longitudinal joints “run along the light,” that is, perpendicular to the window. The transverse joints are shifted by 60 cm. This serves two purposes. Firstly, they “get into the grid” with a cell of 60 * 60 cm, and secondly, they eliminate the formation of long joints “across the light”.
The dimensions of the gypsum board are 1200 * 2500 mm, and the dimensions of the mesh cells are 600 * 600 mm. Therefore, the sheets are trimmed, leaving 1200 * 2400 mm, or the “squareness” of the outer cells is sacrificed, making their size 600 * 700 mm.
Drawing the wireframe
Before making a frame from a drywall profile, you need to draw a work plan. Drawing begins with the “tapping” of the level, in our case, the horizon. The most convenient way is to use a laser building level. When it is turned on, a horizontal line is visible on the walls, located at an arbitrary height from the floor. In the corners of the walls, along this line, mark with a pencil. They are then transferred to the desired height using a tape measure.
To connect the marks, use a “beating” paint cord, into the body of which colored chalk is poured. It is difficult to perform this procedure alone, but it is possible by screwing the end of the cord to the wall - at the level of the mark. Then, stretching the cord to the end of the wall and pulling it to the height of the second mark, a “click” is made. As a result, the chalk leaves a noticeable mark along which the guide profile will be screwed.
In addition to the laser level, hydraulic and bubble levels are used. They give approximately the same results, but have their own advantages and disadvantages.
Having drawn the “directions”, they place Fr. Solid products are usually installed along long longitudinal plasterboard seams. Therefore, they start from the window or the opposite wall, marking every 60 cm from the corner. Then they place marks on the remaining two walls, also starting from the corner. It should be remembered that the size of the outermost (for the sheet) cells is 60 * 70 cm.
Many installers draw a frame made from a metal profile under plasterboard on the base ceiling in order to immediately attach the hangers. However, this is not necessary, especially since sometimes during the installation process you have to move something and change the diagram. However, attaching guide profiles and hangers is the dirtiest and noisiest part of the job. Therefore, it is advisable to do it all at once.
Installation of hangers and guides
If a decision is made to secure hangers at an early stage of work, their location is marked on the base base. In our case - on the surface of the interfloor ceiling. Technologically correct placement - on each rack profile, every 40 - 60 cm. The displacement associated with the installation of “crabs” and jumpers should be taken into account. Holes are drilled about the profiles and the spaces between the hangers, nailing these elements with dowel nails.
They make frame lintels for drywall on the wall from the profile. Essentially, jumpers are pieces of a stand that form two (or one, if the cell is extreme) sides of a grid cell. As a rule, their length is 52 – 53 cm, and they are fixed using “crabs”. It is advisable to “hang” each jumper. Especially those that will become the basis for the gypsum board joint. The more suspensions, the more reliable the design will be.
It is advisable for two people to secure the guides, although an experienced installer can easily do it alone. Assembling a frame from a drywall profile can be a difficult task for one person with minimal repair experience.
The profile is held along the line and “drilled”, immediately driving in the dowel-nails. To make it smoother, fixation should begin from the edges. Then they “drill” the center, and then the rest of the nails, every 40-50 cm. A total of 6-8 holes are required per metal profile.
Having secured one “stick”, the next one is mounted end-to-end with the first one. The important point is their connection. In order to maintain a straight line, the metal profiles are connected with a piece of the same “guide”, 20-30 cm long, inserting it into the nailed “sticks”. These “extensions” can then be removed. It is not necessary to connect the guides to each other at the corners, but it is advisable. For this, metal screws are used.
Installation and adjustment of the rack profile
Having a reliable horizontal frame and screwed hangers, you can begin installing the racks, without which not a single installation of a frame made from a profile for plasterboard is complete. To level the plane, fix the cord by pulling it between the walls perpendicular to the window. Screw the cord to the underside of the “guide” with a metal screw, roughly dividing the room into 3-4 parts.
- The stand is slipped under the cord, and its ends are inserted into opposite “guides”, “centered” along the drawn marks. One - central - metal profile will be enough for a start.
- To prevent it from pulling the lace down, the middle is raised above the thread by 5-10 mm and temporarily fixed with a suspension. The remaining hangers are attached to the profile, placing it 1-2 mm above the cord. When all the fastenings have been made, the middle is unscrewed and fixed again - “catching” the level along the thread. As a result, the central rack metal profile is “perfectly” adjusted relative to the guides. For control, you can use the building level and the “rule” (a trapezoidal paint strip taken as a standard). A deviation from the level within 1 mm per 1 m of surface is considered acceptable.
- Installation of the remaining racks of the wall frame from the plasterboard profile is now simplified. After all, you don’t have to look at the lace, using a “rule” or a profile placed on the edge for control. One end of the “rule” is pressed from below to the “guide”, and the other - to the adjusted stand.
- The remaining racks are fixed with hangers, guided by the “rule”.
- Looking at the drawing, install the “crabs” without screwing them in first.
- Jumpers, cut in advance or along the way, are inserted into the “crabs”.
- The jumpers are “suspended”.
- Screw 8 metal screws into each “crab”. Sometimes they are passed “through one”, saving screws, but this should not be done.
- As a rule, a control check is carried out “for the sake of the soul”, because hardly anyone will redo anything. The “rule” or stand, turned edgewise, is applied to the sheathing at different angles.
The worst thing is when making a frame from a profile for plasterboard leads to the appearance of significant bumps. Theoretically, you can try to hit the frame in those places where the “rule” swings, but it’s better to partially touch it. If a hole is found, you should not pull the sheathing down - the reliability of the fastenings will be impaired. It will be easier to then level it with plaster (on drywall).
Marking for frame installation
A plumb line is attached under the ceiling in the corner part; where the plumb line touches the floor covering, you need to screw in a self-tapping screw. In this way, apply in all corners of the room. The painting cord is pulled over the screws. The formed lines are drawn on the floor and ceiling coverings.
For the design, a distance of 4 centimeters should be left. Leaving a large distance does not make sense, because it will reduce the area of space.
Next, the installation locations of the rack profile are marked. The racks are installed in increments of 60 centimeters. If it is known that heavy objects will be attached to the plasterboard surface, the step is reduced to 40 centimeters.
For the design, a distance of 4 centimeters should be left.