In this article you will learn how to work with finishing materials. If you are still in doubt about your choice, we advise you to read the article: Interior decoration of balconies and loggias photos of modern styles.
It contains photos of interiors decorated with different materials and tips on choosing.
In addition, we advise you to read: Types of glazing of loggias and balconies.
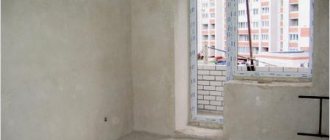
Preparation for repair
At the preparatory stage, a project for carrying out construction and repair work is drawn up and its budget is calculated. The sequence of work is determined, the need for heating the balcony and the choice of heat source, calculation of the required amount of materials for insulation and exterior finishing of the balcony.
The preparatory part of the repair work is carried out in several stages:
- cleaning the surface from dirt and dismantling old coatings - paint, cladding;
It is imperative to get rid of mold! - checking concrete floor and ceiling surfaces for voids, crumbling areas, and cleaning these areas. Additional reinforcement of the balcony slab may be needed;
- repair or construction of a parapet. If it is necessary to construct a parapet and additional partitions, remember that the balcony should not be overloaded. For these purposes, durable and lightweight building materials, such as foam blocks, should be used.
Irregularities, cavities and cracks must be repaired using cement-sand mortar; - Leveling the floor is the final stage of preparatory work.
Setting up a work office on the balcony
Equipping a workplace or even an entire office on a loggia or balcony is an excellent option for workaholics who are so hungry for a secluded and quiet corner in the house. To create a work area, a minimum of funds is required.
Even on the smallest balcony you can make a chic office. You don’t need a lot of furniture here - a comfortable armchair or chair, a desk and small shelves for office equipment and storing documentation.
A wall made of decorative brickwork will add a special atmosphere
A calm and quiet place is what you need for work
For finishing the walls of the study, a good option would be wood, plaster and decorative brick, which will provide the necessary sound insulation.
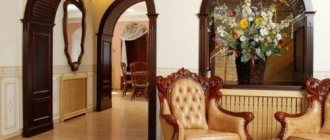
The design of such a room can be made in any style - today, special preference is given to the classics, its luxury and harmony are not subject to age.
The inhabitants of an aquarium, which can be mounted in a window opening, will give special peace and tranquility
Classic interior design always brings luxury and sophistication to everything
The businesslike and strict style of the office is conducive to fruitful work
Minimalism and modernity are not inferior in popularity and many projects are being implemented.
Using a decorative rug made from animal skin, you can add solidity to your office
A work area located along the window is the best solution
For the purpose of practicality, you can place several zones on the loggia at once, for example, equip a small but comfortable work area and always a comfortable chair, and in the opposite corner place a folding sofa for free time and relaxation.
A small table for work and a comfortable sofa for relaxing
Selecting quality glazing
Repairing a balcony or loggia begins with the selection and installation of glazing. Glazing can be “cold” or “warm”:
- cold glazing - These are aluminum or polyvinyl chloride structures filled with single glass. This design will protect the balcony from wind, dust and precipitation, but will not be able to retain heat, and will freeze in the cold season;
- warm glazing – these are structures made of PVC profile, warm aluminum (system with a thermal bridge) or wood, filled with double-glazed windows. Warm glazing will make the balcony comfortable to use at any time of the year. If the renovation of a balcony is carried out with the aim of combining it with a living space, then for glazing it is necessary to use structures with an installation width of at least 70 mm filled with energy-saving double-glazed windows 40 mm thick.
Such enclosing structures have a high coefficient of resistance to heat transfer and are used for glazing residential premises.
If the balcony is to be insulated and part of the balcony frame falls under the lining, then special additional profiles are used that increase the opaque part of the structure. You need to choose the type of glazing based on the functional purpose of the balcony after repair work.
Drywall
If you have a question about how to cover a dry, warm loggia, then you won’t find a better material than this. It is used for interior work in various rooms and is a good material for leveling surfaces and masking utility lines. But it is important to remember that drywall is quite fragile, cannot bear much weight (which narrows the range of materials for subsequent finishing) and requires careful waterproofing.
Installation instructions:
- First of all, a metal sheathing is installed on the balcony. It is a structure of vertically oriented metal profiles that are attached to the wall at intervals of 10 cm less than the width of the plasterboard sheet.
- Then the insulation is laid, and the resulting cracks and gaps are filled with sealant.
- After this, the actual installation of drywall begins. The first element is attached in the corner with special screws along the entire perimeter in increments of 15-20 cm, after which they proceed to the next one and so on.
On a note! The heads of the screws should sink into the surface of the drywall, but it is important not to overdo it so as not to damage the material.
- At the end, the finished surface is treated with putty.
Drywall allows you to level the walls and prepare the loggia for subsequent decorative finishing
Laying lags
The floor on the balcony is characterized by the presence of a large number of irregularities, potholes and cracks. In addition, it has a slope towards the street to remove precipitation. If there are large uneven surfaces, leveling the floor with a cement screed means significantly increasing the weight of the balcony. In addition, you will have to wait until the screed is completely dry to continue the repair. As an alternative, you can consider using joists made of light and natural wood for leveling.
To do this, you will need planed wooden blocks with a cross section of 50x50 mm, anchor dowels, and spacer plastic wedges.
Read about how to properly lay joists here.
Since wood is susceptible to rotting in a humid environment, it must first be treated with an antiseptic or impregnation and dried thoroughly.
In order to minimize the ingress of moisture onto the wood, the floor surface is waterproofed before installation. For these purposes, a waterproofing film is used.
There are other proven methods. Bitumen-based mastic or roofing felt are excellent moisture insulators. Mastic is sold ready-made or diluted with a solvent.
Lathing walls and ceilings under panels
The lathing serves as a frame onto which the interior finishing elements are attached. For its manufacture, dry high-quality timber is used. The thickness of the timber for the sheathing depends on the parameters of the insulation.
Planed pine bars 20 by 40
The timber and all other wooden materials used for finishing are coated with an antiseptic. Work on the installation of the sheathing begins with markings. The timber is cut into identical elements and fixed to the walls with dowels in accordance with the markings.
Stage 2. Laying floors
We insulate the floor
After the waterproofing material is securely glued or the applied composition is polymerized, the actual finishing of the balcony begins inside. Here it is best to move from the bottom up, starting with the floor insulation.
Polystyrene concrete (pictured) is excellent for pouring insulated screeds with low load-bearing capacity
If the load-bearing capacity of the floor allows, then you can pour a screed up to 10 cm thick. In order for the poured material to not only level the floor, but also provide it with the necessary thermal insulation, I usually prepare a polystyrene concrete solution:
- I install beacon slats on the base, forming a slight slope towards the outer wall (albeit small, but still protection from rainwater flowing into the apartment).
- I mix the cement mortar with granulated polystyrene, achieving maximum homogeneity of the composition.
- I pour the floor along the beacons, after which I carefully level the surface using the rule.
- I remove the beacons, sand the floor surface and dry it for at least two weeks. Protecting from external influences with polyethylene film. I periodically open the film to inspect the surface, and when the top layer dries, I moisten the concrete for complete hydration.
However, such strong foundations are rare, because much more often the interior decoration of a loggia is accompanied by insulation of the floor along the joists:
Logs on the balcony
- From timber with a cross-section of 40x40 mm, I cut out three or four logs, the length of which should be approximately 50 mm less than the length of the balcony itself. I treat the parts with moisture-proof impregnation.
- I lay out the logs on the floor so that the step between them is equal to the width or half the width of the panel of heat-insulating material.
- I fix the outermost joists to the wall with steel brackets, securing them at the required height (just below the threshold). I set the middle logs at the level of the outer ones, resting them on the cranial bars and leveling them on a plane.
Laying mineral wool between joists
- I lay panels of thermal insulation material in the space between the joists. Inexpensive finishing is carried out using foam plastic with a thickness of 75 to 150 mm, but I prefer to overpay a little and take mineral wool with an equivalent heat saving index .
- I lay a layer of vapor barrier membrane on top of the insulation (you can use durable thick polyethylene instead).
Subflooring and flooring
Next you need to lay the floor itself. This operation can be performed either immediately or after finishing the walls - it all depends on what technologies you will use. I usually postpone installing the flooring until the last minute only if the walls are going to be covered with plasterboard - in this case there is a risk of glue or putty getting on the decorative materials.
The easiest way to make a subfloor is from plywood:
- For installation on a screed I take plywood with a thickness of 10 mm, for installation on joists - 15 mm or more. It is better to use moisture-resistant varieties, since they not only demonstrate greater stability when exposed to water, but are also more durable for a comparable thickness.
Plywood flooring cut into squares
- I cut plywood sheets into squares, the width of which is approximately 30-40 mm less than the width of the balcony.
- I lay plywood sheets on the base and fix them to the joists using self-tapping screws. When installing on a screed, I use dowels with a plastic sleeve and a wide neck for fastening, and perform additional fixation using adhesive mastic.
- When attaching the subfloor, I make sure that the plywood slabs are not located close to each other. The optimal gap is 8-10 mm: this distance is enough to compensate for temperature deformations, so that the base does not swell when the weather changes.
Installation of rough flooring from boards
When choosing what material to finish the floor with, I usually consider the following options:
- Linoleum is a budget solution that is extremely easy to implement. Yes, the coating is not abrasion-resistant, but let's be honest: do we plan to constantly walk on the balcony?
- Tile is an excellent choice not only for a glazed loggia, but also for an open balcony. It is quite expensive, and it is more difficult to install, but the coating is very resistant and durable.
Ceramic tiles are perfect for open balconies
Before tiling the floor with tiles or clinker tiles, it is worth treating the plywood subfloor with a moisture-proofing compound. Otherwise, the plywood will “pull” moisture from the glue, and the bonding strength of the material will decrease.
- Laminate is a good option for a glazed balcony with high-quality waterproofing of the base. Here the potential risks lie in the swelling of the backing layer: while the front surface of laminated floor panels can withstand moisture well, the moisture resistance of the backing is not regulated, so the likelihood of swelling will be very high.
We install moisture-resistant laminate only in glazed structures
- Cork is basically the same laminate, only using natural cork veneer as a decorative layer. Moisture resistance is slightly lower than that of traditional laminate, but with high-quality waterproofing it can be used.
- Polymer self-leveling flooring is an “eternal” coating that is not afraid of either moisture or mechanical loads. The difficulty lies in preparing the base; in addition, a polymer floor is clearly not suitable if you are looking for a cheaper way to finish a balcony.
The self-leveling coating is not afraid of moisture or loads
In principle, you can use other types of floor coverings, but the main requirement - moisture resistance - should not be overlooked in any case.
Lighting and socket connections
If it is planned to supply electricity to the balcony, then simultaneously with the installation of the sheathing, an electrical cable and other communications are laid, and places for installing sockets and switches are selected. It is necessary to determine in advance the number of lighting fixtures. The electricity supply system will depend on the amount of power consumed. Possible voltage source options:
- electrical panel;
- junction box;
- the outlet closest to the loggia.
The simplest option: output the power cable from the nearest outlet.
To prevent undesirable consequences, electrical wires must be insulated in special metal hoses.
Insulation of walls, ceilings and floors
After installing the sheathing, you can proceed directly to insulating the walls and ceiling. The wall adjacent to the apartment and the ceiling do not require insulation if the neighbors above have insulated floors. The following materials are used to insulate balconies:
- mineral wool has high heat-insulating properties, but is hygroscopic and requires the use of waterproofing;
- Styrofoam has good heat-insulating properties, light weight. This is the cheapest insulation option;
- penoplex – moisture-resistant and durable material, is the optimal solution for insulating balconies and loggias.
Penoplex is usually chosen for walls and floors, and it is convenient to insulate the ceiling with light polystyrene foam. The insulation material is attached to the sheathing cells using glue or polyurethane foam. If mineral wool is chosen as insulation, it is used together with a vapor barrier film, since accumulated moisture worsens the thermal insulation properties of the material.
Penofol - reflective vapor and thermal insulation
Recently, new foil materials have been gaining popularity, which combine the functions of insulation and moisture insulation.
Where to start finishing the loggia
First of all, you need to take care of protecting the loggia from wind, rain, moisture and low temperatures, namely, glazing and waterproofing.
Glazing
To do this you need to do the following:
- Take measurements of the openings in which the windows will be installed.
- With this data, you need to visit a workshop or company producing metal-plastic windows.
On a note! Wooden frames are more environmentally friendly than plastic, but when it comes to performance characteristics, artificial material wins.
- After receiving the ordered products, they must be installed in the openings one by one, using anchors or mounting plates. These fasteners will subsequently be hidden under the trim.
Installation of metal-plastic windowsYou should know! When installing frames, it is important to check the verticality and horizontality of the structures. Even small deviations can lead to the fact that after a few months the doors will not open due to misalignment.
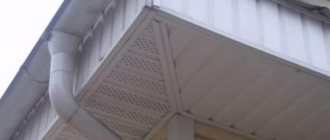
- Then it is necessary to install a window sill no more than 15 cm wide - inside the loggia, and a galvanized steel ebb is installed outside.
- All gaps should be filled with polyurethane foam, then the excess fragments should be cut off and painted to protect from sunlight.
The first stage of finishing the loggia is glazing
Waterproofing
Finishing a loggia with your own hands also means arranging moisture protection for the base:
- To do this, the first step is to remove the old floor covering.
- Clean the concrete slab.
- Fill all cracks and crevices where the floor meets the wall with a sealing compound.
- Next, you need to install a waterproofing material, this can be a coating or roll material.
At this point, the preparatory work for finishing the loggia is ready.
Waterproofing is the second stage of preparing the loggia for finishing work
Warm floor
If you plan to heat the balcony, then “warm floor” is one of the options for the heat source. “Warm floors” are divided into:
- aquatic. The use of a water floor allows you to save energy and useful area of the balcony. The disadvantages include difficulty in installation and difficulty in adjusting the heating temperature;
- electric. They allow you to easily regulate the temperature, have uniform heating over the entire area and an affordable price. The disadvantages of such a system are high charges for electricity consumption and the presence of an electromagnetic field in the heating zone.
Electric underfloor heating cable system
Installation of an electric “warm floor” with cable heating is carried out in the following sequence:
- a layer of thermal insulation is laid on the screed - mineral wool, penofol or expanded polystyrene;
- installation of a metal reinforcing mesh to which the cable will be attached;
- attaching the heating cable to the grid;
- installation of a temperature controller;
- concreting the area with a cement composition;
- laying tiles or linoleum.
Instead of cable heating, an infrared “warm floor” system can be used, which does not require pouring a screed. The system uses film heaters.
An infrared heated floor can be covered with linoleum or laminate. Warm floors have gained particular popularity for heating balconies due to their easy installation in limited space.
Plastic sheathing
Plastic panels are a budget option for finishing a balcony. They do not need careful care. There is a wide range of such finishing materials on the market, which allows each owner to choose the most suitable option for himself. The use of plastic panels makes it easy to level the walls without carrying out complex work.
To decorate the inside of the balcony, panels 10 cm wide are used. However, their thickness must be at least 1 cm.
When using plastic panels, you need to be aware that they can become deformed at high or low temperatures. Therefore, the fastening must be non-rigid, which will prevent the destruction of the material.
The work includes the following steps:
1. First of all, the sheathing is made from wooden blocks.
We build the sheathing
2. Before starting the sheathing, it is necessary to insulate the walls. Mineral wool, polystyrene foam, isolon or ordinary polystyrene are used as thermal insulation materials.
We insulate the walls
3. Plastic panels are mounted on top of the sheathing. Nails, glue or dowels are used as fastening elements. The panels are connected to each other by grooves. Every half meter you need to strengthen the sheathing with nails. This will give it strength and reliability.
Related article: Interesting ideas for a balcony: do it yourself (+40 photos)
Installation of plastic panels
The most convenient option is to mount PVC panels using a mounting profile. Slats are attached along the perimeter of the balcony. In this case, the panels will fit into the grooves and snap onto the rail itself. The use of such a profile will significantly reduce the time of cladding. Under such a coating, electrical cables can be laid unhindered.
In the video: the technology of covering a balcony with plastic panels.
Selecting materials for finishing walls, floors and ceilings
Various materials are used for wall decoration: PVC or MDF panels, plasterboard, OSB with further painting or wallpapering, and wooden lining. Decorating the walls with wooden clapboard is the best option, which has practically no disadvantages.
The natural material has a beautiful appearance, is durable and environmentally friendly, and is easy to install. Installation of the lining begins from any corner of the balcony, and the first board is attached strictly according to the level.
Installation is simple - each subsequent panel is inserted into the groove of the previous one. The lining is secured to the sheathing with nails, self-tapping screws or clamps.
Floor finishing options are also quite varied: ceramic tiles, floorboards, linoleum or laminate. It all depends on personal preference and the financial component.
To finish the ceiling, wooden lining, PVC panels, tension or suspension systems and classic whitewash are used.
Finishing the ceiling with PVC panels is budget-friendly, practical, durable and easy to install. Ceiling panels can be simply white, colored, or imitate natural materials: wood, stone, marble. The panels also vary in width from 10 cm to 500 cm. Knowing the area of the balcony, choosing the right amount of material will not be difficult.
When starting to install the ceiling covering, you need to make sure that it will not interfere with the tearing off of the window sash. Each part is inserted with its protrusion into a groove on the previous panel and fits tightly with it. The sheathing elements are fastened to the sheathing frame using screws, nails or staples.
Installation of PVC panels with self-tapping screws
Adjacent parts need to be joined quite tightly to avoid the appearance of cracks.
What materials are best to use for finishing a balcony with your own hands?
Lining
This is the best option for do-it-yourself interior decoration of a balcony. The lining is made of natural wood.
Pros:
- Beautiful appearance
- Environmental friendliness
- Simple and quick installation
- Sufficiently high level of thermal insulation
- Boards can be painted any color
Minuses:
- High price
- Labor-intensive installation
- Low resistance to moisture and temperature changes
- Prone to fire
PVC panels
Even a person who does not have relevant experience can work with PVC panels. There is no need to level the walls and ceiling during installation.
Pros:
- Quick and easy installation
- Large selection of colors and textures
- High moisture resistance
- Easy to care for
Minuses:
- Fragility
- Tendency to burn out in the sun
- Short service life
MDF panels
MDF panels consist of fine wood chips bonded with synthetic resins. They have a high environmental class - E1.
Pros:
- Easy installation
- Affordable price
- Aesthetic appearance
- Good thermal and sound insulation characteristics
Minuses:
- Burn out in the sun
- Low resistance to moisture and frost
- Higher cost compared to lining and plastic panels
Moisture-resistant drywall
Most often used as a base for finishing with other materials. You can also paint drywall or wallpaper it.
Pros:
- Low cost
- Easy to install
- Increased heat and sound insulation characteristics
- Possibility of mounting elements of complex shapes and configurations
Minuses:
- Fragility
- Using a frame for installation inevitably reduces the volume of the room
Tile
Tiles are considered the most suitable material for finishing open balconies. Subject to certain conditions, it can also be laid on closed balconies.
Pros:
- Durability, wear resistance
- Large selection of colors, shapes and textures
- Easy to care for
Minuses:
- Fragility
- Violation of laying technology worsens the quality of the coating and its appearance.
Decorative plaster
It is made on the basis of a synthetic or mineral binder with the addition of various fillers and additives.
Pros:
- Excellent decorative properties
- Durability
- Preservation of heat in the room
- Porous structure allowing walls to breathe
- Resistance to various mechanical damages
- No harmful substances in the composition
Minuses:
- To work with the material, you need to study the technique of application and decoration.
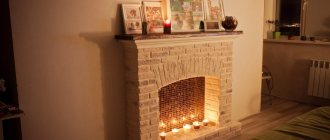
Decorative rock
This option for decorating a balcony with your own hands is suitable for people who want to emphasize their individuality and impeccable taste, as well as create an unusually cozy indoor microclimate.
Pros:
- Variety of textures and colors
- Resistance to high temperatures, rotting, insects
- Possibility of restoration
- Installation does not require special tools or professional skills
Minuses:
- High cost compared to other types of finishing materials
To decorate open balconies, you can use the following materials: plaster, decorative tiles, lining, moisture-resistant paint. To decorate the walls of closed balconies, it is recommended to use wooden and PVC lining, artificial stone, vinyl siding, MDF panels, and liquid wallpaper.
How to decorate the inside of a balcony inexpensively with your own hands? The cheapest option is to decorate the balcony with plastic panels. They are quite durable, and the honeycomb voids that exist in the material will serve as an additional layer of thermal insulation. And if you need to get a unique and inimitable design, you should give preference to decorative stone or natural wood.
The most durable materials are decorative stone and ceramic tiles. But PVC panels will last only a few years.
When choosing materials for finishing a balcony, the following factors should be taken into account:
- selected interior design;
- features of care for finishing materials;
- Is it possible to carry out minor repairs yourself?
- price;
- terms of Use.
Tip: If natural wood is chosen for finishing, before use it must be treated with a high-quality antiseptic to increase its resistance to moisture.
Features of balcony design in various styles:
- decorative plaster is suitable for a room decorated in a loft, hi-tech or minimalist style;
- finishing with tiles will be the best solution for a loggia decorated in a classic, minimalist, loft, hi-tech, country style;
- decorating a balcony with clapboards with your own hands will be appropriate in any style: from country to Scandinavian style;
- decorative stone is appropriate in the following interior styles: minimalism, gothic, baroque, empire, castle, hi-tech, minimalism, modern, ethnic, country;
- MDF panels are suitable for rooms decorated in a modern or classic style;
- PVC panels are characterized by a wide variety of colors and textures, so they can be used to decorate a room in any style.
Slope finishing
To finish slopes, plastering, plasterboard sheets and plastic panels are used:
- plaster - traditional finishing method. But with the advent of new finishing materials, the method is losing its popularity. The plastering process is very labor-intensive, requires additional painting of the slopes, and does not provide the necessary heat and sound insulation. The advantages include the low cost of finishing and the possibility of repainting to give a fresh look;
- drywall - a popular type of finishing due to ease of installation, low cost of material and the ability to complete finishing in a short time. Disadvantages include insufficient moisture resistance and the need for additional finishing - putty and painting;
- PVC panels – an ideal type of finishing if the window and balcony door are also made of polyvinyl chloride. The homogeneous surface of translucent structures and slopes looks aesthetically pleasing.
In addition, installation of PVC panels is quick and easy. This type of finishing does not require additional processing and allows you to choose different colors. PVC panels are durable, UV resistant and easy to clean. If you decorate the entire balcony with PVC panels, then the surfaces of the slopes and walls will look like a single whole.
MDF
This material is medium density fiberboard. The simplest option is a regular board, but there are products with a polymer coating. This material is produced in a wide range of colors. It is easy to install, since no surface preparation is required, and the installation technology is very simple. You can also use it to disguise utility lines or insulation.
Install such panels according to the following instructions:
- Before finishing the loggia, you need to calculate the amount of building material and add 10% of the reserve.
- The same lathing is placed on the surface as in the case of clapboard.
- Glue is applied to the back surface of the MDF panel, after which the product is pressed into the corner of the sheathing.
- Moving from the corner, they build up the entire wall.
- The material at the opposite corner may need to be trimmed.
On a note! During installation, it is necessary to additionally fasten the structural elements with a tongue-and-groove system.
MDF panels are often used for decorative finishing of loggias