Materials for production
To make an arch, it is not necessary to use wood. Manufacturers offer more advanced substitutes. One such material is fiberboard or MDF.
Fiberboard is better protected from external factors and wear, while visually it may not have any differences with wood.
The manufacturing process is also no different. The main requirement for interior arches is to properly prepare the opening. When taking measurements and cutting, make sure that all parts fall into place when assembling the structure.
…
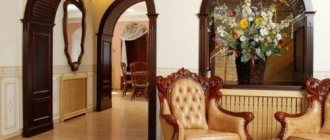
Why are arches needed in a house?
Vaulted openings delimit the space and at the same time connect it into one whole. An arch inside a house helps achieve the following goals:
- combines the bedroom and living room;
- makes the dining room and kitchen a common area;
- conditionally separates the corridor from the kitchen;
- separates the children's room and bedroom - to do this, place a ceiling cornice behind the arched structure and attach a curtain to it.
Arched openings, unlike doors, free up the adjacent wall surface for placing shelves, paintings, and lamps.
Project selection
Main types of arches:
- rectangle;
- classic rounded portal;
- ellipse;
- circle;
- trapezoid;
- broken configuration;
- asymmetrical project.
…
The simplest rectangular model can be assembled from the parts of the door frame and its frame, that is, using platbands and a set of extensions. For structures with bent elements, patience and correct calculations will be required. If you are not sure that you can make parts for complex arch models, it is better to stick with the classic version.
Planning
The manufacture of an arched structure should begin with the preparation of a project. First, you should decide what kind of arch the owners would like to see in their home. The most common types:
- classic arch with a rounding at the top;
- opening in the form of an ellipse or circle;
- rectangular opening;
- an opening of a complex, possibly asymmetrical shape.
Advice! The simplest option is a rectangular arch; it can be assembled from the frame parts of a regular interior door. The most difficult solution to implement is the construction of openings of a complex configuration, so only craftsmen with some experience should undertake this work with their own hands.
Measurements and calculations
Accurate calculations in construction are half the success. If the measurements are taken correctly, then during the installation process there will be no need to adjust the parts.
Advice! It is advisable not just to take measurements from the opening, but to make a drawing to scale on a sheet of paper. This will allow you to more accurately calculate the required amount of materials.
If you plan to make a classic arch, you will need the following materials:
- two pairs of platbands for installation on both sides of the opening;
- a pair of sidewalls;
- top bar;
- elements to give the corners a semicircular outline.
If you make the elements yourself, then you need to prepare templates in advance with which you can make semicircular parts of the structure. When marking, you should take into account the thickness of the material from which the parts are cut.
Sawing
After the calculations and markings are completed, you can begin cutting the material. For this purpose, an electric jigsaw is needed, since it is quite difficult to make cuts without jagged edges with a manual hacksaw. But in any case, after cutting the parts, you will need to grind their end parts so that the arched openings look perfect.
Markings and drawings
To apply the markings, use a level and some round object as a template. To begin, determine the height and width of the opening, mark these data on paper, and draw the corresponding lines on the wall.
For a standard arch you will need:
- sets of platbands on both sides;
- two sidewalls;
- roundings for corners;
- top cross bar.
Making straight parts should not cause any problems, but curves can be made using a template. Use it to draw the contours along which you will need to cut the opening for further installation of the arch.
When marking, take into account the thickness of the parts and additional finishing, since this area will be taken up by the design.
…
Cutting elements
When making an arch from wood, cutting is best done using a jigsaw. This tool does not leave nicks on the edges of parts and quickly copes with any shapes and types of materials. For convenience, full-size patterns are placed on the solid canvas.
After cutting the parts, you need to carefully sand their surface on all sides. This is done with a sander or fine sandpaper.
…
Installation
Before installing the interior arch, prepare a passage so that the entire structure fits into it, and putty the walls. Installation starts from the top, regardless of whether the arch is made of wood or MDF.
If the arch consists of several parts, then they are assembled and glued together. Fix to the wall using liquid nails or polyurethane foam. If there are wooden beams, then nail them to them.
After fixing the arch, vertical elements are installed. Adjust if necessary in height and width. If a platband is required, it can be cut out of a board. Sometimes the platband is made of two parts, connecting them, and decorating the joint with an overlay.
You can make an arch from plasterboard, installing it on a frame made of aluminum profiles, and decorate it with a wooden frame. This is the simplest option, but solid wood looks richer and more beautiful.
Assembly
Once the parts are prepared, you can begin assembling the structure. First you need to install the straight elements of the arch; they are fixed strictly according to the marks and taking into account the level.
Ideally, the surface of the opening is puttied in advance so that the arch can later be assembled with minimal effort.
If distortions remain, it is recommended to fasten the wood or fiberboard not with glue, but with a frame, under which, if necessary, insulation is laid. It can be made from wooden blocks, but since the use of shaped elements is most often assumed, it is better to use metal profiles.
After fixing the sidewalls and the upper straight bar, it’s time for the roundings; they are driven into the free space and fixed. The junction of the arch with the wall is hidden with platbands on both sides or finished with plaster.
If the arch is assembled from additional panels and platbands, it will be even easier to make. The use of telescopic models is assumed here.
…
How to make a wooden arch for the garden with your own hands
The fashion for decorating a personal plot with wooden arches came to us relatively recently, however, in a short period of time it won the hearts of the owners of country houses and summer cottages. As a rule, arches in our houses were used only as a support for climbing plants, mainly grapes. They were made of metal, and they had no architectural value. Over time, wooden arches began to be used as an element of landscape design, decorating paths with them on the site. Such structures usually grow rose flowers, decorative beans and other interesting plants. Naturally, when making an arch for a garden, the same precision is not required as for the interior of an apartment or house, so it is much easier to make it.
Next, we will look at several options for wooden arches that you can make with your own hands:
- A simple arch made from scrap materials. To make such a structure, we will use waste from cutting down trees. For the racks of such an arch, we will take four thick branches. We saw them off to the same length. Next, we dig small holes in the ground, insert posts into them, level them and fill them with concrete. The part of the stand that will be in the ground is lubricated with mastic or wrapped with roofing felt. After the concrete has hardened, we tie the arch posts with crossbars. To do this, we cut out 6 small pieces of branches and nail them across the posts. The next step is to connect the opposite posts with crossbars. Next we install the roof of the arch. To do this, we place the rafter beams and connect them in the middle at an angle. We do the same with the other pair of racks. We connect the rafter beams to each other. Then we strengthen all structural elements with braces. Such a simple and cheap arch will fit perfectly into the design of your site.
- Construction made of timber and boards. It's also not a particularly difficult option. We make 4 racks from 150x150 mm timber, the upper ends of which are filed at an angle of 45⁰. The supports are installed in the ground (don’t forget to treat them with mastic before installation), leveled and filled with concrete. Then the rafters for the roof of the arch are made. To do this, take the same beam, the end of which, at the junction with the opposite one, is sawed at an angle of 45⁰. The next pair of racks is connected by a vault in the same way. As a result, we have two pairs of supports connected to each other by arches. Now we connect them together with braces. We use planks 50 mm wide and 20 mm thick as braces. They will not be installed at a right angle, but at an angle of 45⁰. To do this, we file the ends so that they coincide with the end of the rack. We install braces on both sides of the racks, and in different directions. This is how the entire structure is sheathed. The end result is quite an interesting arc. The final touch will be painting the structure white.
- Construction made of boards and metal. In such an arch, a square pipe will be used as racks. We treat the pipe sections with anticorrosive, install them in the ground, level them and fill them with concrete. Then we weld parts of the arch to the racks. To make them, we take a smaller square pipe and bend it on rollers. If this is not possible, you can contact any locksmith shop. We paint the resulting structure black. We connect the racks and vaults with wooden braces at right angles. Before installation, the braces are varnished. Through holes are drilled in the racks and vaults, and wooden planks are installed with bolts.
Quite often, shelves are installed on the posts of wooden arches, on which flowers can be placed in carriages in the spring. True, then the structure must be strengthened to accommodate the additional weight of the flowerpots.
Treatment
The final design of doorways and arches involves masking the joints and fastenings. The wood must be treated with an antiseptic before installation. The fiberboard will most likely already be impregnated with protective substances.
The best option is to open it with stain and varnish.
If you are afraid that the coating may be damaged during installation, carry out the work after installing the arch. According to the rules, you need to prepare the details in advance. The stain is applied at the very beginning, then the varnish is used in two or three layers, alternating the direction of the brush.
An alternative option for wood and MDF is painting. You can cover the parts with veneer, laminate or PVC. This should be done immediately after cutting onto a cleaned and degreased surface.
Caring for a wooden arch
If the arch is installed indoors, then maintaining it does not require effort. As a rule, the layer of varnish that is applied to the wood will allow it to have an attractive appearance for quite a long time. Another thing is an arch in the garden. To protect it from the influence of precipitation or pests, it is necessary to use special antiseptic compounds, as well as paints for exterior use. Wood should be painted at least once every two years, preferably annually. Before painting, it is necessary to clean off the old coating layer. This can be done with a spatula or medium-grit sandpaper. After stripping, the wood can be covered with a layer of drying oil.