If stored correctly, the shelf life of the dry gypsum mixture is 6 months. As for cement, practice shows that if stored correctly, it does not lose its properties for a very long time. But if it has absorbed moisture from the air and become hard in the bag, then you can safely throw it away.
How long does it take for plaster to dry?
Gypsum begins to set in 45-60 minutes if you mix it correctly in clean water. Complete drying occurs after 2 weeks. The cement mixture on a brick wall with a 2 cm layer begins to set after 4 hours. Lime plaster can set differently depending on the amount of cement in the mix. It may set in 30 minutes, or maybe in a couple of hours. How long does it take for plaster to dry before applying putty? You can continue work after complete drying and visual evaporation of moisture from the leveled surface. But complete drying and hardening of cement and lime mortar occurs after 1 month.
The drying of plaster mortars directly depends on the humidity and temperature in the room; as a result, the drying time may vary.
Storing material on the balcony
It is not recommended to store dry mixture on the balcony for two reasons:
- At night, the temperature drops, and in winter, storage conditions in general are greatly violated.
- high humidity or excessive dry air.
The material should be stored in bags strictly according to the instructions indicated on the packaging. By the way, I also don’t recommend storing it in the basement for a long time. In general, I do not recommend storing leftover material and storing it. There is a very high probability that the remains will have to be thrown away over time.
DIY plaster mixture
With a limited budget for construction or renovation, you have to think about saving. Choosing plaster here is easy: you can save on finishing costs if you make cement-based compositions yourself. It's really cheaper, although it requires additional time and effort. But remember that additives are added to the finished compositions to improve the properties of the plaster. For example, antifungal additives are added to formulations for wet rooms to prevent the development of mold. In compositions for plastering external walls, an additive is added to the antibacterial ones to increase frost resistance. There are also plasticizing additives that make application easier. In principle, you can also add these additives to homemade plaster. You can find them at construction markets or in specialized stores; the standards are written on the packaging. And even taking into account the cost of additives, the savings when making it yourself will be significant - about 30%.
Proportions of plaster compositions for different application techniques
It’s not difficult to make cement-sand or lime-cement plaster with your own hands. Mix the components in certain proportions in dry form, then add liquid components (if any and water), bring to a certain consistency. You can mix it manually with a shovel in a large basin or trough. You can mechanize the process if you have a drill - using a special attachment. The easiest way is using a concrete mixer. With it, things go faster, but large volumes are difficult to produce, especially if you have little experience.
Cement-sand mixture: proportions
The cement-sand mixture is made up of 1 part M400 or M500 cement and 3-5 parts sand. The cement must be fresh, the sand must be dry, sifted through a fine sieve with a grain size of no more than 1.5 mm. Take 0.7-0.8 parts of water. As you can see, the proportions are approximate. Sand can be of different humidity levels, mortar can be used for plastering walls in different rooms, cement can be of different brands. When choosing the amount of water, the main guideline is ease of use. It is necessary to select the composition so that it is not so thick that it falls off the wall, but not so liquid that it slides. This is determined experimentally.
Working with DSP is not easy
There is also a difference in composition depending on the area of application. To plaster exterior walls, take 3-4 parts sand to 1 part cement. To level the walls indoors, more sand is added - 5 parts or even more.
Although DSP is much cheaper than ready-made mixtures, it is more difficult to work with - it does not stick to the wall very well, it takes a long time to dry, and when dry it almost always becomes covered with cracks. But it is not afraid of moisture and for this reason it is recommended for plastering walls in damp rooms, which will subsequently be finished with tiles or wall panels (PVC, MDF or any others). For other types of finishing - painting, decorative plaster and wallpaper - it is better to use cement-lime mortar or gypsum.
DIY cement-lime plaster mortar
Cement-lime plaster is made with the addition of lime paste. Parts of lime are measured out in the form of a dough, then diluted with water to a liquid state and in this form added to thoroughly mixed dry cement and sand.
The proportions of cement-lime plaster are as follows: for 1 part of cement take from 1 to 2 parts of lime paste, 6-9 parts of sand. Water is added to bring the solution to the desired consistency. The sand is the same as for DSP - with a grain size of no more than 1.5 mm, the water is clean, without contamination. Lime dough is better than store-bought. When extinguishing at home, there are still particles that have not reacted. Later, when the wall gets wet, they react and increase in volume, which causes pieces of plaster to fall out. Therefore, it is better not to save on this.
Cement-lime mortar is more plastic, but less durable
The exact selection of proportions is determined experimentally: the mass should stick well to the wall. Walls in any premises can be plastered with a cement-lime composition. The composition is softer, more convenient to work with, and does not crack when dry. But the strength of such plaster is much lower than DSP and this must also be kept in mind.
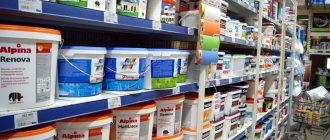
Good gypsum plasters
The most popular gypsum plaster is Rotband from Knauf. This is a really high quality product that is easy to use even for beginners. The same company has other products - Goldband and HP Start. They are cheaper, and the quality is quite decent.
The most popular type of plaster is Rotband.
NR Start is a gypsum-lime composition, Goldband is a gypsum composition. The difference between Rotband and Goldyuand is the thickness of the minimum layer. Rotband’s is 5 mm, the second’s is 8 mm. Otherwise, the technical characteristics are very similar - both consumption (8.5 kg/m 3 with a layer thickness of 1 cm), and maximum layer (50 mm), and compressive and bending strength. The density in the hardened state differs slightly:
980 kg/m 3 for Goldband and 950 kg/m 3 for Rotbabd. Scope of application: any residential and non-residential heated premises, including kitchens with bathrooms.
| White gray | 5-50 mm | Gypsum with polymer additives | ||
| Plaster-Adhesive Mixture Knauf Sevener | For restoration of old plaster surfaces, including facades | Grey | Portland cement with polymer additives and reinforcing fibers | |
| Plaster Bergauf Bau Interier | For plastering in rooms with normal humidity | Grey/White | 5-40 mm | Cement with polymer additives and perlite filler |
| Plaster Volma-Canvas | For indoor spaces with normal humidity | 5-50 mm | Based on gypsum with chemical and mineral additives |
Volma Layer, Osnovit Gipswell, Eunice Teplon, and Prospectors also speak well of gypsum plaster. They cost less, give good results, but it’s still easier to work with Rothband and the “company”. Based on the results of working with these brands, there are both positive and negative reviews, but in general, the quality is not bad.
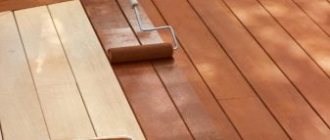
Preferred finishes
Now that we have figured out what cannot be used, let's see what can be used, and what are the most preferable options?
Lime-cement plaster
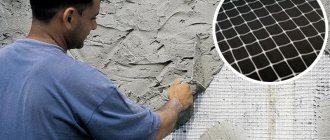
A fairly affordable, economical option for “stone” buildings would be lighthouse plaster with lime-cement mortar. Such rough finishing has proven itself well in both heated and non-residential premises and, most importantly, its reliability has really been tested for decades.
As for the application technology, it is simple.
The first thing you need to do is prepare the surface: remove any build-up of solution that interferes with work, sweep away dust and dirt.
Then, using a long level, check the geometry of the wall and determine what layer will be needed to level it.
Then everything is as usual. I drilled dowels in the four corners and placed one of the pairs strictly at a vertical level, and then pulled the lacing along the diagonals of the resulting quadrangle.
By adjusting the immersion depth of the pair opposite from the exposed dowels with a screwdriver, you can build a beautiful vertical plane. All that remains is to place the beacons under the already stretched threads and glue them to plaster glue.
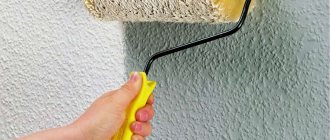
Which plaster to choose for leveling walls
You can achieve perfectly smooth walls using drywall, special solutions or plaster. The choice of option depends on personal preferences and is determined by the material from which the walls are made. To level out large uneven areas, it is better to use plaster with a cement or lime base. To finish walls with small potholes and cracks, another plaster is used to level the walls:
- silicone - consists of mineral fillers, silicone resins and pigments, can be used in any room;
- acrylic - includes mineral components and acrylic resins, is prone to flammability, and therefore is not suitable for leveling walls in the kitchen and in areas with high temperatures;
- silicate - a universal mixture consisting of mineral filler, pigments and liquid glass, provides high quality coating;
mineral - the most budget option, allowing you to achieve a unique decorative surface, contains cement, lime and marble chips.
Plaster is used in the process of finishing a room. It is needed to level walls, hide depressions and cracks, seal seams between masonry, etc. Before wallpapering, the walls must be treated with plaster. Otherwise, due to the uneven surface, the wallpaper will overlap each other or, conversely, a gap will appear between the joints of the two canvases. In addition, plaster has good thermal insulation properties - it does not let cold air into the room and does not let warm air out.
Sometimes plaster is confused with putty. Putty and plaster are very similar in properties, but there is a significant difference - plaster is used to level walls with a large curvature and in appearance it is similar to facade plaster, since it contains filler. And then putty is applied to smooth out the grainy texture of the plaster.
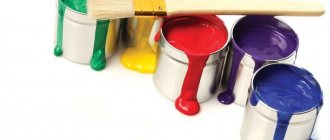
Which plaster is best for apartment walls? This question cannot be answered unambiguously, because when choosing a coating, it is necessary to take into account the material of the walls (concrete, brick walls) and in what conditions the plaster will be used (high humidity, normal temperature conditions, etc.). There are several types of plaster based on composition: gypsum, cement, lime, clay. Plasters with gypsum and cement are more practical. Sometimes the binding elements are combined: lime mass is added to the cement-sand mortar.
Varieties
For fine finishing in rooms that are not heated, water-based or solvent-soluble paints are suitable. The choice of coatings on the market is huge: finding a coating with the desired texture and color is not difficult. But resistance to low temperatures and high humidity is characteristic only of a limited number of paints.
Water-based
The safest available and widespread paintwork materials. They do not contain toxic components, are odorless, and form a durable decorative and protective coating in just a few hours. Can be used for painting rooms where there will be small children, allergy sufferers, and pets.
An important advantage of water-based materials is ease of tinting. It is easy to give them the desired shade, from delicate pastels to bright varnish: to do this, just purchase a special tinting paste, sold in any hardware store. Upon completion of painting work, wash the tools with plain water.
Acrylic
Acrylic coatings are at the peak of popularity. They are suitable for painting heating system elements and doors, walls and ceilings, furniture and individual interior items. Acrylic-based coatings demonstrate good adhesion to various types of surfaces:
- tree;
- concrete;
- metal;
- plasterboard.
To improve the adhesive properties of the material, the substrate is pre-primed.
The paint forms a decorative protective film that protects the base from moisture, temperature fluctuations, and mold development. Thanks to its dense structure, it masks some defects in the substrate - nail marks, minor cracks. The hardened coating can be washed with water and standard detergents.
Acrylic paint dries quickly, has no unpleasant odor, and is easily tinted to the desired shade. To achieve the desired color, before starting work, mix the composition thoroughly, adding color according to the instructions on the package. To check the consistency of the resulting shade, it is tested on a piece of cardboard or paper, waiting for complete curing. If the color turns out to be too dark, add white paint, if the color is light.
Silicone
Silicone paints are valued for their good hiding power. The material is consumed economically, forming a durable and elastic coating. It is resistant to ultraviolet rays and does not fade in the sun.
Silicone paints and varnishes have other advantages:
- Vapor permeability. After drying, they form a specific porous coating that blocks the passage of moisture, but allows water vapor to pass through. This property is especially important in the cold season: the walls dry out faster, which is why dampness does not linger in the room, and the finish retains its attractive appearance longer. A high degree of vapor permeability allows the use of silicone paints and varnishes for painting mineral wool insulation.
- Easy to clean. Dust accumulated on the walls during operation is easily washed off with water: it flows freely over the surface without being absorbed into its structure. Due to this, silicone-based paints are often used in public buildings and institutions with high traffic.
Silicone coatings are durable: they last at least 10-15 years. This type of paint and varnish materials can be used for interior decoration of unheated rooms and for painting building facades.
Which plaster is better: dry or wet?
To understand which plaster to choose for the walls in an apartment (dry or wet), you need to understand the properties of all types of coating. Dry plaster is called drywall. The wet method of leveling walls is done using plaster mortar. In this case, the thickness of the coating is adjusted depending on the unevenness of the surface. Each type of wall decoration has its pros and cons.
Drywall consists of three layers: cardboard, a layer of gypsum, cardboard. Dry plaster is used not only for leveling walls, but also for constructing suspended ceilings, partitions, door and window slopes. Advantages:
- ease of installation;
- strength;
- versatility;
- environmental friendliness.
Among the disadvantages are the possible appearance of cracks, lack of resistance to steam and water, difficulty in attaching pictures, shelves, etc. on a plasterboard structure.
Wet plaster is also called monolithic plaster, because after the mixture dries, a perfectly smooth coating without joints remains on the wall. This type of finishing takes more time than installing plasterboard sheets. The master manually applies the finished mixture over the wall and levels it until it hardens. Advantages of wet plaster:
- does not “eat up” space, as drywall does. Dry plaster is fixed in blocks of a certain thickness, while the thickness of wet plaster can be controlled;
- durable. The service life of such plaster ranges from 15 to 30 years. With proper care, the coating will remain in its original form;
- resistance to mechanical stress. If handled carelessly, dents may appear on drywall; this does not happen with plaster;
- moisture resistance. Wet plaster is not afraid of water and steam, so it can be used to level walls in the bathroom and kitchen.
Difficulties in gluing wallpaper in winter
The modern market offers hundreds of types of finishing materials with different properties. Anyone thinking about decorating the inside of a house in winter should remember one universal rule. Having chosen a finishing material, we first study the manufacturer’s recommendations/instructions for working with it. For example, the optimal humidity and temperature of the room and base when gluing wallpaper. How long should this temperature be maintained? Foundation requirements. Temperature requirements for glue or plaster mortar, etc. Now ask yourself the question, can you meet all these conditions if the finishing work is carried out in winter ?
Go ahead. Wallpaper is a private guest in country houses, especially when it comes to beautiful photo wallpapers that organically fit into the design of the room. To the question whether it is possible to glue wallpaper to walls in winter so that it does not fall off later, the answer is affirmative, but only if the following general conditions are met:
- The surface of the walls must be prepared for gluing wallpaper - leveled and primed.
- The room is stable, without sudden changes, and maintains a positive temperature of approximately + 15 °C.
- The temperature of the base (walls) is not less than + 5 °C.
- There are no drafts in the room and optimal humidity is maintained.
- The glued wallpaper should dry evenly.
Gluing wallpaper to walls in winter is actually no different from summer. The main thing is to maintain optimal conditions necessary for working with the material. And this is the most important problem if the outside temperatures are consistently below zero.
To hang wallpaper in winter, you will first have to start the heating system of the house. Heat the room where the work is taking place and maintain this temperature during the finishing process. Traditionally problem areas are behind radiators. If the batteries are already hanging, then it is difficult to bypass the mounting brackets and properly glue the wallpaper on a locally overheated wall, because The glue dries quickly before it has time to adhere to the base.
If the main heating system has not yet been started, then you will have to rack your brains on how to heat the room where the wallpaper is being glued. The option with heat guns is questionable. If the heat gun runs on gas, then the room will have to be ventilated periodically, and glued wallpaper does not like drafts.
Heat guns powered by electricity are expensive to operate, they can dry out the air, and the hot stream cannot be directly directed to the area where the wallpaper is glued.
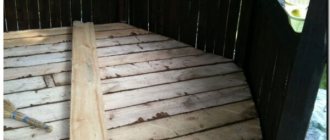
When can you plaster wooden walls?
Is the wooden house completed, repair or reconstruction work completed? There is a great desire to carry out finishing work as quickly as possible and celebrate housewarming. But we'll have to wait.
Wood has a tendency to shrink. Typically, the process is completed within a year or two. The exception is frame houses. Special blocks made of wood and insulation in them are not load-bearing structures. They are not subject to deformation over time. You can immediately begin roughing and then finishing.
For all other wooden buildings, a number of conditions must be met:
- air humidity - not higher than 70%, wood - 12%;
- air temperature - from 10°C to 30°C.
At higher rates, the mixture dries out very quickly and cracks. And low temperatures prevent setting. Therefore, it is not recommended to carry out work in winter. Artificial heating can improve the situation, but not much. Drying the house itself and the layers of plaster should take place in the most natural conditions possible.
READ How to properly glue drywall to a wall
Important point! The possibilities for plastering the inside of a house are not limited only to external conditions, temperature and humidity requirements. The height difference on the walls matters. If it exceeds 4-5 cm, it is better to use sheets of drywall for leveling. The thicker the layer of plaster, the higher the likelihood that it will crack and move away from the original wooden surface.
Materials for winter plastering
Knowing at what temperature it is possible to plaster the facade of a house and an unheated room, the work performers wait for suitable weather or create a microclimate on their own. There is a third possibility - to use solutions with antifreeze additives for plastering surfaces. They are chemical hardeners and ensure drying of the plaster at low and even negative temperatures. It is recommended to use potash, chlorine and ammonia water as additives.
Temperature conditions for different conditions
The recommended conditions under which you can plaster walls outdoors or indoors apply only to standard solutions that do not contain hardeners. Cooling the air to 5°C and below leads to poor hardening and the appearance of cracks, to 0°C – to freezing of water and the need to re-do plastering work. Special chemical reagents help solve the problem, allowing the material not to freeze at low temperatures.
The advantages of anti-frost additives make it possible to avoid heating the air before applying plaster. However, even with such reagents, plastering walls at temperatures below –5°C is recommended only in extreme cases. In addition, during the drying process of the solution, it is imperative to ensure suitable temperature conditions - for this you will need to completely seal the room or provide cover for the facade.