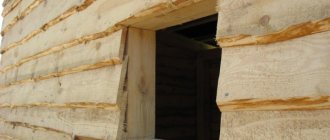
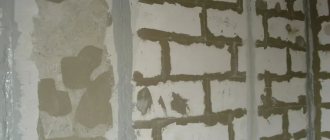
Sanding is also carried out when you want to update the appearance of the walls of an old house. Even if you have assembled the walls of a house from timber very well, some of the crowns of the walls will still interfere. To eliminate this drawback and make the wall ugly, it is sanded.
Since the wood must be additionally protected from mold and mildew, it is coated with antiseptics, but this may raise pile, which also needs to be removed.
It is necessary to renew the impregnation of wooden walls and their paint coating once every 5-8 years, and in this case, sanding helps to thoroughly clean the surface and renew its appearance.
Sanding timber walls is carried out for the following purposes:
- with its help, minor defects and irregularities are eliminated;
- lint that has risen as a result of using water-based antiseptics is removed from the surface;
- with its help, the appearance of wood is renewed, which over time, under the influence of ultraviolet radiation and other negative factors, loses its attractiveness;
- thus, the surface is brightened;
- Sanding allows you to make the structure of the wood clearer and more expressive.
Need for grinding
Most buildings are made of unplaned material with uneven chamfers. This can significantly spoil the appearance of the structure, so in this case additional finishing is required both outside and inside the house. Pre-treated timber has a more aesthetic appearance. Often, after its installation, the coverings are not finished with other decorative materials, so the use of this wood in most cases allows for significant savings.
Wood treatment must be done before applying antiseptic and other protective compounds. The sanding procedure significantly extends the service life of the structure, since various protective impregnations on the surface of such wood penetrate much deeper.
In addition, sanding can highlight the natural beauty of wood and prepare the surface for future painting. It removes all existing irregularities and chips, which allows the coloring matter to lie evenly on the base.
Do I need to sand profiled timber?
When transporting a wooden beam and its subsequent unloading, various contaminants may fall on it, which cannot always be wiped off with a regular damp cloth.
It is worth noting that the drying process of the wood mass occurs unevenly. Since summer trunk rings are looser, they lose moisture much faster than winter ones, whose density is much higher and humidity is lower. Even on surfaces treated by planing, this feature will certainly appear after just one year of use of the log. The smoothness of the wood material is significantly reduced.
The destruction of wood by insects, fungi and various microorganisms always manifests itself superficially at first. Therefore, removing the top layer of material can be regarded as an additional protective measure.
During the process of sanding the wood surface, the cellular structure in this place is significantly disrupted. This is both an advantage and a disadvantage. Thanks to the use of this technology, fire retardants and antiseptics used to process wood penetrate as deeply as possible into its structure, which allows for the highest quality protection of the material.
Recognized advantages and disadvantages of a log house
Wooden design
- environmental friendliness;
- security;
- durability;
- wear resistance;
- resistance to deformation;
- low thermal conductivity;
- frost resistance;
- excellent sound insulation;
- natural ventilation;
- ease of care;
- healing aroma;
- amazing appearance;
- favorable energy.
A wooden structure also has disadvantages - these are:
- change in natural shade;
- biological activity;
- flammability.
The disadvantages are quite serious, however, proper processing of raw materials will not allow them to overshadow your life in such a beautiful structure.
Selecting Tools
The following set of tools is used to process walls:
- grinding machine;
- belt sander;
- grinder with disc attachments;
- chisel and sandpaper (for hard-to-reach places).
A grinding machine is used for professional processing; it can either be purchased (average cost 150 thousand rubles) or rented. A belt sander is more suitable for flat laminated timber, the initial cost is 1,500 rubles.
You can use a drill with a special attachment as an alternative to special profile equipment. It is used in combination with a grinder, which is likely to be found in every master’s kit. Choose lightweight models that will allow you to complete the amount of work faster.
Sanding the timber is carried out in stages, for this it is worth choosing attachments with different hardness, from low to high. For external and internal walls, use nozzles No. 80 (for rough processing) and 120 (for final finishing before painting). If this is not enough (pre-used timber, or with poorly separated bark), then use No. 30 and 60.
Important: it is necessary to add protective ones to the tools for direct processing, such as a mask, respirator and goggles made of impact-resistant plastic.
Grinding Tools
If you have already decided to start grinding, then before going to the supermarket, you need to read this section of the article.
List of commonly used grinding devices:
- Belt or angle grinder.
- Sandpaper of different sizes: large, medium, small.
- Ladder.
- Extension.
- Safety glasses.
- Wooden block.
- Stapler for construction.
- Construction vacuum cleaner.
- Respirator.
Before choosing certain tools that are listed, you need to know important criteria. These criteria are power, ease of use and weight.
Next, it’s worth figuring out why there are several types of grinding machines. Here, as an example, you can take a Finnish beam, which has a rounded side. This example will perfectly draw the line between a belt and an angle grinder. It is worth mentioning that the angle grinder is a grinder with the necessary attachments. So, for this beam, a banding machine will not be convenient due to its rounded shape. But there are places that a grinder will not help with; in such cases, I use a time-tested tool - a chisel.
You have heard a little superficially about the “necessary attachments”. This is the sandpaper that was provided in the listing.
When choosing an angle grinder, do not forget about important criteria. It should be light and powerful. Taking it in your hands you will understand how much weight you need the device. For upcoming work, a power of nine hundred or more watts will be enough. The approximate cost of such a tool will be 2600 rubles. It’s worth thinking about devices with built-in vacuum cleaners. Of course, this model will be more expensive, but you will thereby take care of your respiratory organs.
Material cross section
Manufacturers produce lumber in accordance with GOST. There are several standard sizes for different operating conditions:
- in accordance with the chosen technology for the construction of a cottage, you can use timber with a section of 200 x 200 mm, 200 x 150 mm, 150 x 150 mm.
- for bathhouses, garages, and other outbuildings, smaller sizes are used - 150 x 100 mm or 100 x 100 mm.
- small architectural forms (gazebos, winter gardens) are built from elegant polished timber 70 x 70 mm.
When choosing a polished material for building a house from profiled timber, you should take into account that with a small cross-section, only simple profiles are used, in which heat loss is possible. “Comb”, Finnish profile are present only in lumber with sections 200 x 200, 150 x 150 mm. In such log houses, even without the use of sealing jute, there is no freezing of the walls. The standard length of timber is 6 m or 4 m; for walls with complex configurations, lumber can be ordered individually. This will reduce the budget by reducing cutting waste in the building area.
Processing of a log house from timber inside
To treat internal walls made of timber, grinding and coating with special compounds are used. The main thing is to achieve two goals: to protect the wood from rotting and to make the walls beautiful. Grinding is painstaking work that requires knowledge and high-quality tools.
What tool is needed for grinding
For grinding timber, stores offer a variety of tools. But not everyone is suitable for such delicate work. The main criteria when choosing are power and lightness.
Building a house from timber has a flat shape and a belt sander is suitable for sanding. For example, a Makita tool with a dust bag is convenient for interior work. But not all models of grinding machines have dust collection bags.
For processing Finnish timber with a rounded side, a belt sander is not convenient. In such cases, use a grinder with grinding attachments. The grinding attachment for such a tool is a disk with sandpaper attachments.
In the most inaccessible places, grinding is done using a chisel.
When choosing an angle grinder, you should hold it in your hands. The tool must be light, otherwise the labor-intensive DIY work will become even more complicated. The power for grinding timber is 850 W or higher.
Among the most well-proven ones, it is worth noting the grinders from foreign companies Makita, Bosch, DeWalt, as well as the domestic Interskol. These cost from 2,500 rubles.
By purchasing cheap Chinese tools, the buyer receives a kind of lottery ticket. It’s hard to say whether it will be a winner or not.
How much does it cost to sand walls?
Due to the complexity of the work, the cost of polishing by specialists is not cheap. In addition, sanding timber walls requires at least a week.
The walls must be treated in several passes. One-time internal grinding costs from 250-350 rubles/m2.
Read also: How to charge a maintenance-free car battery with a charger
It’s not difficult to make a calculation, for example, if the wall of a house is 3x4, then the area will be 12 square. Sanding in one pass will cost 12x300=3600 rubles. And this is just one wall.
It is better to do this work with your own hands, slowly. Moreover, you can work inside the house in any weather and time of day.
How can I sand timber?
This material can be processed using various methods and using various devices. Each method has its own pros and cons. The most commonly used tools are the following.
- Belt sander. This option is considered optimal for sanding wooden surfaces. This unit is the most powerful of all manual machines. It will save a lot of time and effort, as it handles processing faster than other equipment. In addition, the device allows you to level all the end parts of the structure, remove even the largest irregularities, and form curved shapes if necessary.
- Angle grinder (grinder). This tool will be a universal option for wood processing. In this case, you need to choose the right grinding attachments. Most often, these devices are used to work with materials for painting. During the procedure, it is better to maintain the equipment at minimum speed.
- Electric drill . This tool is used in conjunction with a special grinding wheel. Equipment, as a rule, is used only when there are no special requirements for accuracy and evenness.
Remember that before starting to work with the grinding device, the surface of the material should be first prepared for this. To do this, you can use a special sandblaster or take simple sandpaper (it is better to use coarse-grained sandpaper).
During the pre-treatment process, the surface of the wood is gradually leveled, and the number of chips becomes minimal. If you use laminated veneer lumber in construction, then you can immediately use a fine abrasive. In any case, do not forget that you will not be able to completely sand the wood with a tool. Almost any such structure has hard-to-reach areas that will have to be leveled manually.
Rules for grinding timber
Sanding the walls of a wooden house with your own hands can only be done after the timber has dried.
This rule is especially important when the house is built from planed or profiled timber with natural moisture. If you start sanding ahead of schedule, you will not be able to completely remove the lint. After treatment with antiseptics, it will rise again and the process will have to be repeated. Some home craftsmen, having read incorrect information on the Internet, try to sand wood with water. However, wet wood should not be sanded as it will scuff. After such grinding it is unlikely that you will get a beautiful and smooth surface. It is best to start sanding from the upper floors of the house, so that a minimum of dust enters the finished rooms. It is not recommended to carry out work over the entire area at once. It is more convenient to sand in parts. The surface of the wall to be treated is divided into sections, which are sanded alternately.
Before sanding a wooden ceiling, in order to clearly see all the surface irregularities, it is necessary to install the correct lighting. The light should fall from one side with a slight angle of inclination. Large area ceilings are faster and more convenient to process using an orbital grinder. For ceilings with complex structures, it is better to use an eccentric sander.
When sanding with a grinder, wood often ignites. This usually happens if inexperienced craftsmen take on the job and select the wrong disk rotation speed. As a result, the tool operates at high speeds, and when pressed hard, a spark is formed, which ultimately leads to burning of the wood.
To avoid burning the timber during grinding, it is necessary to work at low speeds and not press hard on the tool. Another reason for wood fires is untimely change of sanding wheels. Worn or chip-clogged tips can cause a spark. During work, it is necessary to ensure that the cables are laid correctly, which, if twisted or broken, can also cause a fire.
Execution technology
In order to properly sand the timber with your own hands and make it completely smooth, you should take into account some important nuances of this procedure. Do not forget that sanding freshly cut timber is strictly prohibited, since fresh material can quickly clog all the attachments. If wood coverings have acquired a bluish tint, then before the procedure it is necessary to bleach such a surface using abrasive elements. The grinding technology itself may vary depending on what kind of timber structure will be processed.
When leveling the end sections with a grinder, the work should be carried out in several stages, because it is this part of the product that is most often exposed to the negative effects of moisture and begins to swell and crack . Grinding the end needs to begin with rough leveling, then you can begin finishing and polishing (this is best done with a grinder).
When all the stages have been completed, the surface of the timber must be covered in several layers with a special protective impregnation for wood.
Rough leveling involves removing the black pigment of the wood from the surface. At this stage, a small pile should appear. Final sanding involves getting rid of lint, mechanical damage and dents. The sanded material must be additionally treated with a vibrating nozzle or sandblasting device. This will allow you to finally get rid of minor scratches and other defects that arose during work. The impregnation stage with protective substances is mandatory for all types and species of wood.
A slightly different technology is provided for laminated veneer lumber. This type requires basic sanding immediately after the final assembly of the structure, because this wood is most susceptible to various negative atmospheric influences. In addition, when dry, the fibers of the laminated timber gradually begin to lift up, and it is almost impossible to remove them by simple sanding.
When leveling the surface of a round timber wall, you will need an angle grinder , but for hard-to-reach areas you can also use an electric drill or use a special small attachment for an angle grinder.
Remember that even when manufacturers process products, all protective impregnations are carefully removed using special abrasives, since after sanding new layers of compounds and antiseptics will have to be applied. Grinding of profiled timber should be carried out in two stages. First, leveling is carried out using a coarse abrasive.
After complete shrinkage, final polishing is done.
Wall grinding technology
Building a house from laminated veneer lumber involves sanding immediately after assembly. If it is natural humidity, then you need to wait until shrinkage and drying are completed. Otherwise, the wood fibers will lift up and you won’t get a smooth surface.
To work with your own hands you will need the following tools:
- Nozzles with different coarse sandpaper.
- Tape train - machine or grinder.
The first time sanding is done with sandpaper No. 40. It will remove all the unevenness. In the future, No. 80-100 is taken to obtain a smooth surface (for example, domestically produced Fera paper).
Changing attachments occurs frequently, since when working with wood, the abrasive becomes heavily clogged with dust and resin. Experts recommend extending the life of sandpaper using a wire brush and alcohol. But after this the working ability of the nozzle decreases.
Do-it-yourself processing moves on average 60 cm in 5-10 minutes. The speed depends on skill, type of timber (building a house from profiled coniferous timber takes longer due to high resin content), and the power of the tools.
You can sand it the old-fashioned way using a block wrapped in sanding paper. But your hand will get tired quickly, and such grinding of a room of 15-20 m2 will take more than a month. This method is good to use when you need to sand small parts and areas where the tool cannot reach.
All work is carried out in a respirator, since there is a lot of wood dust, and it easily gets into the worker’s nasopharynx. You can use tools with special bag attachments, but these are more expensive.
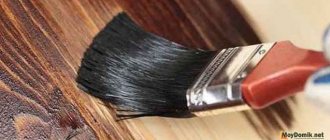
After sanding, the timber walls must be treated with antiseptics and glazing compounds, or simply painted with varnish or paint. Coating is a simple job and you can do it yourself. You can find out more about how to do this here.
Wood polishing
Polishing wood products and wooden structures is used to prevent natural hairiness and cracking of wood; polishing enhances the attractiveness of the texture and protects it from external factors. Most often, polishing timber is used for finishing furniture and interior decoration. Technology includes:
- Grinding for polishing. Preparing wood for polishing differs from ordinary sanding; at the final stage of processing, fine-grained abrasive material No. P150-P180 is used.
- Primer. The operation is performed to seal microcracks and pores, strengthen the top layer and prevent the formation of fibers. Transparent impregnating mixtures are used for priming; the layer is applied with a swab or a flute brush. The most common compositions have a casein-rosin and nitrocellulose base. All types of primer are applied in 2-3 layers, the next layer is applied after 1-2 hours.
- Polishing. Apply 2-3 layers of colorless rosin varnish to the primer; after drying, each layer of varnish is treated with sandpaper with a fraction of up to 100 microns (grade P400-P600 according to GOST).
- Polishing. The surface is treated with a felt wheel using polishing or wax paste until a uniform shiny surface is obtained.
Dry and wet sanding
How to properly sand wood with a sander or other tool? First, it is important to choose the type of procedure. It can be dry or wet. The first type increases the effectiveness of the abrasive and ensures its accurate removal. The downside of this technology is that the skin easily becomes clogged with dirt.
When carrying out wet sanding, you need to apply the liquid to the grainy surface of the sandpaper. Mineral oil or soap solution can be used for this. White spirit will also work.
Note! During the wet procedure, the abrasive becomes much less clogged, which helps to increase its service life. This creates an unpleasant mass of foam and shavings.
How to sand timber walls
The tools used are the same as for processing logs. A specific choice can only be made by assessing how deeply you need to remove the top layer of wood.
If the bathhouse is made of profiled or laminated timber, most likely you do not need to level anything. Just remove the top darkened layer, if there is one. In this case, if you have a sufficient level of proficiency with an angle grinder, you can work with it. If you don't have enough experience, use an eccentric sander. It will take longer, but the result will be guaranteed to be at least good.
Timber needs to be sanded in different ways. Depending on its geometry
If the walls are made of ordinary timber, then you will have to do a lot of leveling. You can’t do without a grinder here. Moreover, in some places it will be necessary to remove a couple of millimeters of excess - non-ideal geometry and errors in cutting bowls lead to the fact that the difference can be quite significant.
I found a video fragment about a very interesting Pobedit grinding disk, which, it seems, can easily cope with rough grinding and easily remove excess thickness.
Typical mistakes when working
Glued laminated timber can be sanded immediately with fine sandpaper.
The lack of experience, which is typical for novice developers, is a prerequisite for making mistakes that affect the quality of the final result, delaying and complicating the entire process as a whole.
The most typical errors are:
- The application of excessive force when working with tools, which leads to grinding off of excess material, the formation of grooves and depressions.
- Ignoring the removal of resin, which, after being spread over the surface, significantly complicates the further completion of the task.
- Wetting wood. As a result, the abrasive slides along it, creating a large amount of lint.
- Saving on purchasing tools. Low-power equipment is difficult to operate; it breaks down and fails more often. The other extreme is heavy equipment, from which the master quickly gets tired and makes inaccuracies.
- There is a rush when processing raw timber, which gives practically no effect.
- Delay in treating a fresh surface with protective coatings when it darkens and requires new polishing.
Sanding timber will be successful if done on time, correctly, with high-quality and convenient tools.
Abrasive sandblasting
When assembling industrially manufactured house kits, suppliers grind the outside of the timber using sandblasting or abrasive blasting. You can order such processing for the log house of your house from specialized companies. The technology allows you to quickly and efficiently process the surface, inter-crown cracks, locks and corners of the log house. Compared to electromechanical tools, productivity increases four times.
It is not recommended to use sandblasting for sanding timber inside the house.
When abrasive jet sanding, a brushing effect appears, the wood pattern on the surface is effectively highlighted, emphasizing its attractiveness.
Grinding Tools and Equipment
To sand a timber house you need:
- vibration and belt sanders;
- coarse, medium and fine sandpaper;
- stepladder or construction sawhorses;
- extension;
- respirator;
- protective glasses;
- construction vacuum cleaner;
- wooden block;
- construction stapler.
To grind timber, it is necessary to use grinders with a power of at least 1 kW. When using less powerful machines, the risk of deep scratches and gouges increases. This is due to the fact that less powerful machines work with less efficiency, so the operator, after a few hours of work, tries to speed up this process and increases the pressure. As a result, instead of uniform grinding, the machine gnaws out a hole, which is very difficult to remove.
Precautionary measures
In the process of sanding timber, it is worth adhering to some important safety rules, since the resulting small sharp particles of wood can seriously injure a person. In addition, the smallest dust is quite capable of easily penetrating the respiratory tract.
First, you should purchase a respirator and special safety glasses. It is also recommended to prepare a construction vacuum cleaner, with which you can easily and quickly get rid of dust.
Why sand the walls inside a wooden house?
When assembling a house from a ready-made kit, and even more so from ordinary timber, you have to deal not only with the pile that appears as a result of shrinkage, but also with changes in the color of the wood. The top layer, as a result of shrinkage and under the influence of oxygen, oxidizes and loses pigmentation. Proper sanding removes the top layer with disturbed pigmentation from the timber and reveals the true color and texture of the wood. Often, during the installation process, pencil marks, small scratches, and dirt absorbed into the thin top layer remain on the beam. These contaminants cannot be washed off, because this will negatively affect the moisture content of the wood, so they are removed by sanding.
Types of timber
Types of timber for building a house
The timber consists of wooden profiles of square, rectangular and “D” sections. It is obtained by sawing off the semicircular parts of the trunk until the parameters of a rectangular geometric figure are achieved. The products have a wide range of applications in monolithic and frame construction.
The following types of profiles are used for the construction of private houses:
- Simple. It is an elongated rectangle made of solid wood with flat and even edges. They can be processed to a certain degree of smoothness or left rough, with irregularities and protruding fibers. It is the most inexpensive product in this line of profiles.
- Profiled. A type of massive timber in which paired tenons and grooves are cut out on the upper and lower edges. Thanks to this, the connection of the crowns is carried out tightly and without gaps. Over time, as the tenons dry out, they fit deeper into the grooves, which contributes to even greater tightness.
- Glued. An innovative option characterized by increased strength and absolute resistance to cracking and deformation. Profiles are made from well-dried boards glued together under a press. There are profiled and smooth models. The former are used for laying out walls and ceilings, the latter are used for racks, supports and rafters.
When to start processing?
You can start sanding as soon as the frame dries and shrinks. This will take approximately 10 days, if the sun warms well. Otherwise, the waiting time will have to increase.
Why can’t you immediately start sanding the frame as soon as it’s installed? Can! Only if you guarantee that your house is made of well-dried logs (timber), and the moisture content of the wood will not exceed the required 20%. Then place the crowns under the roof and begin sanding work followed by coating the log with various impregnations. The house will still have to be left to shrink, with or without impregnation.
If you are not sure of 20%, then there is no need to rush - wet wood will warp and the surface will not be smooth and beautiful.
Professional grinding services
Our specialists are highly qualified, have extensive experience and proven work skills. All this ensures high quality grinding, which we will perform in accordance with the deadlines specified in the contract. In our work, we use modern professional power tools that allow us to achieve a perfectly smooth and even surface. If you need high-quality sanding of a country cottage, country house or bathhouse, we are very willing to carry out work of any level of complexity. Contacting us is very simple - on the “Contacts” page you will find all the coordinates of our company, and you can also leave your request.
Calculate the cost of painting and insulating your home right now
Select types of work:
Sandblasting Sanding with machines Warm seam Painting Additional. work
Select materials:
Ramsauer sealant Remmers sealant Gnature or Biofa oil Remmers oil Adler oil Other
Do you have accurate measurements of the house?
I measured it myself. I have a house design. Measurers came. I want to call a measurer.
Recommendations
It is best to carry out grinding after the material has thoroughly dried (especially for profiled surfaces), but before installing door and window structures, installing ceilings and floors. This limitation is due to the abundance of dust that remains after leveling.
Before starting work, it is necessary to carefully prepare wall coverings made of timber . If you carry out the treatment indoors, then first of all you need to completely get rid of the resin that comes out. To do this, you can use a small scraper. Large clots should be removed with special solvents. If the resin is not removed, it will quickly render the abrasive unusable, clogging its structure, and this will cause the paint to subsequently not be able to lie evenly on the surface of the material.
Before you start grinding, be sure to pay attention to the parameters of the technical equipment. The grinder must have a power of at least 1 kW. Using a weaker device may result in the formation of grooves on the surface, the removal of which will be quite problematic. In order for sanding to proceed as smoothly as possible and the result to be of high quality, you should monitor the progress of the machine and the direction of the wood fibers. They must match each other.
Don’t forget to stock up on construction paint in advance for further coating of the timber. After sanding, it quickly begins to lose its attractive appearance and darkens, which can negatively affect the future coating. Therefore, it is recommended to apply pigments faster. Otherwise, you will have to re-grind the surface.
To learn how to sand timber with your own hands, see the following video.
Basic mistakes
If a person sands walls for the first time, he may make certain mistakes, as a result of which the quality of the work is significantly reduced:
- The work is carried out at maximum tool speeds, which often leads to the formation of deep grooves.
- If there are resin residues on the surface, then during sanding it is smeared on the wall, which significantly complicates the further process.
- If there are defects in the radial wood, that is, its peeling, then first the surface must be treated with glue, allowed to dry, and only then proceed to sanding.
- If water-based paint or varnish is used, then after the first painting the pile may rise and therefore it is necessary to re-sand.
- If paints and varnishes based on chemical solvents are used, then in such cases the pile usually does not rise.
- It is recommended to carry out the specified work in a new house after installing the roof, but before installing doors, windows, ceilings and floors.
- Please note that over time the wood hardens and it will be more difficult to sand.
- Often, to speed up work, inexperienced craftsmen use large and powerful grinders or grinders, but they quickly tire the hand, and therefore damage the surface.