Adobe houses are a housing option made from natural and environmentally friendly materials: clay, sand, earth, straw and water are used for their construction. This method of construction was widespread in the last century, but even now there are many of its admirers. In the summer, such a house is always cool, and in winter it is quite warm. However, working with the material has certain specifics, so it is important to know how to properly plaster adobe walls inside a house.
What are the features of plastering?
When plastering adobe walls, it should be remembered that the main feature of structures that contain natural materials is the need to protect them from the outside from frost, as well as take care to remove excess moisture from the wall itself.
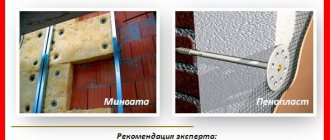
When performing work on external walls, you should decide what thickness of the plaster layer will need to be applied. If it is thick, then it is better to use a reinforcing mesh in the process, otherwise in the future the plaster will begin to fall off in pieces.
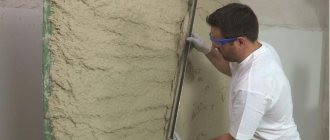
Rough plastering
Adding sawdust to the plaster mixture helps strengthen the mass and eliminates the need to use a plaster mesh, which is usually attached to adobe walls using conventional long nails.
The thicker the wall, the longer the nails, but this process destroys the integrity of the wall. It is not much, but it becomes less durable, so it is better to stick to ancient methods that have not changed for many centuries, which, naturally, only proves their perfection.
Adding sawdust to the plaster mixture helps strengthen the mass and eliminates the need to use a plaster mesh.
So you don’t have to worry and get to work. If you have assistants, then use the ancient method of general work, which has been tested for centuries.
For this method, you will need to split into two teams to plaster the walls. One will forcefully throw lumps of mixture onto the walls in the right places. The second half, which must necessarily consist of men, must regulate where exactly the clay should be thrown.
And using a wooden grater board, level the uneven layer as thoroughly as possible, additionally pressing it. The layers need to be leveled immediately after application. The longer you wait, the more difficult the process itself will be, which already requires male strength. That is why this method requires the participation of at least two or three people.
With the second method, you can plaster alone, but, of course, it will take much longer than in the first option.
The layers need to be leveled immediately after application. The longer you wait, the more difficult the process will be.
The grater board (board with a handle) or spatula should be small. Several lumps of the mixture are placed onto the tool by hand in one mound, and, applying it to the wall and pressing, work it from the bottom up, spreading it as evenly as possible.
You can check the evenness with a level; naturally, you need to correct irregularities as soon as they are discovered. The layer of rough plaster for more or less even walls can be equal to 1 cm. For uneven walls, the thickness of the layer can vary from 0.5 to 2-3 cm. You can see large irregularities with the naked eye, but small ones will still have to be identified using a level
After finishing the rough plastering of the walls, you need to let them dry for about one month, perhaps a month and a half. Basically, work on finishing adobe walls, as well as on building adobe houses, should be carried out in the warm season.
In order to properly finish the walls, start work in early summer. In the cold season, it can take more than 3 months to dry the rough layer, and you still won’t be sure of the result.\
What solution can be used?
Before plastering adobe, you should know that such structures are poorly able to tolerate excess moisture. Therefore, the main requirement for finishing material is increased moisture resistance.
Standard cement plaster is not suitable in this case. Such a coating will become heat-intensive, thermally conductive and have poor vapor permeability.
The result will be moisture seeping out from inside the house, settling on the inside of the cement layer and regularly flowing down. As a result, the plaster will either crumble in a couple of years, or the wall will collapse (this is more typical for warm regions).
The ideal option for adobe walls is a lime-based composition. It’s easy to make it yourself by mixing 1 part of the main component with 5 parts of sand. This is an excellent option for the lower volumetric layer of plaster. For the final layer, the same mixture is usually used, but in a 1:1 ratio.
Plastering adobe walls inside a house is often done using a mixture containing gypsum.
If there is such a need, then you can make the walls even by using a solution with the addition of straw, manure or sawdust. This strengthens the structure of the solution and allows you to avoid using a plaster mesh.
Finishing: features
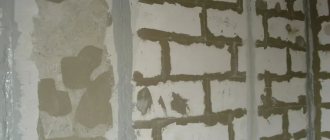
At this stage, you need to finally level the walls and grout using clay-sand mortar without any fillers. First, you need to prepare a fairly liquid grout with which you will plaster the wall with a second layer.
The layer of rough plaster for more or less even walls can be equal to 1 cm. For uneven walls, the thickness of the layer can vary from 0.5 to 2-3 cm.
Grout
Maintain a proportion of 3:1:1, where 3 parts are sand and one part each of cement and clay. The solution should be liquid for a more even application. As in the previous version, the sand must be dry, of medium fraction.
For fine sand you will need much more cement. A large one will look very rough. Mix dry sand with cement and only then add clay. After thoroughly mixing these three components, gradually add water.
This layer will also require quite a lot of time to dry completely, from one to three weeks, everything will depend on the microclimate of the room. It is strictly not recommended to dry both the first and second layers using a hair dryer.
This can lead to cracking of the walls, which, of course, leads to additional work, and you will again have to plaster the wall, sealing the cracks, and wait for drying.
Therefore, drying should take place under natural conditions, without additional means, even if you are in a hurry to finish construction. Everything may turn out completely the other way around, and you will end up spending much more time on remodeling.
How to properly putty walls under wallpaper. Preparing the walls
The walls are put in order so that they are even, and then wallpaper can be hung on them. But the fact is that their initial condition may be so bad that it may be premature to think about how to putty the walls, since first you need to repair deep holes in them, then plaster them, and only then proceed directly to putty. Therefore, I highly recommend that you first read my article The procedure for preparing walls for wallpaper, which clearly presents a plan for working with walls, and putty is just one of the stages.
Puttying of walls is carried out in 3 cases:
- After removing old wallpaper, when the walls are relatively smooth and it is not important for you to level (plaster) them.
- After plastering the walls, when they are strictly vertical and ready for further processing.
- When in some places you need to repair small chips on the wall.
Let's go in order.
Main stages
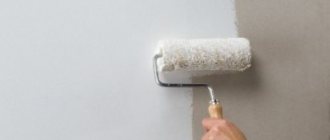
The methods of applying putty depend on its type - starting, finishing, lighthouse. When working with starting putty, you will need to stretch a construction mesh onto the wall. This will allow you to apply the mixture in a thin layer. The walls must be covered completely, evenly distributing the material over the surface. This will help achieve perfect smoothness. Experienced craftsmen give this advice: ideal evenness can be achieved only with the help of a coarse mesh.
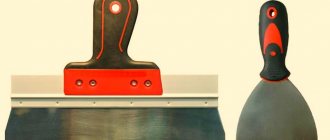
Two spatulas are often used in work Source remontdoma24.ru
Making the walls even
An important step will be to determine the evenness of the surfaces. In dilapidated buildings, it is quite common to see walls that are far from the standard. Some were initially erected without leveling, others were smeared by not very experienced craftsmen. Ultimately, carrying out modern renovations in a room with these walls will result in significant expenses for leveling. Based on this, before starting work, determine the degree of evenness of the walls and ceilings, using a building level, usually plumb lines and threads stretched along vertical marks. Experienced builders use special laser levels to determine planes.
As mentioned above, different consistencies can be used to adjust clay walls. This can be a clay-sand mixture, a lime-clay solution (clay, sand, lime dough in a ratio of 6:15:2), a clay-gypsum mixture. But it is more convenient to level clay walls with putty.
The layer of starting putty should not be more than 1.5 cm, despite the fact that the most acceptable layer for gypsum plaster is three cm per application. Based on this, experts recommend correcting deeper bulges using clay mixtures, or using drywall for leveling.
Important! Plastering or repairing defects on clay walls can only be done with lighter substances than clay. So, cement mortar is not suitable for this purpose. It will not be able to adhere properly to clay and will quickly fall off.
Procedure for applying putty
The first step in wall putty is preparing the mixture. If you use dry putty, you will need a container of sufficient size to mix the composition. A small amount of water is poured there and powder is added. First, you can mix the mixture with a regular spatula. But to get rid of lumps, you still need a drill with an attachment. It is necessary to knead the putty until it has a homogeneous consistency. The main sign of the mixture’s readiness is elasticity and thickness. Properly prepared putty sticks to the nozzle and spatula.
What immediate tools and materials are needed?
When starting to repair and decorate clay walls, you will need the following tools:
- Set of spatulas, trowel, trowel. It is better to choose which tool for puttying clay walls is more ergonomic using the trial method. Some people find it more convenient to use spatulas, while others are used to working with a scourer or other equipment.
- Buckets for mixing clay-sand mortar and putty.
- A construction mixer and a shovel will be indispensable when producing large volumes of finishing mixtures.
- Knife for filling cracks and trimming serpyanka.
- A construction stapler can be useful for securing a meter grid to the wall.
- To find out the evenness of surfaces can be a building level and rule, a plumb line and threads.
The materials needed are:
- Putty for clay walls requires a starting and final putty (depending on what kind of coating is planned to be applied at the end of puttying).
- Reinforcement nylon mesh with a small cell. A narrow serpyanka is needed to strengthen cracks, and a meter-long one will be applied over the entire surface of the wall.
- To adjust the walls using a clay-sand mortar, you need one part clay, two or three parts sand, and water. In addition, if desired, you can add a little sawdust or small grass to reinforce the consistency. To increase plasticity and thermal insulation, the forefathers also added horse manure to the clay. The smear came out strong, even, with a small fraction. The composition should brew well and the mixture should resemble thick, homogeneous sour cream. In addition, you can use a mixture of clay, sand and gypsum in a ratio of 1:4:1/4.
Putty on clay, is it possible to putty on clay walls with gypsum putty?
Puttying clay walls has its own characteristics that must be taken into account when performing work. Surfaces can only be finished with compounds that are lighter in weight than clay, otherwise they will fall off.Decorative plaster Saman
Surface preparation
Before applying the design effect of Bousillage Rustique BR1 - Adobe walls, it is necessary to carefully prepare the surface. Surface type No. 2, method 2. Application conditions: air temperature: from 5°C to 35°C relative air humidity - no more than 75% (recommended - 60%).
Applying Bousillage Premiere Base Coat
- 1 Application technique using a velor roller. 5-10% water is added to the Bousillage Premiere base, which reduces consumption and makes application more convenient. The base coat is applied to the surface in two layers, between which at least eight hours must pass.
- 2The application technique using a paint sprayer also involves diluting Bousillage Premiere with water in an amount of 5-10%. The pressure in the spray gun must be maintained at least six atmospheres, and the diameter of the gun nozzle must have a size from 1.8 to 2.0 millimeters. This method allows you to get by with one layer of coating.
Applying the finishing coat of Bousillage Rustigue
Application of a protective and decorative layer
Caring for the surface consists of wiping it with a damp sponge from time to time. No detergent is used.
What is the best way to putty the walls? Tools
To putty the walls we will need:
- A trowel for applying the finished mortar to the wall.
- Spatulas (Large, medium (small)).
- Rubber spatula (very small).
Catalog of tools for finishing work
If you rarely go to hardware stores, then it may be difficult for you to immediately navigate which department and what you need to take.
Here is a catalog of tools for finishing work, where you can calmly search for everything you need for work: construction buckets, spatulas, trowels, trowels, etc. And below we will look at the most interesting thing - the process of puttying walls.
How to plaster an adobe house
The fact is that traditional adobe houses do not tolerate moisture well, so to treat the outside of such an eco-house you should purchase moisture-resistant plaster. The selection of plaster must be approached carefully: ordinary simple cement plaster is not suitable for finishing the outside of an adobe house. This structure has excellent heat capacity, excellent thermal conductivity, but at the same time very poor vapor permeability.
If you choose the wrong plaster mixture, moisture will penetrate into the house through the walls, settling inside the cement plaster, then it will drain. If the climate is warm, this process can quickly destroy the walls. Therefore, it is necessary to use materials based on lime as a connecting link. Such putties are often used for the reconstruction of old buildings.
If the walls are crooked, then sawdust can be added to the finished mass. This additive will significantly strengthen the mixture; with this additive you can avoid the use of plaster mesh, which is recommended on many sites. The fact is that the plaster mesh requires fixation with nails, which can destroy the adobe walls.
Preparation for work and plastering
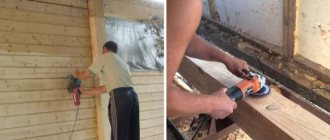
First of all, prepare the walls. First, they are treated with deep penetration soil, then all the walls should be covered with shingles. In this case, wooden slats should be treated with a special antibacterial preparation before final installation.
Preparing clay walls
First, you need to remove all old coverings. This applies to both whitewashing and various paints and wallpapers. To facilitate the process of removing old coatings, the walls can be wetted. The swollen top layer of clay will be easy to clean.
The technical features of clay wall smears are that this base is relatively soft and free-flowing.
Before you start leveling the walls with putty, check the clay surface for damage. To do this, tap the wall with the handle of a trowel or spatula. A dull sound and slight movement will reveal places where the clay has moved away and may collapse. To prevent the new renovation from having to be redone because a piece of the wall has fallen off, it is better to remove the unsafe area in advance.
If there are cracks in the clay smear, you need to perform the following steps:
- Using a spatula, knife or trowel, clear the edges of the crack at an angle of 40-5 degrees to a depth of at least 1 centimeter.
- Treat with primer and allow to dry thoroughly.
- Using pressing movements, fill the crack with starting putty or a clay-sand mixture.
- Apply the serpyanka so that it completely covers the fault.
- Cover the top with a layer of putty, pressing the mesh into the mixture.
- Leave the corrected areas until completely dry.
Moreover, in this case, while the clay plaster is done at the highest level, the walls are even and smooth, the components of the composition are kept in perfect proportion, it is necessary to prepare the clay walls for applying putty.
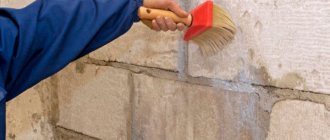
The clay base needs to be strengthened. To do this, use a deep penetration primer. Penetrating into the coating to a depth of up to a centimeter, the primer, when dry, perfectly glues the particles of the loose base, preventing them from disintegrating and preventing excess water from passing through. At the same time, priming the clay walls increases the level of adhesion of the base to the next finishing layer, and prevents the formation of mold, since for the most part, priming consistencies include disinfectant additives. It is also necessary to treat with a primer those places that have been cleaned of weak parts. Before applying putty, you need to prime the clay twice, thoroughly drying any layer.
Decorative finishing
Now the walls need to be treated with lime; this is done in several layers, if a purely Ukrainian version is required as a result. In another option, the surface is thoroughly sanded; you can use fine-grained sandpaper.
Then, using a deep-penetrating primer, the walls are treated and putty is applied with a finishing gypsum mixture. This is done to prepare the wall for subsequent wallpapering or painting it with water-based paint.
There are many finishing options, the main thing is to choose the one that suits you. Many will say that adobe houses and clay have not been in fashion for quite some time. But we must not forget that the main requirements for building materials are reliability, safety for human health and durability.
Both adobe and clay have all these qualities; moreover, it is also a very economical option that does not require the use of special equipment. Therefore, not only European residents, but also Russians are increasingly turning to this option.
Some tips:
- Experts advise using clay that has only melted after freezing. At this moment, its qualities are ideal for use.
- French builders use cattail for adhesion and believe that the clay is a natural preservative.
Lithuanian builders do not advise building adobe houses using “eco-trash” such as polystyrene and cotton wool. Such errors can affect the entire house as a whole, which can even result in its destruction.
How to plaster an adobe house?
They can stand for several hundred years, although they are made of straw. In addition to the fact that adobe houses are cheap and durable, they have an excellent microclimate. This structure will keep you cool in the summer and warm in the winter. Building an adobe house is quite cheap, and many people can afford it. However, not everyone knows how to properly plaster the outside walls of an adobe house.
For this purpose, you can use some dry mixtures that are currently on sale in our stores. How and with what to plaster the outside of an adobe house will be discussed in this review of the construction magazine samastroyka.ru.
Why putty the walls?
Why do you need to putty the walls at all, you ask? Well, I took off the old wallpaper and put up new ones. Or I lined the walls with plaster and also hung wallpaper on them.
The fact is that the walls, in any of the above cases, are quite rough, and the wallpaper on them will lie worse than if we had previously puttyed the wall. Wall putty is a fine leveling with millimeter precision. The good thing about putty is that, on the one hand, it is firmly attached to concrete or plaster, and on the other hand, new wallpaper fits perfectly on it.