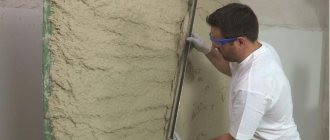
Before gluing wallpaper or other decorative coverings, the walls must be leveled. Usually plaster is used for this (with or without beacons).
This procedure is especially important for walls with chips, cracks, or old plaster that is crumbling.
In this case, the task of plastering is to create a flat, smooth surface without defects.
Types of plasters and working with them
The result of your work depends on the choice of plaster, its composition and conditions (temperature, humidity, surface quality, what the wall is made of, degree of unevenness).
Now mixtures can be divided into two types:
- With a plaster base;
- With a cement base.
Tools and material for plastering walls
To perform any construction and repair work, you need a specific tool that will make the work easier and help you complete it with the highest quality. To plaster walls, you need hand tools and a measuring tool to measure the plane of the plaster.
Hand tools for plastering
Spatula
Professional plasterers use spatulas of several sizes from proven manufacturers that can withstand large volumes of work. But for independent one-time plastering of walls, there is no point in purchasing expensive spatulas; it will be enough to purchase cheap spatulas that will withstand one repair.
It is recommended to have two to three working spatulas. One spatula 15-20 cm, for spreading the plaster and cleaning the rule from the plaster. A wide spatula up to 30-40 cm will be necessary for smoothing individual areas on the wall. One strong spatula from 20 to 40 cm may be useful for performing some rough and cleaning work, cleaning buckets and other things; in this case, a used tool is also suitable.
plaster spatula
Rule
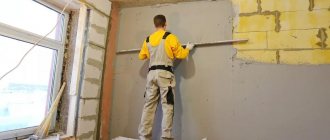
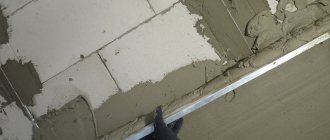
The main tool of a plasterer is a metal rule. Using the rule, the master smoothes the plaster mixture along the beacons on the wall, creating a single, even plane. The size of the rule must be greater than the step between the wall beacons. It is recommended to have several sizes of metal rules: 80 cm, 120 cm, 180 cm. The most popular is the 120 cm long rule. This tool is also necessary to check the plane of a wall that has already been smoothed along the beacons.
rule for plaster
Buckets and small containers
At least two buckets with a volume of 15 to 20 liters are required. The plaster mixture is prepared in buckets. One bucket can be used for plaster, the other for water, or both buckets for plaster to speed up the work. It is recommended to use plastic buckets or buckets made of other elastic materials. Since such buckets are more convenient to use, plaster residues are easily removed from them.
buckets for plaster
Small-volume containers: a plastic bucket up to 5 liters or a cut-off half of a rubber ball are an indispensable device when you have to plaster hard-to-reach places on the wall, seal cracks and corners. In such containers small portions of alabaster are mixed, which is often used for plastering.
half rubber ball is very convenient for working with alabaster and plaster in hard-to-reach places
Hand ladle or plastering trowel
Very convenient for putting dry plaster mixture into a bucket, for mixing plaster and for throwing the finished mixture onto the working surface of the wall. The plaster ladle is used with a capacity of 1 liter.
plastering ladle
Hammer and chisel
They are needed to knock down protrusions from the general plane of a part of the wall. It is often necessary to plaster walls made of old brick or other artificial stone, where there are many sharp-angled irregularities. If such protrusions are not knocked down, then in order to hide all the irregularities in a single plane, a large amount of plaster will be required.
Using a chisel and a hammer, for better grip, notches are made on the stone wall. Notches are made when the porosity of the wall is low, which is extremely rare.
hammer and chisel
Grater and coarse sandpaper
Necessary for additional leveling and cleaning of the surface of an already hardened plaster layer, before finishing.
Brush and paint brushes
In order to saturate the surface of the wall with a generous amount of primer, a coarse bristle brush is used. Using paint brushes and other paint brushes, you can saturate the most difficult to reach places on the wall: corners and cracks. As they say, the wall needs to be literally “watered” with primer and then the adhesion of the materials will become as stable as possible.
paint for priming walls
Power tools for plastering
Mixer
To prepare a liquid plaster mixture, a construction mixer is used, but such a tool is often used by construction teams that perform large volumes of work. For independent repair work, an artificial mixer consisting of a drill and a mixing attachment is used.
construction mixer
Drill or hammer drill
A drill together with a special mixing attachment can effectively replace a construction mixer and work no worse than the latter. A drill and hammer drill is lighter and more economical than a construction mixer and is a good option even for constant repair work.
drill with mixer attachment
Broom, dustpan, garbage bags
No renovation is complete without cleaning equipment. Cleaning is especially necessary during plastering work. When the plaster mixture dries, it creates a large amount of dust that has to be breathed and small stones that can get into the new mortar and create unevenness on the wall. Therefore, it is recommended to clean indoor floors at the end of each working day.
Measuring tool
Manual level (rack)
Used for smooth installation of beacons and periodic checking of the finishing plane during repairs.
level
Plumb
Using a plumb line, at the initial stage, the level of deviation of the wall from the vertical plane and the approximate thickness of the plaster layer that will be required for finishing are determined. When installing beacons, you will also need a plumb line.
plumb line and tape measure
Square
A metal or wooden square will be needed for installing beacons on slopes and deep doorways.
square for plastering walls
Materials for plastering walls
Plaster
Actually the material with which we finish the rough surface of the wall. It has a wide variety of manufacturer types and specific features. Before purchasing dry plaster mixture, read its characteristics, which are outlined on the bag. Pay attention to the thickness of the layer, which allows you to apply the mixture without deformation and the time it takes to gain strength. Read more about the types of plaster mixtures.
gypsum plaster
Primer
Used to impregnate a rough wall to improve the bonding ability of the wall and plaster. The primer is also used for subsequent finishing work, before applying putty to the hardened plaster layer and before gluing wallpaper. The primer also adheres the fragile parts of the wall to each other and enhances the strength of the top layer.
primer for wall
Metal beacons and corners
Lighthouses can be metal, plastic or artificial, which are made on site from a gypsum mixture (alabaster). Without beacons it is impossible to create a flat wall surface. Each type of beacon has its own advantages and disadvantages. Metal beacons are often used. Due to their softness, metal beacons must be handled very carefully, as the slightest damage to the surface of the beacon will create a noticeable unevenness on the wall.
beacons for plaster
Alabaster
A quickly set gypsum mixture that must be used during the installation of beacons. You will need a small volume of alabaster up to 5-10 kg for an average room of 15-18 square meters.
Mesh for reinforcement
It is used when the plaster layer exceeds 5 cm. The mesh strengthens the integrity of the layer and prevents the not yet hardened plaster composition from flowing down to the base of the wall, preventing peeling. The mesh is attached directly to the wall.
mesh for reinforcement
In addition to the one-time tool listed above, you may need small auxiliary tools that are used for any repairs and in everyday life: screwdrivers, pliers, scissors, several self-tapping screws.
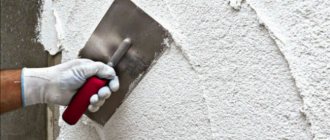
We complete the work - grouting
The last step is grouting, which is done using a float, pressing it firmly against the wall and moving it in a circular motion. On bumps you need to put in a little more effort.
Now you know how to properly plaster walls and can save on calling a repair team. And doing something with your own hands is an incomparable pleasure.
How to properly putty walls with your own hands
High-quality preparation of walls for various finishing works consists of obtaining a flat, smooth surface. To do this, you need to properly perform priming and puttying.
Puttying is not a difficult task. The main thing here is to follow the procedure and be able to handle construction tools correctly. We will look at how to properly putty walls yourself without resorting to the help of specialists in this article.
To putty the walls yourself, prepare a minimum set of tools. What tools can you not do without?
1. A drill equipped with a special attachment – a mixer. As a rule, putty is sold in the form of a dry mixture.
Water is added to this mixture in a certain proportion. Only with a special mixer can you mix the putty mixture perfectly. The output should be a homogeneous putty without lumps.
2. Set of spatulas. Be sure to choose a spatula of different sizes.
In your work you will have to use both large spatulas (40-50 cm) and very small ones. After all, in problem, hard-to-reach places, it will not be possible to properly putty the wall with a large spatula. This is exactly what small spatulas are used for.
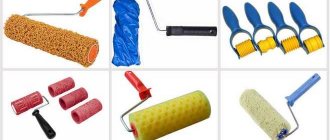
3. Rollers and brushes for priming walls.
It is not advisable to skip the priming step. After priming, the wall is covered with a thin film. This not only further increases its strength, but also ensures excellent adhesion of the treated wall to any facing materials (adhesion).
4.Rule. It will be needed in case of uneven walls when you have to apply putty in a thick layer. To level thick layers of putty, it is convenient to use a long metal rule.
5. Alcohol or laser level. Often the wall surface is very uneven. Before starting the initial puttying, test beacons are installed using an alcohol or laser level to check.
6.Sandpaper. If you want to get a beautiful surface that is pleasant to look at, use fine sandpaper for rubbing.
For example, grouting with 240-grit sandpaper will allow you to get the perfect result. Use the finest sandpaper only when performing finishing putty. And at the stage of the initial initial putty, it is correct to rub the wall with coarse coarse sandpaper.
7.Manual skinner. Sanding will become much more convenient if you use a manual sander. This is a tool with special clamps on the handle for securing the skin.
8.And, of course, you can’t do without a container in which the putty is mixed.
Preparing the wall for plastering
Wall preparation consists of two, sometimes three types of work:
- Cleaning the wall of old finishing materials, if any
- Wall primer, strengthening wall adhesion
- Installation of plaster reinforcing mesh, if necessary
- Installation of beacons
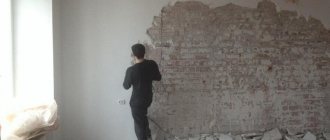
Cleaning the wall of old finishing materials, if any
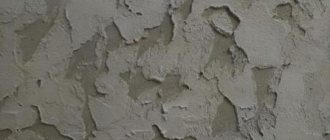
Plastering work must always be carried out on a solid surface where there are no falling off materials. All old finishing materials must be cleaned from the rough surface of the wall. Wallpaper and paint layers must be removed as much as possible. In practice, old plaster is removed partially or completely, depending on its condition. Some plaster layers may still be intact with the wall and be strong enough to serve as the basis for a new plaster layer.
the old layer of plaster must be knocked down completely or partially
When partially removed, unstable areas of the wall can be determined by tapping the plaster layer to produce a dull and empty sound. Such materials should be removed from the wall. Mark the places where old electrical wiring is laid in the wall so as not to damage it. Before starting work, you can turn off the power supply to the room in order to comply with safety precautions. But on the other hand, if you don’t know exactly where the wiring is, then if you damage the electrical cable, you won’t be able to determine exactly where it happened. Therefore, if you dismantle old plaster without turning off the electricity, wear gloves to avoid possible electric shock.
When dismantling the old layer, the electrical wiring can be damaged
However, in the case of plaster, there may be two sides to the coin. Before purchasing a plaster mixture, read the description of its properties, since not every plaster mixture can interact well with other compounds. Incompatibility of the components of the new and old plaster layer can cause its rejection and, as a result, the collapse of the plaster layer. In this case, it is recommended to completely clean the wall of old plaster before work.
After dismantling the old materials, it is recommended to clean the wall with a stiff brush or broom in order to sweep away any remaining dust and small particles that impair the adhesion of the new plaster to the rough wall.
after removing the old layer, the wall must be cleaned of dust
Wall primer, strengthening wall adhesion
The level of adhesion is the strength of adhesion of materials to dissimilar states. In our case, the materials in a heterogeneous state are a solid stone wall and a viscous-liquid plaster solution.
Wall adhesion is enhanced in several ways:
- Priming the wall with a special solution
Any hardware store has a variety of soil mixtures for walls. Before purchasing, it is recommended that you familiarize yourself with the characteristics of the primer, as it may not be compatible with the plaster that you plan to use. Some manufacturers are guilty of such properties of the primer, so they would only purchase plaster made by them, which is suitable only for their primer.
Concentrated soil mixtures are available for purchase, which must be diluted in water before use, and formulations already diluted with water. It is more profitable and practical to purchase a concentrated primer for ordinary repairs.
After cleaning the wall from dust, using a brush - a brush or a coarse-nap roller, the wall must be well soaked with a primer, literally “watered”. Use a paint brush to treat all small cracks and recesses with the solution; there should be no dry spots left on the wall. Depending on the humidity of the room, within 15-30 minutes the primer on the wall will gain strength, stick together the remaining small particles, and the wall surface will be sticky to the touch. This means that the surface is ready to apply a layer of plaster.
Before installing beacons and plastering, the wall must be well primed
If you do not prime the walls, but apply the material to a dry wall, then a dusty layer will remain between the wall itself and the plaster, and after gaining strength, the layer of plaster will most likely begin to fall off the wall.
- Notching the wall and cutting seams
It is recommended to make notches on the surface of the wall if it is insufficiently porous, as well as if you have to work with a cast reinforced concrete wall or with a wall made of large artificial stone (aerated concrete, foam concrete) where there are significantly fewer seams. And also when the wall was cleared of a smooth layer of paint, which could not be completely dismantled. It is best to combine priming the walls with applying serifs for greater efficiency. Thus, additional recesses are created for adhesion of the plaster to the wall and penetration of the soil mixture.
notches on the wall for plaster
Serifs are punched using a puncher or using a hammer and chisel. Then they are treated with a primer. At the same time, you can additionally identify weak points on the wall that need to be dismantled.
Installation of plaster reinforcing mesh, if required by technology
It is recommended to install a plaster mesh if the plaster layer is more than 5 cm. The mesh will significantly strengthen the wall and create a strong frame for a thick layer. Currently, reinforcing mesh is rarely used for interior decoration; a regular primer allows you to create good adhesion to the wall. But the most important thing is that it is cheaper and faster to manually knock down some of the bulges on the rough wall in order to reduce the thickness of the plaster layer.
It is advisable to install plaster mesh at the joints of walls made of two different materials, such as brick and aerated concrete, but in practice, such reinforcement is also rarely resorted to.
reinforcing mesh for plaster
Installation of beacons for plaster
Installation of beacons is the main stage of work, on which the quality and evenness of the wall plane depends. Therefore, it is recommended to do this work without haste.
In order to install beacons on the wall you need
- Find the zero point on the wall
- Mark the location of the beacons
- Secure and mount one or another type of beacon
How to find the zero point on a wall
The zero point is the most protruding place on the wall surface, in which the thickness of the plaster layer, relative to the future vertical plane, will be the smallest.
The zero point can be found in different ways. A simple way to find the most protruding point on the wall is to use a rule, a hand level and a construction ruler, vertically, measure the entire wall, applying the level rule to the wall. The vertical where the distance from the wall to the rule is greatest will have the most protruding point at the point of contact of the rule with the wall and will be zero. It must be marked on the wall with a pencil or other means.
Finding the zero point using a rule and level
Marking beacons on the wall
To mark beacons and place them in one plane, old manual methods are used: using a plumb line, ruler and level, as well as modern methods using a laser level. The laser level is quite expensive equipment and is used by craftsmen who do plastering work on an ongoing basis. Therefore, we will consider below a simple method of marking beacons using a regular plumb line, ruler, nylon thread and level.
The main purpose of marking and installing beacons is to create a vertically even layer in a plane, with a minimum layer of plaster.
- Step of beacons. When choosing the distance between the beacons, you must be guided by the length of the painting rule you will be working with and the features of the wall. It is most convenient to carry out plastering work with a rule of up to 1.5 meters in length. At the same time, so that the edges of the rule do not jump off the beacons when leveling the solution, it is recommended to mark the step between the beacons no more than 1.3 meters. Beacons recede from corners, windows and doorways at a distance of 10 cm to 30 cm. In this way, connections to corners and openings can be made most conveniently and evenly.
step between beacons for plaster
- We select a point at a distance from the corner and ceiling of the room from 10 cm to 20 cm. At this point, using a hammer drill or a regular screwdriver, a screwdriver, depending on the wall material, we screw in a self-tapping screw or drive in a dowel-nail. We screw in the self-tapping screw not all the way, but until it is firmly held. The self-tapping screw should protrude as much as possible above the wall, but no more than 5 cm. We carry out the same operation from the opposite corner of the room.
- We hang a plumb line on a screw that is screwed in under the ceiling and let it stop at the bottom. Strictly under the plumb line, vertically, we mark the lower point of the lighthouse at about 10 cm from the floor and higher to the ceiling, in increments of 30 to 40 cm we mark the same points.
marking outer beacons from corners
- At the marked points we screw in the screws to such a level that the heads of the screws are under the plumb thread and at the same distance from it, that is, in the same plane. We carry out a similar operation on the opposite side of the wall.
We screw the screws plumb into the wall
- Next, horizontally, between opposite screws, from each side of the wall, we stretch the nylon thread. It is IMPORTANT that the thread loop passes over the caps, creating a plane strictly at the level of the screw cap. By stretching the threads in the horizon between all the screws, it becomes clear where the most protruding point of the wall is located (the zero point). When screwing or unscrewing the screws, the tensioned thread must be brought closer to the zero point by the minimum thickness of the plaster layer (indicated on the bag) if you are installing gypsum beacons or at a distance equal to the thickness of the metal and other beacons if you plan to install them. Below are the types of beacons for plaster in this article.
the loop of thread of the first self-tapping screw runs along the head
- Having received a new level of the plane, after finding the zero point, we tighten all the screws vertically, focusing on the plumb line, in accordance with the zero point.
- After that, along the threads stretched horizontally between the self-tapping screws, we mark vertical lines for the middle beacons with the above-mentioned step of up to 1.3 meters. Using the previously described method, we mark points on the wall along a vertical line and tighten the screws according to the level of the tensioned thread.
the thread should pass along the head of the screw
Installation of plaster and metal beacons
Gypsum beacons
Installation of gypsum beacons can begin immediately after all the screw heads are in the same plane. A rule of 2 meters in length, alabaster, a spatula, or any slippery mixture is used.
Alabaster gains strength very quickly, so you need to work quickly but without haste.
gypsum beacons
Before starting work, clean the rule from all deposits and dust. Lubricate the flat coal side of the rule, the one on which alabaster will be applied, with any water-repellent mixture; a piece of lard, melted fat, or butter works well. This is necessary so that the rule peels off from the frozen plaster beacon. There is no need to rub it heavily with grease so that the fresh solution does not fall off the rules. After that, secure the rule in a horizontal plane and, after mixing the alabaster mixture, apply it in an even layer on the obtuse side of the rule that you have lubricated. Then, along the heads of the screws, vertically, place the rule against the wall, making sure that all the heads touch the rule, lubricate the lighthouse yourself with one hand, or an assistant will do it. Do not let go for 2-3 minutes until the alabaster hardens. After about 5-10 minutes, as the solution hardens, the rule must be removed from the gypsum beacon. The metal screws that remain in the body of the lighthouse should be unscrewed to avoid the formation of rust in the wall.
gypsum beacons
If, due to the insufficient length of the rule, the lighthouse does not reach the floor and ceiling, then in the same way, relying on the plane of the finished lighthouse, it can be extended to the required length, using the same rule.
Metal beacons
To install metal beacons, it is necessary to install special plastic clips on the heads of the screws, which firmly fix the beacon. Before installation, the beacon is cut to the required length. Before the advent of such clips, metal beacons were attached to the wall with plaster pads, using a rule and a hand level. This method can slightly reduce the thickness of the plaster layer, but is more labor-intensive and inaccurate for a beginner, and also involves further dismantling the beacon from the wall or its permanent presence in the wall, which has some adverse consequences.
clips and metal beacons
metal beacons
Preparation of cement mortar
The proportions of classic cement mortar are 1 part cement and a little more, 3-5 parts sand. Its quantity directly depends on the brand of cement. For example, when using M400 cement, the proportions will be 1:3.5.
The brand (that is, strength) of the resulting solution is often indicated in the literature. We repeat, not cement, but the already obtained solution! (see photo). Naturally, the higher this number, the stronger the surface will be.
Proportions of sand-cement mortar
M150-200 cement is best used only for interior work. For finishing facades, more durable mixtures with the addition of M300-M400 cement are used. Since its quality has not been up to par in recent years, it is better to play it safe and even use cement M300 and higher even for interior work. To level places with increased mechanical load (corners, doorways), it is better to take mixtures with the addition of M400-M500 cement.
Sand is used only clean, dry, without admixtures of stones and clay, preferably river sand. To prevent the plastered surface from cracking, you should not add too fine sand. The size of its fractions should be 0.5-2 mm.
The amount of water is determined experimentally. The mixture should not be too liquid and run off the trowel. Water is always added only after mixing the dry ingredients, in small portions.
Please note that the solution for applying the base (primer) layer is thicker than for the coating mixture and spray. We will discuss the last two types of solution below.
Pros and cons of metal beacons
- The main disadvantage of metal beacons is their tendency to corrosion and rust formation. Often, when working with the rule, the surface layer of the metal beacon is damaged, moisture from the solution, as well as from the rough wall itself, gets on it. In the future, rust may form, which will seep through wallpaper, decorative putty and other finishing materials that are mounted directly on the plaster.
- To avoid corrosion in the wall, metal beacons are sometimes dismantled from a hardened layer of plaster, which requires additional labor and additional consumption of plaster in order to seal the recesses after dismantling.
dismantling metal beacons creates damage in the plaster layer
- Metal beacons and clips for them must be purchased additionally, which entails material costs.
The main advantage of metal beacons is their strength. If installed firmly, the surface of the metal beacon is difficult to damage when working with the rule.
Selection of plaster mixture
Classic cement-sand mortar is used for finishing facades, bathrooms and showers (rooms with high humidity). It adheres well to brick and concrete. The walls are finished with cement mortar before gluing heavy tiles.
Proportions of cement-lime mortar
To finish wooden walls, lime is added to the solution or gypsum-cement mortars are used. They have less shrinkage and adhere better to such surfaces. You can also add slaked lime to the cement mortar to reduce the weight of the plaster. But, since it is capable of absorbing moisture, its use is only permissible for interior decoration of heated premises.
Since cement mortar can shrink strongly and crack when dry, it is applied in a layer of 3-5 mm. A large amount of solution can only be applied in layers. Moreover, each previous one must be well dried.
Pros and cons of gypsum beacons
- Gypsum beacons do not rust and do not need to be removed from the hardened plaster layer.
- They allow you to apply the thinnest layer of plaster on the wall; it is thinner than factory beacons and the clip does not take away the thickness.
- The cost of a gypsum beacon will be lower than any purchased beacons.
- If damaged, a gypsum beacon can be easily restored on site and there is no need to incur additional costs for purchasing a new beacon.
The only disadvantage of gypsum beacons is their greater fragility, unlike their metal counterparts. When plastering on gypsum beacons, you don’t need to be too zealous and put pressure on the rule.
gypsum beacons
Solution consumption per sq. m
Cement mortar
Although the cement-sand mixture seems to be cheaper, it should be borne in mind that its consumption is higher than that of gypsum mortar. It's easy to calculate consumption. When applying a layer of 1 cm per square meter, 17 kg of cement mortar will be required. Accordingly, as the layer thickness increases, the consumption will increase. You will need much less gypsum - about 9 kg. Accurate mixture consumption per sq. m the manufacturer always indicates on the packaging.