Methods of plastering without beacons
First you need to check the wall for level. If the distortion in one of the directions (horizontal, vertical) is too large, it is better to use special construction beacons. There are removable beacons, so you don’t need to purchase them for the entire room; you can cover one wall with plaster, and then use the beacons for other walls and the ceiling.
Most often, plastering of walls without beacons is carried out in utility and technological rooms, since they do not require perfectly smooth walls and ceilings. Plaster without beacons is thinner, so the material consumption is less, and therefore this method is more economical. You can apply this method to a living space, but first you need to make sure, using a building level, that the distortion of the walls is no more than 1-1.5 cm.
The easiest way to save money is to plaster walls without beacons
Pros and cons of finishing
The technology of plastering surfaces without the use of beacons has certain advantages:
- Economical mixture consumption - when installing profiles, the minimum layer thickness is 7-8 mm. A specialist with experience will have readings within 4-5 mm. The results for beginners will be different - 5-6 mm. and this is already evidence of savings. True, if you don’t have basic skills, it will decrease.
- Without beacons and thanks to a thin coating, it avoids the formation of cracks.
- A smaller thickness of plaster will not eat up a lot of usable space in the room.
- Since the purchase of beacons is postponed, there is no need to purchase associated fasteners.
- Installation of profiles, as well as their removal and sealing of grooves will require a certain amount of time. That is, abandoning beacons also reduces the time it takes to complete the work.
- A thin layer of plaster dries faster.
However, even here, with all the advantages, there are disadvantages. Firstly, it is impossible to obtain an absolutely flat surface - small defects cannot be avoided. Drawing an ideal vertical or diagonal is problematic, especially in the absence of experience and relevant skills. Secondly, the process itself is labor-intensive. Thirdly, you should not expect the job to be completed quickly.
On a note!
When working with beacons, all that remains is to simply throw the solution on the wall, and then follow the rule. In the case without beacons, it is necessary to constantly monitor the process. This forces processing to be carried out in small areas.
Tips for Newbies
Advice
Quality work depends on the mixture. It is necessary to mix the solution correctly.
Every beginner must adhere to an action plan:
- Water is poured into the container, then 6-8 trowels of the finished mixture are poured. Using a construction mixer, mix everything thoroughly.
- The other part of the mixture is added gradually and mixed well during the process. This will avoid the formation of lumps.
- Wait three minutes and repeat mixing.
- Before you get to work, pay attention to advice from experts:
- It is not recommended to treat walls that are too smooth at one time.
- The smooth surface is treated using a plaster mesh.
- It is not advisable to apply the prepared solution onto walls that are too wet or dry.
- Use a trowel to remove excess compound from the lines.
- The mixture for plaster should not be liquid, thick or dry (how to dilute the mixture correctly?).
- You can repair walls using putty yourself, without having extensive experience in installation. The main thing here is to follow all the rules and listen to the advice of experts. Only in this case can you get a good result. With careful attention, even beginners will succeed.
What mixtures are used most often?
When choosing a building mixture for leveling using technology without beacons, you need to rely on cost and operating conditions. Gypsum plaster (for example, Rotband) is suitable for dry rooms due to its environmental friendliness and ease of use. In addition, the solution quickly gains strength. And due to its low weight, it is also a good option for leveling ceilings.
The gypsum mixture is highly plastic, which is suitable for decorative finishing. However, the coating is susceptible to moisture, and therefore plastering the walls of damp rooms, including the bathroom, is extremely undesirable.
There is also another option - cement-based sand mortar. In this case, high reliability and durability of the coating is ensured. This surface is no longer afraid of water and is resistant to negative temperatures. Therefore, this is the optimal solution for arranging the façade of buildings and rooms with high levels of humidity. Cement-lime, as well as gypsum-lime mixtures are also widely used.
Attention
! When using mineral compositions, it is worth considering their general disadvantage - vibration and shrinkage of buildings are destructive for them. For this reason, if the structure is located in one of the earthquake-prone regions, it is necessary to choose a polymer mixture.
In dry rooms, gypsum mixture is preferable
Work on different walls
The type of base directly influences the technology for leveling walls with plaster. This must be taken into account first.
plaster wall
The gypsum surface must be coated with a special primer with deep penetration. This will not only strengthen the base, but also increase adhesion to the plaster.
Concrete wall
With a solid concrete base, there is usually no need for careful leveling since the surface is inherently free of curvature. Concrete walls are easy to plaster, but in order for the mortar to stick better, it is advisable to make notches up to 2 mm deep using a power tool with an appropriate nozzle.
Foam block
In such a substrate it is necessary to cover up the voids, otherwise the solution will not be distributed evenly. For this purpose, it is better to mix a thick cement composition by adding plasticizers.
Monolith
In this case, the surface must first be coated with a primer in two approaches. And give time for each layer to dry. In the future, it is worth running a rule along the wall to identify debris. Detected defects should be repaired with a solution, and then sanded and only then proceed to the main stage of applying plaster.
Brick wall
There is no need to perform any additional actions regarding brickwork. The mortar will catch on the seams between the building elements.
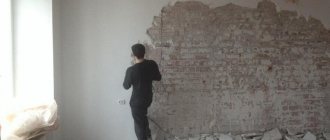
Stage 1 – prepare the surface
The further result will depend on the quality of this stage. The main task is to remove all excess from the wall, make it smooth, clean and ready for plastering. To begin with, all protruding parts are removed: hardened lumps of mortar, defects in concrete slabs and protruding nails or screws. After which the surface is cleaned of dust.
Advice! The adhesion to the smooth surface of the concrete wall will be poor, so you can make notches on it using a chisel or grinder. The wooden wall is covered with shingles. A brick wall, the seams of which will promote good adhesion, can be called ideal for plaster.
All that remains is to prime the wall. To do this, you need a roller and a brush to treat hard-to-reach areas. Subsequent work should begin after the primer has dried.
Basic techniques for plastering without beacons
There are several tactics that allow you to make walls smooth when using plaster mixtures, without beacons. The specific technique depends on the conditions for applying the solution and the preferences of the master.
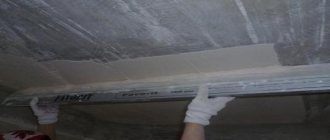
How to plaster using the rule without beacons
The rule strip is a suitable choice for leveling surfaces, especially when it has been decided not to use beacon profiles. There are several effective ways here.
The first tactic is suitable for leveling small areas or relatively flat surfaces. To begin with, the area to be treated is filled with the construction mixture using a spatula. Next, the strip is drawn along the surface (in a vertical position) with alignment to the strip. There is less mortar on the protruding parts of the wall than in the recesses. When the composition has dried, final leveling with a thin layer of plaster is carried out with a spatula.
For leveling, several methods are used to apply plaster.
Important!
If you need to process a wall to its full height, you should select a rule of suitable length (according to the height of the room or close to this value).
The second method uses a double pass. First of all, the mixture is applied with a spatula, forming a thin coating with relative evenness, and then it is leveled using the rule. Only during the first pass is the tool positioned horizontally relative to the surface and drawn from bottom to top. The second pass is performed on the slightly dried layer. In this case, the rule is to move in a horizontal direction (the tool is applied vertically).
The third technique is applicable for leveling corners and adjacent surfaces. Here, in addition to the rule, you also need a wide and medium spatula. The solution should be of medium viscosity.
First, the mixture is applied to a wide tool, after which it is applied to the edge of the wall, but without going to the corner itself. A strip of solution of a triangular cross-section is formed - towards the corner it is thicker, and towards the center of the surface it is thinner.
The rule is applied to the corner and with zigzag movements you need to move it towards the center of the wall. In this case, excess mortar will be cut off and a kind of “beacon” will appear in the extreme part of the wall. The edge farthest from the corner is smoothed with a wide spatula, making horizontal movements with it.
After filling the entire wall with such “beacons” and setting the plaster, you can begin to form the leveling layer. Here, a wide spatula is also used and a strip is made along the direction of the “beacons”. One end of the rule rests on the “beacon”, the other on the wall (that is, the tool is applied horizontally) and in this position the excess mortar is cut off. The corner itself is filled with the mixture with a short spatula, and then leveling is done using the rule on an already flat plane.
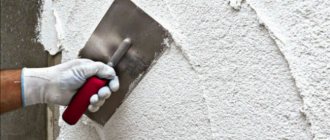
Leveling walls with plaster with your own hands without beacons using a spatula
If the size of the irregularities on the wall does not exceed 2-4 mm, then in addition to the beacons, you can also abandon the rule. The plastering technology will be performed exclusively with a spatula. In this case, the mixture is applied in a thin layer, which saves both material and time. All you need in terms of tools for leveling walls with plaster without beacons is two spatulas. One is wide, the other with a short blade (from 80 to 90 mm).
Using a short spatula, the mixture is evenly placed on a wide tool or on the wall itself in small piles. Using a wide spatula, level the solution, removing excess.
For your information!
If the surface to be treated is large, a rule will still be needed to correct defects that may form. In small areas there is no such need.
This leveling method is used if the size of the base unevenness does not exceed 2-4 mm
Alignment with preliminary marking
The essence of this medoka is that plastering is carried out with an emphasis on approximate lines, and alignment is made a rule. A fishing line is suitable as a guide, or paths are made from mortar.
The fishing line requires preparation. Along each edge of the wall you need to screw 3 self-tapping screws into a vertical line, departing from the corner by 100 mm. All caps should be leveled - they should rise 5-6 mm above the surface. After adjustments, you need to pull three fishing lines between the fasteners in a horizontal direction. They should be located on the caps. This will become a guideline for the leveling layer.
The second way is as follows. Three horizontal lines are drawn. One will run along the center of the wall, the other two are located at a distance of 10-15 cm from the edge (under-ceiling and above-floor). A path of construction mixture is formed along these boundaries, and their surface must be leveled using a rule and a level. The result is mortar beacons.
Cement mortar is used, but to make it harden faster, it is recommended to add a little gypsum. When the solution dries, if desired, you can level the surface of the tracks with a spatula or sandpaper, getting rid of lumps.
Stretch lines can serve as guide lines
Application of laser level
To begin with, the surface of the wall is primed, then marks are made at a distance of 10-15 cm from the corners. The laser level is placed in such a way that the vertical beam coincides with the marks made. According to the markings, beacons are formed from a cement mixture. And then you can proceed directly to plastering work.
This technique works well in the case of large plane deviations. With a slight difference, horizontal solution beacons are enough.
The most popular method is working with a laser level
The procedure for plastering without beacons
How to correctly implement the technology of plastering surfaces without using metal or plastic profiles? First of all, it is imperative to follow all stages of work. If you ignore any of them, you will have to do everything again. And this is a waste of time, effort and finances.
Preparatory work
The plaster should be applied to a previously prepared surface of the wall or ceiling, cleaned of dust, protruding lumps of masonry mortar or defects in concrete slabs and protruding screws.
On a smooth concrete wall, it is necessary to make approximately 20-30 notches per square meter with a chisel for better adhesion of the mortar to the surface. A wooden wall must be covered with shingles or slats diagonally. The seams of the brickwork themselves will serve as an adhesive link.
Next, we treat the surface of the walls and ceiling with a primer corresponding to the wall material (deep penetration or concrete primer). The treated surface should be given time to dry (at least 12 hours) and you can begin plastering.
Materials and tools
The following tools are required for plastering work:
- solution container;
- water container;
- putty knife;
- construction ladle or trowel;
- construction float;
- rule;
- shovel (preferably a construction mixer with a drill, a concrete mixer);
- large sieve (if preparing a solution from individual components);
- large paint brush (for preparatory work).
You will also need consumables:
- fine-grained sand;
- cement grade 400;
- water;
- PVA glue (preferably);
- primer (for surface preparation).
You can prepare the solution yourself; for plastering you should take 3-4 parts of sand + 1 part of grade 400 cement. PVA glue is added for the plasticity of the solution and for better adhesion to the surface of the wall and ceiling.
Advice!
It is recommended to use ready-made building mixtures; their composition is selected most accurately for durable, high-quality plaster, and it is easier to work with them, especially for beginners.
Calculation of material requirements
It’s easiest to calculate how much solution with beacons is needed. It is only necessary to multiply the value of the average thickness by the area of the processed surfaces. But if you bypass the beacon profiles, the calculation will be difficult.
Professional builders have learned to determine the required amount of material (finished product or in the case of mixing the mortar on their own), adopting an effective method. Its essence is as follows:
- Using a rule and a level, the point with the greatest deviation relative to the vertical is determined and its value is measured.
- The resulting value must be divided in half and added 4 mm.
- The result must be multiplied by the area of the wall.
- The final figure is multiplied again, but by the safety factor (1.15).
It is a little easier to carry out with ready-made plaster, since the data is indicated by the manufacturer on the packaging.
If it was decided to carry out plastering work without the use of beacons, then suitable material will be required
Mixing the solution
It is necessary to sift the sand through a sieve to remove large particles and debris. Pour 3-4 parts of sand, 1 part of cement into the trough, mix with a shovel. You should add a little water and mix again.
You need to add water gradually so that the solution is not too liquid, otherwise it will drain from the surface, and too thick a solution will fall off the wall. When mixing, add PVA glue to the water; the consumption of PVA per bucket of solution is approximately equal to one construction ladle. You need to knead the solution and check how it stays on the wall; if it falls off, add more water; if it drips, add dry mixture. For the ceiling, the solution should be mixed thicker.
Fact!
The ready-made mixture for plastering walls and ceilings is very easy to prepare. Add water to it in the proportions indicated on the package and stir.
Solution application technology
After the wall surfaces are cleaned of dirt and coated with primer, and when the solution has already been mixed, it’s time to begin the main part of the finishing. Actually, the technology itself consists of several interconnected sequential stages:
- Spraying is the very first preparatory layer of plaster. The solution at this stage is diluted to the consistency of liquid sour cream.
- The soil is the basis of the future coating and it is here that a protective layer of the required thickness is formed. The construction mixture must be made thicker than for spraying.
- Washing is the third layer, which, in fact, represents the finishing stage of plaster. The consistency of the solution should also be the same as when sprayed or even thinner.
Each of these stages has its own role in creating a durable coating. If all technology is followed, including preliminary work, the plaster layer will last for a long time without requiring repairs.
First layer of solution
For better adhesion of the solution to the wall, be sure to moisten it with water. Using a construction ladle or trowel, apply the solution to a section of the wall approximately 1 square meter. Use a construction float to level the mortar over the surface; the thickness of the mortar should be about 5-7 mm.
For work, you need to choose a grater that is long enough (40-50 cm), then the layer of solution will lie more evenly. The grater should be moved in different directions, from bottom to top, from left to right, in an arc, etc.
Next, the next meter of mortar is applied and thus the entire wall is gradually plastered. You should work from the bottom of the wall upward.
Attention! There is no need to try to completely level the solution; the roughness will be useful for adhesion to the second layer of plaster. Leave the wall to dry for about 2 hours.
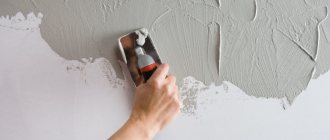
Second layer of solution
After the first layer has dried, you should go over the entire wall as a rule. This tool will remove large deposits of plaster. The rule is to apply it close to the wall and move it in different directions so that excess protruding particles move away from the wall.
Next, a second layer of solution is applied. This time the plaster should be smoothed more strongly. Do not throw the second layer on the wall, but apply it to a grater with a spatula and level the surface with it. Movements are also in all directions.
It is necessary to give the solution a little time to set. When the top layer is slightly crusty, you can check the wall for evenness. To do this, apply the rule to the wall and look for the presence of depressions and bumps. The lumps are removed with a construction float; it should be moved in a circular motion, removing excess mortar.
Periodically you need to apply a rule and level the wall. There should be no major defects left at this stage.
Allow the plaster to dry for another 3 hours.
Third layer of solution
The third layer of plaster is the thinnest, it is needed to make the plaster smooth.
Add water to the solution; it should become very liquid. Using a construction bucket, starting from the top of the wall, water a square meter of surface. Using a trowel in a circular motion, level the plaster. Leave this layer to dry for 5-8 hours.
It is necessary to plaster the wall with mortar in small areas
Grouting plaster
When the third layer has dried well enough, grouting should begin. It gives the plaster a velvety feel. Use a ladle to pour water onto the wall and rub it with a grater in a circular motion. Do this all over the wall.
If the walls are being prepared for tiles or facing stones, then this stage should be omitted. For the listed types of finishing, roughness should remain on the wall; they contribute to better adhesion of the finishing to the plaster. Before wallpapering or painting, it is definitely recommended to grout the walls and ceiling, this will reduce the cost of putty in the future.
The plaster should dry for several days at average temperature and humidity. In very hot weather, the plaster must be periodically moistened with water to prevent cracks.
Important!
This method is best used for utility rooms; it is advisable to plaster residential premises in beacons. They help make both the surface itself and the position of the wall in the plane more even.
For a small room, one way or another will result in small savings in material consumption, and working with beacons with your own hands is much easier and more practical.
Calculation of material requirements
Now, based on the condition of the wall surface, you can determine how significant the defects are, perform calculations that allow you to estimate the amount of material costs and the amount of Rotband or cement, gypsum and sand required for repair. First of all you need:
Find the product of the area of the area to be plastered and the thickness of the layer of applied mortar. 13-15% is subtracted from the result obtained (obligatory losses), and having learned the final figure, use the tables for preparing construction mixtures to determine how much sand and cement you will need to buy.
Plaster layer thickness
Experienced plasterers, painters, and façade designers can share secrets on how to level a wall without beacons with your own hands, avoiding overuse of building mixtures. The most accurate data is obtained from the linear parameters of the area being finished, taking into account the need to deduct the area of window and door openings, as well as arched structures.
Now it is necessary to determine the severity of deflections and deformations in order to establish the planned thickness of the layer of the applied mixture.
Of course, modern manufacturers, presenting Rotband-type plaster mixtures on the construction market, indicate directly on the bags the consumption of the finished mortar per 1 m2 of area to be plastered without installing beacons. Based on this data, it is easier to understand how many bags of dry composition you need to purchase.
How to plaster walls without beacons with large deviations
Even if the surface is too curved and with large deviations, this does not prohibit technology without beacons. And if there are several such areas, work should begin from the outermost zones along the perimeter.
To begin with, sight lines are made on the side of the ceiling, floor and adjacent walls adjacent to the surface to be treated. Thanks to this landmark, an auxiliary vertical plane is formed.
The sequence of actions on how to plaster without beacons with strong deviations is expressed as follows:
- Using a rule or the length of a rigid rod, the most convex part of the wall (zero point) is found by applying the tool and running it along the surface. You need to add 5 mm for the plaster layer.
- Now you need to transfer the projection of the zero point to the surfaces adjacent to the wall (floor, ceiling). A line parallel to the wall being processed is drawn through this point. It is more convenient to use a laser level.
- The wall section is wetted, and the spray is applied in the form of a thin layer (the mixture should have a semi-liquid consistency). However, it should not extend beyond the auxiliary plane. This is monitored visually along the nearest hairline.
- Allow time to dry the spray. Next, a layer of primer is laid taking into account the auxiliary line.
- When the plastering of the area is completed, move on to the next zone and do this with all the problem areas of the wall. At the same time, the surface should be controlled using a rule and a level. When moving from one uneven area to another, you need to move in a circle, leaving the last section in the center of the wall.
- After sealing the last outer section, the inner part of the “ring” is aligned, taking into account the finished plane with the plaster already laid. Gradually it shrinks and everything ends in the center of the wall.
When the work is completed, it is advisable to walk along the entire wall as a rule to ensure its evenness.
Stage 2 – prepare the solution solution
All you have to do is open the finished plaster and start working. The dry one will have to be cooked. For mixing you will need a bucket of water into which the plaster is added. At the same time, the contents are mixed with a mixer. The instructions indicate the proportions and sequence of work. The mixture should have a paste-like consistency.
Subtlety! When the solution is mixed, it should be left for 5-10 minutes, and then mixed again. So it will “get there” and be perfect.
You should not mix a lot of solution at a time, as it has its own “lifetime”. During this time, the entire mixture must be applied to the wall.
Application of plastering technology without beacons
Plastering without the use of profiles allows you to speed up the work, since you do not need to wait until the beacons are fixed. In addition, financial savings can be seen here. However, despite the benefits of using beacon profiles, in some situations their absence is completely justified:
- With a slight slope of the wall, which cannot be seen with the naked eye. And also when small flaws are visible on the surface.
- A flat surface with slight slopes at the corners.
- There are waves or only the upper part of the wall is blocked.
- The need to eliminate defects on a flat surface.
- Plastering small areas.
- If the evenness of the walls is not an important requirement.
It is worth noting the use of attached and hanging furniture. If objects hide the middle of the wall from view, then its unevenness will be effectively hidden.
Carrying out work on leveling walls with plaster without beacons requires a lot of effort and time
Most property owners try to do it on their own when planning plastering work. But it is worth noting that performing plastering without the use of beacons is fraught with certain difficulties. It is worth practicing on some section of the wall that is subject to further processing. Throw on a rough layer, remove it and repeat the procedure until the skill is mastered. This will allow you to hone your skills, after which you can proceed directly to the main part of the work.
Did you learn something new? Share it in the comments!