Painting on walls has been practiced since ancient times. This can be judged by the surviving old buildings. Artists especially often painted walls in temples, palaces and other majestic buildings. For a while, this decorative method was forgotten, but is now being revived again.
Wall painting is an opportunity to make your interior or exterior unique and unsurpassed. It is simply impossible to draw the same picture twice. In addition, paints on different substrates may look darker or lighter. Nowadays, wall painting is used to decorate not only temples and churches, but also public buildings and residential premises. It is often applied to the facades of houses and brick main walls. The applied image can delight you for decades, or even centuries, if the paints are prepared in accordance with the technology and the surface is properly prepared. An important advantage of frescoes is that they are not afraid of temperature changes or other impact factors, so they remain attractive and unsurpassed for a long time.
Modern masters use two painting techniques - on dry and wet plaster. Each technology has its own advantages and disadvantages, features that must be taken into account. If you decide to decorate a wall with painting, you are not limited in your choice. You can choose a design for any theme, regardless of the color scheme and general style of the room. The image on the plaster will make the room elegant and sophisticated, adding a touch of uniqueness to the chosen style.
Types of painting on plaster
There are different techniques for painting on plastered walls. The main ones:
- Fresco. It is painting on wet plaster with water-based paints. To create a design, you need a special plastic mass made from slaked lime, sand, and brick dust. Ideally, crushed linen threads or hemp are added to this mixture - in this case, the picture on the wall will be more durable and will not crack or crumble.
- Alsecco. This is painting with paints on dry plaster. For this technique, special paints based on glue, water, and raw eggs are used. They allow you to obtain a durable image that is not damaged by adverse factors.
Painting on dry plaster
The technique of painting on dry plaster is called alsecco. It appeared much later than frescoes, although now it is very popular. Only artists can use this technique, since the image is drawn on the wall and not applied using stencils.
Due to its excellent resistance to moisture, low and high temperatures, and various precipitation, painting using this technique is often done on the facades of buildings. The image retains its color saturation for a long time. Such drawings on the walls always look excellent and luxurious.
Technique of painting with paints on dry plaster
Painting on dry plaster has its own characteristics. It does not require haste; one master or several people can draw on the wall in a convenient manner. The paints contain natural materials, so the finished paintings will be safe for adults and children. Most often, the dry method is used to decorate bedrooms and children's rooms. The colors of the paints are characterized by brightness, and the materials themselves are dense; moreover, they do not fade for a long time and do not crumble.
The uniqueness of the alsecco technique
Now the alsecco technique (asecco, secco) has begun to gain popularity, especially for decorating buildings, fences, as well as for the interior of houses and apartments. This type of wall painting involves painting on an already dry, but re-moistened surface. The technique is considered unique and has a number of undeniable advantages:
- use of 100% harmless dyes;
- the ability to work all day or several days without the need to accelerate;
- durability of the image, resistance to changes in humidity and temperature;
- careful drawing of details, clarity of the picture;
- the ability to create three-dimensional images and multifaceted figures;
- suitability for paintings on any subject, performing work in all kinds of artistic styles;
- the ability to correct the image or wash it with clean water during work.
Disadvantages of painting on dry plaster
Only a professional can draw a truly beautiful picture and create voluminous decor. We are not talking about small drawings or ornaments that can be made using a stencil, but about truly exclusive works. The price of such work will be very high, and completion will take many days. Since such an interior can become boring, it is better to think in advance about its feasibility.
It is recommended to carry out large wall images in rooms where you usually do not spend a lot of time: offices, hallways, libraries.
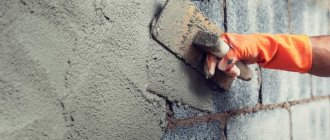
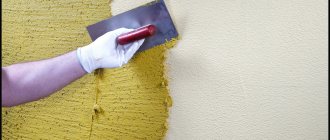
Preparing the surface for the artist's work
To get a beautiful and durable image on the wall, it should be properly prepared. First, remove old coatings: paint, wallpaper. Then all chips, defects, and traces of fasteners are covered with plaster or putty. The base is primed with 1-2 layers, then plastered again with a suitable composition, leveled to perfect condition. After drying, the plaster is primed again, dried well, and only then can the artist begin work.
Technique of wall painting with paints on dry plaster.
Wall painting on dry plaster is called Alsecco. They use paints mixed with raw eggs, glue based, and water. Painting on dry plaster is more resistant to polluted air and dampness. This way you can paint the walls of buildings from the street side.
The technique of wall painting with paints on dried plaster appeared later than frescoes. Compared to light translucent frescoes, painting on dried plaster looks bright, colorful, and does not lose its original appearance for a long time.
Wall painting on dry plaster is carried out by artists. Therefore, the facade of a house with such decoration or the interior of a room looks elegant and chic.
What is unique about the alsecco technique?
Recently, wall painting on dry plaster has begun to decorate many buildings, and masters have appeared who are fluent in the specific features of this work. Unlike a fresco, painting an image on a dry wall does not require fast work, since the artist is not involved in the process of drying the wall. After all, the fresco must be applied to a damp surface, which means you need to have time to finish the painting before the surface dries. It is more convenient to paint on a dry wall. Can be done by one artist or a group. This painting technique originated in Europe in the Middle Ages and is still used today. What attracts such pictures?
- Paints are based on natural materials: water, lime. They can be used to paint walls even in a nursery. They are absolutely safe for health.
- Durability. Colors based on natural ingredients adhere well to plaster, do not crumble or fade.
- All details of the picture are carefully recorded.
- Resistant compositions are not afraid of exposure to natural factors or sudden changes in air temperature. The alsecco technique is used to decorate plastered exterior walls and building facades, painting blank walls and solid brick fences.
Important to note! Using this technique, paintings on any subjects made in different artistic styles will look quite harmonious.
The technique of wall painting with paints on dried plaster should be well mastered by a person who approaches the matter with soul and has an artistic vision.
Disadvantages of painting wall art on dry plaster.
The complexity and responsibility of the work requires its execution by a real master - an artist. This kind of work is unique, exclusive, and cannot be exactly repeated. Therefore, the cost of finishing will be higher than stencil images. The work will take a long time to complete. Therefore, you can’t count on quickly completing the decoration of a room with wall painting on dry plaster. In order for the artist to work calmly, without haste, discuss with him in advance how long you need to focus on. The functionality of the room may vary. Therefore, such expensive design projects should decorate offices, living rooms, and libraries.
Advice! Choose a subject for a painting carefully, expect that the painting will last for a long time, so that after 2-3 years you don’t have to cover it up or spend money on a new painting.
How to prepare a wall surface for an artist's work.
If you want to get the perfect picture on the wall, prepare it well. The wall must be cleaned of old paint or wallpaper. Carefully repair dowel marks or other defects with putty. After this, coat the surface with a primer and plaster again. Achieve a completely flat surface. Once it's dry, prime it again and let it dry. The place for the masterpiece is ready! The subtleties of working with dry plaster are that the material is applied in several layers. Each subsequent layer is applied to the dried previous one.
Painting on wet plaster with water paints
The meaning of this technique is that the design is applied to the wall before the plaster dries. First, light colors are applied to the surface, then darker, more saturated and bright elements are alternated.
The plaster mass itself also has its own peculiarities: in its production, high-quality lime is necessarily used, which is quenched with water until the active chemical reaction stops.
Also, to make plaster you need the smallest brick chips - they are able to retain water for a long time and not dry out. The wall is also prepared in a special way: unevenness is artificially created on it to enhance adhesion to the material. During painting, the wall surface is regularly moistened so that the paint lies on the wet base. After drying, the picture will lighten a little, which is due to the presence of lime in the composition.
The quality of the finished fresco will depend on the type of surface. For example, brickwork absorbs water strongly, so the fresco will dry quickly, and without additional priming, the contours of the image may crack. On weakly absorbent bases the fresco dries slowly, as a result the painting will look more natural. The more layers of plaster applied to the surface, the longer it takes to dry.
Technology of painting on wet plaster with water paints
The technique of painting on a wet base is quite complex. It includes the following stages of work:
- Creating a drawing and preparing a life-size model.
- Cutting the workpiece into separate fragments.
- Transferring the drawing to the wall, tracing the contours.
- Whitening the main background.
- Filling individual segments of the fresco with color.
There are also simplified options for performing the technique. If you have the skill and some experience, you can do the job even at home. In the original, speed of reactions and precision of strokes are required. To make the task easier, the layout of the picture should be painted in advance as it will be done on the wall, and painted with shadows.
History of the method
Painting on wet plaster was practiced in the ancient Mediterranean. Some paintings made several centuries ago have survived to this day - they can be seen on the walls of temples and ancient buildings. In Ancient Rome, painting on plaster decorated palaces, walls in the houses of rich people, and public buildings. There were especially many frescoes in the cities of Pompeii and Herculaneum, which later turned out to be covered with the ashes of Vesuvius.
In the Middle Ages, frescoes became even more popular. Thanks to inexpensive raw materials, which were prepared from local minerals, they began to be used everywhere. Italian artists who possessed enormous skill and talent became widely famous.
Because the paint adhered tightly to the plaster, it lasted an incredibly long time and did not fade, although it became paler after drying. Until the 18th century, fresco occupied a leading position in interior decoration, and only later was it replaced by new types of art.
The essence of the process
After the plaster based on sand and lime is applied to the wall in several layers, a drawing is made on the top with certain types of paint. The latter must be water-soluble, based on lime, casein or silicates.
Gradually, the paints are absorbed into the plaster and color the lime (calcium carbonate) present in it. As a result, the painting becomes part of the wall and is not erased. It can only be removed by removing a layer of plaster.
Frescoes in the apartment
A fresco is a type of monumental painting: it cannot be removed, like a painting, and hung in another place. For a fresco to truly decorate a room, it must become an integral part of the interior, in harmony with its other elements. That is why you need to think through the design of the room in advance and decide on the type of painting that will be depicted on the wall.
The dimensions of the fresco also need to be calculated
Painting on wet plaster
If this painting technique is used, the plaster is prepared in a special way. Brick chips must be added to it. It retains moisture and does not allow the solution to dry out quickly. Lime must also be added to the solution, but it must first be quenched in water. To prevent cracking, linen threads are added to the mixture.
The paint is applied to the wall until the plaster has dried. The surface is regularly moistened. Coloring mixtures are applied in several layers. First light shades, then dark ones. Since the master has little time to complete the work, stencils are prepared in advance. Although the technique requires precision strokes from the master. The speed of work directly depends on the base. For example, a brick wall absorbs moisture well, so the plaster dries quickly, but the mixture on a concrete base remains wet for a long time.
When choosing a color scheme, keep in mind that lime-based paints lighten when dry. The background is usually highlighted with lime, although other solutions can be used.
Technology for creating frescoes on plaster
The work includes two main areas: applying plaster and painting it. Both stages are directly related, and the second follows from the first. It is important to strictly follow the technological process, otherwise the image may crack and soon crumble.
Image selection
To make a fresco, choose any design that suits the main style. To paint the walls yourself, you should not take more than 3 primary colors. The wall on which the fresco will be located should be well lit by the rays of the sun, not cluttered with pieces of furniture.
Preparing the base
Finishing work always begins with high-quality preparation of the wall. As part of the preparatory activities, the following actions are carried out:
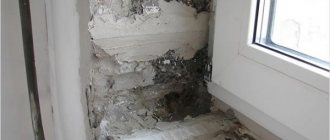
- Removing the old coating. Remove all flaking materials, clean the plaster down to the base (concrete, brick, wood). If the layer holds tightly, you can limit yourself to partial removal of crumbling areas. The surface of the wall is carefully swept with a rag to remove debris and dust.
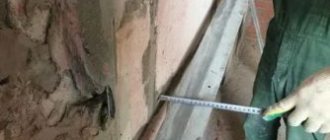
- Making notches. Using a hammer drill with a special chisel attachment, small cuts less than 0.8 cm deep are made on the wall. For 1 sq. m area approximately 120 notches are applied. Once again brush off the dust from the base.
- Padding. The substrate is treated with a deeply penetrating composition in 1–3 layers to improve the adhesion strength to the plaster.
Preparation of the solution
Experienced craftsmen prepare solutions according to their “recipes”, selecting the ratio of components experimentally. But recommendations on proportions still exist. Usually, to complete the first layers of plaster, the following are mixed together:
- 1 part slaked lime;
- 4 parts sand;
- a little finely chopped hemp or cellulose.
For the finishing layer of plaster, combine 1 part lime and 2.5 parts sand. The ideal option would be to replace the sand or its share with brick powder. For street work, the amount of brick should be small. As for lime, it must be of high quality, otherwise it will not be suitable for painting frescoes. Cheap lime has minimal calcium oxide content, so slaking it can take several months. As a result, efflorescence will occur and the plaster will pull away from the wall or peel.
The ideal option is to buy pure fluffed lime for the solution, which has already been quenched. You can also purchase quicklime powder and extinguish it yourself (fill it with clean water for 2 weeks, then drain the liquid). Sand for plastering must also be of high quality and clean. It is better to take river sand and sift it through a fine sieve to make the plaster more plastic.
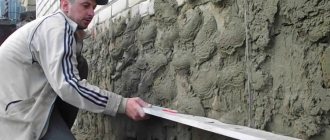
Applying plaster
After preparing the plaster, you should immediately begin applying it to the wall. There should be at least two layers, but most often 3 layers of plaster are performed (maximum number - 7). If the thickness of the plaster is more than 1–1.5 cm, the risk of cracking will increase.
Plastering is carried out in three stages:
- Spray
- Priming.
- Cover.
First, beacons are attached to the wall, which will allow you to level the plaster. Spraying is done with a trowel, casting the first layer up to 6–8 mm thick. Distribute the plaster with a trowel to ensure uniformity, but do not smooth it too much. Excess solution is removed as a rule. Using a notched trowel or other convenient tool, make wavy lines up to 2 mm deep in increments of 40 mm. Such waves will help form the relief and improve adhesion to subsequent layers of plaster.
After partial setting of the first layer, proceed to the second, intermediate one. For soil, the solution should be thicker than for spraying, so less water is added to the plaster. The mixture is applied to the wall with a trowel, rubbed with a trowel, and the excess is removed as a rule. The position of the plaster layer is regularly checked by level, since at this stage the base is leveled.
For covering, the plaster is made more liquid. Apply it using a grater in a thin layer (2–3 mm). In one approach, it is advisable to apply as much covering to the wall as can be painted over immediately, because it dries very quickly. Experienced craftsmen paint 6–9 square meters. m per day, and beginners should start with small paintings.
Paint for painting
When choosing paint, you need to take into account that the lime component of the plaster has an alkaline reaction, so the pigments must be alkali-resistant. Otherwise, the paint will quickly change color or become discolored altogether.
Also, the pigments must be soluble in water, otherwise it will be difficult to dilute them, and upon contact with the plaster, the paint base will be damaged. Most often, the following types of paints are used for painting on wet plaster:
- acrylic water - diluted with ordinary water, contain various pigments: chromium oxide, umber, sienna, burgundy, ocher, cinnabar and others;
- lime - prepared on the basis of lime water or dough, very convenient for making changes to the fresco;
- tempera - contains chicken eggs, casein, liquid glass, and additives to slow down drying.
Tempera paints are considered the most durable and beautiful. Egg white albumin reacts with the lime of the plaster, resulting in a new chemical compound - calcium albuminate. It is very durable and does not collapse for many years. Experienced craftsmen dilute tempera paints with beer or wine, not water, and add only egg white (the yolk can change the main shade).
Liquid glass improves the quality of the finished paint: it is always added for painting exterior walls. When in contact with lime, silicates form an insoluble substance that is not at all afraid of precipitation and temperature changes.
The finished paint should not be thick. It is better if the consistency resembles semi-liquid sour cream. When painting plaster, you need to use a soft brush that does not leave lint.
Applying an image
First, apply a sketch of the future picture to the wall and carefully pin it directly to the layer of plaster. Mark the lines with a sharp awl, getting a clear imprint, and remove the paper. Next, we begin to draw the light areas. It is recommended to bleach them with slaked lime in advance so that the pastel shades have their natural appearance. Gradually move to medium-bright tones, then to dark ones.
The strokes are made with light movements so that the brush does not remove the wet lime composition from the wall. If white streaks appear in the paint, immediately wash the brush and squeeze it out. After completing the main drawing, begin drawing in the reverse order:
- Dark colors.
- Medium shades.
- The lightest colors.
Drawing makes it possible to make transitions between individual areas smooth and natural. At the end of the painting, the edges of the unpainted plaster are carefully cut off with a sharp knife, forming bevels, gypsum mortar is applied to them and carefully smoothed. As a result, the joints between the fresco and the wall should completely disappear.
The finished fresco takes about 10 days to dry, since the paint is absorbed into the plaster rather slowly. During this time, drafts and temperature changes should not be allowed to occur. In general, the technique of painting on wet plaster is quite complex, but if you wish and have artistic taste, it is quite possible to master and practice it yourself.