The final finishing of the slopes after installing plastic windows is a mandatory step in decorating the house. In addition to decoration, high-quality slopes well insulate the window frame and protect the room from dust, drafts, rain and snow. Properly installed windows will last you a very long time.
It is customary to do slopes immediately after installing windows. The polyurethane foam used to fill the gaps between the window frames is destroyed literally in one season when exposed to moisture and direct sunlight. It by itself cannot provide sufficient insulation from moisture and cold, and even more so if it is destroyed. This means that the seams made of polyurethane foam must be carefully hidden under the slopes.
The use of cement or other special mortar for finishing and decorating slopes is the cheapest among analogues - finishing with metal, plastic, ceramic tiles, drywall, etc. The disadvantage of this work is that it is very dirty; an inexperienced or novice builder will have to tinker before the slopes become perfectly smooth. Therefore, if you are not confident in your abilities, we recommend turning to professionals who will do this work much faster and with better quality. However, if you decide to try to make them yourself, then you need to study the types of plaster that are used for these purposes, the necessary tools and the technology itself, which should be strictly followed to achieve the highest quality result.
Window finishing methods
Today, there are various methods of finishing slopes for plaster windows. Everyone can choose the most suitable type of finish for themselves:
- plaster;
- MDF panels;
- drywall;
- insulated sandwich panels;
- cork panels.
Next, we will take a closer look at the method of finishing using plaster.
The comfort and warmth in the house depends on the design of the window.
Which plaster to choose for slopes
How to insulate window slopes
In the middle zone, slopes often cry. Why is this happening? The cold penetrates especially easily through the seams. And although the relative humidity in indoor air is not so high, the absolute vapor content is still significant. As a result, a dew point forms at the point where it reaches the surface. Condensation begins to form at this point. That's why slopes cry. To prevent this from happening, insulation is used. But there is another important point. At the location of the slopes the wall is much thinner. Even if you take a diagonal cut, this will still be true. As a result, moisture penetrates relatively easily through these places into the street. Let us explain the process diagram:
- The relative humidity in the apartment usually does not exceed 50 percent. However, in terms of the mass of vapor, this is quite a lot. There is an imbalance with the street. Where the relative humidity is high, but at low temperatures there is little vapor content.
Builders strive to avoid this phenomenon in every possible way. But by installing insulation from the inside of the room, we thereby lower the temperature of the load-bearing structures. Due to this, the temperature field inside the supporting structures drops sharply. If it goes below the dew point, then moisture will begin to condense in the wall. The most negative consequences will occur when the wet area begins to freeze. In winter, ice forms and melts inside. What causes the most durable building materials to rupture. As a result, the service life of the house is reduced.
You see that on the one hand we need to avoid the phenomenon of weeping slopes, and on the other hand we need to keep the wall dry and prevent it from freezing. It would seem that this problem is partially solved by GOST. According to the document, slope insulation is carried out as follows:
- The surface of the window opening along the slope is cleared of construction debris, primed, and insulation is applied. It could be polyurethane foam or something else. It is not recommended to use polystyrene foam, because according to Rospotrebnadzor, interior decoration of premises with this material is prohibited.
- Then a vapor barrier membrane is laid. For example, it could be glassine. The bottom line is that the vapor permeability resistance of this material must be high.
- A slope is mounted on top. If plaster is used, then a reinforcing mesh must be used.
What is the purpose of the structural elements of such a scheme? The heat insulator blocks the cooling of a section of the room, thereby eliminating the effect of weeping slopes. At the same time, the vapor barrier membrane prevents moisture from penetrating into the thickness of the floors. This eliminates the dew point effect. That is, the temperature field inside the wall decreases, but condensation does not fall out, because moisture has difficulty penetrating inside.
Disadvantages of the standard method of finishing window slopes
What do we not like about the presented solution? Let's analyze the standard technique when plastering window slopes is done from the inside. On the one hand, everything looks great. We assume that the design of the main walls was calculated by the developer in such a way as to exclude the dew point, so the problem areas are precisely the slopes. In these places, low temperatures come close to the surface. And the high content of vapors in the air of the room provokes condensation.
Accordingly, by laying insulation, we block this process. The closer the slope point is to the street, the lower its temperature. At the same time, the insulation layer thickens. That is, mutually compensating moments are obtained. The lower the temperature, the thicker the insulation layer. This seems correct at first glance. At the same time, the layer of vapor barrier material does not allow moisture to pass in, so as not to create a dew point in the thickness of the wall. Now let's look at the negative aspects.
By creating such a design, the temperature of the wall section around the perimeter of the window frame is significantly reduced. As a result, polyurethane foam is used under more severe conditions. Many have observed polyurethane foam chipping along the edge of a plastic window. But few people think about why this happens. And the point is this. Most insulation filters water vapor. They are not at all insulators, as uninformed builders claim. As a result, the polyurethane foam is gradually saturated with moisture. And not only from the premises, but also from the street. Fogs fall, it rains.
When frosts begin, due to more severe operating conditions, the insulation, that is, polyurethane foam, freezes through. Due to this, ice crystals literally tear the material apart from the inside. As a result, the polyurethane foam crumbles, and the seam ceases to meet its purpose. According to the standard, it must prevent direct filtration of air, moisture and steam. Eventually, it begins to leak through the cracks around the perimeter of the window. And more severe temperature conditions lead to cracking of the plaster around the perimeter.
How to avoid many problems when finishing window slopes
We argue that plastering of window slopes should be done from the outside. How to do this, and what advantages do you get in this case? Firstly, we have every right to use polystyrene foam. Secondly, by covering it with a layer of plaster, we protect the insulation from the effects of the external environment. The filtration of steam from inside the room to the outside is blocked by installing a vapor barrier membrane along the inner surface of the window slopes. Due to this, the temperature conditions for the operation of load-bearing structures and insulation seams are softened, and the effect of weeping slopes is blocked.
To be even more specific, from the point of view of the distribution of the temperature field over the inner surface of the wall, there is no difference whether the insulation is laid outside or in the room. This fact is only relevant for the distribution of dew point locations. If the insulation is laid from the inside of the room, then condensation begins to form on the inside of the wall. If the thickness of wet load-bearing structures intersects with a negative temperature field, conditions arise for impact spalling of the wall material. That is why insulation must be introduced from the outside. Moisture filtration is additionally blocked by installing a vapor barrier membrane on the inside.
Therefore, it is recommended to finish the slopes from the inside with plasterboard with a vapor barrier film on its reverse side. The gap between the sheet and the wall should contain only air. This is necessary to heat the perimeter of the window and the mounting seam. The slopes are finished with plaster from the outside. For insulation, you can use foam sheets. What thickness should I choose? To solve this issue, you should find an online calculator on the Internet for calculating the load-bearing structures of buildings. Based on the available data, you need to select a layer of insulation in such a way as to avoid the occurrence of dew points throughout the entire thickness of the supporting structure. We remind you that the layer of vapor barrier film from the inside is aimed at the same task. The use of glassine reduces the filtration of steam into the thickness of the walls.
When finishing external slopes, you should use a painting net. It is mandatory to reinforce all external and external corners first. Only then is the rest of the surface processed. The painting mesh does not require any fastening. It is sunk into the plaster solution, then everything is smoothed out according to the rules. And not the other way around. You cannot attach a painting mesh to sheets of foam plastic and then cover it all with plaster on top.
Why do you need plastering of window slopes?
Often, a property owner thinks about the need to plaster the slopes of plastic windows with his own hands after replacing double-glazed windows. During the installation of windows, part of the wall is destroyed. To restore its integrity, it is necessary to apply a layer of plaster.
The application of a finishing layer to slopes is carried out not only to improve the aesthetic appearance of the room, but also to:
- cover up cracks, chips and small cracks;
- hide fasteners;
- protect windows from high humidity;
- improve the degree of sound insulation;
- increase thermal insulation.
On a note!
The method of applying plaster has much in common with the process of finishing the doorway area.
If desired, plastered window openings can be decorated in a variety of ways (pasting them or draping/painting them).
Plastering external slopes of plastic windows
This procedure consists of several stages:
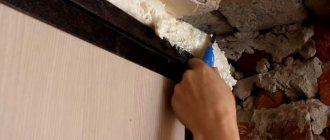
- The most difficult stage in finishing work is plastering the top part. This is where we begin attaching the base for the applied solution - the type of mesh you have chosen. The shape of the fastening depends on the type of slopes you will make - straight (perpendicular to the window frame) or unfolded.
- We strictly determine the thickness of the layer that we will apply using a plumb line and mark the value with a marker.
- The surface on which we will apply the plaster must be treated very well with a construction primer, this will allow the solution to adhere more firmly to the surface.
- After this, mix the plaster solution for the first time. To create the best quality mortar, it is recommended to use a drill with a construction mixer. It will ensure thorough mixing of the components and uniformity of the structure.
- Using a trowel and spatula, we apply the first rough layer, trying to fill in all the flaws in the surface of the walls as thoroughly as possible. The installed mesh will serve as additional reinforcement and will not allow the plaster to peel off, but to set directly on the wall.
- If you need to fix a lot, and the layer turns out to be very thick, then you should not immediately apply it completely. It is better to do it in stages, adding the required layer several times, each previous layer being pre-primed. It is advisable to let each of them dry for at least 1-2 days.
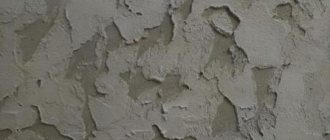
- The last layer must be removed with a spatula, forming the finishing surface. Usually, after drying, small cracks remain on it; they are caused by the fact that “starting” mixtures are used for the plaster. To remove them, you need to use a small (the size of the slope or slightly smaller) spatula to treat the dried slope with a slightly more liquid solution than was used previously. By applying a moderately thin layer, we will hide all the imperfections of the rough surface under it. After the last layer has dried, the surface is carefully sanded, removing small wave-like irregularities.
- After they are formed, it is necessary to draw a corner with the main wall. To do this, two trowels are used, one of them is placed on the plane of the main wall of the building, and the second one is drawn out at a beautiful even angle. It is recommended to first mark the line of the corner using a plumb line so that it does not turn out to be blocked. For this, the plaster solution needs to be moderately thick, so that the required angle can be freely formed, and after rubbing with a float, the applied layer does not immediately float, but begins to set.
- After the formation of the corner is completed, you need to wait until the applied solution dries completely. To do this, you need to wait at least 2-3 days in dry weather so that you can safely proceed to further improvement of the slopes.
- Next, gently but thoroughly rub in the last layer of applied plaster. Visible cracks and minor flaws can be easily corrected with a soft paint brush and liquid solution. This layer does not require much time to dry, and soon you can begin priming the slopes.
- The next mandatory step is to protect the plaster from moisture. The ideal option for this would be to use hydrophobic paint from the same manufacturer whose plaster mixture you used. This layer will protect your plaster from water and will not allow external natural phenomena to adversely affect it.
- After protection from moisture, the finished smooth slopes can be painted with facade white paint. A recommended, but more expensive option would be to use acrylic sealant, which, in addition to protecting against moisture and dirt, will add another protective layer. In addition, it is easy to clean, which will allow you to return your slopes to their snow-white, original appearance using a regular rag and soap. In addition, the service life of this paint is approximately twice as long as usual, which will allow you to soon not return to preventive maintenance.
How to plaster slopes on windows
To plaster window slopes in a living room, it is recommended to use gypsum mortar. The composition, which sets quickly, is easy to work with. If there is a high level of humidity in the apartment, it is better to purchase a cement-based plaster mixture. This solution is moisture resistant and resistant to ultraviolet rays.
When working with window openings, you cannot skip the priming step.
Cement mixture
When choosing a cement mixture, it is worth considering that there are 2 types of compositions on sale:
- for rough coating (contains coarse sand);
- for finishing (fine-grained sand components are added to the solution).
The cement mixture can be prepared at home. The composition is easy to apply. When choosing a cement mixture, it is important to remember that it will take much longer to dry than gypsum
compound.
The most durable material for mortar is cement
Gypsum plaster
Gypsum compositions for slopes can not only be purchased at a specialized store, but also prepared at home. The solution sets quickly, so some preparation is required to work with the composition.
Gypsum plaster is endowed with the ability to absorb moisture. That is why experts recommend using the solution only in a dry room, the surface of which is not in contact with precipitation. You should not plaster window openings with gypsum mixture on the outside of the building.
For your information!
Acrylic plaster is used to repair window slopes on the inside of the cottage or on the façade of the building.
The purpose of plastering a plasterboard surface and its main stages
The purpose of plaster is to seal cracks and holes, as well as correct uneven walls and ceilings. Most often it is used when working with concrete and brick surfaces, which, due to installation difficulties, simply cannot be made smooth. Applying plaster makes it possible to eliminate obvious flaws in the plane and completely level it. However, such a surface is not suitable for applying a decorative coating, since it requires finishing.
Most plaster mortars are made on a cement or gypsum base. Moreover, unlike putty, plaster has a large grain, which affects the quality of the finished surface.
Plastering a plasterboard slope
In relation to mounted plasterboard structures, plasters are used extremely rarely, since their surface is already smooth. Therefore, they are never covered with a layer of plaster from the inside.
The only option when it is necessary to plaster window slopes made of plasterboard is to place them outdoors or in places with high humidity, such as a kitchen or bathroom.
In such conditions, the purpose of plastering is not to level the surface, but to protect it from the negative influence of moisture particles that can lead to damage to the material. At the same time, it is necessary to plaster slopes on plastic windows or doors correctly, without violating technology or neglecting building codes. The process of plastering window or door openings consists of two equal parts:
- preparatory work;
- applying plaster.
Each of these stages contains its own characteristics and specific structure. Depending on the location of the slopes, the main stages of construction work also change. Their purpose in the bathroom or kitchen is to protect the plasterboard surface from steam particles, and outside the room is to counteract the direct influence of precipitation.
Advantages of the plastering method
Plastering window slopes is a popular way of finishing window openings. It is important to use only high-quality building mixtures in your work. Such materials allow you to achieve a smooth surface, which will have a positive effect on the appearance of the slopes and the duration of operation.
Due to the presence of reinforcing fibers in certain types of plaster, the building mixture does not crack after drying. The plasticizer allows you to provide the necessary level of plasticity, which makes it possible to repair even small potholes and cracks.
Experts recommend using a mixture of coarse sand for rough work. For finishing, it is better to use a composition with finely dispersed, purified sand.
The vapor permeability of the mortar eliminates the accumulation of condensation in the area of window openings and the appearance of plaque, mold or mildew.
The main advantage of plaster on slopes is its long service life
Preparatory work
If there is a window sill, it is better to install it before plastering the slope, otherwise you will need to knock off part of the slope from below and re-seal the flaws. Installing a window sill is simple, but before you plaster the slope on the window, you need to seal it with tape and film or paper so that it does not become dirty or damaged. The preparation of the window slope is as follows:
- A layer of old mortar is removed from the window, after which the walls are swept with brooms so that the plaster adheres well to the surface. Otherwise, cracks will appear, even worse if the new layer simply falls off the wall.
- It is better to cover the window frame itself with tape or tape.
- Inside, it is better to cover the fittings on the window, as well as the radiator under the window.
Prepared window surface for plastering
- The entire surface to be treated is primed with a deep penetration agent. This allows you to achieve maximum adhesion of materials.
- Next, the window is left for the soil to dry out; insulation can be done if necessary. Insulate the window sill itself before installation and you can use the material for the slope. Not just any insulation for a slope is suitable; the use of polystyrene foam and expanded polystyrene is allowed.
It is recommended to install slopes during the warm season. For a more detailed look at the process of decorating a window opening with your own hands, you can watch the video above.
Tools and materials
Even a beginner in the repair business can cope with finishing slopes. The most important thing is to adhere to the builders' recommendations and follow the step-by-step implementation process. During the work you will have to use:
- building level;
- tape measure;
- aluminum rule;
- spatula;
- trowel;
- sealant;
- profiles and strips;
- a knife, a pencil and a brush that allows you to apply a layer of primer;
- float for cement mortar.
You also cannot do without a mixer and a suitable container for mixing the solution; a hammer will come in handy. You also need a pencil for marking.
Tools for plastering windows
The main points about how to plaster slopes on windows have already been announced and it’s time to talk about the devices. In order to achieve excellent results, you cannot do without a set of tools and related equipment. For work you will need:
- laser level to set the profile (beacons);
- foam if the window cracks are poorly sealed during installation;
- construction trestle or small stepladder;
- thick rubber gloves to protect against solutions;
- grater and trowel for cement mortar;
- silicone sealant and a sharp knife;
- black pencil, tape measure;
- spatula and trowel.
Apply a layer of plaster using a spatula.
Next, we’ll talk about how to make slopes on plaster windows.
Making your own plaster mortar
Builders involved in the repair of slopes prefer to prepare a mixture consisting of 1 part cement and 2-4 parts sand for plastering window openings. To properly prepare plaster, you will need:
- Pour the sand into a deep container.
- Add a layer of cement.
- Mix the dry ingredients thoroughly and pour water into the container. The composition is constantly mixed at this time.
- Liquid is added until the consistency of sour cream is obtained.
Advice!
To speed up the setting process of the plaster, you should add a small amount of PVA glue or building plaster to the composition. To slow down the setting, you need to add detergent.
How to plaster window slopes with your own hands - step-by-step diagram
Step 1: Preparation
First of all, it is necessary to fill all the gaps; for this, polyurethane foam, felt or tow are used. The first is much more convenient to use, but if you decide to fill all the cracks the old fashioned way with the other listed materials, then they must first be treated with a three percent sodium fluoride solution. Since these insulation materials are literally driven into the gaps, this can lead to deformation of the window frames, and in order to avoid such a turn of events, they must be wedged with wooden spacers.
Also, be sure to remove all traces of dirt, dust, paint, etc. from the surface. After cleaning the walls, the depth of the joints in the brickwork or between the panel and the window should be about 10 mm. And in the case when it is necessary to apply a thick layer of mortar, this value can be more than 4 cm, and then you cannot do without a reinforcing mesh, which is attached using special plastic dowels. Also, the solution will not adhere to a very smooth surface, because... there will be nothing for it to catch on, so it is necessary to make notches on such walls. Before you start plastering directly, you should thoroughly moisten the walls with water.
Step 2: Set up beacons
Leveling slopes with plaster is not possible without the use of beacons. Today you can find special plastic or metal devices on the shelves of construction stores. They must be set strictly according to the level and secured with self-tapping screws, mortar, and alabaster. The first beacon should be placed on the side of the window frame so that a layer of plaster (minimum 5 mm) covers it, and then the outermost beacon should be placed, the angle of dawn should be more than 90° (checked with a square).
Step 3: Set the dawn angle
The angle of dawn is the slope of the slope, it is due to the fact that the distance between the internal boundaries is made narrower than between the external sides. The function of this parameter is to increase the penetration of sunlight into the room. It is very important to maintain the same window angle in absolutely all rooms .
It is done as follows: using a construction square, you need to draw a right angle on the window sill relative to the window frame, and the tool itself should be placed against the internal beacon. Then, at the very edge, we retreat a few centimeters from this line and connect the resulting point with the beginning of the line. When installing subsequent beacons, it is necessary to comply with all dimensions obtained during this drawing.
Step 4: Directly plaster
Having mixed the solution (the technology depends on its type), you can proceed directly to its application. Most often, internal slopes are plastered with lime-gypsum mixtures. If you need a very thick layer, then in order to save money, you can add sifted river sand to this composition. The solution should be spread in a layer of 2–3 centimeters, and depending on the thickness of the slopes, there may be several such approaches. Each subsequent portion is applied only when the preliminary portions have dried a little, but not completely. After wetting the surface with water again, we apply the final layer, which we level using the rule, while it should be pressed in, as it were.
How to plaster slopes on windows
Beautifully designed window openings in combination with PVC window sills and a starting profile help to give a certain style direction that fits perfectly into the overall design of the room. It is important to follow the recommendations of specialists so that slope repairs are not required in the future. Correct application of the building mixture will hide the installation elements and traces of foam.
In order to plaster the slopes on the windows, you must take into account the recommendations of specialists and strictly follow the step-by-step instructions. This will allow you to avoid mistakes and perform high-quality finishing of window openings.
For those who are already familiar with the features of covering walls with mortar, it is easy to understand how to plaster window slopes. The principles are the same here, and the difference lies only in geometry. In addition, it is necessary to make a quality transition from the window frames to the main surfaces.
To obtain a homogeneous solution, use a construction mixer
Window finishing
Plastering slopes after installing plastic windows requires a competent approach. And in order for the window opening to remain beautiful for a long time and complement the interior, you need to adhere to a number of rules:
- The temperature of the room where the slopes are finished must be at least +5 °C when using cement mortar. Rodband plaster requires a little more indicators - from +10 °C.
- Each mixture should be prepared according to the instructions supplied with the finished product.
- Any type of solution has an individual gap, after which it sets. For example, a cement-based mixture should be used for 30 minutes, no more. It cannot be diluted again, as it loses its performance qualities. Therefore, the solution is prepared in portions.
- Before starting work, it is better to calculate how much mortar will be needed, depending on the thickness of the window openings and the desired dimensions of the slopes.
Following these simple rules allows you to keep parts of the window openings intact, and they will not become covered with cracks.
Surface preparation
It is not enough to know how to make slopes using a building mixture; in order to obtain a durable and even surface, you should not give up the need for preparatory work. Before you start plastering the slopes, you should:
- Clean the base from the layer of old coating and crumbling plaster.
- Remove excess polyurethane foam, which the builders used to blow out the gaps between the wall and the window.
- Remove dust and other contaminants from the slopes.
- Carry out wet cleaning by thoroughly rinsing the surface on which the solution will be applied with a damp cloth. After wet cleaning, you need to leave the slopes for a couple of hours to dry.
- After the specified period of time, it is necessary to apply a couple of layers of deep penetration primer to the surface of the window openings.
Before applying the primer, be sure to make notches if the walls are concrete. On brick surfaces, part of the mortar is removed. This is done to ensure good adhesion of the plaster. And only then the slopes are covered with a primer.
The preparatory stage should be given a lot of time and attention
Insulation of slopes under plaster
In order to prevent moisture condensation on the glass and window surfaces, it is necessary to take care in advance of insulating the slopes. If there is no thermal insulation pad such as foam or tow in the area of the joints, during the cooling of the double-glazed windows, the flow of cold will begin to be transferred to the adjacent walls.
The foam, which begins to crumble, will cause cracks to form, and cold will seep through them. Against this background, condensation will appear. To insulate the structure, you can use sheet insulation sheets such as polystyrene foam or polystyrene foam and use a warm plaster composition (perlite or other warm mixture for plaster).
Sheet foam is not resistant to moisture, so when using this material, high-quality waterproofing will be required. The best insulation for slopes is considered to be penoplex, which can be easily plastered. To insulate a window opening you will need:
- cut sheet insulation into pieces of the required size;
- glue the material to the frame;
- fix the reinforcing mesh over the insulation;
- apply a layer of plaster.
With regard to plastic windows, compliance with the technology of plastering slopes can improve thermal insulation indoors. Namely, it is worth considering:
- For the inside, it is better to use sealed and dense materials.
- Closer to the outside, it is better to give preference to heat-insulating and porous analogues.
This measure ensures good ventilation, thereby eliminating the formation of condensation. In ensuring high-quality sound insulation, an important role is played not only by the double-glazed window - types of window seals and sealants also have an impact on this. Any hardware store has a wide range of insulation materials such as polyurethane foam or polyethylene foam.
Strengthening corners
To protect internal corners (husks) from the formation of cracks, builders use corners for plastering slopes. When working to strengthen the corners, you will need to apply a solution to this area and level it using a special spatula. Having applied a strip of serpyanka, you need to press it with a spatula into the construction mixture. Next, it is recommended to apply the composition and level it with a spatula. Once the solution has hardened, you can rub it in.
Plastering corners will not be of high quality if you do not reinforce the outer corners (crests), since after a while they quickly become damaged. For reinforcement, corners for plastering slopes (counter-shoulders) are used. They are made of plastic or metal.
To begin with, the profile of the required length is measured and cut. Plaster is applied to the outer corner on both sides. The counter-shultz is applied and carefully pressed into the building mixture. At the same time, monitor the verticality of the profile using a level. Protruding mortar residues are leveled with a spatula.
Insulation of slopes is a mandatory technological process
Securing beacons
When starting to apply a leveling layer of plaster on the slopes along the beacons, it is necessary to mark, correctly install and fix the beacon profiles. The functions of beacons can be performed by:
- plastic profile;
- wooden edged board;
- mortar path;
- pieces of plywood that are attached to the corner with self-tapping screws.
To assemble the beacon profile, you will need to screw in 3 self-tapping screws on the surface of the slope. In this case, the caps are placed in one vertical line along the line that was drawn during marking. This procedure is best performed plumb.
A small amount of solution should be applied along the entire length of the line. In this case, it is important to control the position of the profile using a level. At the next stage, final fixation with the solution occurs.
In addition to attaching beacons to the building mixture, you can use parts that are easy to install:
- clips;
- cleverness;
- Ushastiki.
Note!
Beacons on cement mortar can only be used after 24 hours.
Plastering slopes along beacons
The question of how to properly plaster slopes using beacons worries many, especially beginners. It is recommended to start plastering from the inside. The building mixture is applied to the bottom and sides, and only then is it possible to move to the top of the opening. By applying a layer of plaster to the openings, the slopes on the windows should be leveled.
When starting plastering slopes, you must:
- Make a small part of the solution more liquid in consistency. Apply the compound over the surface of the opening and use a spatula to level the layer of plaster. The composition should be of such a consistency that the plaster does not spread, but also does not stick to the slope.
- Leave the work for a while so that the first layer has time to dry.
- Use a level and install the corner profile.
- Continue laying the building mixture, checking how even the surface is.
- Correct the corners after the solution has completely dried.
- Grout.
- If desired, decorate the slopes with decorative plaster.
When using beacons, all work is performed in the same way as in the case of plastering walls using beacons. However, here the distance between them is small and therefore a wide spatula or a short rule is sufficient for leveling.
It is most convenient to carry out plastering work on slopes along beacons
Grout
At this stage, a flat surface is created. You can start grouting only when the solution has dried. This usually takes from 16 hours to a whole day. It is better to give the mixture more time to set, but not to wait too long - more than 24 hours. The determining factors are humidity and temperature. To understand when to start grouting, you should use a clever trick. Take a little solution from the slope and rub it between your fingers. If crumbs fall out, then the time has come, it’s smeared - wait until the next check.
For grouting, the mixture is made more liquid, and it is no longer applied, but rather splashed over the surface. After this, you no longer use a spatula; here you need to use a grater with a foam working surface and a handle. You need to make circular movements with the tool. Upon completion of the work, the slopes are leveled.
This stage is not mandatory and you can do without it, especially when you plan to cover the slopes with putty in the future.
Finishing the work
At the end of the process, it is necessary to apply a small layer of putty to the plastered slopes, and after the surface has dried, paint it or decorate it with facing material. Before applying putty, builders recommend cleaning the openings with sandpaper from drying lumps and irregularities. After applying a layer of primer, you can putty. It is worth considering that the starting mixture is applied first, and only after that the finishing mixture.
After the plaster has dried, the surface is grouted.
Window finishing. What does that require
Materials
Putty KNAUF ROTBAND (Rotband)
- If you are puzzling over how to plaster the slopes from the street, then a number of mixtures with waterproof binders are at your service, and one of them is KNAUF ROTBAND or simply Rotband, as craftsmen and sellers are used to calling it. In such cases, all putties (dry and liquid (paste)) are suitable for outdoor work, in which cement or acrylic is used as a binder component - after all, the most important condition for compatibility here is moisture-repellent qualities.
- For interior work, the instructions allow you to use almost all construction putties, such as gypsum, cement and polymer (acrylic and latex), both in dry and liquid initial states. Among them there are starting (leveling), finishing (smoothing) and universal mixtures that are suitable for any action from any side.
- It would be wrong not to mention cement-sand plaster, which appeared even before all of the above technologies and is still successfully used today as a high-quality and durable base. This solution can be used on any side of the window, especially since the price of cement is the lowest of all possible options, which means that for leveling the surface this may turn out to be the most profitable solution. Of course, working with cement is somewhat more difficult than with putties, and the top layer will still have to be made of one of the finishing mixtures.
- Drywall should also be mentioned, but in our situation it is suitable exclusively for internal slopes. The convenience of using such a material is that it is able to cover almost any damage in a given area, and there is no need to wait for it to dry before finishing (puttying).
Note. Plastering is usually called the process of leveling the surface with a variety of liquid mixtures, which subsequently harden, forming a hard coating. This word is also used to refer to solutions intended for this purpose.
Making slopes
Correct installation of beacons
If the old frames were removed carefully and there is no particular damage, then to start work it is enough to simply clean the slopes from the facing coatings such as paint, lime and/or lime-sand plaster. But in some cases, not even through the fault of the workers, but due to poor-quality installation during the construction of a house, large holes may form that need to be sealed with something first.
In such cases, either drywall is used (installed using a frame as usual), or the potholes are smoothed out with brick or stone - any option is acceptable.
We are considering the topic of how to plaster window slopes from the outside and inside - if the differences on the plane are no more than 50 mm, then you can begin installing beacons, which will be perforated corners (on the edge) and perforated plaster beacons (under the frame).
Such profiles, as a rule, are fixed using any of the putties - this is much more convenient than cement-sand mortar, and they wait several hours for the mixture to set. Otherwise, when finishing (leveling) the plane, you will knock down the beacons with a tool (rule or spatula).
When installing beacons, you should calculate the space so that all slopes are the same and for this you can use a construction square. Apply it with the short side to the glass, close to the frame, and measure the distance from the long end to the edge of the slope - this way you can adjust the installation of the perforated corner.
But you can adjust the plaster beacon, which is fixed at the window, according to the width of the frame, that is, along its edge, but try to ensure that the slope does not cover it by more than half - it will be ugly.
Before installing the beacons, you must clean the surface from dust and prime it, and after they have set sufficiently (before applying the mixture), re-coat the working plane with primer. After two to four hours you can begin further work.
Recommendation. It is best to mix putty solutions in two stages - fill a bucket with water, pour the powder into it and beat with a low-speed drill and mixer (you can also use a regular drill at the lowest possible speed) for five to seven minutes. Let it sit for five minutes to soak up all the dry lumps and whisk again.
At one time, you should make as much solution as you can produce in 20-25 minutes, until it sets. If you mix the mixture again after this, it will lose its astringent properties - the putty will harden for a very long time, and after that it will begin to crumble.
Apply the mixture with a medium-width spatula
The mixed starting solution is applied to the slope with a small spatula with a blade, approximately 10 cm wide. It is best to immediately fill the entire niche on one side so that the solution protrudes slightly above the beacons. With the same tool, you can slightly level it with your own hands, but do not try to do it thoroughly.
After you have applied the mixture in sufficient volume to one of the slopes, cut off the excess mortar with a spatula, as in the photo above (if it is a cement-sand mortar, then it is better to use the short (meter) construction rule). This procedure must be done around the entire perimeter, with the exception of the window sill, but at the same time make sure that there are no large cavities or grooves left on the surface.
After the starting mixture has completely or partially dried (partial drying is determined by the slight appearance of dark spots on the surface), apply the finishing layer. With this, everything is exactly the same as with the start - stir the required amount in a bucket in two stages as much as you can work out in 20 minutes and apply the mixture to the slope in a thin layer (1-1.5 mm) on the slope. Once dry, sand with sandpaper or diamond mesh.
Features of updating an old plastered opening
Plaster slopes need periodic updating. If the old layer of mortar begins to collapse, it is necessary to remove the layer of paint and tap the entire area of the openings, discarding the fallen pieces of mortar.
The resulting cracks are cleaned, the layer of dust and mold is removed. If there is a deep pothole, you should moisten it with water, go over it with a primer, and only then fill it with a solution. As soon as the construction mixture applied to the surface of the slope dries, you can begin to continue working with the opening.
Plastering slopes - features of the process
Before proceeding directly to the plastering, it is necessary to level the window itself and the window sill. If the frame is not located symmetrically in the opening, then you will have to make slopes of different widths, and this will negatively affect the appearance of the entire room. In general, plastering is a very labor-intensive process that takes place in several stages. This includes preliminary priming of the surface, application of a special mesh (especially if a thick layer is needed), and insulation. So get ready to spend several days on this work, especially if you have never dealt with such a task before.
For better insulation, you can leave a small distance to the window frame, which will be sealed with silicone.
But if you do everything in good faith, without skipping a single step, the result will be excellent, the surface will be perfectly smooth. In addition, this technology allows the application of very thin layers. But if you rush and fail to complete at least one step, then all your time and money will be wasted. For example, without paying enough attention to insulation, you will eventually see cracks at the junction between the slope and the frame, which will deteriorate the thermal insulation properties. If you do not apply the mesh, then horizontal cracks will appear, which will greatly spoil the appearance of the room as a whole.
Features of plastering exterior window slopes
After installing a plastic window, there remains space between the frame and the wall. It is needed in case of changes in the linear dimensions of the material due to natural shrinkage of the building. In the absence of such clearance, the window structure becomes deformed over years of use and there is a high risk that the glass will break.
After installing the window, the foam should not be left open. Otherwise, it will be destroyed under the influence of external weather and other factors. The plaster itself will cover the mounting foam, thereby leaving it intact. For this purpose, it is better to choose a facade mixture.
Leveling slopes with plaster - choice of material
The choice of modern finishing materials is simply amazing in its diversity; the leading positions among them are occupied by plasterboard and plastic; it has also become very fashionable to frame windows with very original slopes made from different types of wood or cork. However, despite such a wide list, the oldest and most reliable method, proven over the years, is still at the peak of popularity - plaster.
And all thanks to its advantages: firstly, it does not require any special knowledge, tools and skills. Although you will have to work hard, because the appearance of the slopes should be at the highest level. Secondly, this is one of the cheapest methods. And, thirdly, it is also environmentally friendly, because all components of the solution are natural. The choice of the type of solution depends entirely on the location of the slopes and the humidity of the room.
For external slopes, as well as bathtubs, swimming pools, saunas, steam baths and other places where the humidity level exceeds the norm, it is necessary to use only cement mixtures. Plastering window slopes also has disadvantages. But everyone is used to them and does not consider them something out of the ordinary. For example, periodic cracking, however, for this you need to wait quite a long time. Usually, it is not the essence of the method that is to blame, but the master who could not withstand the technology, even though it is not complicated.
How to calculate the amount of plaster for a slope
Before you start plastering window slopes with your own hands, you need to calculate the amount of material. For one square meter of surface, you should prepare 300-500 g of dry mixture (coarse fraction). If fine-grained plaster is used during the work, then at least 500 g of dry building mixture will be required per square meter. The volume must be multiplied by a factor of 1.1. It is not possible to calculate the exact amount of plaster and therefore the material should be taken with a reserve for unforeseen cases.
Let's move on to practice
Plastering window slopes with your own hands begins from the inside. First they do the lower and sides, then move on to the upper slope.
- Part of the solution must be diluted thinner and distributed over the areas of the window opening. This step will promote good adhesion of the surface to the plaster. The mixture is taken with a spatula and spread along the openings. It is important that it does not spread, but sticks to the surface.
- Let the first layer dry.
- We install the corner profile using a level.
- We continue laying layers on the slopes, not forgetting to monitor the leveling of the surface.
- As the solution dries completely, you need to adjust the corners.
- We grout using a grater.
- Apply a layer of primer.
- We move on to the finishing, which can be decorative plaster or tiles.
Finished slopes are finished with decorative plaster.
After installing plastic windows, the following points are added to the standard technology:
- on the plastered slope, using a spatula, make a 5 mm furrow;
- in the made track we lay a layer of silicone, which will not allow cracks to form in those places where the window connects to the slope.
Otherwise, plastering of slopes of plastic windows occurs according to the technology described above. If a gypsum mixture was used in the work, then at the final stage it is necessary to dismantle the elements of the window strips by bending .
Plastering of external slopes is carried out after finishing the internal ones
Next, you can proceed to plastering the external slopes of the windows. If you follow the basic rules and know how to plaster slopes on windows, you can significantly improve the thermal insulation of your house and give it a beautiful appearance.
Nuances when plastering slopes
Typically the work includes two main stages. Upon completion of each operation, you need to wait a certain period of time for the applied layer to dry. In addition, the joint between the plaster and the window may become cracked. To avoid this, it is better to apply sealant to the seam.
It is important to correctly calculate the time of working with the mixture
Making slopes
For the main elements when creating a template, we will take the window frame and the rule (with emphasis on “and”), set in advance according to the level. The rule must perform 2 functional actions - play the role of a beacon and set a clear limitation of the slope surface to obtain an even external angle.
Attention: The rules for plastering slopes are the same for both windows and doors. It does not matter. Doing the job is exactly the same.
Choosing material
First of all, we decide what to plaster the slopes with. First of all, it depends on what kind of environment you are staying in. Plaster for slopes can be done both indoors and outdoors.
So the first division is precisely on this basis:
For external surfaces Plastering external slopes is done with a mixture specifically for external surfaces. It is mainly made on the basis of cement (see Cement or gypsum plaster: which is better to choose) and has a coarser fraction. Tolerates high humidity and low temperature. For internal surfaces Do-it-yourself plastering slopes with this material have a smooth and even surface. Here the fraction is small and a mixture with the addition of gypsum is mainly used. The material hardens faster.
Possible problems during operation
When plastering external or internal window slopes, various problems may arise. The cause of trouble may be:
- Poorly installed windows. It is important to keep control over the installation of double-glazed windows. In a situation where a defect has been noticed, it is necessary to agree on an immediate elimination of the problem. If you ignore this recommendation, after a while you will need to replace the windows and re-do the slopes.
- Critical increase or decrease in temperature. When mixing the solution, it is necessary to take into account the temperature conditions at which you can work with the construction mixture. Gypsum mortar can be used when the room temperature is above 10 °C. It is permissible to work with cement mortars at a temperature not lower than 5 °C. Ignoring this rule may cause poor quality slopes.
Note!
When working with plastic windows, it is important to make grooves along the perimeter between the slopes and the frame, the depth of which will reach 5-6 mm. As soon as the solution dries, it is necessary to fill the recess with a layer of silicone sealant. During the summer heat, plastic increasing in volume will not provoke the appearance of cracks on the slopes.
Plastering window slopes from the inside and outside of the house is not so difficult. The most important thing is to familiarize yourself with the step-by-step process of work and follow the recommendations of experts. When choosing a solution, you need to pay attention to the shelf life of the composition. An expired composition will lose a large number of beneficial properties. This may negatively affect the final result.
Preparing the work surface
How to properly plaster slopes on windows and get an excellent result depends on good surface preparation. A small violation of an important stage will be the main cause of cracked or fallen plaster. So:
- The beauty and accuracy of plastering work will require leveling the surface of the window slopes from the outside and inside. According to building codes, vertical slopes should not deviate by more than 1-2 mm per 1 m. Inspect the evenness of each wall. Before plastering the window slopes, you need to level the walls . Time costs and plaster consumption will increase, but it is better not to ignore quality requirements in order to get a good result. If the surface is slightly curved, a wire mesh is suitable for leveling.
The surface of the slope must be cleaned and leveled before plastering.
- We clean the surface from traces of dirt and dust in order to increase the adhesion properties of the mortar to the plastering areas. Walls made of brick or concrete are cleaned with a 3% solution of hydrochloric acid and washed with cold water. To get rid of oil stains, you can use oily clay. You need to apply it to the desired areas and allow it to dry well, then remove it. The procedure can be repeated as necessary.
- Plaster mixtures are applied to the window opening after removing the previous layers. External and internal slopes must be tapped so that loose particles of the old mixture fall out. The resulting cracks are cleaned, dirt and greasy stains are removed. Areas with chipped plaster are moistened with water and covered with a new solution. As it dries, a new solution can be applied to the plastered area, distributing it over the entire surface of the slopes.
Construction beacons are used to level the surface of slopes
To properly plaster the slopes on the windows with your own hands, take into account all the preparatory stages to achieve high quality work. To accurately level the surface, use construction beacons or a plaster profile . Visually smooth walls can play a cruel joke after all the work is completed, so be sure to install guides along which the surface will be leveled. Beacons will serve as a guarantee as a leveling element, the use of which will avoid future alterations and additional costs.
Plastering on beacons
Which slopes are better - plastic or plastered?
When choosing an option for finishing slopes for plastic windows, the master asks himself which type to give preference to. Builders prefer plastic and plastered window openings. After studying the table, you can become familiar with the advantages and disadvantages of these finishing methods.
After plastering, you can glue wallpaper onto the slopes
Plastering the slopes of plastic windows is a simple process that can be handled not only by a professional, but also by any apartment owner. If you prefer this finishing method, you should purchase high-quality materials for the work, and after applying the finishing layer, take care to thoroughly dry the plaster.
Did you manage to learn something new? Share in the comments!
Do-it-yourself plastering of window slopes
How to plaster slopes on windows? Initially, you will need to spray the walls with a primer to ensure good adhesion of the materials. A liquid solution is thrown onto the wall to ensure better adhesion of the further mixture. This procedure is performed over the entire surface, which will give a positive result. This method works well if the layer of putty is thick. Next, you need to plaster the window opening like this:
- It is necessary to install slats made of wood or metal, beacons that are sold in any store. They are mounted on mortar, but this does not guarantee strength, so you can use screws or dowels if the house is brick. Correctly installed slats serve as a guide for installation.
Installation of beacons on slopes
- The beacons are attached plumb so that they do not move, due to this the slope will be good and even.
- The main beacons have been installed, now we need to make special beacons that will level the surface of the window slope and give shape to the edges.
- The device is easy to make. A nail is nailed from smooth wood, 10-15 centimeters longer than the slope, on the back side, and it is better to bite off the head using nippers so that the outer or internal slope does not get scratched. The nail is driven in at a distance of 4-7mm from the lath.
Plastering process
- Next, the ready-made solution is placed on the slopes, and the layer can be leveled with a small tool, moving the bar from bottom to top, bringing the surface to a level state. The remainder of the solution is removed and the slope is left to dry. This way you can plaster the window slope in one layer, but the work doesn’t end there.
- While the plaster composition is not completely dry, it is rubbed down. The work is carried out from the top to the bottom, using translational movements.
- After drying the solution, the slats are removed; you need to seal the holes that came from the slats with a small amount of material. After which the window slope is grouted again.
Leveling the surface
- Next, you need to bring the surface to a perfectly smooth state; for this you need to properly plaster the walls using a special spatula. The solution is applied in several layers, each of which is rubbed down. When applying the first layer, it will be correct to install a plastic perforated corner around the perimeter of the window so that the slope has the correct shape.
- Next, the window slope is painted in several layers.
During work, while the solution has not yet dried completely, it is necessary to use a spatula to make a furrow between the window and the slopes; the width and thickness should not be more than 5 mm. Next, a sealant or liquid plastic is used to fill the void. This move is necessary for plastic windows, since high temperatures cause them to expand and increase in volume, so cracks and breaks often appear in the slopes, even if the plastering was perfect. The sealant will not allow the slope to deform.
At the end, you can stick a decorative corner around the perimeter of the window, which will add beauty, and in the summer you can cover the window with foil so that heat does not enter the house or apartment. It is necessary to insulate so that the window does not freeze in winter and the warmth does not leave the house. You can choose a window design from a photo on the Internet, and you can learn in detail about the work, solution and DIY technique using the video:
What tools are needed to work with slopes?
In the process of processing a window structure, the following tools and materials will be required:
- Construction trowel.
- Drill.
- Construction mixer.
- Knife.
- Plumb.
- Bowl for diluting the solution.
- Spatulas of different sizes.
- Water.
- Plaster.
- Metal mesh and fastening materials.
In addition to preparing the tools, you will also need to clean the surface to be treated to remove excess polyurethane foam. This can be done using a knife.
Beacons for slopes
Beacons for slopes, despite their name, are completely different from beacons for leveling walls or installing concrete floor screeds. The beacon for the slope is a limiter, a wide, perfectly straight and rigid strip. The fastening of these slats to the surfaces of the internal walls of the slopes must also be strong, rigid and reliable, and is done with nails or self-tapping screws. The beacons are attached after marking with a protractor, according to the exact markings. The border of the future plaster layer of the slope will run along the edges of the slats. The second task of the beacons is to protect the corner from accidental damage until the mortar sets. The quality of the plastering of the slope depends on the accuracy of the installation of the beacon. Tools for marking - plumb line and building level; Laser levels and levels are convenient and provide maximum accuracy. An illuminated window slope is a section of the surface that will not hide even the slightest deviation from the vertical plane, not the slightest curvature, but, on the contrary, will emphasize both the ideality of the plane and all the jambs, so the accuracy of the marking is very important.
When the installation of the beacons is completed, a final primer of the base is made to maximize adhesion to the mortar mixture. The primer is applied with a brush, and at the same time the tight fit of the vapor barrier tape is checked.
Materials
Tool
- Putty knife
- Rule
- Grater
- Bucket
- Drill mixer or regular drill with an attachment for mixing solutions
- Mounting gun
- Building level
- Hammer or ax
- Square
- Construction plumb
- Nails or screws for making beacons