How to plaster door slopes
We have already written about plastering window slopes. It is a little easier to plaster the slopes of the front door, however, there are several nuances.
During the plastering process the following steps are performed:
- surface preparation;
- marking;
- installation of beacons;
- if it is planned to apply a layer of more than 30 mm, reinforce the base;
- spraying;
- applying the base layer - soil;
- plaster on beacons;
- removing beacon profiles, sealing grooves;
- applying grout;
- drying the coating.
Preparatory work
Pre-treatment of the wall and floor area around the doorway is performed for several purposes. This is, first of all, the creation of conditions that allow for a strong bond (adhesion) between the plaster coating and the wall material. If this is not achieved, the plaster coating will not last long, since vibrations from slamming doors, the difference in the behavior of materials during temperature fluctuations, and the constant load of the coating’s large dead weight will cause peeling, as well as falling off of the plaster layers.
The second purpose of preparation is strengthening, the necessary leveling of the wall surface before plastering. The third is the prevention of dehydration of the fresh solution, which, having lost water, reduces the strength of the coating material. Proper preparation also prevents stains from appearing on the surface of the finish.
The sequence of proper preparation is as follows:
- cover the surface of the frame and door with film and masking tape to protect it;
- disconnect sockets and other fittings from the power source;
- when replacing a door block or during repairs, remove the old coating in the adjacent area or on the surface to be plastered completely;
- excess wall projections are cut down;
- large chips and cracks are cleaned of debris, primed, repaired (reinforced if necessary);
- the concrete wall is covered with notches (using a chisel, a hatchet or a suitable electromechanical tool), the masonry seams are expanded, deepening up to 10 mm;
- dust is swept off the surface (or removed in another way);
- carry out cleaning from rust, efflorescence, grease, mold, fungus;
- dismantle excess nails and other metal objects (what they decide to leave is coated with oil paint for insulation);
- switch boxes are sealed with tape;
- Having dried the cleaned surface, prime it twice (with drying of the layers).
Installation of beacons
It is better to decide how to level the slope by examining the geometry of the opening. If the slopes are adjacent closely to the door block, then it is more convenient to install profile perforated corners at the corners, which themselves will serve as guides for leveling the composition. The second guide can be the frame of the box. In this case, to level the solution, a small template is made, at one end of which a support protrusion is made.
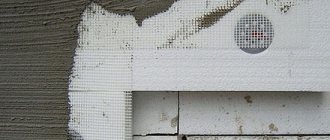
The corner is cut along the length of the opening: the shelves at the upper end of the corners for the sidewalls are cut at 45 degrees, the corner for the top is cut at an angle on both sides. Attach the corner directly to the usenka (protruding corner). For fastening, apply the plaster mixture to the corner on both sides, apply the profile to the corner and press down with a lath or rule, controlling the vertical position of the level. The composition that protrudes through the holes is removed with a spatula, and the solution is leveled along the corner with it. Allow the solution to dry and harden. Read more about plastering corners in the corresponding article on our website.
If the alignment is performed using a rule, then in addition to the corner, a beacon is installed. This can be a metal profile, a wooden lath or a mortar track.
After plastering, the lighthouse strip is removed from the set mortar. The corners are not removed; they serve as rib reinforcement.
Creation of notches and reinforcement
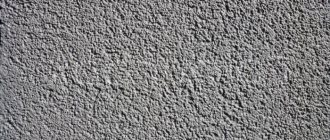
To apply notches on slopes with your own hands, using bush hammers is effective. This is a hammer that has metal pyramids or cone-shaped protrusions on the working surface. Individual notches can be made with a chisel or a hammer drill with a bush hammer attachment (in impact mode). The notches form irregularities to which the plaster layer easily clings. A large depth of notches is not required. 5 mm is enough. The length of the grooves can be 5-10 cm.
Notching and reinforcement
To strengthen the plaster coating, it is reinforced. For this, a metal or polymer mesh is used. It is advisable to purchase a metal mesh made of stainless steel with a cell side of 10-40 mm. The mesh fabric is cut into strips of the required length, attached to the wall using nails (screws) or tied to the fittings.
Plastering entrance door slopes
At the end of the preparatory stage, the plaster composition is mixed following the manufacturer's instructions. Apply the solution starting from the bottom. Apply it to the surface of the area with a spatula, then level it with a rule or template along the guides.
The technology is similar to aligning walls with beacons. First, the sides are plastered, then they move on to the top.
Plastering the slopes of the front door
To smoothly plaster the slopes at the doors, the rule (or template) is not drawn in a straight line, but with a slight cyclic displacement of the tool (zigzag).
This creates vibrations in the plaster mass, and it “swims”, liquefying. This is similar to the action of a vibrator in concrete. With the help of this simple technique, they achieve better styling and easy smoothing of the surface.
Finishing work
They think about what the finishing will be like in advance. After plastering the door slopes, the surface is brought to the “finish”, which is painting, wallpapering or cladding, for example, with artificial stone. The surface can also be covered with decorative plaster. Each finishing coating requires its own degree of smoothness.
To install facing materials, wallpaper or apply decorative plaster, special smoothness is not required. But for a thin layer of paint film, simply rubbing the plaster solution is not enough. It is necessary to putty the surface.
They do this sequentially:
- after the solution has dried, the surface is cleaned with a spatula, removing lumps of dried solution, and the sagging is sanded off;
- the coating is primed and dried;
- apply with a trowel and level first a thin layer of starting putty, then a layer of finishing putty;
- If necessary, the top of the last layer is sanded and dust is removed.
Some paint compositions require a preliminary primer.
Materials for finishing the doorway
Plaster
Plaster, which is gradually losing popularity, is used as a budget option when you need to decorate a doorway for painting or wallpapering. The disadvantage of this method is the complexity of the work and the large amount of dirt. If the technology is violated, cracks may form and even fall off. In stores, plaster is sold in the form of a mixture. The composition is different. The method of preparation and application to the wall depends on the type of plaster.
In general terms, finishing work consists of the following steps:
- Mix the solution in a container. The quantity of one batch is calculated for half an hour of work.
- The solution is poured onto the surface of the wall, spreading with a rule and a spatula.
- When applying a thick layer of plaster, beacons are used. The guides will help you perfectly level the surface.
- To prevent a thick layer of plaster from cracking, after applying a 1 cm thick mortar, a reinforcing mesh is laid.
Decorative plaster can be painted. If this is a rough finish, then the surface is covered with textured putty.
Drywall
The doorway is finished with plasterboard in two cases:
- when changing dimensions or shape;
- if you just need to sheathe the opening instead of plaster for subsequent finishing.
To create shaped openings, galvanized profiles are used. First, a metal structure of the required shape is assembled, and then it is sheathed with plasterboard.
Drywall can be used to correct large irregularities without changing the shape of the opening. The slopes are sewn up with sheets, and the corners are leveled with a profile.
After installation, the surface of the gypsum board is primed. Seams, protruding screw heads and other defects are sealed with glue lined with serpyanka. After the surface has dried, a layer of starting putty is applied. If the opening is intended to be painted rather than wallpapered, apply another layer of finishing putty. After drying, the surface is rubbed with a sanding mesh.
MDF panels
The advantage of finishing a doorway with MDF is that there is no need to additionally prepare the surface by applying plaster or covering it with gypsum board. A wide selection of colors allows you to choose the material even for an old metal door. When covering a door slope with MDF panels, the total thickness of the cladding is taken into account. It should not interfere with the opening of the sash.
Installation is carried out on the frame. The structure is assembled from a metal profile or wooden slats. They are attached to the wall with dowels and self-tapping screws. Sheathing begins from the top crossbar, then moves to the side slopes. The joints at the corners are sealed with a decorative strip matched to the color of the panels.
Where to begin?
It is necessary to prepare for finishing work. Before leveling the doorway with your own hands, you need to dismantle the old door leaf and frame. It is necessary to remove the wallpaper, beat off a layer of old plaster if it is in unusable condition (cracks, holes, scratches). Dust must be removed from the surface of the walls. In order for the new layer of plaster to stick better, it is necessary to open all the seams. To do this you will need a hammer drill with a spatula.
Measuring linear dimensions
After the preparatory work, you need to measure the walls by level and using a metal square. These measuring tools will help you determine how different the walls are from each other. If the difference is large, you will need to install beacons or make a metal structure to create a plasterboard box.
How to widen a doorway?
To increase the width of the doorway, you can use several methods:
- Rude. A method involving the use of a sledgehammer, a jackhammer and a hammer drill. Before using the tool, you need to mark the required size of the opening. You cannot use the rough method for thin and weak walls. The impact load may cause cracks to form or the wall to collapse.
- Dry. This method involves using a grinder or a gas cutter. When using a grinder, you need to change diamond wheels frequently. When this tool is used, a large amount of dust is generated.
- Wet. A method similar to the previous one. Only when cutting concrete or brick is a special cutter with a built-in spray gun used.
When carrying out any expansion work, it is worth initially dismantling the previous door frame and determining where the wiring, pipes and metal elements in the walls go. If tools get into metal, you can break it or harm your health.
How to plaster slopes: do it right
The design of door slopes is an obligatory part of major repairs or finishing of a newly built house. Plastering them can be considered a classic design today. This method, although it takes a lot of time, is the most reliable: with this finishing there are no voids left. Although this is not an easy task, if you follow the technology, plastering slopes with your own hands can also be done at a good level. In any case, you can prepare the surface for wallpapering yourself.
We plaster the slopes with our own hands: if you follow the technology, everything will work out
Openings where there were none
Sometimes, during major repairs or redevelopment of apartments or houses, the owner decides to change the size of the opening. If the walls are load-bearing, such actions are preceded by obtaining permission; if it is just a partition, then the housing commission is notified of the fact of the work performed. But that’s not about that now.
Passages are made in different ways, the choice of which depends on the structural material of the wall. Accordingly, slopes are formed in different ways. In brick, foam concrete and asbestos-cement partitions, passages are cut. These materials are quite soft, so large expenses for cutting the opening are not required.
Naturally, this is done according to preliminary markings, after which leveling and finishing are carried out. If the passage just needs to be widened, it is easier to do it on only one side. Although, the layout does not always allow you to do what is easier, and you have to cut the opening on both sides.
Cutting and strengthening
Diamond cutting of openings, performed using specialized wall-cutting equipment, although more expensive, can solve the problem of a structure of any thickness and strength.
- At the same time, there is no dust, since such equipment is equipped with a dust collecting device. Dirt, of course, happens, but because the working blade of the wall saw has to be cooled with water during the process. But with such equipment, everything is done exactly to size, quickly, and without unnecessary noise.
- Since the cutting process violates the integrity of the structure and removes a fragment that took on certain loads, the openings are necessarily reinforced with rolled metal. In non-load-bearing walls, the perimeter of the opening is tied with a steel angle of 40 * 40 mm and connecting plates.
- In multi-layer walls - for example, frame houses, reinforcement is carried out with a square pipe, embedded inside the surface and fixed to the ceiling. For half-brick partitions, a channel of the required size is selected, mounted in a U-shape on both sides, and attached to the ceiling and floor.
- In general, reinforcement options can be different, and they are determined by the project, without which such work cannot be carried out (see How to strengthen a doorway). Reinforcement of openings is also carried out in cases where the strength of the structural material of the wall is insufficient to withstand, for example, a steel door.
Openings for door installation
By searching: “Preparing doorways video,” you can always find a suitable video where craftsmen share their experience. For our part, we will try to give you theoretical knowledge, relying on building rules and technologies - after all, the opening must not only be correctly calculated, but also leveled properly.
So:
- The easiest way, of course, is when the construction of a house is carried out, as it should be, according to the project. The documentation contains a diagram for filling doorways, an example of which you can see below. It indicates the sizes and types of doors, as well as gaps in the walls where they will be inserted.
Specification of doors and their sizes
- As a matter of fact, when building walls, masons immediately make the openings that are needed - the main thing is that they have accurate information on the markings of doors that will be installed in load-bearing and self-supporting structures. But as for partitions, today most often they invite not masons, but drywall specialists, for interior planning.
Construction of a structure in a gypsum plasterboard partition (see How to make a doorway from plasterboard) - the procedure is not so complicated and can be done independently. But, of course, you need to approach the work with understanding, and try not to confuse anything regarding the size of the opening.
After watching the video in this article, you will be able to cope with the task. Below we offer you a short guide on this topic.
Opening in a frame partition
The thickness of a wooden door frame is on average 5 cm - it is this distance, coupled with the size of the door leaf, that is the full dimensions. All instructions for measuring the opening for installing a door boil down to adding an installation gap around its perimeter, which should be within 3-6 cm.
It is then sealed with polyurethane foam. Deviations of a couple of millimeters are not critical, but it is better if they are larger.
Note! Maybe not everyone knows that in the door markings, the size of the door leaf is encrypted in decimeters, taking into account the thickness of the frame. If, for example, it is necessary to install a door of the DG 21*9 brand, the minimum opening should be 2.160 m in height and 0.980 m in width. This principle applies not only to doors installed in partitions, but also to all similar structures in general.
- Since the plasterboard partition is a frame structure, the opening in it is formed at the time of installation of the load-bearing elements. Wooden blocks can be used for manufacturing, but more often, an aluminum profile is used for this purpose: guide and rack. Its dimensions are selected depending on the dimensions of the partition and the weight of the door being installed, for example: PN75/40 and PS75/50.
Partition frame
- First, the perimeter of the future partition is drawn on the floor, ceiling and walls, along which a guide profile is mounted, with the back to the base surface. Its shelves form a groove into which vertical posts and lintels will be inserted. Before installing the lower guide, it is necessary to mark the location of the opening on the tapping line, because the profile is not attached there.
- Of the vertical load-bearing elements, the first to be installed are those that form the doorway. The distance between them, as already mentioned, should be 8-10 cm greater than the width of the door with the frame. Then, a crossbar is mounted between these two posts, which will limit the height of the opening.
- They cut it out from the PN profile and install it so that the shelves are turned towards the ceiling. Depending on the method of installing the gypsum board around the door, one or two short intermediate posts will be inserted into it, giving rigidity to the opening. For the same purpose, wooden blocks of the appropriate section are inserted into the groove of the side posts, to which the frame will then be attached (see How to assemble a door frame without problems).
Everything is ready to install the door
- What the partition frame looks like can be clearly seen in the previous photo. How to properly cut a profile, use the method of bending the fastening, what distance should be between the frame elements, and other necessary information, look for in articles specifically devoted to this topic, as well as by request: “Preparing a doorway video.”
We talk about this only in general terms, since the article is devoted to the process of aligning the opening. Although there is nothing to level in plasterboard partitions. Usually the thickness of the partition is made in accordance with the door frame.
If no mistakes were made during installation, all that remains is to putty the surface of the walls adjacent to the frame, finish them, and cover the joints with platband.
What are slopes called?
Before leveling the surface, you should define the concept of slope. The concept refers to the area in the area where the door is inserted, framing it from the sides and from the top. The use of plaster mixture in this embodiment allows:
- will be able to perfectly level surfaces;
- will reliably protect slopes and adjacent surfaces from destruction;
- will increase the level of thermal insulation in the room;
- will enhance sound insulation properties.
Traditionally, slopes are made using the rule and various dry-type compositions, which are selected according to the location and operating conditions of the facility. Scientific information on this topic can be found at ru.wikipedia.org
Selection of plaster mixture
To get perfect slopes, you will have to choose the right plaster mixture. It is necessary to talk about the selection of initial and final plaster, since it is selected depending on:
- features of the technical plan object;
- features of further operation;
- the cost of the work performed.
If the gaps are more than 50 millimeters, then before filling them with the plaster mixture, care should be taken to ensure maximum noise and heat insulation by filling the door jamb with special materials.
How to choose the right plaster for the ceiling?
Experts strongly recommend making plaster-type slopes from:
- cement-sand composition - for which you should stock up on cement and sand (1:4), diluting them with water to the state of thick sour cream;
- alabaster based solution.
If the structure is installed in compliance with all requirements, the gap is so small that it can be easily filled with ordinary polyurethane foam. After the foam layer has dried, it will be possible to carry out further surface treatment - plastering and decorative finishing.
Plastering arched door slopes
When constructing openings in the form of arches, the side straight sections are made as usual. And the plastering of the arched slopes of the front door is carried out using a specially made plywood template. Another feature is the mandatory reinforcement of the curved section.
For an interior arched doorway, two templates are made, which are attached to the wall on both sides with self-tapping screws. If the opening is at the entrance, then one guide will be a plywood template, the other will be the arched profile of the door itself. In this case, for alignment, a rule is used with a cut-out protrusion at one of the ends (like a fry).
The surface of the template is covered with tape so that the plywood can be easily separated from the plaster when removed.
After installing the reinforcement and templates, the solution is applied to the base in the usual way (spray, primer). Level the mixture by resting the rule or mulch on the supporting surfaces. Alignment is carried out several times in one direction, then once or twice in the opposite direction (to secure). Rub such a curved surface with a float with a rounded working part.
Why are slopes trimmed?
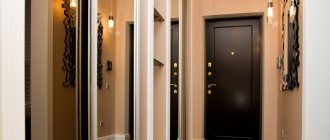
Plastering the slopes of the entrance door is carried out for the purpose of:
- align, improve the wall around the door, make the hallway attractive;
- close the fastening structure of the door frame;
- seal the area around the door (the plaster forms a monolithic coating);
- additionally insulate the room, reduce the level of noise coming from outside.
All these goals are achievable if plastering of the entrance door slopes is used. The main advantages of plaster:
- the solution can be given any shape;
- the material is plastic, it can be laid flat without much difficulty;
- the compositions are environmentally friendly, non-flammable, create a durable coating;
- finishing and repairs can be done with your own hands;
- the material is available and not expensive.
Why is this necessary?
A doorway is plastered for a number of good reasons, aesthetic and functional:
- Gaps and cracks. Using plaster, defects in the jamb are removed. Plus, after the dismantling and installation work, there are likely to be some uneven spots left; the finishing will also help hide them.
- Appearance. Even if the area near the box is planned to be finished with other materials, it is also worth leveling the slopes; they will give the opening the correct geometric shape.
- Decorative effect. Plastering can be the only way to decorate. The method is inexpensive and the work can be easily done with your own hands.
- Installation protection. Polyurethane foam, which is protected by a layer of plaster from exposure to ultraviolet radiation, will be able to perform its functional task for a long time.
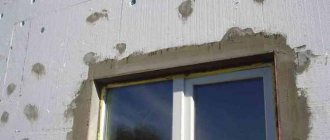
Stages of plastering door slopes
Before plastering begins, a line for the location of the slope is drawn.
Before plastering the door slopes, the wall should be leveled. The door is usually installed after leveling the wall where necessary. When the door is already installed, the wall is aligned on the desired side. They start by measuring the corners, taking into account the height of the side door slopes, not forgetting about the upper slope.
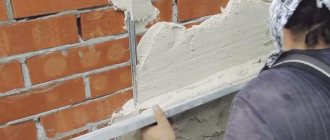
The walls near the door slopes must be carefully plastered and rubbed. Before work, rules are hung on the slopes in their upper part, which must be hung on each of the sides strictly vertically. The plaster solution is applied with a spatula, starting from bottom to top.
If you need to make several layers, then you need to dry them one by one before applying each next layer. Plaster is applied to door slopes not only to create an even layer, but also an attractive appearance. At the same time, they are able to provide additional heat and sound insulation.
Depending on the location of the door, the appropriate type of plaster is selected.
It can be external or internal. The technology for plastering door slopes comes down to the following operating principles:
Decorative plaster
Unusual, but difficult to implement and expensive finishing. After application, it forms a textured, colored surface that transforms the entrance area. Conceals minor irregularities and surface roughness.
Alternative options
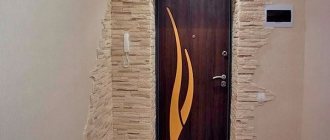
For exclusive eco-style options, bamboo or cork is suitable. This finish looks elegant and stylish. Natural materials will help create a harmonious, peaceful atmosphere. They do not emit harmful components or odors, and do not accumulate dust.
Problems that may arise
Before starting plastering work, you need to make sure that there are no obstacles to the start of the finishing process. Their variability and versatility mean the existence of many nuances that can interfere with the high-quality implementation of what was planned:
- Craftsmen who install windows or doors do not always perform their professional functions efficiently. Before you start plastering, you need to make sure there are no errors or defects. During operation, they will certainly make themselves felt, and then everything that has already been done will have to be broken.
- The electric cable, in secondary housing, is placed in the upper or lower corner of the slope, and if this point is not taken into account, you will have to do additional work - punching a passage and sealing it.
- When engaged in finishing work, especially in cold weather, workers do not take into account the properties of the plastering mixtures used. The temperature at which work is carried out does not meet the manufacturer's requirements. The result is cracking and breaking of already formed layers, the need for re-application in order to eliminate visual defects or additionally strengthen the base layer for final finishing.
- The preparatory stage takes a lot of time, which is reflected in the cost if the master is paid according to the number of hours worked, and not according to the result obtained.
It is necessary to conduct a high-quality and professional assessment of the upcoming scope of work - to see whether external finishing is necessary (when installing a metal door, manufacturers usually have a platband covering external defects), but in other options it may be necessary to carry out work both inside and outside. A thrifty owner will pay attention to the metal trim in order to avoid future problems with operation.
Do-it-yourself rough plaster of slopes
The process of applying plaster to a slope is no different: a solution is poured onto a dust-free and wet surface. They do this with a wide spatula or a paint bucket - depending on how you are used to it. It’s more convenient to start from the bottom and work your way up.
By running a rule or template along the guides, rocking from side to side, the solution is leveled, and the excess is removed back into the container. For the first penetration, you don’t need to achieve a particularly flat surface, but be sure to monitor the condition of the corners - remove excess mortar regularly.
Plaster slopes are made in two stages: the first is rough, the second is finishing
Some problems may arise when plastering the upper slope: it is more difficult to apply the solution here. It is taken with a wide trowel (spatula) and, pressing lightly, applied with a slight pull. If the surface is rough, there are usually no problems. They can occur if a concrete beam is installed on top. The solution, especially cement-sand, does not “stick” well to such a surface. In this case, you need to pre-impregnate it with a primer, which serves to improve adhesion (adhesion) to finishing materials.
Treatment may also be necessary if the surface on which the DSP plaster is applied strongly absorbs water (silicate and clinker bricks, for example). Only in this case should the primer further reduce moisture absorption. The second way out is to use special Knauf compounds - they do not react so sharply to a lack of fluid. And the third way is to apply a layer of tile adhesive to the surface treated with primers, forming a wave with a notched trowel. Tile adhesive admirably “clings” to the most difficult surfaces, and itself serves as an excellent base.
If all this seems very complicated to you, read the article on how to make slopes from MDF. Everything is extremely simple there. No solutions or spatulas, and the result is excellent. Or you can make slopes from plasterboard. The look is almost the same, but it’s faster to do. After installing plastic windows, you can make plastic slopes.
Finishing of slopes - completion of work
In fact, plastering the door slopes is not the very last step in upgrading the doorway. Undoubtedly, many people end up with simple plaster, but there are other methods that will give the surface a more aesthetic appearance. Naturally, the choice of materials in this case depends on the interior of your home. When choosing materials, also rely on the recommendations below:
- If we are talking about internal slopes, it should be borne in mind that they will be exposed to dirt and dust, and therefore the material for the slopes in this case must be well cleaned.
- When talking about entrance doors, especially in a private house, you should remember that the slopes will be exposed to moisture - temperature changes inside and outside the room often lead to the formation of condensation. Some finishing materials do not perceive moisture at all or quickly deteriorate under its influence. In this case, it is advisable not to use gypsum board sheets and wood.
- Do not forget that slopes may be subject to mechanical stress, which also needs to be taken into account. That is why it is undesirable to use plastic products for entrance doors, which are very easy to damage.
We told you how to plaster door slopes, which means it’s time to improve the appearance of your home, because doors play an important role in this.
Forming a smooth opening
Repairing openings in the bathroom, or near the front door, which will be discussed later, is a completely different matter. In these places there are no plasterboard partitions, but rather thick load-bearing walls.
The front door opening is often filled with one frame with two panels or several bindings. This is justified by the fact that one door, for example, can be metal, and the second wooden.
The space between them is called the stub. Considering that the thickness of a load-bearing wall can be quite impressive - say, two bricks (51 cm), then it is natural that even a double frame does not completely fill the opening. Most often, the door is placed flush with the wall on the outside, and slopes are created on the inside.
Doorway alignment methods
Both in apartments and in private houses, doorway alignment can be done in several ways using different materials and technologies. The list of materials and tools will depend on the chosen method.
Using drywall
If a person wants to use drywall to level a doorway, then he will need the following tools:
- Metal profiles.
- Roulette and level.
- Drywall (meterage must be measured in advance so as not to buy excess material).
- Electric drill.
- Metal scissors.
- Glue (when fixing directly to the wall).
- Insulation (optional).
After preparing all the tools and materials, you can begin work.
Drywall installation technology
First of all, you need to check the walls for level. If there are no large differences, you can mix glue and attach sheets of drywall to the wall without additional elements. In this case, it is necessary to set each sheet according to its level.
If there are large differences in level on the walls, you need to make a frame from metal profiles. Sheets of plasterboard are fixed on top of the frame, and the seams are covered with plaster. To fill the space between the wall and the drywall, you can use insulation (foam, mineral wool).
Important! The frame needs to be made depending on the pitch between the screws. It should be no more than 40 cm. After tightening the fasteners, it is necessary to cover the resulting holes with plaster.
Using plaster
To work with plaster you will need the following tools and materials:
- Mesh for plaster.
- Basic finishing mixture.
- Primer.
- Two spatulas.
- Rules.
- Roller or large brush for applying primer.
- Lighthouses (if there are large differences in level).
- Perforated corners for slopes.
- Container for mixing plaster.
- Drill with whisk for kneading.
Now you need to figure out how to level a doorway with plaster and what composition is best to choose.
Which plaster to choose?
There are three types of mixture for leveling walls:
- Cement is a cheap composition that is moisture resistant. It is used to make a base on which putty or paint is applied to hide the gray color. It is important to remember that such plaster shrinks during operation.
- Gypsum is an easy-to-apply composition that is uniform. The surface is smooth after application. Gypsum plaster is afraid of moisture.
- Polymer - the high price of this composition is determined by its characteristics. This plaster is evenly applied to the work surface and at the same time is not afraid of water.
The plaster must be applied in two layers - base and finish. The first can be coarse-grained, the second only fine-grained.
How to plaster correctly
After choosing a leveling compound, you can begin the main work:
- First of all, you need to prepare the work surface. To do this, it needs to be freed from wallpaper, the old layer of putty and plaster. Deepen the seams by 1 cm using a puncher. Sweep dust off the walls.
- Apply primer to the walls with a roller or brush. Let it dry.
- The next step is to install beacons. If there are no large differences in level, you can do without them. Beacons are placed strictly at level.
- Perforated corners are installed at the corners of the opening. When the wall is smooth, a reinforcing mesh is fixed to it and another layer of plaster is applied.
Important! If you need to apply several layers of leveling solution, you need to wait until the previous one dries.
Using a wooden beam
In most cases, doorways are leveled using timber in wooden houses. Also, using a wooden block, you can make a high threshold or reduce the opening itself in size. To carry out the work, you will need a hand saw for wood, anti-fungal impregnation, sandpaper, varnish or paint for wood, wood screws, and a screwdriver. If there are gaps between the main wall and the installed beam, you can close it with an additional cover.
How to reduce the width of a doorway?
During redevelopment or large-scale construction work, situations may arise in which it is necessary to reduce the width of the doorway. You can use several materials for this:
- Brick. The material most often used for wall construction. With its help you can quickly reduce the width of the opening. You will need mortar and red brick. Its quantity will depend on the value being reduced. For additional fixation, you can use metal rods, which are fixed in the main wall and in the seams of fresh masonry.
- Drywall and wood. Using drywall you can make openings of any shape. To do this, a metal frame is created in the shape desired by the owner of the home. Sections of drywall are secured to the resulting sheathing with self-tapping screws. It is necessary to level uneven places and holes with screws with plaster. Wood is used to reduce the openings of entrance doors.
- Plaster. If you need to reduce the opening by a small amount, you can use a layer of leveling compound. Experienced finishers recommend strengthening it with reinforcing mesh.
The choice of material will depend on the desired shape of the future opening.
Finishing technology using plaster mixtures
To work, you will need a set of simple tools and materials, without which a high-quality and smooth surface will not be possible.
Tools for work
- Rule and set of spatulas. You need one that is narrow and the same width as the wall in the opening. You may need a special one for the corners.
- Bucket for mixing plaster, construction mixer. A drill with special beaters will do.
- A grater for leveling the surface and a mesh with different cell sizes, also for mashing.
- Building level.
- Corners.
- Plaster mesh for reinforcement.
- Primer and brush, maybe a roller.
- Stationery knife or scissors.
Layer-by-layer plastered slope
Walls
The concept of “finishing work” includes a list of related operations from painting walls to laying tiles. All of them are carried out only on a carefully leveled wall surface.
Modern methods of leveling walls are divided into two groups. Depending on the technology and materials, a distinction is made between dry (using plasterboard structures) and wet (correction of the surface with a building mixture) methods, each of which has its own characteristics. In order to choose the most suitable method, it is necessary to measure the unevenness with a laser level, a plumb line or a regular level. Potholes and depressions ranging within five millimeters can also be eliminated using putty. Irregularities of about 3-5 centimeters? Then you should purchase a building mixture. Differences of more than 5 centimeters are best leveled using drywall.
Content:
- How to level walls with plaster?
- Installation of beacons
- Plaster application technology
- How to level walls with putty?
- How to level walls with rotband?
- Frame method of leveling walls with plasterboard
How to level walls with plaster?
Immediately before leveling the walls, it is necessary to carry out a number of preparatory work:
- dismantle outdated finishing materials;
- evaluate the surface that needs to be plastered.
The wall should not crumble or delaminate. Often, when working on old plaster, after the first layer has completely dried, defects are discovered that were previously invisible.
The key to success is compliance with three conditions:
- thorough surface preparation;
- correct choice of building mixture;
- presence of accurate beacons.
To level the brickwork, it is recommended to use a cement mixture. The cost of this plaster mixture is relatively low. It is possible to apply a fairly thick layer of material, which is important when finishing brick walls. It should be noted that when applying a layer of more than 2 centimeters, it is necessary to use a plaster mesh to reinforce the composition.
To plaster a smooth concrete wall, you will need gypsum-based wall leveling mixtures. Quartz microparticles included in the material make the wall a little rough. But first, be sure to prime the surface. Reinforcement is performed with a polymer mesh with a cell size of 5×5 mm.
Tools and materials for work
To plaster the sides of the opening, you need:
- mixer (for mixing the mixture);
- spatulas;
- roller;
- short rule or malka;
- grater;
- level;
- capacity;
- masking tape, film;
- rags;
- sandpaper;
- paint brush;
- components for solution or dry mixture;
- primer;
- putty;
- corner profile;
- reinforcing mesh;
- self-tapping screws;
- clean cool water;
- scaffolding or stepladder;
- personal protective equipment.
Plastering slopes - pros and cons
Plastering slopes is a traditional finishing method, and despite the abundance of proposals for new materials, sometimes you simply cannot do without plastering work. The advantages of the method include:
- production of slopes of any size, complexity and shape, including arched, round, curved;
- resistance to difficult operating conditions;
- environmental friendliness and aesthetics;
- maintainability and the possibility of color design, painting;
- Plastering slopes with cement mortar fills cracks and uneven areas, levels the surface, and provides additional sound, water and heat insulation.
But leveling slopes with plaster also has some disadvantages: the process is complex, multi-stage and labor-intensive; if the technology is violated, cracks may appear at the junction; solving the problem will require additional costs: sealing and restoration.
Window profile for plaster, greatly facilitates the formation of the geometry of the opening
Features of the design of window/door openings
There are several simple ways to finish the internal slopes of doors and windows - cladding with plastic, plasterboard, wood. These materials allow you to quickly level and at the same time decorate the surface, but the highest quality option is plastering slopes with cement mortar. It allows you to obtain slopes of various widths and shapes, which is especially important for arched and round structures.
Note: although plastering window slopes is a dusty and labor-intensive task, it allows you to achieve absolute tightness (the finishing layer becomes part of the wall, which cannot be achieved when covering with plastic and plasterboard).
Stage 4. Assembling the accessory box
Before installation, we assemble the extensions into a solid, rigid box.
Photo 11. Drilling holes for self-tapping screws
Using a drill, we drill holes for self-tapping screws - for fastening from the inside. This is a mandatory step so that when screwing in the screw does not split the MDF panel.
Photo 12. Drilling holes for self-tapping screws
We make several holes at a distance of 10–15 cm from each other.
Polyurethane
Their polyurethane door frame is an inexpensive replacement for plaster. Polymer slopes are a little cheaper to produce, lighter and more modern. They are mainly used in classical styles, where they are a good substitute for natural plaster. The only drawback of polyurethane is its low strength. He is unlikely to survive the blows. Therefore, it is not recommended to buy it for an apartment with small children and especially animals.
But installation of slopes is simple. In addition, polyurethane masks wall imperfections.
Advice from professionals
Every business requires practical experience. Therefore, advice from craftsmen who perform finishing work professionally is especially valuable. Here's what professional finishers advise:
- When leveling the plaster, do not pull the rule in one direction. If you move it along a zigzag line, the surface will be smoother.
- When installing a corner, it is better to cut off the edge, which will be adjacent to the main wall at 45°. This way the coal will not rise up during subsequent work.
We also recommend watching the video carefully. Having seen all the stages of the work clearly, you will understand much better how to finish the slopes with your own hands.
Finishing the slopes is an important stage, the quality of which directly determines the service life of the door. But if you study the technology and prepare everything you need, you can do it yourself even with minimal finishing skills.
Finishing of plastered slopes
If the slope is then painted, the putty will be leveled perfectly. To do this, apply two layers: starting and finishing. The starting putty has a coarser grain; it can be laid in a layer of up to 1 cm. With its help, all defects that are difficult to remove with cement mortar are eliminated. After the finishing putty has dried, all irregularities and protrusions are sanded with a special mesh. Afterwards a layer of finishing plaster is applied. It is even more plastic than the starting one, and can be applied in a very thin layer. With its help you can achieve perfect smoothness.
For a beginner plasterer, getting a perfectly flat surface for painting is very difficult. It is much easier to level the slope for wallpapering. In this case, you can stop at the starting putty.
If, when installing the door, the old slopes were not damaged much and can simply be restored, there will be less work. You just need to pour the solution into the depression and level it with a long trowel (trowel).
Panels and laminate
Each door can have either a large entrance opening or a small one. In the first case, it is permissible to use several strips of laminate or plastic. In the second, one may be enough. In this case, the slope will be perfectly smooth and without joints.
Laminate finishing has recently been used very often, since this material does not require much effort during installation. It is enough to evenly cut the desired strip of material and insert it well into the grooves of the corners and beginning levels. Similar actions should be taken when installing plastic. The only negative is that the paneling must be combined with something. This point cannot be achieved with wallpaper; with furniture and doors it is possible, but not easy.
Each type of laminate has its own shade, just like each type of door. Therefore, when choosing the entrance part of the apartment, immediately choose handles and laminate for finishing.
The entrance part should always greet owners and guests with its beauty and reliability. Finishing is very important here, so pay great attention when working with this part of the apartment or house. You need to pay attention to each part - to the initial preparation, to the choice of materials, to the installation process and to use. The combination of all these points should provide the ideal look for your room. Good luck in job!
Plastering external slopes - prices.
If we talk about the cost of materials that are required during the work, then plastering external and internal slopes is an inexpensive process. Very often, working with slopes is a small element of the finishing work performed during repairs. You should not skimp on the price of metal corners - they must be of high quality.
You should also buy cement and gypsum based plaster. A cement base will cost no more than one American dollar per meter, a gypsum base will cost twice as much. If you add up the price of the corners and all consumables, the cost per square meter of slope is three dollars.
Finishing external door and window slopes with plaster is financially calculated based on the purchase of high-quality materials, in particular, corners that do not break from mechanical stress. The cost increases. If you order a slope in several layers, use a mesh and work with complex shapes. At the same time, using expensive materials such as silicone plaster. A linear meter costs an average of $3. And the complexity of the working conditions increases its cost to 4.5 dollars.
Finishing external window and door slopes with plaster is not a very complicated process. If desired and diligent, it can be successfully completed by non-professional builders. Most of the time is spent installing a system of beacons that limit the working plane. All other stages of work are a matter of technique and effort.
Selection of plaster mixture
As for the material, it is most convenient to work with dry plaster mixtures based on gypsum: these compositions, already prepared in the required proportions, only require the addition of water and thorough mixing. In addition, they dry approximately twice as fast as traditional cement plaster, are more flexible in work, and there is noticeably less dirt from them. Therefore, if plastering a doorway is carried out in a residential area and large layers of material (3 cm or more) are not required, it is best to use dry gypsum mixtures. When working outdoors or in cold technical rooms, plaster made of cement and sand, in the classic ratio of 1:3, is more suitable.
The ratio of sand to cement should be 1:3