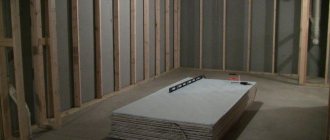
Suspended plasterboard ceilings are an excellent solution for hiding defects in a load-bearing concrete slab and creating a perfectly smooth surface underneath. Any type of decor, wallpaper, paint or ceramic tiles will look good on such a surface.
But for this you need an absolutely flat surface. In order to create it, you need to know how to plaster a plasterboard ceiling, what materials and tools are required for this. It is also important to follow the technology of this process. These nuances will be discussed.
Plastering drywall: risk assessment
This division of opinion regarding plasterboard plaster is largely due to the fact that the material itself is somewhat unpredictable. As the practice of its use shows, there are contradictory cases: in some cases, plasterboard sheets actually become deformed, in others they serve for many years without the slightest hint of cracks in the plaster. Therefore, it is recommended to decide on such a risky event only after assessing its feasibility, i.e. determine whether there is a need to cover the ceiling with plasterboard.
Experts advise using plaster only when the curvature of the surface is slight or there are dents in the material. If the surface is strongly curved, especially if there are displacements of the sheets relative to each other, plaster is strictly not recommended. In this situation, plaster not only will not correct the surface, but, on the contrary, will deform it even more, because it's quite heavy. If the drywall is severely deformed, only reinstallation will help. In this case, it is recommended to pay attention to the reason for such a serious curvature; Perhaps it's due to high humidity. If this is the case, then it is definitely better to replace the sheets with more moisture-resistant ones.
How to plaster a plasterboard ceiling with your own hands
The finishing mixture, which contains a fine fraction (up to 0.5 mm), is applied to smooth out defects in the starting layer of plaster. A well-putty surface will become a high-quality basis for further finishing - painting, gluing wallpaper, etc. When deciding whether to plaster the ceiling or choose a suspended option, it is worth considering that the first will cost much less, and for its implementation you will have to prepare: However, there is also a minus , which lies in the fact that it is unacceptable to apply almost any finishing mixture in a layer whose thickness exceeds 3 mm. With a ceiling that does not have a perfectly flat surface, it will not be possible to hide errors, and in the end it will not look as desired. If you do not want to waste time and effort, then you should first analyze the evenness of the ceiling surface and only then choose the technology for carrying out the work.
Once the surface is clean, it can be primed. For this, acrylic-based primer mixtures are recommended, since they penetrate deeply into the coating structure. They must be applied only with a brush so as not to bypass any potholes.
- large capacity for solution;
- drill with mixer for building materials;
- spatulas of different sizes;
- building code;
- grater with sandpaper;
- brush;
- roller
- On a polymer (acrylic) basis - it’s difficult to find flaws, since such compositions combine all the best qualities of other putties. The only conditional “minus” is the rather high price.
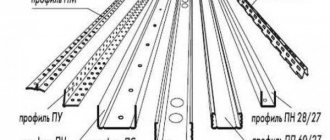
- It is almost impossible to perform plasterboard cladding (except for some completely miniature structures) with one sheet. This means that it is assumed that there will be joints on which there will be either a factory chamfer (sheets with a UK, PLC, PLUK edge) or one cut independently during the installation of the coating.
Mandatory conditions and work technology
So, if you decide to plaster the ceiling or walls lined with plasterboard, then you must follow three important rules:
- Plaster can only be used if the ceiling is covered with moisture-resistant plasterboard;
- Before applying plaster, the surface must be primed; There are special deep penetration primers for drywall;
- The plaster is applied in several thin layers.
Thus, in order for the plastering of plasterboard walls and ceilings to be of high quality and not lead to disaster, it is necessary to strictly follow the technology for applying the plaster mixture. Let's look at each stage in more detail.
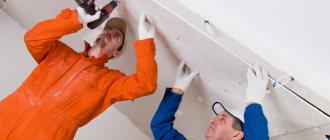
- Preparing the plasterboard surface. First, the surface is cleared of dust. The most convenient way to remove dust from drywall is with an industrial vacuum cleaner, but any available means will do.
- Seams, sheet joints and other irregularities on the surface of the drywall are sealed with putty. Today, both ready-made putty mixtures and dry mixtures that are diluted immediately before use are available for sale. Read more: puttying a plasterboard ceiling.
- The leveling layer of plaster is applied only after the putty has completely hardened.
- The key step in preparing a plasterboard surface for plaster is the primer. Its importance is explained by the fact that special deep-penetrating primers are used for drywall, which increase the strength of the material and significantly improve the ability of drywall to adhere to other materials, in particular, putty and plaster. It is recommended to use primers that contain acrylates (usually primers with 100 percent fine hydrosol). They are distinguished by their vapor-permeable properties. When treated with a primer, the surface of loose materials, which includes drywall, is impregnated to a depth of 10 cm and reliably glued from the inside.
- Work on plastering plasterboard surfaces should be carried out in conditions of moderate air humidity at a temperature of + 5-35°C.
To apply the primer, use a brush or roller; it can be applied by spraying. When processing a material with high moisture absorption capacity, the surface is primed according to the “wet on wet” principle, which means applying layers of primer immediately one after another, without waiting for the previous one to dry. The primer layer should be thin; too much material will cause a “glazing” process. If necessary, the primer can be diluted with water, but the percentage of water content should not exceed 20-25% of the total volume. A test application is done to determine whether the primer needs to be thinned.
By following the above rules for plastering plasterboard surfaces, you can achieve high-quality and durable results.
Do I need to plaster drywall?
The most frequently asked questions regarding gypsum board plaster will be as follows:
- How to plaster drywall under wallpaper?
- How to plaster a ceiling and drywall?
- How to plaster plasterboard walls?
In the vast majority of cases, the answer will be the same: not at all. Drywall is sometimes called drywall because the plasterboard sheets attached to the frame perform the same function as the plaster mixture applied to the wall: level it. And these questions arise because not everyone sees the difference between plaster and putty.
Plaster is a material for rough rough leveling. It has a coarse-grained structure, can be applied in a fairly thick layer and is designed to eliminate significant defects in the base. Even the finest-grained gypsum plaster mixture cannot serve as a substitute for putty when processing plasterboard, since it cannot be applied in such a thin layer.
Putty is a finely dispersed construction mixture, due to which it can be applied in a layer only a few millimeters thick. It is the putty that, after drying, allows us to obtain a perfectly smooth surface, which we expect to see after finishing the walls with plasterboard.
Thus, walls, ceilings and any other plasterboard structures should not be plastered, but puttied. And if you come across advice about the rules for plastering gypsum boards, do not trust such an article - it was written by an incompetent author.
Plaster is applied to drywall only in one specific case, which is rather an exception to the rule and will be described below.
Preliminary work
Before starting finishing work of any plan, any shortcomings should be eliminated. Self-tapping screws must be recessed into a sheet of drywall. Quite often a situation arises when a sheet is caught by several screws during installation, and the rest are simply forgotten to be screwed to the end. Therefore, the first stage of preparation comes down to completing the process.
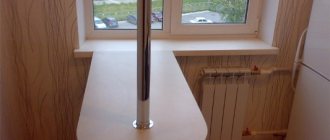
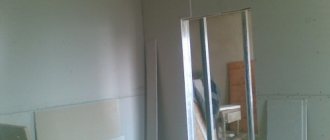
Places where sheets join are cleaned of dust. If there is an un-removed chamfer on the seams, the seams are processed in such a way that the joint at the joint forms a channel. The photo shows a seam between sheets of drywall.
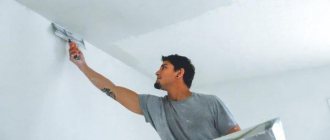
Applying plaster
When applying the composition to an instrument, it is necessary to take as a basis the movement that is characteristic of a person spreading butter on a piece of bread. When applying plaster to the base of the ceiling, you should not try to rid the surface of all stains, since such a skill can only be achieved by a professional. Don’t think that the errors will remain on the surface; they can be removed after the ceiling has dried. This can be done using a grout mesh.
It is important to remember that it is initially recommended to eliminate obvious errors, while after that the master should begin processing the entire remaining area of the ceiling. As soon as the entire surface of the ceiling has been processed, we can assume that you have completed this stage of the work; you can leave the base until it dries completely.
Tools and materials for puttying drywall
If you are going to putty a plasterboard ceiling with your own hands, prepare the following tools:
- drill with mixer attachment;
- container for mixing putty;
- special brush;
- corner, wide and narrow spatula;
- grinding float;
- painting knife;
- trestles or stepladder for working at heights;
- To assess the evenness of the surface, a carrying lamp is needed.
To putty a finished suspended ceiling you will need the following materials:
- primer;
- serpyanka;
- regular and finishing putty;
- paint or plaster (depending on the type of finish chosen).
Tools
When working with drywall, no special construction equipment is required. You also don’t need to have any special technical skills. However, the minimum set of tools for high-quality repairs should be:
- angular and even spatulas (80 and 250 mm long);
- container for construction mixtures;
- electric drill with mixer attachment;
- roller or brushes for applying primer;
- construction knife and brushes;
- grinding float with abrasive mesh;
- stepladder and protective respirator.
The availability of building materials and a minimum set of tools will make it possible to complete the work of puttying a plasterboard ceiling.
Recommendations for carrying out work
Before plastering the ceiling for painting, it is necessary to complete all work that could cause vibrations of the surfaces. Otherwise, the procedures performed will be in vain. If the work is supposed to be carried out in a room characterized by high humidity, then you should choose drywall with moisture-resistant characteristics. During operation, such a ceiling can be vacuumed and subjected to wet cleaning; such effects on the surface will not cause harm.
If you are thinking about the question of how to plaster the ceiling in the bathroom, then you need to choose a composition made not on gypsum, but on a cement base. By following all the rules of work, you will get an excellent result.
Preparing drywall for puttying
Puttying and leveling of uneven ceilings during repairs
Puttying of a plasterboard ceiling is carried out after careful preparation of the surface:
- Check all fasteners to ensure they are recessed 1 mm into the body of the drywall. Protruding screws are screwed in deeper, and fasteners that are too deep are replaced with longer elements.
- If the paper has moved away from the gypsum base at the cut, it is removed.
- The surface is primed. An acrylic primer is more suitable for working with gypsum plasterboard. It is not recommended to use alkyd-based compounds. They lead to swelling of the surface. Apply the primer with a roller or brush, treating the seams especially carefully.
- After the primer has completely dried, we begin to putty the seams.
Typically, gypsum boards have chamfers in the longitudinal end part, but if the sheet is cut, then the seams are unstitched and a 45-degree chamfer is made in them using a painting knife. This work can be done before installing the sheet or after installing it.
We glue the self-adhesive serpyanka directly onto the seam. We press the usual reinforcing tape into the solution previously applied to the seam. In both cases, apply a layer of putty on top and level it with a spatula, removing excess mixture. Simply cover the places where the self-tapping screws are installed in the central part of the sheet with putty solution and level it with a spatula.
In multi-level plasterboard structures, we reinforce the outer corners with metal corners with serpentine. If the corner protrudes strongly above the surface of the material, then remove the layer of cardboard from the sheet at the place where it is installed. After this, the cut is primed, and the corner is pressed into the putty solution.
Preparation of putty from dry mixture
Ready-made mixtures do not require preparation before use. Just open the bucket and get to work. That is why, if painting or plastering plasterboard ceilings is being done for the first time, it is recommended to use ready-made mixtures. If you need to take a break from work, cover the bucket with a lid so that the solution does not dry out.
If the plasterboard ceiling is puttyed with a dry mixture, then the solution is prepared before use. It is advisable to prepare a small amount of the mixture so that it does not harden while working.
The cooking sequence is as follows:
- Pour 1/3 of water into the mixing container.
- It is better to work together: one person pours the mixture into a bucket, and the other stirs it with a drill with a mixing attachment. The solution should have the consistency of thick sour cream.
- After this, the mixture is allowed to brew for five minutes and stirred at low speed for a minute.
After preparation, water should not be added to the solution or stirred so as not to destroy the molecular bonds created. The remaining unused mixture is discarded. The prepared solution is ready for use within two hours.
Putty application technology
We carry out the work in the following sequence:
- Using a spatula with the applied composition, we begin to treat the surface with wide movements. Try to apply the mixture in a layer of no more than 2 mm. Don't worry if scratches appear, they will be hidden with subsequent layers of putty.
- The surface dries out within 24 hours. Dry areas differ in their characteristic white color from undried grayish areas with a wet surface.
- Use a sanding float to remove large grooves. We work in a respirator. After this, prime the surface using a roller and wait for it to dry.
- Apply the second layer of putty mixture in the same way. We make sure there are fewer scratches. If the second layer is done well, there is no need to putty a third time. Sand the surface with sandpaper.
- Now we begin to apply the fine-grained finishing putty mixture. The application technology is the same. While working, we periodically bring the carrier to the surface at an angle. This way all the unevenness and defects in the work are visible.
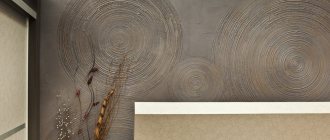
After applying the finishing putty and drying it, all irregularities are eliminated with sandpaper. Depressions on the surface are re-coated with putty. For sanding, use zero-grit sandpaper. Before painting the ceiling, the surface is re-primed. Remember that glossy paint requires a perfectly smooth base, while matte paints hide minor coating defects. If the ceiling will be wallpapered or covered with decorative plaster, then such careful preparation and leveling of the surface is not required.