Drywall partitions quite often become a lifesaver in designing an apartment renovation. Just a few decades ago, walls made of brick or concrete were erected in their place, which was quite troublesome and required a lot of financial costs for the purchase of materials and the work of specialists. Therefore, the design of partitions was used extremely rarely, when it was really necessary. Nowadays, with the advent of such material as plasterboard, the construction of false walls has become completely commonplace, which you can cope with yourself. How to make a partition from plasterboard, as well as its positive and negative characteristics will be discussed in this material.
Plasterboard partitions: their place in interior design
Drywall is a thin slab, the core of which is gypsum with fillers, and the top layers are heavy-duty cardboard. Quite often in our time, redevelopments are made in apartments, and the organization of false walls plays an important role here, namely:
Drywall finishing options
After completing the installation process, the last stage of constructing a decorative wall remains - finishing. Since the partition in the interior actually plays a key role, this process should be approached very carefully.
The simplest finishing methods are painting and wallpapering. To do this, it is enough to properly prime and putty the surface. This will hide the seams between the sheets and ensure the necessary adhesion of the decorative coating.
More interesting options would be the use of natural finishing materials and their combination. For example, sandstone in combination with decorative plaster. The main thing is that the finishing material is not too heavy, as it can not only make the structure more massive, but also lead to its rapid destruction.
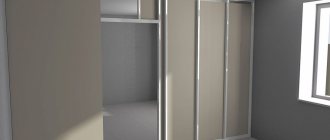
One of the most effective ways to divide any room into zones is to use figured or openwork plasterboard partitions. They give the room lightness and practically do not interfere with the penetration of natural light. What are the best techniques to zone a children's room? What colors and materials to use? After all, often several offspring grow up in a family and at the same time they are forced to “share one room, do homework in it and fully relax.
Plasterboard partitions: advantageous advantages and some disadvantages
Such designs rightfully occupy a leading position due to many positive characteristics, namely:
Along with numerous advantages, it is worth mentioning some of the disadvantages of these designs, which, however, are quite few. Drywall does not have high strength compared to stone, concrete or wood.
Consequently, it is subject to various mechanical influences. Although drywall has a certain degree of hygroscopicity, with direct and prolonged contact with water, for example, in the event of flooding, it will very quickly deform and become unusable, which will entail alteration of the structure. That, in fact, is all that should be taken into account before starting work.
We are planning the zoning of the room into a bedroom and a living room
In small apartments, zoning rooms helps to organize the living space more conveniently. For example, in a one-room apartment, with the right approach, you can arrange a full-fledged bedroom and a fully functional living room.
In a specific situation, you can determine for yourself two types of zoning:
- Open - dividing a room into two rooms is done only visually. For this purpose, a decorative false partition is erected.
- Closed - the pier being erected is an additional wall with an arched opening or door.
Open zoning
This type of zoning includes decorative partitions, which may have niches, through shelves, columns, etc.
Ideas for open zoning of rooms with plasterboard:
- A decorative partition separating the living room and bedroom can, on one side, serve as a wall for a false fireplace or other decorative design.
- The partition dividing the room into a bedroom and a living room may include a niche for a TV with shelves and cabinets on one side and a decorative addition to the head of the sleeping bed on the other.
- The partition can be equipped with through shelves, on which a terrarium or aquarium will look great.
- A purely decorative partition that does not perform any functions other than dividing the bedroom and living room. This design, being translucent, can consist of many elements of non-standard shape and include decorative lighting from neon lamps or LEDs.
With open plasterboard zoning, the partition can be located anywhere in the room: it can be divided in half or one part can be made smaller than the other.
Closed zoning
This type of dividing a room into two full-fledged rooms is a serious step and requires a responsible attitude to planning and drafting.
With closed zoning, the partition separating the bedroom from the living room is a full wall with sound insulation and a doorway.
To divide a room into a bedroom and a living room, you can build a full-fledged wall - a partition made of plasterboard, which will meet the necessary requirements in the field of sound insulation and functionality. Such a wall can hide communications or a small hiding place behind a wide picture; it can include decorative and functional elements with lighting.
The wall separating the living room from the bedroom can include a wide doorway with translucent doors to provide daylight to both rooms.
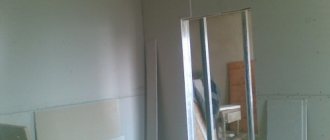
Do-it-yourself plasterboard partition: step-by-step instructions with photos
When the project is ready, the necessary drawings and measurements have been made, and the selected materials have been purchased, you can begin installation.
First of all, keep in mind that a self-made plasterboard partition can be erected after familiarizing yourself with the sequence and rules of the installation processes. Working with main and auxiliary materials has its own subtleties and some nuances, which we will discuss in detailed instructions.
Step 1. Marking
You need to start marking from the floor. Using a long ruler, a pencil and a corner, a straight line is formed to fix the guide (if a plasterboard partition with a door is provided, it is worth immediately marking a place for it, since there will be no profile on the floor at this interval). Using a plumb line, this line is projected onto the ceiling surface. So, two guides are ready. Next, the horizontal lines are determined. Thus, the main outline of the future structure was formed.
Step 2. Frame installation
To begin assembling the frame, you need to make holes for the dowels along the guide lines. Sealing tapes are applied to the profiles and they are fixed according to the markings. The side (wall) profiles are designed in the same way. The main box is ready. Then follows the installation of all other racks, the pitch and number of which must be calculated based on the load on the plasterboard partitions (the presence of any hanging cabinets, shelves, etc.); Usually the pitch is 60 cm. Attaching to the guides is done using a cutter. Throughout all this work, it is necessary to constantly check the position of the structures using a building level.
After installing the racks, it is necessary to connect them with horizontal jumpers in increments of 70 - 80 cm in order to ensure the rigidity of the structure, and then lay the electrical wiring. The profiles of the plasterboard partitions have holes for wires, and all cable routing work is carried out before the sheathing.
If the partition has niches or shelves, in their intended place it is necessary to arrange transverse profile jumpers between the racks.
Step 3. Doorway
A plasterboard partition with a door will require the formation of additional elements of the doorway. To do this, profiles are cut along the length of the box, into the inside of which bars are inserted to strengthen the opening and rigidly secure the block. Such prepared structures need to be inserted inside the guides on the floor and ceiling and secured with self-tapping screws. It is important to maintain the same width at the top and bottom. The cross beam is formed from a rack profile. Its internal part is also supplied with bars, and the finished structure is fixed at a measured height. The inserted wooden elements are fixed inside with nails.
Step 4. Sheathing
Before you begin sheathing, you should prepare the drywall by cutting it to the desired length. If decorative partitions are made from plasterboard, it is necessary to cut out the necessary sectors to design elements such as niches and shaped openings.
Using self-tapping screws, the sheets are attached to the guides. Experts experienced in this matter advise starting to fasten from the doorway to the walls, and if there is no doorway, you need to start from the middle: this will make it easier to hide the trimmings at the final stage.
Step 5. Final processing
The last stage involves sealing the joints of the plasterboard partition (photos in the article demonstrate various processes). Initially, the entire structure must be treated with a primer. Then you will need a construction sickle mesh, from which thin strips are cut. Mesh tapes are glued to all joints, then starting putty is applied and leveled with a spatula until an ideal surface is obtained.
Since, when attaching sheets of drywall, the self-tapping screws are screwed in deeply, their heads leave small dents on the surface, which also need to be filled. The finished surface is once again treated with a primer, then a finishing layer of putty is applied over the entire area of the constructed structure. And now, the do-it-yourself plasterboard partition is ready.
The invention of drywall certainly made it much easier to implement various design techniques in interior design. All the processes of constructing structures from it that we have considered once again prove the convenience and ease of installation. It is safe to say that plasterboard partitions are the most successful solution in arranging any redevelopment.
Installation features
You can do the installation of plasterboard walls yourself. The main thing is to follow a certain sequence of actions.
First you need to decide on the future partition that will look best in the existing design. Once you have made your choice, you can make an estimate and prepare the necessary tools. It is better if plasterboard is also chosen for the ceiling. Do not forget about choosing the shape of the arch that comes from the kitchen or is located in the hallway. As a result, all surfaces will be perfectly smooth. They can be finished with any materials.
Don't forget to prepare materials for finishing, wires and sockets for lighting. If arches are planned, they can be additionally decorated with polyurethane stucco molding. Such arches look good in a classic design.
If you plan to bend drywall, you can use two methods - dry and wet. With the dry method, you should use special drywall, which is the thinnest. The dry method is well suited for large rooms if you need to create an area with a rounded wall. The sheet is carefully bent by hand and attached to a prepared metal frame. It is allowed to make cuts at the edges of the sheet. This is necessary when the radius of curvature of the septum is large. In the same way, arches are created when the kitchen transitions into the hallway.
Article on the topic: Wall painting - an original note in the interior
The wet method is more labor-intensive. For it, you can use standard sheets to create curved walls.
The work is performed in the following sequence:
- using a needle roller, pierce the outer side of the sheet;
- on one side the sheet is moistened with warm water;
- the material is bent and fixed in this position with a plaster compound;
- After drying, the sheet is placed on the prepared frame.
This method can be used for decorative ceiling elements. When creating an arch, the process will be more painstaking. But the result is a durable structure in the area where the rooms meet.