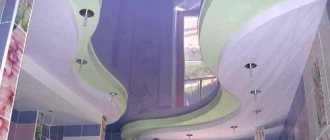
Drywall is a universal building material that can be used to design openings, arches, shelves, ceilings and walls of any configuration. Drywall corners deserve special attention, since any weak fastening or insufficient rigidity contributes to the slow destruction of the structure. The first sign of poor installation is cracks at the seams. To ensure that there are as few such signs as possible, it is important that the corners are mounted exactly according to technology.
Maintaining the shape of a right angle even in problem areas of the joint of gypsum board sheets without a perfugle is very difficult
Incorrectly installed corners of plasterboard structures begin to crack over time.
Drywall corner
Corner joints are the most vulnerable part of a plasterboard structure. Since the material is quite fragile and it is almost impossible to achieve an absolutely even connection, because the sheets are cut by hand, and the edge turns out to be uneven. Protruding corners are very noticeable, so you need to properly seal the joints, achieving an ideal surface.
When wet, drywall is very plastic and can take any shape, creating a perfectly flat surface without cracks or other defects. GCR corners also turn out perfect, and such installation does not require any special skills or experience. For repair work, you need to prepare a level, usually a tape measure, screws (preferably in frequent increments), primer and gypsum glue.
They start by checking the corners for curvature, since if stored improperly, the flexible profile is easily deformed. If bends are visually detected, it is better to put the corner aside, since it is difficult to align it. Using a tape measure, determine the length of the corner; as a rule, it is 2-5 mm shorter than the corner.
It is convenient to press the corner along its length, making sure that there are no gaps between them. The verticality of the corner is checked with a level by placing it on top. If there are deviations, they can be adjusted by pressing and releasing the structure. Having fixed the corner with screws that are screwed into the perforation holes, you can put the rule aside.
Schematic illustration of finishing a corner from gypsum plasterboard
Plan for installing drywall on an external corner
After fixing, the corner can be coated with thick glue using a spatula, applying it to the corner halves. With glue you need to fill all the voids in the perforation of the corner.
Once the glue has cured, the screws can be removed by going over the vacated areas with a putty knife and spreading out the excess glue. When the adhesive treatment has completely dried, the corners are sanded, treated with a primer and puttied.
There are external and internal corners; the finishing of each type has its own specifics.
Plastic corners for joints of plasterboard sheets
Installing this element is a fairly simple type of work that even a beginner can do with his own hands. In general, corners are used not only for strengthening and leveling - if you choose decorative plastic, it will serve as an excellent decoration for doorways and niches, as well as for decorating arches and podiums.
If you are installing a plastic corner as a brace for an internal or external corner, it will adhere perfectly to the special putty for gypsum boards. If you decide to use decorative models, then it is customary to use liquid nails (assembly glue) as fasteners.
Drywall corners come in both plastic and metal and are an accessible and inexpensive element of plasterboard structures. The price for plasterboard corners is not high (about 50 rubles per piece), so everyone can make high-quality and durable plasterboard structures for themselves without worrying about serious expenses.
Internal corner made of plasterboard
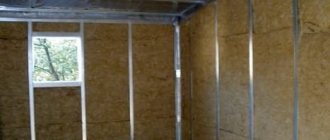
To design any type of corner, you first need to make a metal frame. For the internal corner, a base on CD or PS rack profiles is suitable.
It is better not to skimp on the quality of profiles, as otherwise the walls will quickly become covered with cracks.
There are several ways to cover an internal corner; the instructions present the simplest one.
To cover curved corners, an arched corner made of plastic is used
Building a niche with drywall joints
Let's assume that we need to build a false wall with decorative niches according to the project with our own hands. Let's look at the sequence of actions. We will have approximate instructions for the procedure.
Advice. If you want to make decorative electric lighting, then you need to remember the rules of the PUE, which state that wiring behind drywall can only be laid in a corrugated pipe that does not support combustion.
This is a metal hose or a special plastic one with the NG marking.
Step-by-step instruction:
- At the first stage, a frame from the profile is installed. To do this correctly, the guide profile is installed along the perimeter of the wall, the plane of which forms the side of the corner. The profile is secured with long self-tapping screws (from 45 cm) and dowels.
- After installing the guides, mark the vertical position of the CD profile in 60 cm increments and install U-shaped fasteners for the ceiling profile at intervals of 1 m of its height.
- After installing the frame on one wall, it must be covered with plasterboard, and only then move on to the adjacent plane.
- Now you can make a frame on the adjacent wall, complementing the internal corner. First of all, install the UD guide profile. It is simply fixed to the sheathed wall using drywall.
- The next step is to install the vertical CD profiles on U-shaped mounts.
- The mounted frame is covered with plasterboard, and an additional chamfer is removed along the edge of the gypsum board adjacent to the corner. After such preparation, the finishing will be of higher quality.
When installing an internal corner, it is important to consider the distance between the screws. The rigidity of the base depends on this, and for the inner corner it should be maximum. Therefore, screws are screwed in in increments of 25 cm.
Forming the frame of the internal corner (method 2)
The method is used by experienced builders - first the entire frame is mounted, and then all that remains is to twist the drywall:
- The guide profiles are screwed to the floor and ceiling in the shape of an angle;
- Two corner rack profiles are twisted together so that the side of one profile is adjacent to the front part of the other to the middle. For twisting, use self-tapping screws with a press washer, in increments of 25 - 30 cm;
- This reinforced corner profile is inserted and screwed to the floor and ceiling guides;
- To enhance the rigidity of the corner, you can form L-shaped holders from profile scraps and attach them to the rough wall and to the paired corner profile;
- After forming the corner, the required number of rack profiles are set, which are attached to the NP with self-tapping screws, and to the rough wall with direct hangers.
Cutting drywall at home without construction skills
The structure is covered with plasterboard: first, the side where the shoulder of the paired profile is smaller. Otherwise, the thickness of the gypsum sheet will cover the area of the profile, causing the edge of the gypsum board to be fixed too close to the edge, which is not very reliable. Then they begin finishing with the finishing coat.
Note: rack profiles for walls with light finishing (wallpaper, painting) are placed at a distance of 60 cm, but with increased load on the wall, for example, when facing with stone, tiles, the step between joints is reduced to 40 cm.
External corner made of plasterboard
The outer corner differs significantly from the previous instructions in installation technology.
Step-by-step instruction:
- The guide profile is installed along the perimeter of the walls that form an angle.
- Next, CD ceiling profiles are mounted, with 2 profiles installed side by side, on both sides of the corner and fixed with self-tapping screws to the perimeter profile.
- The remaining profiles are installed in increments of 60 cm.
Drywall is fixed to the finished frame, positioning it in such a way that the uncut edge of each sheet hits the corner. Then it can be covered with reinforcing tape under putty. This will increase the adhesion area of the finishing material to the drywall.
How to putty external corners and mask drywall joints
Knowledge of puttying technology at joints will prevent cracking of the coating. In this regard, the alignment of the outer corners is more difficult - you need to overlap the corners (for the inner ones, it is enough to use a serpyanka).
Drywall sheets are fragile and susceptible to damage; be careful when handling them. First, apply a perforated metal or plastic perforated corner - it will protect the drywall from damage.
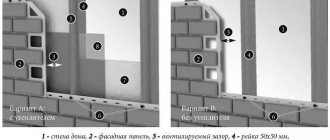
Note! The cost of corners made of galvanized steel, aluminum, and plastic is almost the same. Each of them has pros and cons that you should familiarize yourself with before purchasing. For example, the former, when used in rooms with high air humidity, can form rust stains. Aluminum eliminates this possibility, but close proximity to copper and some other materials destroys them. PVC is gaining popularity every year due to the fact that it is impervious to corrosion, does not rot, and resists deformation.
- To begin with, measurements are taken of the joints, corners are cut at an angle of 45º, metal ones - with metal scissors, plastic ones - with a painting knife (but most often with ordinary scissors).
- Next, a level is applied on each side of the slope to determine the evenness of the slope of the surface. Marks are made on the wall indicating the approximate thickness of the future layer of putty.
- A solution is prepared and applied to the slopes at intervals, according to the marks.
- The pre-selected corner is pressed in before the putty is squeezed out through the holes.
- The excess is removed and the angle of the angle is checked with a level. By applying pressure, the correct vertical or horizontal position is created.
- The excess is removed, another layer of putty is applied, leveled with a spatula and wait until it dries completely.
- If at the end of the work there are still unevennesses, a correction layer of “nulling” is applied.
How to sew up a corner with plasterboard
Select plasterboard sheets so that in the corners they meet the original truncated edges. This is necessary so that at the stage of laying the construction mesh on the internal corners and the corners on the external corners, the reinforcing mesh and corners do not stand out on the general plane of the plasterboard sheets.
If this edge of the sheet has already been cut, a chamfer must be removed from it, cutting it at an angle of 45° to the depth of half the sheet or slightly less than its thickness. This is necessary to increase the area where plaster and putty are attached when sealing joints.
Self-tapping screws are used to secure the sheets to a metal frame. Sheathing with plasterboard will give it the necessary rigidity.
Profile fastening scheme when creating a corner structure
When installing internal corners, an L-profile is used
Before finishing the corner, it is necessary to freeze the perforated corner
Drywall joints in corners
Drywall corners are finished using the following auxiliary corners:
- aluminum, it is quite rigid, not subject to rust, it can be used if you need to seal drywall corners at right angles;
- galvanized, it is more rigid, it is difficult to break, but it can rust over time, also used for right angles;
- made of plastic, this element is less rigid, does not rust and is not brittle, can be used for any angles, for sharp, straight and turned ones.
How to work with drywall joints
The question arises, how to seal the corners of drywall using corners? You can watch a video about this process on our website.
The principle of working with all types of corners is the same:
- we remove the chamfer from the end edges with a special plane for working with plasterboard so that there are no protrusions;
- We apply a layer of gypsum putty on both planes; the Knauf fugenfüller is best suited for this;
- glue the corners, pressing them with a rule or an even strip so that the excess mixture comes out through the perforation;
- We give the corners a chance to set with a thin layer of fugenfüller.
Important. The price of Knauf fugenfüller often exceeds the prices of leveling putty from other manufacturers. But this is a well-known brand that has proven itself well. If you choose material from another manufacturer, try to read reviews about its quality before making a decision.
Finishing drywall corner
GKL putty does not require high skill, the main thing is to maintain consistency and accuracy. After fixing the sheets, a primer is applied to their surface. This will help strengthen the drywall surface, making it hard and moisture resistant.
To get the corners without extra layers of putty, you need to remove the protective film from the plasterboard with a knife.
Then they move on to putty. First, you need to seal the recesses for the screws, then the joints and seams are processed. To finish the corners, you need some kind of reinforcing material, for example, serpyanka. The mesh is cut according to the width of the finishing strip (40 cm on each side) and glued end-to-end, thickly spreading it with putty for the seams. Gently press the mesh into the putty layer and smooth the surface. It is convenient to do this with a spatula. The solution must be thin enough for water to saturate the surface.
Seal drywall joints
We start working with drywall, doing it in the following order:
- we mark the future structure in accordance with the drawing;
The drawings will allow you to seal drywall joints later without any extra work.
- we build a base for drywall from a metal profile and guides;
Think about the nuances in advance so that there are fewer joints on drywall
- we fix the side crossbars from the profile;
- The frame is ready, let's move on to its covering;
- we attach the gypsum board strips to the inner side surfaces of the niches so that its ends are at the level of the front side of the guides;
- we sew up the entire front part of the wall with plasterboard, covering the lining of the side surfaces of the niches;
- prime the surface of the plasterboard;
- we use drywall corners to process all rectangular joints followed by putty;
The number of joints on plasterboard sheets was reduced
- we process the seams by gluing them with serpyanka and putty with a leveling mixture twice;
- completely putty all the drywall with the finishing mixture;
- Our design is ready for final finishing.
How to install a metal profile for plasterboard to the walls and ceiling?
To fasten the metal frame strips to the wall, direct hangers are used, which are screwed through special holes with self-tapping screws. The hangers are attached to the concrete wall with anchors or dowels, the holes for which are made with a hammer drill. The frequency of installation of hangers is 600 mm . When performing installation, you should control the line of their attachment.
In exceptional cases, as an alternative, you can use sections of 60x27 mm profile, bending them in the shape of the letter “L”. Some experts argue that this method is even better - it fixes the bar more rigidly.
Sometimes, when installing a frame made of a metal profile for plasterboard, it is necessary to lower it to a much greater distance than standard hangers allow. What to do in this case?
For these purposes, a system of sliding suspensions , which consists of three elements:
- two knitting needles;
- bracket;
- elastic holder.
One spoke is attached to the ceiling, and the second is adjusted to the desired height. The bracket is inserted directly into the profile and fixed.
Important! It is advisable to install suspensions to the ceiling using anchors, because the load is distributed over a smaller number of points. On average, the distance between hangers should be no more than 800 mm.
Reliable walls: how to qualitatively connect a galvanized profile for drywall
As already written, the length of the slats is three meters, but this is not enough and they have to be assembled. This can be done not only along the length, but also at a certain angle. Let's take a closer look at all the available methods.
How to lengthen rack elements
There are three ways to make a rack part of the required length:
- overlap to a length of 50-100 cm;
- end-to-end using the third section of the profile;
- end-to-end using a guide bar.
Before connecting the drywall profile using these methods, you should purchase special LN piercing screws or LB Build self-drilling screws with a length of 9.5 mm. Alternatively, you can use a cutter for the same purposes, if, of course, you have one.
Extension of ceiling profile elements
This type of profiles 60x27 mm is grouped with a special connector. It is inserted directly at the junction of two metal strips inside the CD. For additional rigidity, the part should be secured on the side with self-tapping screws. The features of some ceiling frames require rail connections at an angle of 90°, and according to the design, they can intersect at different levels.
Anyone who watched the ceiling installation of a profile for plasterboard in the video could pay attention to the special connectors that craftsmen colloquially call “crabs.” With their help, the planks are joined in one plane. In manufacturers' catalogs, this part is listed as a “single-level connector PP 60/27”.
Cross fastening of frame elements at different levels is possible not only at an angle of 90°, but at any desired angle. This is possible using the following components:
- one-sided connector PP 60/27;
- two-level connector PP 60/27;
- swivel connector PP 60/27.
T-joint
This method is often necessary when assembling not only ceilings, but also floor structures and partitions made of gypsum plasterboard. The essence of the technique is to cut off the sides of one of the profile components with metal scissors; trimming is carried out by 30-50 mm. It is worth noting that the sides are not removed, but are bent at right angles and screwed to the main link.
How to assemble an angled corner connector yourself
Many developers, before connecting a metal profile for drywall at the desired angle, prefer to go to the nearest hardware store and buy a special corner connector. However, this is not always possible, and doing it yourself does not present any problems - the principle is simple:
- cut off the required piece of the guide element;
- make a V-shaped cutout in the sides;
- bend the part to the required angle.
Since the dimensions of the rack link are slightly smaller than the guide, the two rack profiles will freely form into a homemade connector. The unit is fixed with self-tapping screws. If it is necessary to create an acute angle, the sides are also cut at an angle.
Installing profiles for drywall: installation secrets
- Place the hanger at the intersection of verticals and horizontals on the wall;
- Mark the locations of the dowels through the mounting holes;
- Drill holes at the marked points;
- Secure the hanger to the wall with dowel nails.
The height of the racks should be one centimeter less than the height of the room. If they are installed end to end, cracks may subsequently appear in the drywall.
- Cut the CD to the height of the wall;
- Tuck the end post into the UD and align it opposite the vertical line on the wall;
- Apply a long rule to the post and level it;
- In this position, fix the stand in the hangers with self-tapping screws;
- Also install the stand on the opposite side;
- Stretch several twines between the outer posts;
- Align the intermediate posts along the stretched twines, as shown in the photo, and fix them in the hangers.
- For covering walls with plasterboard;
- For installation of interior partitions;
- For covering plasterboard ceilings.
- Will make jumpers from UD according to the diagram;
- Install lintels above and below openings, as well as at the joints of drywall sheets.
- profile length;
- There will be two rack profiles for each corner;
- the number of corners available in the room. Here you need to take into account the degree of angles.
- perforator;
- screwdriver with a set of attachments;
- Bulgarian. With its help, you can easily adjust the length of the profile to the desired angle;
- metal scissors, as well as a hammer;
- knife for cutting drywall sheets;
- building level, plumb lines, squares and meters;
- sandpaper;
- set of spatulas.
Important! There are situations when the walls are so crooked that fixing the UW profile on the wall will not lead to anything good. In this case, in one direction, the CW rack is positioned as close as possible to the wall, taking into account maintaining a perpendicular to the base, then, using peobraks (or direct hangers), it is attached to the wall, ceiling and floor UW profiles. The second rack-mount CW is attached to it as a base. Strange as it may seem, such situations also occur. And the point here is not that the angle is categorically impossible to install; of course, you can set it, and it will be exactly 90, but the price of this angle will be golden. And the measure of this action will not be money, but a hidden space on which one could safely place, at least a cabinet, like this.
We explain what to do in this case - a turned corner.
How can a video help when installing a galvanized profile under drywall?
More recently, the installation of gypsum boards was carried out on not entirely reliable wooden blocks. Making connections in such a design was a very difficult process. Today's metal frames are much more reliable, they are easier to assemble due to the wide selection of hardware components available for them.
At first glance, a novice developer may have many questions, including how to connect several drywall profiles or how to assemble a two-level frame with your own hands. Not only books on construction, but also video materials prepared by experienced craftsmen will help you solve your problems.
Having studied such tips in detail, every more or less capable person will be able to do both simple room renovations and complete complex home improvement projects. In addition to creative pleasure and experience, you will receive tangible financial savings.
Mounting options
The method of fastening sheets when covering with plasterboard follows from the type of angle (external, internal, straight, acute or obtuse).
For example, if you sew the frame into one sheet, then adjacent elements at the outer corner will overlap one on one - in this case, the end of the sheet must be cleared of the cardboard layer all the way to the gypsum surface.
If the plasterboard corner is internal, it is also advisable to remove the cardboard layer. And when making a T-shaped joint, it is advisable to cut the ends at an angle of 45 degrees, which will make puttying easier in the future.
You should be especially careful when sheathing in two sheets - here the displacement of parts is almost inevitable.