If your home has many items made of wood (floors, window frames, furniture), sooner or later they will need an update to their appearance - painting. But wood has such a feature that over time or due to mechanical stress, cracks, unevenness and other defects appear, which the paint can even highlight if you do not first treat the surface with putty.
It allows you to achieve evenness by filling the smallest holes in the product, and ensures long-term preservation of the paint layer. Let's look at how to choose the right material for preparing a wooden surface for painting.
Types of wood putties
There are different types of decorative putty, and you need to clearly determine whether you need putty to preserve the wood pattern when the top of the wooden product will be varnished, or if you are going to tint it with paint. The first types of products are almost invisible on the surface and copy the shade of wood. The second ones are often made in white.
There are these types of putties:
- Oil based. Thanks to the presence of drying oil, such materials protect the surface from moisture. And its high resistance to changing weather conditions makes this putty an excellent choice for application to wooden windows, for treating house facades and other objects located on the street.
- Acrylic. Polymer compositions with acrylic are environmentally friendly, they can withstand heavy loads and get along well with a humid environment (they do not allow moisture to penetrate deep into the wood).
- Water based. They do not contain harmful chemicals and do not conduct liquids. This putty can protect wood from fire, but it takes a long time to dry.
If you are interested in the natural color of wood, then oil-based or water-based samples will be the most suitable.
Criteria for choosing putty for painting
Depending on the conditions where the wooden object will be used, the most suitable type of covering material should be selected. When carrying out repair work outdoors, an important parameter for choosing a putty composition is resistance to heating, cooling and high humidity.
Therefore, for treating the walls of wooden houses, fences and other attributes of architecture, oil putty will be the best choice. It can be used after wood components have been treated with insect and rot repellent compounds, but before final painting.
Acrylic compounds are the most versatile; they are suitable for wooden products indoors and outdoors, as they have a high level of strength and wear resistance. It should be noted that such putties are white in color, therefore they are intended specifically for applying paint on top, not varnish.
For parquet floors, furniture and other objects that people come into contact with, you need to choose safe materials, so you can use harmless aqueous compounds. Their characteristics are in many ways similar to acrylic putty mixtures, but their price is cheaper.
What types are there, what are they called?
Nitro putties
Their composition is simple. It contains one component that allows you to start putting putty immediately. When using nitro compounds, take into account their slight shrinkage after application - up to 15%! The mixture removes scratches and small dents well.
Advice
The coating layer of one application should be no more than 1 mm thick. This is not enough to complete the work, so the procedure is repeated and the tree is coated several times. Before puttying, the area is primed to improve the adhesion of the surface to the solution.
In nitro putty, the main volume of the mass is occupied by special fillers. These are neutral powders, fibrous elements that add volume.
Depending on the filler, the composition is determined:
- Fine-grained . Forms a smooth, pore-free surface.
- Coarse-grained . A high-strength composition that is difficult to apply, but it holds well and retains its original appearance for a long time.
- Powder reinforced with steel or fiberglass composition. The most durable type of mixture that can seal even through holes.
- Lightweight . It fills large holes without enlarging the parts being restored.
Based on texture, there are paste-like ones, which must be applied with a spatula, and liquid ones, which must be applied only with a brush.
Plaster
Gypsum composition is best suited for indoor work. The powder should be stored in a dry and warm place. Gypsum putty consists of gypsum, polymer materials, quartz sand or marble dust. The mixture is white and very plastic. It is diluted quite easily and applied to the surface by sanding.
Gypsum is an environmentally friendly material that is suitable only for certain temperatures and does not tolerate excess moisture. But its remarkable ability to regulate humidity is noted. But this applies only to its small differences.
Attention
Gypsum putty is ideal for shaping the surfaces of ceilings and walls.
Advantages of gypsum mixture:
- after applying the first layer, the surface becomes smooth, without roughness;
- has excellent thermal insulation and fireproof characteristics;
- it is necessary to wait the minimum time to be completely sure of drying;
- has economical consumption;
- The material used is environmentally friendly in production, without foreign odors.
The disadvantages of the gypsum composition are susceptibility to mechanical damage, inability to use in rooms with high humidity. Gypsum putty cannot be used in the bathroom or kitchen. The composition does not tolerate sudden temperature changes.
Polymer
Polymer compositions are used indoors as a finishing layer. The material is indispensable if you need to apply a decorative layer over a wooden surface. Such a coating must be applied to a flat, smooth base, which is provided by polymer putty. Based on polymers, two types are produced:
- Acrylic . It is used for both internal and external work. The thickness of the layer when applying the acrylic composition should be as thin as possible. It is advisable to keep the thickness to less than 1 mm. Used on wooden surfaces, has a long shelf life. Non-toxic, does not have a pungent odor.
- Latex . It is used only for interior work, as it has low resistance to temperature changes, high ductility, and no odor. It is very easy to apply to wood.
Important
Among the advantages of the polymer mixture is excellent resistance to mold and mildew. This property appears due to the high degree of moisture resistance of the composition.
A significant drawback is the high price. Therefore, it is best to apply the polymer putty as a finishing layer, when all the unevenness and defects have already been corrected, all that remains is to give the final look to the wooden surface.
Acrylic
Advantages of acrylic wood putty:
- protection of wood from damage and cracks;
- no drying effect;
- leveling properties;
- speed of hardening;
- elasticity;
- absence of harmful components;
- the ability to combine the mixture (basic – white, oak or pine color);
- surface treatment with paint or varnish on a water-dispersion basis;
- can be used in preparation for laying laminate, ceramic tiles or chipboard.
Among the disadvantages is the need to level the surface with sandpaper and sanding. However, significant defects (cracks, crevices) cannot be repaired in one go. You have to do the work again.
The first thick layer of applied acrylic putty does not need to be leveled. It is best to lay a barely noticeable layer that will be easily distributed around the perimeter of the surface to be treated. Movements must be neat and precise. The application tool is a small spatula. Excess is removed with sandpaper. When leveling the surface, you need to use gauze.
We recommend: Moroccan plaster - materials and techniques for applying a unique, moisture-resistant coating
It is best to buy the composition ready-made. When the open container thickens, you can add water or liquid primer to the composition. It is important to mix the composition well with a construction mixer. To putty the parquet joints, take a wide spatula. The solution is rubbed into the gaps of the parquet board, treating the entire surface.
Oily
The composition of the mixture is viscous and homogeneous. Contains:
- drying oil;
- plasticizers;
- thickeners;
- pigments for giving color;
- ground chalk;
- water;
- acrylates.
Depending on the type of plasticizer, oil putty can be moisture-resistant, fireproof and explosion-proof. Pigments are added to obtain a suitable shade. For example, many people want to achieve whiteness, which has an increased degree of surface coverage.
Attention
If you add glue to the mixture, you get an oil-glue base.
Advantages of oil formulations:
- Ready to use. On the shelves of construction stores, such wood putties are sold only in finished form.
- Does not require thorough, and sometimes no mixing at all before application. After opening, the composition can be applied to a wooden base.
- Low price.
- Good adhesive ability.
- Low consumption per square meter.
- High degree of plasticity.
- Dries quickly.
- It does not contain harmful impurities, so it can be used for work in living rooms.
Disadvantages include poor load-bearing strength, incompatibility with oil-based finishing compounds, and poor moisture resistance. Some of them have a rather unpleasant odor due to the high content of drying oil and a very short shelf life. Because of this, you should not take large volumes of goods.
Required Tools
The process of decorating wooden products has several stages: first, the surface must be properly prepared, then it can be puttied and painted. But depending on the type of materials that will be painted, the technology is somewhat different. The general list of necessary tools for painting includes:
- paint of the desired color and composition;
- brushes;
- putty and primer;
- putty knife;
- “skin” (sandpaper);
- construction hair dryer or cleaning agent.
We will need a hair dryer or a cleaning agent to remove the old paint layer from the product.
You should be very careful, because the temperature of heating the surface with a hairdryer is quite high, which can negatively affect your wooden object. Therefore, if you are going to repair an antique item, it is better to use chemical cleaners.
Recommendations for applying a leveling layer
Puttying allows you to solve a number of problems:
- seals artificial holes in wood, such as nail holes;
- fills the natural pores of the wooden surface for leveling (if there are porous types of wood, such as oak) and protection from damage;
- forms a homogeneous layer on which paint can easily spread.
To ensure that the treated area turns out “according to the rules”, use several recommendations:
- If you work with putty outside, choose a day when the air temperature is above +5. Otherwise, the composition will thicken and will not fill the cracks well.
- If there are voids on the surface, they must first be filled with putty, after which they are sanded, the “sand” that appears is removed and the wood is fully processed with putty, and after it dries, you can paint it.
- The best material for a spatula is stainless steel.
- Deep holes (more than a centimeter) in the wood are filled with putty in several layers, allowing each layer to dry. Application thickness – 2-3 mm.
Preparation of plywood
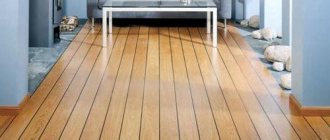
A plywood sheet can hardly be called a full-fledged tree, since this material is obtained from veneer, but it is often used in the construction industry. Using plywood, you can make a variety of interior items and also use it for finishing walls, creating partitions, etc. Due to its smooth surface, plywood is easy to paint, but you must first putty.
There are plywood sheets of different sizes on sale, and it’s not difficult to cut, but to cover a large area, as a rule, you can’t get by with just one sheet—several pieces are installed, right next to each other. As a result of this action, joints are formed that must be sealed, otherwise cracks may appear in the paint.
To hide the seams, they are covered with putty: the compound is applied across the joint, creating a dense layer. It is more convenient to work with a 10-centimeter spatula, periodically moistening it with water, because acrylic compounds dry quickly and lumps may form. After puttying, the surface must be leveled with a grinding machine. When the layer dries, repeat the action, but covering the entire surface, and not just the seams.
Preparing the tree
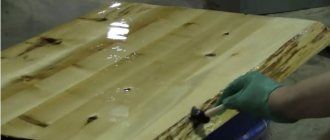
Wooden products often retain unevenness on the surface from knots, and also have places where resin can appear - these points must be eliminated before applying a leveling compound. Knots should be cut with a chisel (about 3-5 mm deep), creating small depressions, which are then filled with putty. But before that, wooden objects that have not previously been varnished must be oiled - for this they use heated drying oil.
When working with a product that has traces of paint, varnish or other substances on it, the top layer must be completely cleaned. To do this, wipe the surface with a cleaner and wait until the soaked paint can be easily removed with a spatula.
Wash with plain water or vinegar to neutralize the alkaline environment. After that, use sandpaper to lift the wood fibers. To improve the adhesion of the putty to a wooden surface, you can apply a primer, choosing one with the same composition as the putty, for example, acrylic.
Final putty before painting
The process of treating wooden surfaces with putty comes down to several steps:
- dilute the mixture until creamy, whipping with a drill with an attachment;
- You shouldn’t mix a lot of putty at once, because... it can dry quickly;
- start treating pits and cracks, creating a layer of 2 mm;
- When you have laid the first layer and waited for it to dry, level it with sandpaper;
- repeat the application of putty, reducing the thickness of the mixture to 1.5 mm;
- cover the surface with soil.
Now your wooden product is completely ready for painting, for which it is better to take paint compositions with the same components that are present in the putty: acrylic paint, water-dispersed paint, oil paint, etc.
When working with putty on wood or other material, remember that indoor air humidity cannot be higher than 50, and outdoors cannot exceed 75%. The ideal temperature in the room for quick drying of the putty is 20-25 degrees.
Application of putty
Before processing wooden structures, it is necessary to carry out preparatory measures in advance. Protruding, rotten, and severely damaged areas are removed. Garbage, dirt, and dust are also removed, blown off with a hair dryer or washed off. Allow the surface to dry thoroughly, then degrease it.
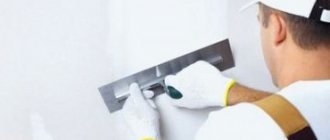
The putty is applied with a spatula with a rubber working part, which allows you to evenly distribute the mass. They work as quickly as possible, since most wood putties set in air in a short time. Apply the material with a reserve, well sealing the cracks and holes to form a small protrusion. Afterwards it can be carefully sanded (in the absence of such a protrusion, concavities may appear during grinding). Grinding or other methods of mechanical processing are started only after the composition has completely dried.
Main varieties
For wooden surfaces, several classes of material are used:
| Putty class | Characteristic |
| Polymer | The second name is latex. The cost is above average. The advantages include: quick drying, easy to use, environmentally friendly, safe for health. Well suited for puttying floors. Seals deep holes, cracks, gaps. |
| Oily | The second name is adhesive. It takes a very long time to dry. Not suitable for every tree, sealing cracks. Durable. Suitable for apartment floors. Not waterproof. |
| Acrylic | Much more expensive than plaster. The advantages include: used for sealing walls, cracks, cracks, a variety of colors, waterproof, not afraid of temperature changes, dries quickly (5 hours). It is a universal coating for any type of wood: plywood, laminate, parquet, pure wood or with bark, chipboard. Finished wood can be coated with varnish. There are some disadvantages: it requires constant updating and correction of coating nuances. |
| Plaster | This type is often used to cover wood. It has positive features: plastic, stable, durable, good tenacity. The disadvantages include: not moisture resistant, not used in wet rooms or premises. Low cost price. |
| Nitro putty | The material contains: petroleum resins, solvents, plasticizers. Positive features: moisture resistant, impervious to chemicals, easy to use and operate, odorless. Dries in 24 hours. |
Main manufacturers
Putties on the domestic construction market can be presented by both foreign and Russian manufacturers. Of particular interest to consumers are mid-price products with high product characteristics.
We recommend: Do-it-yourself wax for plaster – features of the material
| Putty | Type | Applied layer | Drying time | Seasonality of work |
| Dry mixture “Plitonit-KF” | Cement | 5 mm | 72 hours | At +5-30°С |
| Dry mix “Knauf Multi-Finish” | Cement | 1-5 mm | 24-72 hours | At +10-20°С |
"Ceresit CT-225" | Cement | 1-3 mm | 24 hours | At +5-30°С |
| Dry mix “Glims Finish-R” | Cement-polymer | 1-10 mm | 24 hours | At +5°C and above |
| Dry mix “Bolars Finish-Super” | Polymer | 0.2-2.0 mm | 2 hours | At +5-30°С |
| Pasta "Bolars Empire-facade" | Polymer | 1-5 mm | 24 hours | At +5-35°C |
| Pasta “Profi” | Latex | 1-5 mm | 4 hours | At +5°C and above |
| Paste “Holzer Festspachtel Elastisch” | Latex | 0.2-3.0 mm | 10 hours | At +10-30°С |
German cement-based Knauf exterior putties are characterized by high levels of frost resistance and moisture resistance, so they will be the best option for finishing the exterior walls of newly constructed buildings and restoring old façade surfaces.
Knauf putties
Finnish acrylic-based putty compositions “Vetonit” are ideal for working with any concrete or wooden bases subject to high humidity levels.
Photo of Vetonit LR putty
Domestic mixtures “Ceresit”, “Starateli” and “Bolars” are distinguished not only by their affordable price, but also by their good quality, and also allow you to obtain a durable coating.
Photo of finishing plaster Prospectors
Prices for popular types of putty
Putties
Do-it-yourself putty - cheap and cheerful
In order for the finished work to be durable or of high quality, the substance must have the following qualities:
- Dry quickly, no more than 8 hours;
- It is plastic, working with the material should not require much labor effort;
- Tenacity to the surface from the first layer;
- The composition is not harmful to health, without a pungent odor.
- The finished surface has a smooth texture;
- Doesn't crumble after drying.
How to make wall putty yourself
With this material you can make an imitation of a pattern, the decor is a three-dimensional tree made from putty with your own hands. Do-it-yourself wood putty is used to save money. You can avoid buying it and cook it yourself. Especially if you need to putty a large area. Homemade putty is made with your own hands using various materials and substances. Let's look at do-it-yourself wood putty with a recipe for making it. Types of home putty:
- Epoxy. Contains: ammonia, food gelatin, drying oil, turpentine and linseed oil, perlite, casein. It is necessary to mix oils, pumice, clean water. Stir, add the remaining ingredients, heat in a water bath. Remove from heat when it reaches a paste-like consistency. Once cooled, use within one hour.
- DIY wood putty made from sawdust. The main ingredients are sawdust and laundry soap, chalk.
- DIY epoxy wood putty.
Why do you need homemade putty?
Putty for wooden surfaces can now be purchased at a favorable price at any building materials store. All compositions from the world's leading brands are characterized by fast drying time, excellent adhesion to wood, and ease of application. However, not every mixture has these characteristics, because some manufacturers try to save on key ingredients. Since wood tends to expand and contract under specific thermal conditions, over time a poor-quality mixture can easily crack and become unusable.
To prevent this from happening, you need to either buy expensive wood putty or make the composition yourself. Only in this case you guarantee the durability of the floor covering and the aesthetics of its appearance.
Article on the topic: Eco-style in the interior - style features, photos