Arrangement of a metal base
Let's look at building a frame for metal profile siding. The cost of a metal frame, of course, will be higher than that of a wooden frame, however, it is more reliable and durable. In addition, it is easier to install metal structures.
The only drawback of this type of frame is that it is susceptible to corrosion. However, today this problem is easily solved by purchasing more expensive material with a more reliable coating.
Today, manufacturing companies produce galvanized profiles for frame structures, the thickness of which is 1 mm. There is no doubt that they are more reliable, however, their cost is higher than that of wooden structures. For this reason, to mount the sheathing, they often use profiled metal used for working with drywall. A lathing made of this material will easily support the total weight of the siding panels, and at the same time the insulation.
Installation of profile posts is carried out in a vertical direction, so that the distance between them does not exceed 50 cm. In the corners and for the connecting strip, double or twisted profiles are used. There are craftsmen who trim corners using horizontal shorts.
The installation of U-shaped canopies is carried out in a vertical position, so that the distance between them is 50 cm. They are attached to concrete surfaces with dowels, and to wooden walls - using self-tapping screws. It happens that in order to compensate for unevenness or lay insulation, instead of suspensions they use consoles, which they make on their own, using scrap profiles.
Video: do-it-yourself frame for siding from a profile
The sheathing for basement siding is most often made of metal. Installation is carried out in a horizontal plane, at a distance of 46 cm (the same as the height of the panels). This type of lathing is assembled on vertical jumpers, and this prevents the profiles from sagging under the sheathing. When laying insulation, do not use hangers; they are secured using profiles.
Every man should, if not build a house, then at least trim it with his own hands. If siding is chosen as the facing material for the external walls, then all installation features will need to be studied.
Installation of siding involves the installation of sheathing - a frame for the siding. In order to improve the house, protect it from the harmful effects of the external environment, and also ensure the preservation of the appearance of the facing material, it is necessary to implement several stages of work. And also, put into practice some useful tips.
Lathing for basement siding
If this type of cladding is planned to be used according to its name, that is, for cladding the base or under-pile space, it would be better if the siding sheathing is positioned horizontally. This refers to situations where the distance between the top and bottom of the plinth is within 20-50 cm. In the case of covering large surfaces, such as walls or gables, it is better to use the vertical arrangement of the slats.
For basement siding, it is more preferable to use a metal profile, at least when it comes to the lower part of the structure. However, cases of using wood also occur due to the well-known positive qualities of this material.
The method and procedure for installing siding depend on the presence of insulation Source megapolis-sc.ru
Methods for arranging the structure depend on the specific situation and are determined locally, preferably by a specialist who will be directly involved in the installation.
Is lathing necessary for siding?
Installing wood, vinyl or metal siding begins with determining the need for sheathing.
Of course, siding can be attached directly to the base of the house, i.e. without sheathing. But, only if:
- the base is level;
- the surface area is insignificant;
- it is possible to provide a ventilation gap;
- There is no provision for installing thermal insulation material under the siding.
In all other cases, regardless of what type of siding you choose, installation of the frame is necessary.
The information and recommendations collected in this article will help you form a clear idea of how to properly make sheathing for siding.
Good to know. The sheathing is needed not only to attach the siding sheets, but also to provide the ventilation gap necessary to ensure condensation drainage.
Installation of wooden sheathing under siding
Before starting installation work, you need to calculate the material that will be required to build the frame. The number of slats and its cross-section depend on the following factors:
- Type of siding and direction of panels in the structure;
- The presence of a thermal insulation layer (implies the installation of an additional frame for its installation);
- The distance between the siding and the insulation sheathing (or wall);
- Height of the walls of the building;
- Number of window and door openings;
- The presence of a pediment, its area and shape;
Installation of vertical sheathing beams under siding Source megapolis-sc.ru
Let's consider the simplest situation with wall cladding with vinyl siding. In the vast majority of cases, this type of coating is mounted horizontally. Therefore, the rail to which it will be screwed must be located perpendicular to the siding strips, that is, vertically.
Mounted sheathing for installation of vinyl siding Source centermira.ru
If insulation is not planned, the timber is attached directly to the wall using self-tapping screws, dowels, or galvanized brackets (for very curved walls).
ES bracket for sheathing Source mktools.ru
Do-it-yourself lathing for siding - instructions
Stage 1 – surface preparation
A guarantee of high-quality installation of siding panels will be the preparation of the base of the surfaces that are intended for cladding.
Advice. Do not think that defects in the house can be “hidden” behind the cladding. They will definitely show themselves, but access to them will be much more problematic than before the sheathing.
Surface preparation includes the following:
- Dismantling protruding elements on the facade of the house. Regardless of the material from which the house is built, you need to remove everything unnecessary. Obstacles in this case include: protruding window sill, low tide, deformed plaster, peeling paint. If there are poorly nailed boards, they need to be secured.
- Sealing cracks. If there are any, seal them with cement-sand mortar (brick wall) or tow (wooden, timber, log).
Advice. If the house is wooden, it is necessary to treat its surface with an antiseptic solution to protect the base from pests.
- Getting rid of everything in contact with the surface. Tree branches, bushes, drainage system, places where lighting fixtures are fastened, awnings, canopies - all this needs to be removed so that siding of a private house is less problematic and of higher quality.
Advice. In places where decorative elements are attached (corners), as well as near windows and doors, you will “stomp around” a lot, so if you are afraid for any bushes or perennial plants, it is better to replant them. You must have at least a meter and a half square meter of free space to install the frame for the siding.
- Try to remove any roots that might sprout inside the siding sheathing. Visually they will be invisible, but over time they will lead to deformation of the insulation under the sading.
- Alignment of walls. The maximum visual effect of the cladding is possible if there is a flat surface. For leveling, a building level and plumb line are used.
Stage 2 – tools and materials
It is advisable to prepare both of these before starting work. In this case, you will not have to interrupt your work due to lack of material or searching for a tool.
Tools:
- grinder or metal scissors;
- roulette;
- plumb line;
- square;
- building level;
- hammer;
- hacksaw.
If the house is tall, you should take care of scaffolding, because it is very inconvenient to carry out installation from a stepladder.
Good to know. The work of installing the sheathing is quite dusty. Therefore, to protect your eyes and hands from chips, splinters and scratches, stock up on safety glasses and gloves.
Material:
Material for the sheathing - wood or metal profile. The names and quantity depend on what will be used as the material for the frame - wood or metal profile.
How to make a sheathing for metal profile siding
In this article we will look at how the sheathing is installed under metal profile siding.
Arranging a frame is the most affordable way to attach the material. Before starting construction work, visually inspect the building and prepare it for installation. Free the façade from protruding elements (sills, window sills, cracked plaster, protruding nails) that violate the integrity of the base. Clean the wall affected by the fungus and treat it with an antiseptic. Fill the cracks with concrete and plaster. Nail down loose boards.
Types of sheathing for siding
Option 1 – wooden sheathing for siding
Wooden beam for sheathing Wooden beam with a section of 50x50mm.
The amount of timber is calculated only based on the need for standing profiles, which are mounted in increments of 500-600mm, depending on the type of insulation.
Hardware
. Quantity based on 1 hardware per 400 mm. surfaces.
Good to know. It is more difficult to “extend” (build up) a wooden beam, so the length of the post beam should be equal to the height of the house.
When choosing wood for a frame, pay attention to its moisture content. If it is above 12%, the wood should be subjected to natural drying. The drying time depends on the humidity level. And it can reach 1 month.
Advice. During drying, it is better to press down the wood with something heavy to avoid “torsion” of the wood. It is better to store lumber in a well-ventilated area, avoiding direct sunlight as much as possible.
The service life of wood can be increased by impregnating it with a special solution.
Option 2 – metal sheathing for siding
A frame for metal profile siding will cost you more, but installation will be easier and the durability will be several times higher.
To install a metal frame you will need:
UD profile for lathing Guide UD profile
The number of profiles can be easily calculated by summing up all the perimeters. For example, you have a wall measuring 3 by 3 meters, in which there is one window measuring 1 by 1 meter. Then, you will need 3+3+3+3=12 m.p. profile for the wall and 1+1+1+1=4 m.p. for installing a guide profile near the window.
CD profile for sheathing Standing CD profile
The need for it is determined as follows: the length of the surface is divided by 0.6. Since a profile is installed on average every 60 cm. The height of the house will increase the number of profiles.
Good to know. The installation distance of the profile is affected by the expected insulation under the siding.
CD connector for CD profile for sheathing CD connector for CD profile
Needed if the height of the house is more than 3 or 4 meters. (standard profile length 3 or 4 m.p.).
The number of connectors is calculated based on the estimated number of profile joints.
Good to know. Since the purpose of the frame is to withstand the weight of the siding, the thickness of the metal profile must be at least 0.45 mm.
Elongation is carried out using the method shown in the figure.
Material prepared for the site moydomik.net ES-bracket for sheathing ES-bracket
Used to fix the CD profile to the surface.
Good to know. ES-bracket (U-shaped bracket or crocodile) allows you to level the surface clearly.
Hardware. For attaching UD profile. The choice of hardware depends on the quality of the base (wall).
Advice. A self-tapping screw is suitable for aerated concrete and brick. For wood you need a dowel screw. The length depends on the quality of the surface. Quantity based on 1 hardware per 400 mm. surfaces.
Hardware “flea” 3.5x9.5mm. For fastening metal to each other.
Stage 3 – marking the sheathing for siding
The markings are applied using a building level and a plumb line. In the future, a frame will be built on it.
Advice. When applying markings, keep in mind that if the siding will be mounted horizontally, the markings should be applied vertically. If it is vertical, then the marking will be horizontal.
The correct geometry will ensure a beautiful and problem-free installation of siding panels.
Do not think that defects in the arrangement of the frame can be “hidden” behind the siding. On the contrary, they will appear quite clearly.
In regions with a humid climate, moisture insulation will help protect the surface of the walls from moisture. The choice of insulation material will be affected by the material of the house's foundation. Installation of moisture insulation is shown in the figure.
Stage 4 – installation of a frame for siding
Frame for siding - choosing material
Before figuring out how to make a frame for siding, you should decide on the materials for such sheathing and thoroughly prepare the surface of the walls. The biggest problem is finishing the façade of the house, which is what we will do in this article in order to touch on all the nuances. The fact that sheathing is necessary becomes clear not only when unevenness is discovered on the walls, but also when you want to at the same time insulate the house, so that later you do not have to resort to additional structures and unnecessary work.
There can be at least two options for arranging the frame - metal and wood. There are, of course, compelling arguments in favor of the durability of galvanized metal; it will indeed rarely let you down in the next decade, unlike wood, which, if installed carelessly and the structure is poorly sealed, will very quickly become unusable. After all, we are talking about finishing the facade, which is exposed to snow, rain, wind and the merciless sun.
In addition to the operational characteristics, you should not forget about the process of constructing the sheathing. It will take much less time to create a wooden frame, and installing siding on it is also easier; a screwdriver and self-tapping screws will allow you to enjoy your work very quickly. If the walls are wooden, for example, plywood or made from specially treated logs with a smooth end, then you can even use nails, but today it’s somehow more common to use mechanical tools. Since you choose lightness at this stage, then take care of the preliminary protection of the wood, treat it with antiseptics before installation. Now is the time to discuss what the materials we are about to purchase look like.
Main functions of the lathing
By lathing we mean a special support designed to secure siding panels. It is worth noting that this
The appearance of the building directly depends.
The work begins when monitoring the surface level. If any unevenness is detected on the surface, the lathing levels the wall under the siding.
The siding design makes it possible to make adjustments to the appearance of the facade, be it industrial or residential. Siding can be made of materials such as plastic, metal or wood, which are used to construct facades with ventilation of the simplest shapes.
We purchase everything necessary for the frame for siding
First of all, let's note what we will use to secure the frame, these are self-tapping screws. It is known that their lengths vary, so before purchasing, calculate how thick the strips or profiles of the sheathing itself will be. To do this, take this thickness, add to it the thickness of the gasket and cap, and then add another 3-5 mm, depending on the severity of the future siding. This way you will get reliable fastening parameters. Next, we'll buy the frame parts and perhaps something like a scaffolding kit if you plan to do the sheathing of the entire house yourself.
If you decide to make the lathing in a metal version, then you will need a U-shaped profile made of metal with zinc coating. Its length for facade work should be 3 meters, and the cross-section should not be symmetrical, its parameters are 60x27 mm. It is important that there is a reinforced edge on such a profile; this guarantees the rigidity of the structure. In addition to the profile itself, plates for fastening are needed; they will first appear on the wall, and only then the profile is fixed to them. Instead of such suspension plates, you can use a smaller profile of 27x28 mm; it is also installed as a support in cases where a vertical sheathing is created.
A wooden frame will be cheaper; you will only need 50x50 mm (or 50x80 mm) bars and several metal profiles to strengthen the starting strips. But behind the apparent simplicity of such a purchase there are several nuances, because we choose natural, and therefore almost living and unpredictable material. Therefore, pay attention to the initial humidity of the purchased raw materials; it should not be higher than 15%. If you manage to buy a good option, then do not risk installing it in wet weather, as this will ruin the raw materials. Having high humidity, the bars will dry out over time, but because of this they will bend, and the entire frame will become distorted.
The ideal length of the beam will be the one that covers the entire length of the wall at a time (for horizontal lathing) or the height (for vertical lathing).
How to make a frame for siding from a metal profile?
One of the advantages of covering walls with siding is the speed and ease of installation. The service life of such hanging systems directly depends on high-quality fastening to a properly prepared siding frame. It’s easy to do it yourself if you stick to technology.
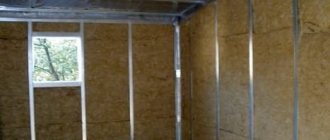
This sheathing performs several functions at once. It not only serves as the basis for fastening the panels, but also allows you to level the walls, place a layer of thermal insulation material and make the facade ventilated. The principle of the frame structure is common to various types of siding.
Frame material
A wooden frame made from timber will be cheaper, but it has some disadvantages. Firstly, the structure has significant weight, which creates additional load on the foundation and walls.
Secondly, wood tends to absorb moisture and become deformed when drying.
This can lead to the fact that if moisture accidentally gets under the skin, the entire structure will become distorted, which will require replacing it.
For these reasons, it is advisable to make the frame for the siding from a metal profile, especially for heavier types of panels.
For these purposes, a galvanized steel U-shaped profile is used, having a cross-section of 60x27 mm and a length of 3 m.
It has acceptable rigidity for both vinyl and heavier types of siding and lasts longer than wood frame. It is easy to install it yourself.
Preparing the walls
Before you begin installing the frame under the siding, you must carefully prepare the walls. In order for the sheathing to be durable and perform its protective functions efficiently, the walls under the sheathing must be dry, clean and even. If there is old plaster, it should not crumble. Cracks and holes must be sealed with cement mortar.
Wooden walls require inspection for rotten parts and the presence of vermin damage. Such items must be replaced. The wood should be treated with a deeply penetrating primer with an antiseptic effect. After treatment, all surfaces must dry thoroughly before constructing the frame with your own hands.
Door and window frames, window sills, ebbs, gutters, shutters and other protruding parts must be dismantled. The surface of the walls should be as level as possible, with a difference of no more than 2 cm allowed.
Advice! If wall insulation is required, it should be considered before the construction of the frame begins in order to correctly place the thermal insulation material.
Procurement of necessary parts
Before starting installation work, all necessary materials must be purchased and prepared in sufficient quantities. If you plan to assemble the frame yourself, you may need to purchase a scaffolding kit.
Frame elements
For metal lathing you will need a U-shaped galvanized metal profile with an asymmetrical cross-section. It must have a reinforced edge, giving the structure additional rigidity. Heavier types of siding will require more profile as it will be spaced at smaller intervals.
To attach the profile to the wall, you will need suspension plates or a profile with a cross-section of 27x28 mm, which can also be used as a support.
Depending on the wall material, fastening is carried out using galvanized screws (for wooden walls) or dowels (for brick and stone walls).
They must be of suitable size and in sufficient quantity. When choosing their length, it is necessary to take into account the material and weight of the siding, the thickness of the profile and the characteristics of the walls.
It is recommended to place a wind-vapor barrier film under the sheathing; this is especially important if you plan to lay a thermal insulation layer. The amount of film depends on the area of the wall.
Required Tools
When building a frame, all the necessary tools should be at hand, especially if you assemble it yourself. Here is a list of what you may need:
- roulette;
- metal scissors;
- screwdriver;
- perforator;
- cord, chalk;
- level and plumb.
How to install a frame under siding
Step 1: Step 1. Clean the walls
No matter how trivial it may sound, if your building is not just built, then you probably already have a lot of interesting things on the walls that should not end up under the siding. We remove all plants, mosses, bird nests, peeling previous finishing, branches of nearby trees should be removed so as not to interfere with the work. In addition to cleaning, you should remove all communications, for example, gutters, lights. Remove trims, window sills, shutters and other elements that protrude above the wall surface.
The areas around the openings of windows and doors will also be equipped with sheathing elements, which means that they will then be decorated in completely different ways. If you have some significant finishing, for example, old wooden paneling, and you don’t want to get rid of it, then the task of preparation will be further complicated by a high-quality diagnosis of its condition. Everything that is rotten will have to be replaced, everything that is lagging should be tightened or even an additional screw should be installed. If the walls are just wooden, for example, you decide to sheathe a log house, then this will simplify the installation, but preparation again involves examining the condition of the logs and sealing.
Step 2: Step 2: Install the starting bar
This part serves not only as the starting point of the entire frame, but also as a leading reference point, that is, it needs to be set as evenly as possible; each subsequent plank will be aligned with it. If you are making a vertical frame, but the starting strip will be at each end of the walls, if horizontal, it will be at the bottom of the wall. In the latter case, the first plank must be mounted at a height of 4 cm from the lowest point of the house. Having marked this level, it is best to hit it with a special cord in order to maintain horizontality when attaching a long starting bar, especially if you are working alone. In addition to this detail, you should install strips around the openings; usually J-profiles from the siding kit are installed there.
Step 3: Step 3. Frame installation
The remaining slats or profiles are attached at the same distance from each other, most often it is 40 cm. But if your siding is not PVC, but is made of heavier materials, then this distance should be reduced to 25 cm. If the walls are not made of wood or similar pliable material, you will have to use dowels, for which you first need to drill holes in the wall. Always check whether each new level matches all previous ones.
When there are large differences in level on the surface, you can add wood inserts to even out these inconveniences. For greater structural rigidity, jumpers made of the same material can be fixed between profiles or bars, this is especially important when installing insulation. For a metal frame, the jumpers will be a 27x28 mm profile, which was already discussed at the beginning. As a result, you should have a strong and even lattice frame for future siding finishing.
- Author: Manager Andrey
Rate this article:
(0 votes, average: 0 out of 5)
Cladding with siding is the easiest way to give an aesthetic appearance and insulate an old house or a new building.
In the installation of plastic panels, the frame lathing plays a key role in the final result.
What types it comes in, how to correctly calculate and install it, will be discussed in our article.
Is lathing necessary?
The lathing plays an important role:
- The frame aligns the walls of the house, which will hide the errors of the brickwork, as well as the unevenness of the cobblestone house, under the finishing.
- Installation will allow you to additionally insulate the walls of the house, and also, if necessary, isolate the facade from moisture penetration.
- The frame under the panels provides air ventilation of the walls.
To avoid heat loss, to give a beautiful appearance to the building, to protect against the appearance of fungus and mold - these are the main purposes of the structure.
In order to achieve all these indicators, it is necessary to perform appropriate preparation of the walls:
- Remove all protruding finishing elements from the surface of the facade - window and door frames. After installing the panels, the removed fragments are installed in place.
- Pay great attention to the wear rate of a wooden house: strengthen moving beams, replace damaged elements.
- A prerequisite is to treat the walls with an antiseptic composition, regardless of the service life of the building. This will provide additional protection against moisture that may seep in during heavy rain.
- On brick buildings, it is recommended to concrete the resulting cracks and cover them with an appropriate primer after complete drying.
- The foundation, which has undergone preparatory work, should ideally be free of depressions and differences.
Lathing for corrugated sheets
In a situation with corrugated sheeting, the choice of material for the sheathing depends more on the purpose of the future structure. For example, if you plan to build a fence, and especially a gate, it is better to pay attention to a square metal pipe. If it is a roof frame, a wooden beam will be more preferable.
The pitch of the sheathing under the corrugated sheet depends on the requirements for the future structure and the thickness of the metal. The standard distance is 20-30 cm (for roofing), while the fastening step on each profile depends on its cross-section and is usually 40-50 cm. A distance of 30-40 cm between each batten will be sufficient even for relatively thin corrugated sheeting ( 0.35 mm).
If the material is used as a covering for walls or arranging a fence, you need to use thicker grades of corrugated sheeting (0.5 mm). The distance between the beam or profile, as well as the step for fastening, in this case will be 50-60 cm.
Types of materials
For façade cladding, it is possible to use several types of frame materials:
- Made from wooden beams . If you plan to use this material, then several rules should be followed:
- Choose timber made from coniferous wood.
- The lathing must be impregnated with a special protective compound to combat parasites and rotting processes.
The humidity of the wood should not exceed 15%, which will avoid deformation of the frame during drying.
Fulfilling these conditions may require a long period of time, so wood material is increasingly being replaced with metal analogues.
- When installing in the hot season of the year, the error of metal expansion is taken into account.
The holes for the mounting bolts should be made oval rather than the standard round.
But this crate is not without its drawbacks. To install such a frame, you cannot do without special tools for working with metal.
Material characteristics
Before choosing any material, it is necessary to study the characteristics in detail and consider the positive and negative aspects of all sources for the lathing.
For the wooden version:
- The frame is formed only from dried material. The attractive side of wooden solutions is the relatively low cost of the material. This frame is a higher priority for wooden houses.
- Uneven and curved slats complicate installation work.
- Installation is carried out perpendicular to the siding panels. Based on this, you should choose boards that are equal in length to the wall to avoid joining the lumber. It is especially important to follow this recommendation when sheathing a house made of logs.
- The installation uses timber with a cross-section from 30x40 to 50x60 mm.
- Vertical slats are fastened in increments of 40 to 60 cm, and fasteners are installed at intervals of 50 to 70 centimeters.
- The pitch of the structure largely depends on the weather conditions of the region of residence and the weight of the entire structure. In areas where strong winds prevail, the frequency of timber fastenings is doubled to provide additional rigidity.
- It is also necessary to take into account the width of the insulation board used.
- The wood for sheathing must not be infected with parasites; to protect against them, it must be coated with an antiseptic, as well as a fire-resistant compound.
The lathing option using metal materials, although more expensive, has several advantages in its favor:
- The frame is stronger than wood, the profiles have standard factory dimensions.
- Metal structures are not deformed and are not subject to the harmful effects of humidity. The materials are fire resistant and do not rot. Due to these factors, there is no need to coat the frame with special compounds.
These characteristics help speed up the installation process of siding panels.
Metal lathing can be made from various profiles:
- The steel metal profile is mounted at intervals of 40 centimeters. This frame is applicable to one-story small buildings. Additional insulation in combination with siding is not provided due to the small ventilation space. The lathing uses a profile measuring 60x27 mm. It has a U-shaped rolling shape. The length of the material for the frame starts from 3 linear meters. For work, it is worth using models with flanging, which provides the necessary rigidity.
- Galvanized ventilation purlins. Installation is aimed at higher facades. This element is made from special steel grades S250GD and S280GD; it is these materials that provide the strength and rigidity of the purlin. Ventilation is created through perforations. Positive characteristics:
- This material is convenient for transportation: one run fits into another and takes up less space.
The frame element does not warp and is not subject to shrinkage, like wooden structures.
- Complies with fire safety standards.
- By increasing the ventilated flow, the durability of the lined structure is ensured.
- L-bars in combination with a fastening system . The optimal option for a metal frame that combines the capabilities of thermal insulation and adjustment of wall surfaces. The interval between the sheathing elements is 50 centimeters. For additional insulation, the distance can be increased to 60 centimeters. The brackets are installed identically to the pitch of the L-planks. This type of construction is quite expensive, but, as you know, you need to pay well for quality materials.
Purlins with a thickness of 0.7 mm are used for lathing. Additional insulation is not provided when using this material. This type of structure is suitable for tall buildings up to 12 meters. Thanks to the powerful characteristics of the purlins, the distance between the fastenings increases to 50 centimeters.
Fastening the facing material to a plastic system is a relatively new technology in the installation of ventilated facade finishing. This system has many advantages:
- Plastic does not rot, rust, or be damaged by insects.
- The system is designed to carry out work without relevant experience.
- Provides rigidity and hardness to the façade.
- The technology was developed specifically for working with siding; it is identical in configuration.
- Promotes ventilation of walls and heat conservation of the room.
- Plastic profiles are the result of high technology developments.
- Material costs are significantly lower compared to metal structures.
- The consumer can count on a warranty period from the manufacturer.
- The frame has a wide range of uses: gas silicate walls of the house;
- log cabins;
- structure made of SIP panels;
- surface of frame-panel houses;
- brick walls;
- uneven texture of plaster;
- walls that have undergone deformation;
- log buildings.
As a result of using this system, it is possible to achieve leveling of any level of walls, an aesthetic appearance and a neat installation process.
Construction device
When installing a wooden frame, they are guided by the width of the lumber, which is twice as wide as the distance between the fastener grooves. This lathing arrangement allows for fastening in the center of the element, which will avoid cracks in the siding due to temperature changes.
The frame is fixed with nails or 8 mm self-tapping screws with a dowel mounted in a drilled hole.
Along the edges of openings and corners, horizontal lathing made of short fragments is used to fix other elements on the finishing panels.
To install a metal sheathing, the profile is fastened to perforated steel plates - hangers. Along with suspensions, installation is carried out on special brackets; they are designed for heavy structures. The profiles are mounted to the fastening system starting from both edges of the wall.
The frame structure must be checked for flatness using a laser or water level.
Ventilation purlins are installed with steel screws with a diameter of 4.8 mm with dowels made of nylon materials, a length of 50 mm and no more than 40 centimeters, staggered on each side.
The design of G-planks involves the use of brackets of different characteristics depending on the insulation used and the height of the plank. To install one fastening to a brick wall, use two screws 80 mm long, 6 to 8 mm in diameter with a nylon dowel. For a concrete wall, galvanized nails with a 60 mm long dowel using a washer are advisable. When choosing the size of the fastener, it is necessary to take into account the condition of the wall. For damaged surfaces and thick layers of plaster, choose a larger screw size.
You can also use a wedge dowel - a steel nail with a length of 40 mm. The construction of the frame should begin at the corners of the building.
The elements of the plastic sheathing system are various types of profiles:
- Profile D 4.5 - for fastening “ship plank” panels that follow the geometry of the siding.
- Profile VN-01 - for single-fracture BlockHouse siding.
- Profile VN-02 - for the double-fracture type of BlockHouse panels.
- Flat profile - for attaching finishing strips to plastic panels.
For options with and without insulation, the plastic system provides two types of studs with a length of 138 mm and 53 mm. They come with a mounting base, which, when snapped into place, allows the profile to be adjusted.
For proper installation of siding, the system provides a metal corner 25-30 centimeters long. To ensure rigidity of the frame, the corner element is installed in increments of no more than 25 centimeters.
Types of plastic profiles
Step-by-step frame construction process
Wooden frame
- The installation of wooden sheathing should begin by installing the starting strip in a horizontal direction, orienting its location at the lowest points of the paneling.
- Then they begin to install the fastenings for the timber. If the wall is flat, as is the case with a frame house, installation can be done directly to the wall.
- The vertical bars are attached to the installed hangers. First, vertical beams are installed at the corners of the building. After installing them and adjusting the level, they begin to fasten the sheathing elements in the main part of the wall. To avoid frame protrusions, stretch the cord between the corner beams.
- The final operation is the installation of timber along the window and door openings.
Metal carcass
The profile frame is mounted as follows:
- Installation of profiles begins, as in the case of the wooden version, from the corners of the building. These elements will serve to track the level of the frame. Marking marks for drilling slots for fastening. Dowels are installed in the holes made with a hammer drill.
- Then brackets or hangers are installed. The starting profile, into which the vertical profiles will be mounted, is fastened at the base of the wall.
- Before attaching the main part of the profile, insulation and a protective film from the wind are installed.
- The remaining elements of the sheathing are installed. To provide additional rigidity, the profiles are connected with jumpers made from scraps of material.
- The final stage of installation is checking the plane using a water or laser level.
Plastic fastening system
- Installation of the system on the facade begins with attaching a flat profile to the base of the facade finishing in a horizontal position.
- The studs installed in the base lock are screwed into the required profile.
- At the next stage, the mounting base is mounted to the wall using self-tapping screws.
- The profiles are level-adjustable using unscrewed pins 53 mm long, if insulation is not required.
- In case of additional insulation, after installation of the mounting bases, the profiles are removed. Insulation sheets and a waterproofing layer are installed on the studs. Then the profiles of the plastic system are installed back.
- Having adjusted the frame elements according to the level, the excess part of the stud is removed with a hacksaw.
A well-executed lathing is the key to a high-quality result in finishing the facade of your home.
Installation of metal sheathing under siding
The process of constructing a structure from a galvanized profile is not much different from installing wooden sheathing. The main differences lie in the method of fastening and mounting the frame for laying the insulation.
An example of using a metal profile Source pallazzo.su
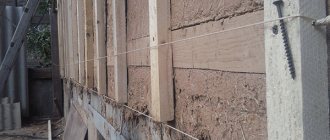
The direction of the profile relative to the walls also depends on the type of siding and its choice is best left to a specialist. If insulation is not required, the profile is attached directly to the supporting structure. As an example, consider the sequence of assembling the sheathing for vinyl siding with a heat-insulating layer:
- Fasteners for the profile are mounted on the prepared wall. Most often this is a galvanized EC bracket, which is also used for assembling structures for drywall.
- Thermal insulation material is laid on top of the fasteners. Laying is done in such a way that part of the fasteners is outside the insulation. That is, the brackets actually break through a layer of mineral wool or expanded polystyrene.
The insulation is literally threaded through the bracket Source moypodval.ru
- The waterproofing film is laid in the same way. Fixation is carried out after laying the film using foam dowels (fungi).
- Then a galvanized profile is attached to the protruding brackets (EC bracket), and siding is attached to it.
The distance between the profiles should not exceed 60 cm. The spacing between fasteners on each profile is 40 - 50 cm.