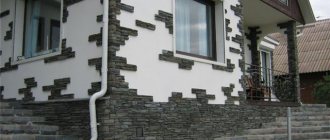
Covering a house with siding and insulation
There are two main ways to attach insulators.
- On a wooden frame or metal sheathing.
- Adhesive - only suitable for hard, smooth surfaces.
The first method is more reliable and universal. It may be labor-intensive, but, as a rule, it is what is used.
Preparatory work
Start with surface preparation.
- Log house, frame and panel house - first you need to eliminate all defects so as not to waste time dismantling the panels. All excess decor is removed, which will still not be visible under the coating. The voids are expanded and cleared. The mold is removed. Then you need to treat with antiseptics and fire retardants - fire retardants. Cleaned cracks, cracks and chips are covered with wood putty and sealed. If the basement has not been hydro- and vapor-insulated, it is advisable to do so so that moisture does not accumulate inside.
- Brick, concrete, porous blocks - the surface is cleaned, defects are eliminated using cement mixture, plaster and putty. All voids are treated with antiseptics before filling. If necessary, the foundation is waterproofed. If you plan to install a porous mass with glue, the base is primed.
Pixabay
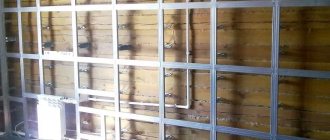
Frame installation
It is necessary for attaching the casing. The material used is a metal profile or wooden blocks with a maximum cross-section of 50x50 mm. To prevent ice from forming inside. Work is carried out at positive temperatures. Metal is more reliable. It is not subject to temperature and humidity deformation, does not dry out and does not lose strength over time. To create the lathing, you will need PS rack parts 50x50 mm and ceiling PP 60x27 mm.
The guides are set in increments of 0.5-0.6 m. For plinths it is 0.4-0.5 m. They are placed perpendicular to the siding panels. It is usually directed horizontally. The bars are coated with antiseptics and secured according to the markings. It is advisable to pre-drill holes for screws in them and in the base. Dowels are inserted into the base.
Metal parts are installed on hangers. First, their locations on the wall are marked, then holes are drilled. Dowels are inserted into them. Step - 0.5 m or less. Suspensions are elongated metal plates. They are bent into the shape of the letter “P”, then guides are inserted into them and screwed in place.
Jumpers are installed to increase the strength of the sheathing. It can perform its task without them, but with jumpers the reliability will increase significantly.
A polyethylene film or porous products based on it, which perform the function of a vapor barrier, are attached to the ground floor and foundation. It is laid overlapping and secured with tape. It should not be pulled. The corners are covered in solid pieces. The seams must be absolutely sealed.
Instagram @remsistem63
Instagram @remsistem63
Frame technologies differ from each other in complexity. The fastest method is suitable for smooth walls. The surface is covered with hard slabs that have a shell, and a sheathing is mounted on top. It can only be used in warm regions, as it does not allow the coating to be made thick enough.
For the middle band, other technical solutions are required. They depend on the material used.
Laying insulation
For mineral wool and polystyrene foam panels, vertical wooden slats are sufficient, the height of which is equal to their thickness. The pitch of the slats is equal to the width of the slabs.
Penoplex is recommended to be attached to a metal frame. Suspensions and horizontal jumpers are used as supports. For fixation, dowels with a wide head that do not fall through the loose porous mass are also used. To ensure that the joints do not coincide, the rows are offset - otherwise the cold will penetrate into the room through the cracks. The voids are sealed with polyurethane foam.
PPU is sprayed onto the sheathing with a spray gun with a nozzle. Only professional builders have such equipment.
Pixabay
Installation of siding on a log house
Tool for working with facades
Finishing the siding of a log house can begin only after you have the following tool at your disposal:
- Drill.
- A jigsaw or circular saw for cutting profiles. Power tools speed up the process of installing panels.
- Measuring instruments: tape measure, level (construction and laser).
- Hammer.
You may also need metal scissors, a chisel and twine to install the sheathing in one plane (see the article Installation of siding: technology and installation steps for details)
This is how the siding sheathing is leveled using a rope
The first stage is surface preparation
The quality result depends on this.
- Before covering a log house with siding, you should remove all other finishing materials, fill cracks, and eliminate fungus and mold.
- Secure the plywood or chipboard using self-tapping screws. These materials will serve as a kind of leveling substrate on which insulation and sheathing can be mounted.
- After that, a wooden or metal sheathing is installed, with insulation attached between the vertical posts.
For your information!
- The choice of thermal insulation material depends entirely on your budget and weather conditions in your region.
- If the sheathing is planned from wooden beams, you should purchase already processed material with anti-burning and anti-rotting properties. If this is not available, then you will have to process the timber yourself. You can buy all the products at any hardware store.
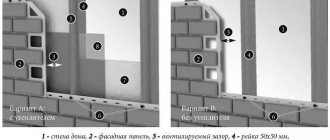
- Together with the insulation, a windproof membrane is attached to the surface to prevent condensation.
- A small gap should be left between the siding and the insulating layer, which will serve as a ventilation duct. The instructions for installing ventilated facades, which describe all the advantages of using such a system, will be useful.
The preparatory stage includes:
- Siding should be stored at the temperature that will accompany the finishing process. Of course, if it is not lower than -15 and not higher than 60 degrees.
- To avoid bending and deformation of the panels, they should be placed on a flat surface: if outdoors, then on pallets; indoors, you can simply lay them on the floor.
The facing material should be in this position before starting work.
A log house should not only be erected, because the installation of siding can begin only after shrinkage. If the wood is damp, problems may arise.
DIY vinyl siding installation: fittings and fasteners
The fittings help make the facade more beautiful, serve for decorative finishing, and also help in the process of installing siding. Currently, there are various profiles, using which you can finish the facade of a building of any shape:
- corners (external and internal)
- start strip
- end strip
- F-profile
- end mounting strip (G-bar)
- connection strip (H-bar)
- chamfer or cornice strip
- drain
- platband
- window trim
So, we have made the sheathing, and now it’s time to install the lower edge of the facade, which is to be covered with cladding panels.
We determine the most pinched place and make a mark, which we project along a horizontal line to each corner of the building. Next, you need to measure a distance from the marks upwards equal to the width of the starting strip and at the obtained level, pull the thread or mark it using a tapping cord. It is from the resulting line that the upper edge of the initial rail will pass.
The starting bar is mounted with self-tapping screws 20 cm apart along the previously marked line. It is also necessary to provide a temperature gap of 6-10 mm, which is made between the starting strips docked with each other.
Next, you need to fix the corner profile, which should be 5-6 mm from the top of the wall and the same distance from the bottom of the starting strip.
First you need to secure the corner with self-tapping screws by the edge and carefully align it with the vertical using a level or plumb line. After leveling, the profile is attached to self-tapping screws every 20 cm, which must be inserted into the very center of the holes.
When you need to combine the corner strips, they are installed with an overlap of 20 mm. Before connecting, you need to cut 25 mm from the fastening edge of the top strip. This connection method will prevent moisture from getting under the siding.
If windows or doors are located in openings, then a special strip is used during finishing, which hides the slope and decorates the outer corner.
The finishing panel is attached near the frames themselves. If the sheathing and windows are on the same line, then the connection between the siding and the window is made using platbands.
If there is enough space, you can finish the slopes using an external corner profile mounted along the wall line and a G-profile, which is installed directly against the frame. This method involves hiding the slope with siding elements.
The profile, which is mounted above windows or doors, must be cut from the inside and the resulting elements bent towards the side panels.
To drain precipitation, a drain panel should be secured under the window. Along the perimeter of the windows and doors, horizontal fittings are installed, inside which you need to insert a finishing strip that will secure the strips of panels.
The end profile is also installed on the top edge of the wall, where it connects to the installed roof box.
G-panels can be used to decorate facing strips and in cases where the wall is in contact with enclosing elements. They are used mainly on gables, near windows and doors that protrude into the siding, as well as on the sides of walls and when covering soffit.
Thorough preparation for siding installation
New buildings usually do not require preliminary preparation, but old ones require major work - the walls often require repairs. Most often, they cannot be covered in their original form - what is the point of simply decorating the walls without eliminating the shortcomings? In most cases, destruction will continue under the sheathing, and even worse - under the insulation.
Preparing the walls of a stone house
Before covering a brick house with siding, this applies to all plastered, stone, and concrete facades - we remove what peels off and weakly adheres to the surfaces. If possible, to a solid base. Often this is a weak mortar, brick worn out by time and precipitation, sometimes concrete.
At the same time, there is no need to purposefully “show up polish.” If the damage is minor, we simply remove the imperfections so that they do not crumble under the casing later. If repairs are required, we eliminate the shortcomings at minimal but sufficient costs. This is done without restoring the “finish” surface; most often, cracks are foamed if necessary, or simply repaired with a solution.
Preparing the walls of a wooden house
Before covering a wooden house with siding, we identify dilapidated areas that require repair. To restore, first use an ax or chisel to remove the rot from a log or timber, and use a saw to smooth out the edges. You need to act carefully - it is advisable to maintain the integrity of the log along its entire length, and not saw it completely - divide it into parts only if absolutely necessary. Usually a log does not rot through and through - it can be repaired with the so-called “cork” of half, or even less - a quarter of the log.
Along the way, we inspect the inter-crown insulation. There will almost always be places where it was badly damaged - it was melted to the point of rot. We remove its remains and line the grooves with new, preferably the same or similar material. Why not just “blow it out” with polyurethane foam? There is no urgent need for this; it will not be possible to replace the inter-crown insulation in full, so we use natural vapor-permeable insulation.
How to calculate the amount of siding
If even the approximate volume of materials is unknown, the number of siding panels is approximately calculated according to the principle:
- The total sheathed area is calculated; for ease of calculation, the complex geometry of the walls is “broken” into simple figures.
- The entire area of windows and doors is subtracted from this.
- Divide by the useful (not total!) area of one panel.
- The result is multiplied by a correction factor that takes into account trimming waste. For simple surfaces - 1.07-1.1, for complex ones - 1.15.
- Round the result to a whole number, and get the number of siding panels for installation with a margin.
For clarity, the calculations are shown by the formula:
((S
all walls of the house -
S
windows and doors) /
S
panels) x
1.10
A margin of 10% is required for trimming and fitting.
Next, you need to finally decide on a specific brand, with which we will continue to work. This is necessary, since the installation of different siding models may differ significantly - a different sheathing step will be required, or a different arrangement for the starting and additional elements.
Siding elements
Drainage
This element serves to protect the base and foundation of the building from moisture. It is a painted metal corner. Drainage drains are leveled along the entire perimeter of the building. Insulation and siding of a house should begin with drainage.
Then the initial or starting rail is attached to them. The rigid design of the drain allows it to be set strictly at level, which simplifies the installation of the soft starting rail.
Starting rail
This rail is attached directly to the drainage system while maintaining the level. This is where siding installation begins. The lower starting level is corrected by releasing the sheathing to the required level if the walls have a slope.
The siding panel is inserted into the starting rail until it clicks. After installing all the elements, install the panels from below into the lock, also until they click. On a blank wall, the panels are stacked up to the roof, and on a wall with windows – up to the bottom of the window.
Siding corners
The siding must be closed on the sides and ends of the building. To protect against side winds and water, wide siding angles are used. To properly install the sheathing, you need to attach the corner of the siding to the wall surface and make the necessary notches. The panels extend into the corners by 10 mm and should not rest against its walls.
Soffit
A soffit is needed for lining the roof overhangs from below. The difference between soffits and panels is that soffits have perforations for natural ventilation. The fastening technology is the same as for all elements, only the edges of the spotlights are inserted into the J-rail.
Fastening the panels after installing all the elements will not be difficult. This is easy and simple to do, just like insulating plastic windows or insulating a loggia.
Insulation of the house followed by cladding with siding panels
A little about insulation
Now, as for the thermal insulation material. Currently, either mineral wool or polystyrene foam boards are used. Firstly, it should be noted that external insulation is the best option. Secondly, the volume of the interior of a wooden house does not decrease. Thirdly, two different construction processes are combined: facade cladding and thermal insulation of the walls of the house.
If mineral wool is chosen, then it must be covered on the outside with a waterproofing membrane, and with an internal vapor barrier. The thing is that this insulation is a hygroscopic material, that is, it absorbs moisture. Why does it lose its thermal properties? Although today manufacturers already offer moisture-resistant mineral wool boards that do not need to be protected with anything. But experts still recommend laying a waterproofing layer on top in case a leak occurs through the siding due to heavy slanting rain.
As for the thickness of the insulation. For central Russia, the optimal value is 100 mm. Let us add that both heat-insulating materials are not heavy, so the loads from them on either the walls or the foundation are not taken into account.
Insulation for siding: mineral wool or polystyrene foam boards Source krysha-expert.ru
See also: Catalog of house projects for which siding is provided - from construction companies presented at the Low-Rise Country exhibition.
Preparatory work
Before directly installing the cladding, you must perform the following steps:
The main material of the walls is freed from the old cladding, as well as from the dust and dirt present on it. Rotten or moldy areas are cut off and sanded down to “healthy” wood
The inspection should be carried out with the utmost attention: even a small colony of microorganisms hidden under the siding will have time to cause considerable damage to building structures before being discovered. Next, the walls must be thoroughly lubricated with antiseptic impregnation. After the impregnation has dried, the walls are covered with a waterproofing, vapor-permeable membrane. Be careful: this film must be installed with the correct side
At this stage, it will be enough to grab it lightly, for example, with a construction stapler. In the future, the membrane will be more firmly fixed by the frame.
Installation of waterproofing
Frame installation
First of all, you need to decide on the frame material. Wood is cheaper and easier to work with, but two circumstances must be taken into account:
- The maximum permissible humidity for timber is 20%, and it must be dried in the open air. Finding such material is not so easy, since, as a rule, freshly sawn wood with a moisture content of over 50% goes on sale. A frame made from it will undergo the shrinkage already mentioned here, that is, it will dry out and become deformed.
- Even after treatment with the most effective antiseptic impregnation, the wooden frame will not be durable, since it does not have waterproofing protection.
Slats in a wooden frame have to be installed quite often - every 30 cm.
Frame installation diagram for horizontal siding
The frame elements are installed perpendicular to the siding panels. That is, if the cladding will be mounted horizontally (the most common option), then the slats or frame profiles should be screwed vertically to the walls. The construction of the frame begins with the installation of elements at the corners of the building, then the profiles framing the window and door openings are screwed in. After this, you can install intermediate elements.
When the profiles are positioned vertically, their installation is controlled using a plumb line, and when the profiles are positioned horizontally, using a building level.
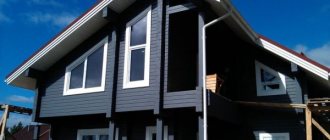
Home with vertical vinyl siding
Equipment
Additional elements
Here are the parts included in the cladding kit:
- Narrow long panels are the main element from which the cladding is assembled.
- The corner is external, usually 3 m long.
- The corner is internal, has the same length.
- The starting plank, into the protrusion of which the lowest cladding panel is placed. Installed above the plinth and above window/door openings. Typically 3.8 m long.
- J-section plank. This part covers the ends of the panels if the cladding is open. For example, if the siding is not installed along the entire perimeter, or there is an extension adjacent to the house, which it was decided to leave unfinished. In addition, the J-plank is used as a frame for gable trim, and if desired, it can also be used as a finishing strip.
- Planks with T-shaped and H-shaped sections. They are used to design joints between siding panels - mainly when extending them along the length. The length of one part is 3 m.
- Near-window slats. They are used in cases where windows and doors are recessed into the wall. Length - 3 m.
- Platbands. They are used for finishing openings, the filling of which - a window or a door - is located in the plane of the outer surface of the wall.
- Window tides. Before purchasing, you should make sure that you have not already installed them: these parts are usually supplied complete with metal-plastic windows.
- Drain plate. An additional accessory designed for installation above a window.
- Wind board.
In addition to the above, you will need soffits - perforated panels that line the space under the eaves of the roof. Thanks to perforation, ventilation of the ventilated gap under the roof is ensured.
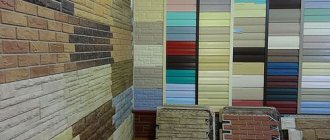
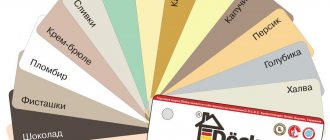
What siding should I use for cladding?
The modern market offers a huge selection of panels in a wide variety of colors and textures. Siding can successfully imitate wood, brick and stone surfaces.
What siding to use for cladding
The standard thickness of the facing panel is 1 mm. Width and length indicators are not subject to standardization and depend on the preferences of a particular manufacturer. The most common cladding panels are about 3-4 m long and about 20-25 cm wide. A large dimensional grid will allow you to choose the panels that will be most convenient to use for cladding your home.
Siding
Residential buildings are usually finished using vinyl or any other base siding. When choosing a specific option, all other things being equal, give preference to vinyl panels.
When choosing vinyl siding, be sure to pay attention to the appearance of the elements - the coloring of the panels must be strictly uniform
Facade panels
Expensive siding usually has the same color on both sides. For more budget-friendly materials, the inside is often a little lighter than the outside.
It is not recommended to use panels with a glossy finish. Such material will become very hot in the sun, to the point of deformation. Therefore, the best choice is siding with a matte finish.
Vinyl siding
Make sure all panels are the same thickness. The parameters of their nail holes should also be identical.
Before purchasing a material, check its ductility. To do this, you can bend the thin part of the panel near the nail hole. If the edge breaks, you should refuse to purchase such panels. If the material bends, but remains intact, you can safely use such siding for cladding with insulation.
Vinyl siding Nordside
Types of siding
Today, manufacturers produce 6 types of siding:
- basement;
- cement;
- vinyl;
- aluminum;
- steel;
- wood.
Siding finishing options
Let's take a closer look at each type:
- Basement siding, according to its name, is used for cladding bases, but can also be used for interior decoration. Externally, it differs from all other types in that it is made in the form of an imitation of stone or brickwork.
- Cement siding is made from a mixture of cement and cellulose fiber. This type is used mainly for cladding industrial buildings, due to its main advantage - fire safety, as well as durability. Too heavy for load-bearing structures of ordinary private buildings, it is practically not used for cladding private residential buildings.
- Vinyl siding is the most versatile. Used for constructing ventilated facades of buildings of any type. Great variety of surfaces and a wide range of colors make it possible to use siding as a modern finishing material for facades.
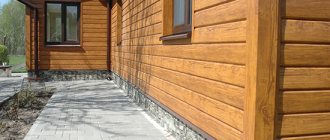
- Wood siding is similar to traditional solid wood siding, with the difference that the panels are made from wood fibers compressed with special resins. Requires the same care as natural wood, is flammable and expensive.
- Aluminum siding has all the advantages of vinyl, with the difference that it is much less impact resistant. Warped siding is difficult to repair. Mainly used for cladding warehouse and industrial buildings.
- Steel siding is used in cases where it is necessary to provide greater mechanical strength to the cladding, and at the same time, the load-bearing structures of the building are able to withstand the load from the steel cladding.
Wooden sheathing on the facade of the house
Siding finishing options
Facade cladding with siding can be done horizontally or vertically. Vertical cladding is usually made of panels that imitate a log. Horizontal cladding is made from herringbone or shiplap panels.
Beautiful solution for home decoration
Selection of facade panels
In this section we will briefly describe all the advantages and disadvantages of siding made from various materials:
Vinyl panels
Positive traits:
- Lightweight - do not bear any load on the walls and foundation.
- Simple installation - when using siding up to 3 meters in length, you can handle the installation work alone.
- Hundreds of different colors.
- UV resistance: PVC panels do not lose their color for many years.
The disadvantages include:
- Fragility of the structure - any mechanical impact will lead to the surface being deformed. However, vinyl siding cannot be repaired.
- When installing panels on an uneven surface in the first winter, most of them will be damaged, since polyvinyl chloride becomes brittle in the cold and bursts under pressure.
Metal and aluminum products
Pros:
- They are durable and do not depend on temperature changes; they do not become more fragile in severe frost.
- They are not afraid of moisture, dirt and insects, and are not classified as materials susceptible to mold and mildew.
Minuses:
- Additional load on the foundation, which must be taken into account at the design stage.
- Facade panels freeze in the cold, creating additional “load” on the thermal insulation material.
- Cannot be repaired if dents or cracks appear.
Wood siding
There is no need to talk about environmental friendliness and quality of the product - log siding is an excellent option for lovers of natural materials, however, a couple of points should be noted that may negatively affect your choice:
- Wood requires care - once every 2-3 years it is necessary to treat it with special impregnations and products that provide protection from fire and insects.
- It is necessary to renew the paint on the surface, therefore, every 5-6 years (depending on the quality of the paint).
Expensive to maintain, but beautiful on the outside
Types of facing material
Types of siding for cladding a house:
Wooden - is the least common due to its high price and difficulty in maintaining. Wood siding is the most environmentally friendly, but it must be constantly treated with antifungal agents, painted, and damaged panels replaced. Often, lining for interior work is made from wood, the fastening of which we wrote about here.
Iron - not used for renovation of residential premises. Most often, metal siding is used for warehouses and garages.
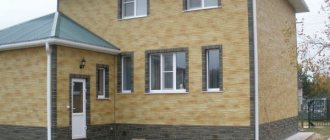
Basement is the newest type of all. If you look at the photos of the houses, they look like brick or stone masonry. Installation of basement siding will immediately make any home stand out from the rest.
Vinyl siding for finishing. The advantages of vinyl components: long service life (about 50 years), corrosion resistance, basic maintenance and the ability to attach to any surface. Covering a balcony with this type of siding will improve even an old “Stalin” building.
Today we will look at the principles of wall cladding with vinyl material.
Covering a house with siding and insulation
There are two main ways to attach insulators.
- On a wooden frame or metal sheathing.
- Adhesive - only suitable for hard, smooth surfaces.
The first method is more reliable and universal. It may be labor-intensive, but, as a rule, it is what is used.
Preparatory work
Start with surface preparation.
- Log house, frame and panel house - first you need to eliminate all defects so as not to waste time dismantling the panels. All excess decor is removed, which will still not be visible under the coating. The voids are expanded and cleared. The mold is removed. Then you need to treat with antiseptics and fire retardants - fire retardants. Cleaned cracks, cracks and chips are covered with wood putty and sealed. If the basement has not been hydro- and vapor-insulated, it is advisable to do so so that moisture does not accumulate inside.
- Brick, concrete, porous blocks - the surface is cleaned, defects are eliminated using cement mixture, plaster and putty. All voids are treated with antiseptics before filling. If necessary, the foundation is waterproofed. If you plan to install a porous mass with glue, the base is primed.
Advantages
When analyzing the advantages and disadvantages, we will talk about vinyl and metal materials, since this is what is meant when they talk about cladding a house with siding.
- It is resistant to sunlight, ultraviolet radiation, gusts of wind and other natural phenomena that it will encounter during operation.
- This material protects the walls of the building from negative influences. If it was installed on old structures, it can prevent their further destruction. But to do this, before covering the old surface must be treated with a primer.
- It is characterized by easy installation and replacement of individual elements if the need arises.
- Siding can retain its original appearance for many years. It does not need to be additionally painted or treated with protective agents. The only thing that will be necessary is to wash it. Drops of rain, wind with dust particles do not make it cleaner. To ensure that it always pleases you with its appearance, wash it at least once a year.
Materials for insulating external walls under siding
Types of insulation:
- Mineral wool insulation. They are made from metallurgical waste, silicates and other rocks. The thermal conductivity of the material is 0.042 W/m*K. Mineral wool has good fire-fighting properties. The main disadvantage is the high water absorption coefficient (about 70%).
- EPPS (extruded polystyrene foam). Low thermal conductivity (0.03 W/m*K); water absorption does not exceed 2%; ease of installation. These advantages and the high density of the material (up to 40 kg/cub.m) provide it with high thermal insulation properties. A significant drawback is the high degree of flammability.
- Expanded polystyrene is suitable for insulating foundations and rooms with high humidity.
- Styrofoam. It has a low level of thermal conductivity (0.035 W/m*K) and water absorption. The material contains many gas bubbles. The buyer can choose slabs of different thicknesses and densities. The disadvantage of polystyrene foam is that rodents love it.
- Polyurethane foam. It is obtained by mixing two substances - a polyol and an isocyanate. Low thermal conductivity, good noise insulation, high density, low degree of water absorption. It does not lend itself to mold, rot, and does not harbor rodents or insects. Its disadvantages: it is destroyed under the influence of UV; When attaching siding, the integrity of the layer is compromised, and this reduces the effectiveness of the material.
The first two types of insulation have better sound-insulating properties than polystyrene foam and polystyrene foam, but at the slightest wetness they lose their thermal insulation properties. Therefore, it is better to install mineral wool with special membranes. Foam and EPS may require additional sound insulation during installation.
When choosing between rolled and slab materials, the following should be taken into account: rolled mineral wool serves more effectively on horizontal surfaces, does not fit well at joints, and to prevent the dew point from being in the room, the material must be laid in two layers. Slab insulation does not have such disadvantages, so it is more often used for wall insulation.
The environmental friendliness of the material plays an important role. Here the winners are basalt insulation, polystyrene foam and polyurethane foam.
Which siding to choose?
If timber or a solid log was used as a building material, then it is best to use vinyl siding to cover the erected log house.
Panels made of polyvinyl chloride reliably protect the building from adverse weather conditions.
They are light enough, so they do not create additional load on the foundation. Plastic panels are easy to install and clean. Such cladding will significantly extend the life of a wooden house and give it a unique appearance. Sheathing an old wooden house will give it a fresh look.
Wooden siding is ideal for covering a frame house. This type of cladding looks truly expensive and impressive. The sheathing is installed very quickly. In this case, the panels can be installed both vertically and horizontally.
Excellent breathability and the absence of toxic fumes are the main advantages of wooden siding. For cladding a frame house, experts recommend purchasing panels made from beech, spruce, pine or larch wood.
As for a brick building, when choosing a finishing material, you should take into account the purpose of the building. If this is an industrial building, then it is best to finish it with metal siding. It is better to cover a residential brick house with vinyl siding. It will allow you to successfully imitate other expensive materials.
To decorate houses made of foam blocks and aerated concrete, you can successfully use vinyl, metal, and basement siding. Simplicity of installation, as well as excellent performance characteristics, of the installed panels will help improve the facade of the house, it will look beautiful and stylish.
A high-quality frame for siding, where insulation is necessarily present, can significantly reduce heat loss and improve the waterproofing of the building.
Features of high-quality siding:
- Same panel thickness. This cladding will not deform and will serve the building owner for as long as possible.
- The presence of a uniform layer of paint. If the panel is unevenly painted, then most likely low-grade raw materials were used in the production process. Such panels cannot withstand mechanical loads, quickly lose their color and become deformed when temperatures fluctuate.
- Surface structure. There are no chips, stains or cracks on high-quality panels. They should not delaminate.
- Plastic. All cladding parts must demonstrate flexibility and strength.
- Availability of certificates. When purchasing material for cladding a house, feel free to ask for a quality certificate. The document must contain, certified by seal, expert conclusions that confirm the fire resistance and hygiene of the product.
Metal siding
The basis of the material is sheets of aluminum/steel; a polymer coating is applied to it, which provides anti-corrosion protection, which is difficult to do without due to negative influence from the outside.
With the help of polymers, products are given a certain color and texture. Their cost is determined by what exactly is used as the basis. In the selection process, do not forget that steel sheets benefit from rigidity, but if the integrity of the coating, which performs protective functions, is compromised, then they become vulnerable to corrosion. This negatively affects appearance and functionality.
Metal siding is the most popular type
Metal exterior siding types are ideal for finishing a garage. They can also be used in relation to industrial premises, shops, warehouses, and residential buildings. Do not forget to take into account the fact that metal puts additional stress on the structure of the building. The panels can be stylized to look like natural wood (boards), brickwork, or completely smooth.
Unlike PVC products, these are characterized by increased resistance to mechanical loads, and geometric parameters change to a minimum under conditions of temperature fluctuations
Equally important is the ability to withstand the chemical environment, which itself is very aggressive
A type of metal siding is zinc consumable. Due to its high cost, it has not become widespread. It is produced in gray and black colors, the sheet thickness is 1 mm, the length of the lamellas reaches 6 m. Installing metal siding with your own hands will solve all installation issues.
Preparatory work
The technology requires careful preparation of the base. The work may vary depending on the material from which the walls of the house are made.
Wooden base
To qualitatively sheathe such a structure, you need to perform the following steps:
- The general condition of the coating and foundation is assessed. This must be taken responsibly, because problems can only be eliminated by disassembling the casing and removing the insulation.
- The surface is cleared of all unnecessary elements and decorative elements are removed.
- Cracks and crevices are opened and cleaned well.
- The wood is carefully treated with antiseptic compounds. It is also recommended to impregnate with fire retardants.
- After drying, the damage is covered with a special wood putty.
- All cracks are carefully sealed.
- As additional protection, the basement part (foundation) is waterproofed.
Before cladding a wooden house, all cracks and cracks must be sealed with special putty or sealant.
Similar measures are carried out with a frame or panel house, provided that the outside is completely covered with slabs.