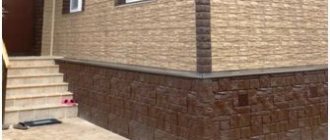
Facade stone is a popular facing coating due to its decorative properties and durability.
The facing stone does not require additional maintenance.
Since the range of stones is quite large both in terms of color and texture, it will not be difficult to provide your home with individuality and a unique image.
The façade can be completely covered with stone, or it can be combined with other facing materials.
Why is it worth using facade stone for cladding?
A special feature of facing stone is its strength compared to hanging panels or wooden lining. The coating provides reliable protection of walls from environmental influences. The material does not require additional maintenance and during operation adequately withstands weather and mechanical influences .
Unlike other external facing materials, stone is a durable coating; if installed correctly, you won’t have to think about the façade for many years: it can withstand a wide range of temperature changes, mechanical damage, and has high wear resistance.
IMPORTANT!
If the decision to decorate the façade with stone is made at the design stage, then special attention should be paid to strengthening the foundation and load-bearing walls.
Natural is especially heavy , so its load should be calculated in advance.
Features of façade design with this combination
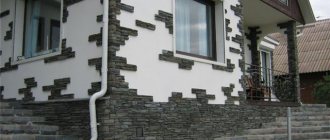
The design of the facade of a house using plaster and stone is an original interior solution that allows you to strengthen the floors and correct shortcomings.
This type of design makes it possible to implement complex architectural projects. The work uses plaster with different textures, textures, and colors. It is optimal to use terrazite, stone or colored mixture for facade finishing. The type of material is optimal for processing stone and brick walls, with additional insulation.
pros
Advantages of design using stone and decorative plaster:
- the ability to correct unevenness and cracks;
- will help hide electrical wiring, pipes of communication networks behind stones;
- additional protection of the walls of the house from mechanical damage and climatic precipitation;
- maintaining the microclimate in the building;
- improving the fire safety characteristics of the house;
- frost resistance and resistance to temperature changes.
Minuses
Disadvantages of finishing from plaster mixture and stone:
- high requirements for the reliability of the panels; walls made of lumber will need to be further strengthened;
- high cost of construction work and materials;
- natural stone can be used for finishing permanent buildings designed for heavy loads;
- plaster is not suitable for wooden facades.
Advantages and disadvantages of the material
In addition to the fact that the cladding has increased strength characteristics, the material can be classified as a fireproof coating, environmentally friendly and impervious to atmospheric influences.
As for the artificial imitation of natural stone, the positive characteristics of this material are :
- ability to retain heat;
- soundproofing;
- light weight of the facing coating, which allows the material to be mounted on any surface;
- decorative imitation of natural stone with a variety of colors and textures;
- resistance to acids and alkalis;
- durability;
- immunity to ultraviolet rays (provides the coating with color retention throughout its entire service life).
Natural stone, along with the above properties, is characterized by increased strength and heaviness of the structure . Natural stone has a longer service life than artificial stone.
The disadvantages of stone cladding include the high cost of the material relative to other facade coverings. But the quality of the cladding is much higher than its inexpensive analogues.
Pros and cons of stone cladding
Facing stone for building facades is the undisputed leader among other finishing materials. It is strong and durable, stylish and has an attractive appearance. In terms of environmental friendliness, stone blocks are absolutely safe for humans. In recent years, the combination of various types of stone with other facing materials has become popular.
In addition to external aesthetics, stone cladding has other obvious advantages:
- Practicality and versatility
- Weather resistant
- Resistance to temperature fluctuations
- Resistance to strong mechanical stress
- Long service life of stone cladding
- The ability to give your home a unique look
- Provides the opportunity to realize any design idea
Cladding the façade of a house with natural or artificial stone has its disadvantages:
- Considerable weight, which makes transportation and installation difficult
- Quite difficult to process
- The need to strengthen the load-bearing structures due to the heavy weight
But despite the shortcomings, exterior decoration, even with “wild” stone, will give the house individuality.
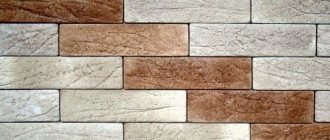
Types of artificial and natural stone
As for the artificial façade element, the imitation quite accurately conveys the texture of the natural material.
The classification of facade artificial elements is carried out based on the structure of the internal filling of the material (its composition):
- clinker. The composition includes clay, which is subjected to thermal effects;
- concrete. High-quality types of concrete form the basis of this type of cladding;
- architectural. In addition to concrete components, the composition contains high-quality white cement that can be painted;
- polymer sand. The basis of the material is polymers, they serve to lighten the mass of the structure and its plasticity;
- resinous. Their crumbs are made from the production of natural stone facing elements. In combination with resin, natural chips form a strong and durable composition;
- ceramic. The clay contained in the stone ensures the strength of the material. However, ceramics can crack under large temperature changes. Therefore, it is advisable to use ceramic imitation in mild climates or indoors.
Depending on what natural species the natural elements for façade cladding are made from, the material is classified as follows:
- granite. It has good wear resistance, has a range of colors, and can be polished, despite the heterogeneity of the texture;
- syenite. Fireproof, durable, weatherable;
- gabbro Durable, does not weather, requires systematic polishing;
- limestone. Durable, plastic , can be polished, has significant weight;
- sandstone. Not subject to polishing, lighter than natural analogues;
- labradorite Strong, polishable, durable;
- breccia. It has a wide range of colors, is wear-resistant, has uneven polishing, contains inclusions;
- porphyry. Suitable for painting, subject to polishing, has significant weight ;
- dolomite. Durable, environmentally friendly, can be polished, expensive, has a meager assortment;
- quartzite. Can be polished, painted, durable, heavy material;
- travertine. Fire-resistant, abrasion-resistant, quite lightweight, has low strength compared to natural analogues, and is not resistant to stains;
- marble. Heat-resistant, durable, wear-resistant, but quite capricious in use : it can fade, turn yellow under unfavorable conditions, and can become stained.
In addition to the structure of natural stone, the material is divided according to its shape, based on which the required amount of material is calculated, and the arrangement of elements for combined cladding is determined.:
- tiles measuring 60x30 cm;
- wild stone. Elements have formed corners with an irregular shape;
- die. The elements measure 30x30 cm, are visually attractive, and are created from scraps of material;
- slabs Consist of solid stone elements.
The most expensive coating is the “Moscow fur coat” format, which has elements of the same size with the effect of a torn surface on the outside.
Natural natural facing material
Natural stone is a wonderful finishing material. But in its natural state it is not used in construction: a number of specific processes are required to turn it into a building material. Decorating your home with natural stone will create a design of amazing beauty. Typically, tiles for cladding are produced by mechanical or manual processing. The complexity of processing will directly depend on the density. Thanks to modern technologies that make it possible to cut any stone, it can quickly be turned into the material necessary for finishing.
The price of facade tiles consists of several components:
- Specifics of production
- Transportation cost
- Difficulty of processing
It is cheapest to purchase a stone whose deposit is located in your region, since often the costs of transporting a heavy product significantly affect the cost of the material. Natural stone tiles that undergo mechanical processing are called sawn stone. It is characterized by excellent performance, this material is quite strong and durable. Thanks to a wide variety of sawing variations, it has high decorative characteristics.
The types of tiles that are made from the sawn version are varied; they differ according to several criteria:
- Breed variety
- Color spectrum
- Geometric shape
- Processing technique
- Dimensions
It is best to trust the installation of stone panels to experienced professionals who have experience in the work.
In the construction world, there is the following division of material by type of tile:
- Euro tiles. Its dimensions are 60x30x2 cm;
- Slabs: manufacturing specifics - solid block;
- Wild stone: the material is characterized by irregular geometry, the corners of which are processed;
- Die - this material consists of pieces;
- “Moscow fur coat” - similar in properties to the previous type, but differs in the presence of “torn” edges on the front side.
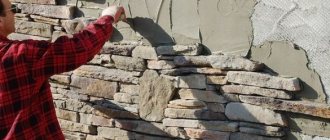
In terms of popularity and prevalence, wild stone leads. It is believed that wild stone has been created by nature for thousands of years.
Due to the variety of shapes and shades, it is the optimal facing material, which is divided into subtypes:
- Flagstone – has an uneven shape in the form of a flat slab. The dimensions of the stone slab are approximately 40x40 with a thickness of three centimeters. Due to the unique texture, it is widely used in finishing works and performs a decorative function. You can buy slabs to order in the required quantity.
- “Fat man” - used more often for laying walls or columns. There are blocks whose thickness can reach fifteen centimeters.
- Rubble stone - can be of any size and any shape; it is used more often without pre-treatment to improve the landscape of the local area.
Decorative stone for facades exists in various modifications. Only an experienced and competent specialist can help with the choice of material.
Which material is better to choose: natural or artificial?
When choosing a stone cladding, you should take into account important factors: price and quality. The facade covering has a certain weight: the load of the cladding must be taken into account.
At a price, artificial material is more attractive. Some types of non-natural stone are in no way inferior in strength and wear resistance to natural stone . In this case, there is no need to overpay.
The wear resistance and durability of natural stone is greater. Environmental conditions must be mercilessly aggressive to damage or render natural stone unpresentable. Most often, natural cladding is chosen in urban environments, where increased gas pollution prevails and the tendency to mechanical damage is quite high.
If stone cladding is required for a private country house or building located far from the city, then it is advisable to choose artificial stone: it will last at least 50 years if installed correctly and will create a decorative look . And if you combine stone with other materials, the structure will differ favorably from neighboring houses.
Typology of basic species
Each breed is unique in its own way and has its own advantages and disadvantages.
Below we consider the main types of stone that are widely used in decoration:
- Granite – has high strength and durability. A significant drawback is its heavy weight, which causes difficulties in handling and transportation.
- Marble - has high aesthetic qualities, looks attractive, and is durable. Among the disadvantages: difficulties in operation. Under the influence of negative factors, loss of a beautiful appearance is possible.
- Limestone – light weight, good thermal insulation, environmental friendliness. The most affordable option for the price. Among the disadvantages: the need for additional processing.
- Sand is a wear-resistant, very common finishing material. A wide range of colors and affordable prices make it the most popular on the market.
- Labradorite is reliable, resistant to frost and heat, and can be polished well.
A ventilated facade designed in this way will last a very long time.
What materials are best to combine finishing with?
When offering decorative solutions for decorating facades with stone, designers focus on the combination of additional finishing materials with the main one.
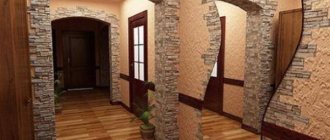
Most often, it is customary to combine the stone as follows::
- with decorative plaster. You can plaster the walls, and decorate the corners, ledges, and bases with stone, observing the contrast of colors;
- with another type of decorative stone, alternating the location;
- with facing brick;
- with tiles.
You can use a combination of thermal panels and stone, or combine stone with wooden boards or even lining.
NOTE!
The color of the material is of great importance: it can emphasize any elements, as well as hide flaws.
When using several types of materials, it should be remembered that a large stone visually reduces the area, and a light wall covered with plaster appears larger.
A little about installation
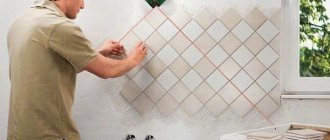
Installation of both natural and artificial stone is approximately the same. In theory, everything is simple and easy to remember, but the problem is that you first need to “train” your hand, i.e. practice.
- Laying is done only on a solid base, and if there is old plaster left, it will be tedious to knock it down. To begin with, you should coat the base several times with a primer with strengthening and deep penetration.
- Next, using dowels, you need to attach a galvanized metal mesh to the base.
- It is better to secure the starting profile from below; usually a corner is used for this. But if for some reason you don’t have one, just nail a flat piece of wood. After the glue has set, the profile will need to be removed.
- Afterwards, construction adhesive is applied to the reinforced wall using a trowel and the stone is laid. Glue is applied not only to the wall, but also to the stone.
- At first, the glue will set well, so we first lay the stone on the ground and then transfer it to the wall.
Please note that previously, finishing a house with stone was done using sand-cement mortar, but now these are relics of the past, since there are many types of construction glue. Although the solution will cost you less, only a professional installer can work with it.
Choosing adhesive for facade stone
When choosing an adhesive composition for decorative stone cladding, you should be guided by the purpose of the composition for a certain type of material.
Used for facade:
- dry mixture containing cement. Diluted with water. Used for gluing natural stone elements, effectively used for any surfaces of complex structure;
- a composite mixture in the preparation of which epoxy resin and polyurethane are mixed. Suitable for use in aggressive environments when gluing any synthetic materials with deformable and smooth surfaces.
When choosing glue, you need to pay attention to the following indicators:
- properties saving time. The period of time during which the mixture retains its characteristics;
- frost resistance. The ability of the composition to withstand freezing cycles;
- thixotropy. The ability of the composition to be held vertically. For a stone, this indicator is most important.
It is important to pay attention to the thickness of the application: it is different for each manufacturer.
In order for the glue to have good adhesion, you must first prepare the surface on which it will be applied.
How to correctly calculate material consumption
Finishing a frame house with artificial stone begins with careful measurements of the planes. The façade cladding diagram shows all corners and protrusions, as well as window and door openings with dimensions
It is important to understand whether the slopes in the openings will be finished. If yes, then the area of windows or doors can not be minus when calculating
As a rule, this is the slope area with material trimming.
If the cladding is carried out without seams and gaps, then the surface area is divided by the area of one element and the number of products is obtained.
In the case of using stones with gaps, it is necessary to add the thickness of the seam (vertically and horizontally) to the size of the product and use this increased area in the calculations.
When using corner elements, first calculate the area of the corners, remove this indicator from the total sum of the planes, and then calculate the number of piece elements.
The façade cladding is always considered separately from the plinth cladding. Firstly, these elements are finished with different materials. Secondly, the base does not (usually) have projections, windows, or doors.
When ordering material, I take into account the trimming of the material, which goes to waste, as well as rejects and damage to the material during transportation. As a rule, this value is five percent of the total area of the entire material.
Preparing the surface for installation
A properly prepared wall for stone installation will ensure reliable adhesion of the adhesive composition and good adhesion of the material.
The preparatory stage is as follows:
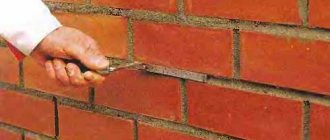
- it is necessary to level the walls;
- plaster protruding elements, seal cracks (applies to concrete and brick walls);
- remove nails, secure boards, replace moldy elements, waterproof and lay reinforced mesh (for wooden walls).
IMPORTANT!
For wooden surfaces, it is recommended to install a continuous sheathing on the frame, on which the stone elements will then be laid.
The walls are plastered, sanded, primed, and then an adhesive is applied to which the facing elements are glued..
Types of masonry
The final result of the façade cladding will largely depend on the type of stone masonry chosen. When determining the variety, it is necessary to take into account the general design style of the house and the surrounding area. The most common options are:
- Die laying. Allows you to achieve maximum naturalness. Most often, sandstone, slate, and limestone are used for such facade cladding. A special feature of this method is that there is no need to pre-process the stones. It will take a lot of time to select elements that are suitable in shape and size.
- Castle. This masonry looks like a castle. Each element is rectangular in shape, varies in size, and may have torn or chipped edges.
- Plateau. This method involves pre-processing the edges of the stone. Ideal for finishing plinths and corners. Also used for framing window openings.
- Shahriar. Panels and concrete blocks have fixed parameters, which simplifies the installation process and makes it possible to do such cladding with your own hands. The surface may be chipped or torn. Pre-grinding of the plates is also possible.
- Assol. This volumetric option allows you to create the appearance of a solidly built wall. They are laid with the end facing outward, which is how the desired effect is achieved.
- Rondo. Imitation of marine style. River stones are used for this type of masonry. The material is not subject to initial processing. Larger elements are attached first, then the gaps are filled with smaller stones. The entire façade is rarely covered in this way. This option is more suitable for finishing the base and corners.
Laying artificial stone on the facade
How is fastening done?
Gluing the stone is done as follows:
- the back side of the element should be moistened;
- after 30-60 seconds, you need to apply the adhesive composition using a spatula so that its layer does not exceed one and a half centimeters;
- The sharp angle of the spatula is passed along the glue to form grooves;
- Pressing the element against the wall should be held for up to 10 seconds.
The following elements should be glued either at a selected distance or end-to-end, depending on the type of finishing material.
Do not allow glue to get on the front part of the product; excess is wiped off with a wet cloth until the composition dries.
After gluing the stones, the seams should be sealed with either adhesive or a special mixture. Grouting is carried out using conical devices.
Preparatory stage
- remove old finishing material;
- carefully scrape off all the scraps that, one way or another, may interfere with you in the future;
- inspect the wall for cracks and irregularities;
- if you notice cracks, then use a hammer and chisel to make them a little wider and fill the holes with a deep penetration primer - this will help prevent the appearance of always unwanted mold;
- carry out the initial treatment of the wall surface with a primer - it is not necessary to achieve a perfectly smooth surface, since after puttying the priming procedure will have to be repeated;
- if the surface is very uneven and there are noticeable defects, then go over the wall with plaster, and also cover the cracks previously treated with primer;
- to achieve a perfectly smooth wall after plastering, it makes sense to use gypsum-based putty - it is not so rough in consistency and will help make the wall flawless, eliminating those irregularities that plaster, for objective reasons, cannot cope with;
- the final touch is re-priming the surface, this time we are pursuing the goal of achieving excellent adhesion to the decorative material that will be used to imitate brick, the treatment must be carried out carefully, generously lubricating those areas that very quickly absorb the solution.
Popular articles “Sunny” bag for the summer season
How to check if your wall is ready for the next stage? Everything is very simple: run your hand over it - if you don’t feel any obstacles or unpleasant roughness, it means you have successfully completed such a tedious, but still necessary preparatory stage.
Cladding technology
Installation should begin from the top so that falling glue from the upper elements does not fall on the masonry.
Next, perform the work in order:
- The corner elements should be laid from top to bottom first;
- openings and window elements are laid out exactly along the edge (if the parts have the correct shapes), or as the shape suggests;
- the solution should be applied directly to the wall and the part to be glued;
- If necessary, the seams should be unstitched. To do this, you need to clean the seams, squeeze out the composition using a cone device and fill the seams.
The cladding should not be 600-700 mm below the ground to avoid peeling of the coating from contact with cold soil.
Cladding work should not be carried out in frosty or too hot weather. If the weather is dry, the wall should be moistened before installation.
Other ways to imitate brickwork
False bricks can be obtained by extruding them from flat ceiling tiles made of polystyrene foam without a pattern.
For false bricks, flat polystyrene foam tiles without a pattern are suitable. For our purposes, you can use any of its sides. The optimal size of the “stone” is 7/15 cm. If you increase the proportions, the wall will look unnatural. The process of making “stones” is simple: we squeeze them out of the ceiling tiles.
First, using a gel pen, apply markings to the polystyrene foam. Please note that to maintain the correct shape you need to make seam allowances. Next, take a toothpick and, tilting it, press straight lines along the ruler with slight pressure. Then you need to make a special device: a crusher. To do this, use metal scissors to cut out a flat tin strip from the lid of a tin can, and cut off both sides from one edge of it so that you get a “sting” 2 mm wide. Using this device we press our bricks along the lines in the ceiling tiles.
We glue the finished products with our own hands onto the desired part of the wall. We use ceramic tile adhesive as a binder. There is no need to fill the seams with plaster. The gaps between the “stones” need to be made very small: 1-1.5 mm. After finishing the gluing work, the bricks need to be painted. We try to apply as much paint as possible into the gaps, thereby creating an imitation of brickwork.
Popular articles DIY Easter eggs: thread craft
wooden bricks
Using imitation brickwork, you can achieve the maximum decorative effect with a minimum thickness of the coating.
This method is quite simple: with our own hands we make the required number of wooden dies of the same size and rectangular shape. If you sand them on one side, you get a stylish, beautiful wall surface with an imitation of brickwork. Work on installing the “stones” begins with markings. Along this horizontal line, starting from opposite corners of the wall, we install the bricks, keeping an equal distance between them corresponding to the selected seam thickness.
First, we lightly nail the wooden dies to the wall with thin nails. When the entire row is laid out, we will drown them in plaster. When all the rows are completed, we will cover the ends of the brickwork with wooden slats. Then we paint the wood with our own hands in the desired color. It is recommended to make the seams much darker. Over time, the wall can be refreshed by repainting it or covering it with wood varnish. This imitation brick wall is very durable.
tile adhesive bricks
For the manufacture of parts, any tile adhesive is used, which is sold in the form of a dry mixture. It needs to be diluted with water until it becomes a very thick sour cream. It is best to use a white composition. Then we divide the whole mass into 3 parts, adding a little paint to each of them.
It is important that the paint differs in shade in each part
Mix the mass in each pile like dough. We will get a mass with beautiful stains. Roll it out into a “pancake” and cut bricks of the same size. We lay them out to dry. We do this until we collect the required number of “stones”. We glue it to the wall using the same tile adhesive. Fill the seams with a compound painted in a darker color. At the end, the wall surface can be covered with several layers of varnish.
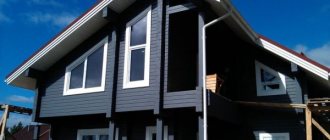
Pediment finishing
The pediment of the building is its calling card: visible from afar, it is the front part of the house. For a stone facade, you can choose a material for decorating the pediment made of wood (lining, plank, panels with imitation timber), or siding panels .
When finishing the pediment, you should use waterproofing, install the frame under the finishing material, and then attach the facing material.
It is not advisable to trim the pediment with stone: it creates a load. But if the project involves installing stone on the pediment, then it is necessary to lay an armored mesh on the surface.
Methods of jointing and invoicing
After drying, cement plaster becomes granular and finely porous, which is not entirely natural for most types of rocks. Removing texture and applying jointing is the most creative and delicate part of the finishing process, which determines the believability of the appearance.
It is required that the surface acquires some semblance of a glossy film, which is possible by squeezing a small portion of dissolved cement onto the surface. The best way to achieve this effect is to spray the freshly applied solution with a small portion of water and cover the surface with a film about 10–15 microns thick. The film is laid on the surface and rolled with force with a hard roller, without smoothing out the folds. At the same time, through the transparent shell it is clearly visible how laitance accumulates on the surface.
Popular articles Table restoration
Do I need to cover the façade stone with anything and how to care for it?
In order for artificial stone to last longer, it should be treated with a silicone water repellent, which will protect the facade from moisture and dirt. The regularity of work depends on the composition. Some types last up to six years.
The natural facade does not require special care over a long period of time. If necessary, you can clean the surface from dust and polish it with a special wax composition . To repair scratches, you can use grouts that will hide the defects.
Thus, stone cladding is a durable and practical protection for the house. The stone facade will not bring additional hassle and will ensure the decorative appearance of the structure.
Working with Bark Beetle
It’s worth mentioning right away that you don’t need complex tools and devices for the job. The set is quite simple:
- Capacity. Special construction buckets are perfect.
- Spatulas - different types. It is better to have a set on hand that consists of three different sized tools.
- Drill. You need to purchase a mixer attachment for it.
- Grater.
Applying bark beetle plaster depends on the ability to use these devices.
Surface preparation
It is assumed that bark beetle plaster will be the final stage of surface finishing
Therefore, attention should be paid to the preparation process. After all, creating a beautiful top layer can be simple, but a lot depends on the base. Finishing walls with bark beetle plaster requires a well-prepared base
Finishing walls with bark beetle plaster requires a well-prepared base
Decorating a house with Bark Beetle begins with the following, regardless of the type of work:
- The surface is completely cleaned of all excess. Remove any dirt. If there are areas affected by fungus or mold, they are removed and etched with an antiseptic.
- Any cracks and chips are opened and filled with mortar.
- The starting composition (purchased or made independently) is applied to the wall. You should get a flat surface.
- Unless the manufacturer has stated otherwise, a primer is applied. Sometimes it is tinted for greater effect.
VIDEO:
Preparing the mixture
To understand how to make bark beetle plaster more pliable to work with, you should follow the rules for diluting the dry mixture. Of course, every self-respecting manufacturer duplicates them on the packaging. So:
Pour water into the container and begin adding the mixture
Pay attention to the temperature of the liquid; it should be within 20°C. The solution is gradually mixed
It has to be done well
It happens that some fragments remain dry at the bottom. The composition is left for some time, after which the procedure is repeated.
Preparation of the solution You need to dilute as much solution as necessary for the work. It cannot be prepared for future use. If it dries out, it will not be possible to return its properties.
Application
Before we start talking about how to apply bark beetle, we should make a small remark. The fact is that there is roller plaster on the market; it has a similar pattern, but is slightly different in application. Therefore, you should carefully consider the choice of composition.
The process of transferring the mixture to the surface is no different from other types of decorative solutions:
- Using a spatula, take the required amount of material and place it on a grater (trowel).
- The tool is placed at an angle of sixty degrees to the surface. And moving from bottom to top, they apply bark beetle to the facade (or other area). There should be an even distribution.
- Take into account that the thickness of the layer directly depends on the diameter of the largest fraction.
- Excess is removed. This is done immediately, and not during the formation of the pattern.
Applying plaster with a trowel
This is the first stage, the effect that should be achieved is not yet visible.
Getting the pattern
The technology for applying bark beetle plaster is generally clear, but the further process will be determined by the factor. Manipulations are carried out with a plastic or wooden spatula. The main thing is that work should begin immediately after applying the composition. How to do:
- The tool is slightly moistened so that nothing sticks.
- He is pressed against the wall.
- Produce forward movements. The pebbles begin to move and grooves appear.
Obtaining a pattern depends on translational movements. Some ways to obtain different patterns:
- If you make movements along a small radius, you get short curls.
- When the trajectory is made in the form of parallel lines, the bark beetle finish will resemble dashes. Their length can be made different.
- By making movements perpendicular to each other, you get a grid. The lines are made of different lengths.
One of the ways to apply Bark beetle plaster. A few secrets about how to apply Bark beetle plaster:
- When choosing an acrylic-based mixture, you need to remember that it cannot be applied at high temperatures - it begins to crack.
- Work cannot be carried out in winter (outdoors), even if the manufacturer indicates otherwise on the label.
- Indeed, the Bark Beetle for facades is not very afraid of heavy rainfall, but does not tolerate constant exposure to dew.
VIDEO:
Texture of facade plaster
The texture of the plaster does not in any way affect its durability or strength and is purely an aesthetic parameter. To create a textured layer, fillers with different grain sizes are often used.
All invoices are divided into:
- traditional with a texture depth of up to 5 mm - they can be made with both conventional and modern mixtures;
- modern - require the use of only modern materials.
To create texture, not only filler is used, but also various tools: smoothers, graters, sponges, textured rollers.
With their help, you can give the surface almost any relief. But there are technically standard textures that can be created with special modern plaster mixtures: pebble; mosaic; bark beetle The pebble texture is universal and is a surface covered with crumbs measuring 1-3 mm. With its help, you can decorate facades with patterns, carved designs, and shallow bas-reliefs.
To create this texture, use a plastic grater and any tools that allow you to give the surface a relief. The result is a finely lumpy surface.
The mosaic texture is a smooth transparent surface, in the thickness of which granules made from one or several types of high-strength natural stone are clearly visible. This type of plaster is the most durable and, according to most people, the most attractive.
The silicate and silicone binders used to create such plaster are transparent and therefore the stone chips are transparent from all sides. Such facades are not painted or varnished, preserving the natural appearance of natural stone.
Bark beetle is a very common and popular decorative texture, made in various versions: vertical bark beetle; horizontal; cross; circular.
To create such a texture, modern plaster is used - bark beetle. It is applied to the facade to the thickness of the grain, and then rubbed with a grater in a certain direction.
The pebbles contained in the plaster scratch the lines, forming a texture reminiscent of wood with bark beetle holes.
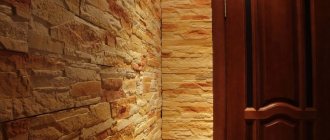
Types of natural stone
Let's consider stones that are more suitable for cladding the facade of a house. Depending on their characteristics, you can choose the most optimal option.
Granite
This is the strongest rock of igneous origin. But at the same time, the price of such a stone is at the level of marble. This is not surprising, because granite does not age and is not affected by the atmosphere. At the same time, the stone looks very rich. In ancient times, it was always a symbol of the nobility.
In addition to its high cost, granite has another disadvantage - its heavy weight. It is one of the heaviest finishing materials, so this material is not suitable for every building.
Limestone and shell rock
This stone, on the contrary, is lighter in weight. Limestone is of organic origin. In fact, it is the remains of shells of sea inhabitants that have undergone a pressing procedure. In this regard, limestone is an environmentally friendly material. It contains a large amount of calcium, and the stone also demonstrates excellent sound and heat insulation properties and is easy to process.
Healthy! Few people know that limestone also has a bactericidal effect. This means that it is capable of purifying the air from harmful microorganisms.
If we talk about cost, then limestone will cost much less than granite. But it also has one significant disadvantage. The fact is that limestone does not repel water, so it will have to be additionally treated with water-repellent impregnations.
Shell rock (officially called Meotis) is a type of limestone. This material has a fibrous structure. It has an unusual color and quite high strength.
Sandstone
It is the most common and affordable stone for home decoration. It is inexpensive and has a pleasant appearance (rough structure, color from yellowish to dark brown). Sandstone consists of a mixture of quartz, carbonate and expanded clay. It is a hard and wear-resistant (but not polishable) material with good moisture resistance.
Marble
This material is almost impossible to damage as it has excellent strength. But it all depends on the specific stone. Sometimes soft marble goes on sale, which is not highly resistant to water. But hard marble will not allow moisture to pass through, so the formation of mold and mildew is excluded. There is no point in talking about what marble looks like, since it is considered one of the most beautiful stones.
But the stone is very expensive. In addition, it is difficult to process. The material also requires maintenance. Otherwise, stains may appear on it and the entire external gloss will disappear.
Healthy! Marble can also be classified as limestone. It consists of calcite, which is formed during the metamorphism of calcareous rocks.
Other types of stones
Other stones are used much less frequently for decoration. But some of them have very good characteristics:
- Labradorite. Frost-resistant, reliable and strong stone. Easy to polish. Just like granite, it is an igneous rock. It has a beautiful blue color with yellow tints.
- Syenite. Another representative of the igneous rock. It is characterized by increased strength and resistance to extreme temperatures. It has a light, porous structure.
- Porphyry. In this case, we are talking about a rock that is characterized by a dark red tint. The stone has a smooth surface and is similar in characteristics to granite.
- Quartzite. It has a light or reddish color. It is difficult to process and has a high weight.
- Dolomite. Resistant to frost and fire. This is a very beautiful stone, but it is very expensive.
- Slate. It also easily tolerates temperature fluctuations. It can be machined because it has a layered texture. It has a green or bluish tint.
It is also worth paying attention to the shape of the finishing material.
Types of plasters by texture
These façade materials differ greatly in appearance. The surface becomes textured thanks to fillers of different sizes: fine- and coarse-grained. Another option to get an interesting surface is to use special tools: rollers, sponges, brushes, floats and trowels. Now there are several popular types of texture: lambskin, pebble, bark beetle, mosaic.
Barashkovaya
Because of the particularly “tender attitude” towards it, the popular name for this type of mixture appeared - “fur coat”. “Lamb” is a finely lumpy surface; this texture is considered a type of pebble, and for good reason: such plasters contain stone grains of different sizes. What distinguishes it from other types is the casting technique, which makes the process quick: this composition does not require grouting. To form the relief, additional mixtures are often used - sand-cement or lime-cement.
Gluing Dagestan stone to the facade
There are two ways to install finishing natural stone.
- Gluing.
- Installation on metal profiles.
The first one is suitable if the back side of the stones is quite smooth. But this characteristic is most often inherent in artificial materials. Therefore, for Dagestan stone it is advisable to use the method of installation on metal profiles. But this method also has its disadvantages.
In the Caucasus, houses are traditionally clad as follows:
- plastering the facade and basement;
- attach a polypropylene or metal mesh with a fine mesh;
- apply a thick layer of tile adhesive mixed with fine-grained sand to the wall;
- glue the stones.
Example of finishing a private house
Despite the simplicity of this technology, the cladding remains on the walls for many years. For more severe climates, a method of gluing natural stone using CORAL building compounds is recommended. You will need the following materials:
adhesive composition CG-12;
Adhesive for natural and artificial stone Coral CG-12
primer composition CPP-8;
Deep-penetrating primer Coral CPP-8
- grout mixture;
- protective varnish.
Natural stone gluing technology
Step 1. Clean the stones from dust using a stiff-bristled brush, water and a rag. Leave until completely dry.
Before laying the stone should be washed to remove dust.
Step 2. Using a paint roller, apply primer to the walls. You can use "Betonokontakt".
Concrete contact is vapor permeable
Application of primer
Step 3. Mix a solution from the CG-12 adhesive mixture at the rate of 300 g of water per 1 kg of dry powder. Since there is a large amount of work to be done, a metal mixer is purchased in advance. This is a special attachment for a drill, which is used to mix construction mixtures. The freshly prepared solution should stand for several minutes.
A construction mixer is used to thoroughly mix the glue.
Step 4. Mix the grout mixture, which is necessary for sealing the seams. The fact is that when cladding the facade with Dagestan or any other natural stone, the joints are grouted as the facing layer is installed. After laying several stones, the seams are sealed.
Mixing grout
Step 5. Using a notched trowel, apply glue to the mesh so that it is completely immersed in it. The surface of the layer should be embossed, which is ensured by the teeth of the spatula.
Applying glue to the mesh
The adhesive solution is applied with a small spoon or spatula, and then the relief is made with a comb.
Step 6. Press the stone against the facade and, slightly shaking, immerse it in the adhesive layer. In order for the facing material to connect as tightly as possible to the wall, tap it with a rubber or wooden mallet.
Gluing the stone
For a tighter installation, tap the stone with a rubber hammer.
When gluing the next stone, metal (plastic, wooden) strips 5-10 mm thick are inserted between the first and second. In this way, the distance necessary for forming the seams will be maintained.
Step 7. Take a spatula with a smooth edge of a metal blade, scoop up the grout mixture and press it into the space between the stones. Remove excess with a damp plastic bag. If necessary, carefully knock off the protruding parts of the stones with a hammer.
Apply the grout with a 3-5 cm wide spatula in such an amount that the next stone has contact with it along the entire edge
Step 8. After 24 hours, wash the cladding with a brush, water and a rag.
After the grout has dried, wash the stone
Step 9. After the stones have dried, begin applying protective varnish. This work is done with a paint brush.
Varnish for natural stone (acrylic-silicone, hydrophobic, antifungal)
Section of the wall after applying varnish
Types of facade plasters
If we talk about the purpose, then we can distinguish two types of plasters:
- Repair - its main task is to level the surfaces of the walls and prepare them for further finishing. The thickness of such a plaster layer can reach 50 mm.
- Decorative – creates a protective layer and gives the facades individuality. Usually applied in a thin layer.
Any plaster composition contains the following components:
- astringent;
- filler;
- modifying additives.
You can prepare the plaster mixture yourself or buy it ready-made in the store (you only need to add water to it).
Ready-made mixtures are more expensive, but they greatly simplify the work and save time.
Having decided to decorate the facades of your house with plaster, you need to choose the right plaster, because the durability and quality of the finish depend on it.
House facade design - spectacular finishing using plaster and painting
It’s good when a country house is warm and comfortable, but it must also be beautiful - as the future owners imagined it in their dreams. It doesn’t matter what material the walls are built from, its appearance is completed by the decoration of the facade. It is this that shapes the visual perception of the cottage, making it original and unlike others.
The market offers a huge selection of materials, both expensive (artificial stone) and economical (siding, plaster). They are used in a variety of combinations. By calling on desire and imagination to help, you can decorate the facade effectively and relatively inexpensively, as the examples below show.
Generalization on the topic
So, let’s summarize and answer the question posed by the topic of the article - what is the best siding to cover a house with. The choice is usually based on the strength of the product and its long-term operation. That's why:
- Vinyl siding changes its dimensional parameters under the influence of temperature changes. Therefore, in the installation instructions, the manufacturer always mentions that the sheathing material should not be fully attached to the frame. That is, the screws are not screwed in all the way. This gap allows the material to expand and contract.
- The metal variety is susceptible to corrosion. Especially in pruning areas. At the same time, metal products made from thin steel sheets are afraid of shock loads, under the influence of which they lose their presentable appearance.
- The wooden version is inferior to all others in terms of fire hazard. In addition, this variety has the shortest service life, even if it is treated with protective compounds every year.
- Fiber cement siding and its ceramic counterpart are heavy, which requires large investments in the construction of the frame.
Incorrect installation led to warping of the claddingSource makebestphoto.ru
In addition, other factors also affect the service life:
If the external walls of the house are constantly exposed to ultraviolet radiation, then it is better not to use the vinyl option.
For a multi-story building, choose light weight material.
Pay attention to the quality of the building materials you purchase. Require a quality certificate
The exact dimensions of all panels used are very important during the installation process. The modern market is simply inundated with different types of siding from different manufacturers, where both domestic and foreign companies are present. Among them there are many counterfeits of low quality.
Finishing material for every tasteSource vse-pro-stroyku.sqicolombia.net
Here is a list of several manufacturers of the best siding for your home.
- U-PLAST from Belarus. The manufacturer purchases the equipment in Germany or the USA. It uses only European raw materials.
- FINE BER. This is a domestic manufacturer. At the very beginning of its activity, the quality of its products left much to be desired. The siding simply faded quickly under the sun. The new technology introduced solved this problem at its root.
- PROFILE VOX from Poland. One of the company's factories is located in Russia. The company offers two- and three-layer siding.
- TEKOS from Belgium. One of the factories is located in Russia. It was at this plant that they began to produce vinyl siding covered with an acrylic layer.
- Russian – manufacturer of vinyl and metal siding.
- ALTA-PROFILE is another Russian company that produces vinyl and basement siding. It must be noted that on the Russian market the products of this company are the cheapest without sacrificing quality. Hence the high popularity of the material from this company.
- Midten Canada. This manufacturer has been producing siding for 60 years, hence the vast experience and wide range of developments. Only this company guarantees its products for 50 years.
- DOCKE. German quality has always been at a high level. Russia has its own plant that produces basement and vinyl siding.
Tips for decorative facade finishing
In order not to overpay for extra slabs, and not to buy missing ones, you should correctly calculate the required number of sheets. When purchasing blocks, ask the seller for a certificate - you cannot trust dubious companies. Decorating a house is an expensive task and involves long-term use of materials.
It is important that it is of good quality
A combination of the same type of panels, but in different colors, looks good - this will preserve heat and sound insulation and give the house an elegant look. Such a house will not only become more comfortable to live in, but will also acquire a new, original design.
A plastered house with siding located in the basement of the same shade looks beautiful.
Photo of a house with brick siding - the combination with plastered walls in the same color scheme looks stylish Source pinterest.com
The use of slabs imitating brick is not limited only to residential buildings. They can be installed on gazebos, outbuildings, and finish the foundation of permanent fences.