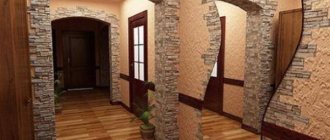
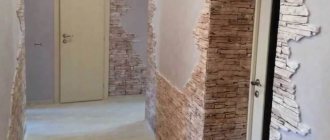
You always want to create the presence of nature next to you while at home or at work. A good solution could be finishing with natural materials. There are natural and artificial decorative stones that are easily used for home decoration.
You can also combine it with glass or plastic. Decorative stone finishing is mainly used in the hallway, kitchen, bathroom or bathhouse. The interior will be much cozier and more comfortable if the decorative stone is decorated with vegetation. In addition, stone finishing is well used in hotels and business centers.
Using stone for finishing in a new home
There are a number of conditions: if finishing with decorative stone occurs indoors, then the light must fall well on the walls so that all parts of the finishing are visible and the pattern of the stone is clearly visible.
Climbing hanging plants in flowerpots will make the interior unique. This way you can create a piece of nature in your home or office. This finishing method is suitable for rooms where there is good lighting.
The best option is when light falls on the walls. The light source in this case is placed at the bottom and at the top. This will give the material a noble, impressive appearance.
When there is a fireplace, then stone is exactly the material that will be in place, especially if you decorate not only the fireplace itself, but also the space near it.
If you cannot create the necessary lighting for the stone, then you can choose a light coating. Also, the solution may be to simply do the finishing in parts. Not the entire perimeter should be covered with material, but only its individual fragments. An artificial fountain will look good against the background of a wall or arch that is decorated with decorative stone.
You will also need the following materials:
- Putty. It is used to seal seams at corners and between joints;
- Varnish on water. Will be needed to cover areas around seams and chips;
- Tile adhesive (can be replaced with liquid nails).
You need to dilute the tile adhesive so that you can use the prepared solution within 15, maximum 20 minutes. You can’t do it longer, because the mass will begin to harden. The best consistency for the adhesive solution is creamy, similar to toothpaste. In any case, you need to read the instructions.
Laying technology
To properly and beautifully decorate walls with artificial stone, it is not at all necessary to have experience in construction or design work. A little hard work, patience and the desire to do something yourself is all you need. The lack of experience is compensated by the building material.
The general conditions for finishing work are as follows:
- The temperature range when facing with artificial stone is from 5 to 30 degrees. If the air temperature exceeds 30 degrees, then about half an hour before starting work, the wall and the back surface of the stone are moistened with water.
- Before laying, inspect each pebble. Sometimes opposite sides have a different shade. It doesn’t hurt to ask the seller which side is best to lay the material.
- Make markings on the wall. Its pitch is up to 500 mm. This is necessary to know in advance how the decorative elements will be laid out.
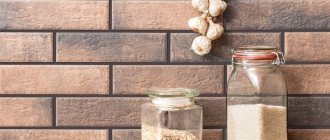
Types of stone
Today, the following types of stone are used for finishing:
- sandstone;
- limestone;
- marble;
- granite;
- slate;
- cobblestone.
Decorative stone allows you to decorate a room inside and outside. To cover the surface with sandstone, you do not need technical devices and skills, but as for cutting other types of stones, the help of a specialist is needed.
But if you just need to lay a stone, then this can be done easily and without the help of a hired worker. To make installation convenient, ready-made stone with a smooth surface is sold.
The simplest and least expensive way is to treat the premises with artificial material. It is sometimes difficult to distinguish it from the real thing, which means that it is also capable of ennobling a room, just like a real stone. In the manufacture of this stone, dyes are used, as well as cement, sand and clay.
Also, artificial stone can be of any color, and all you have to do is choose exactly what you need. Also, artificial stone is good because it is light in weight, which means there will be minimal load on the load-bearing elements.
Selecting consumables
Finishing of stone on a cement base is done with an adhesive mortar containing cement, and on gypsum - with mastic, tile adhesive, or a cement-sand composition. PVA glue is suitable for cladding plasterboard and wooden walls. The wooden surface is treated with an antiseptic before gluing the stone.
The color of the grout for the joints is selected to match the shade of the stone. The finish using slate decorative stone turns out to be monolithic. The tiles are coated with acrylic impregnation or water-based varnish. This protects the material from negative influences and increases its decorative effect.
Which stone to choose for wall treatment?
First of all, you need to choose quality material. You need to study it carefully, and the more clearly the colors stand out, the more interesting the stone will look where it is used. If artificial stone was chosen as the finishing material, then you need to make sure there are no stains, growths or chips on it.
Any finishing material must adhere well to the wall and stick to it. In order for the adhesion to be maximum, it is necessary that the adhesive surface is not too smooth, but there should also not be excessive roughness.
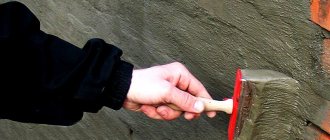
To treat a room outside, you need to make sure the water-repellent properties of the material. If the stone does not meet these characteristics, then it is necessary to apply a water-repellent mixture to the stone on average once every 4 years.
Facade cladding technology
Decorating the facade with artificial stone is not difficult. And, by the way, not all types of facing material require careful surface preparation, especially in cases where a material with a relief surface will be used as a facing.
But still, before starting installation, it makes sense to check the wall - there should not be large differences on it.
Alignment of walls
Laying should be done on a flat surface. You can use a building code to check the condition of the wall. If the gap between the wall and the tool is from 3 to 5 mm, then the stone can be laid without preliminary preparation.
If installation is carried out on a brick wall, it must be plastered.
When laying on wooden walls, the preparation is as follows:
- Remove nails and other obstructions.
- Replace boards with signs of rotting.
- Waterproofing must be applied to the places where the tiles will be laid.
- A reinforced mesh is fixed to the wall surface.
The technology of façade cladding using the dry method implies that you will need to first build a frame. Its dimensions will determine the size of the tiles to be laid.
Surface and Tool Preparation
After the surface of the wooden or stone facade is ready, you will need to assemble a certain tool that will be useful when facing the walls. Below is the list:
- rule;
- level and tape measure;
- markers and ruler;
- spatulas of different formats;
- angle grinder equipped with a cutting disc;
- brushes;
- electric drill or mixer.
DIY surface finishing with artificial stone
First you need to understand how much decorative stone you need to use. This task is actually very difficult. Basically, the stone does not have clear parameters and shapes.
Only ceramic stone is an exception in this case. Having calculated all the parameters, all that remains is to develop a laying plan.
- Why are clients in Russia often offered Chinese counterfeits of German stretch ceilings?
Floor coverings
How to make slopes inside on plastic windows with your own hands
In order to understand how much decorative stone is needed for wall decoration, you need to draw a working area, but to these calculations you need to add 10-15% for costs that may arise during work. If you take everything into account, this will allow you to accurately calculate the required amount of finishing material.
Laying methods
There are 2 methods of laying artificial stone: with jointing and without. The first method is used to decorate the “brick” texture. You can lay out a wall without jointing with artificial stones that imitate slate.
Seamless installation option is easier and faster. Its essence is that the stones need to be placed one from the other at a minimum distance. Excess glue must be removed in time, otherwise it will be difficult to do this later.
The essence of laying stones with jointing is that the cladding elements are laid at a distance from one another. In this case, you need to add jointing purchased in advance to the list of tools and accessories. You will also need a dye to match the finishing stone (or, conversely, a contrasting shade) for the seams.
Pre-layout
Specialists who have been laying surfaces with decorative stone for a long time, at the very beginning of the work, plan how they will lay it. You can lay it out on the floor or draw a plan on a piece of checkered paper.
The main thing in this matter is to adhere to the parameters and take into account the seam. There are different seams - there are small ones, this type of installation is called seamless or continuous, but the seam can also be more than 1 cm thick.
Many people ignore the preparatory process, thinking that they can do without it. But in this case, you need to take into account the fact that the glue sets very quickly, and it may take too much time to redo the work. Of course, it's best to plan everything first.
Rustication
In most cases, decorative stone is placed under the jointing. This implies a certain distance of the tiles from each other. These seams can be filled with glue during the process of pressing the stone. Therefore, it should be carefully removed. These seams are then filled with special jointing. If the jointing mixture consists of the same adhesive composition, then there is no point in removing residual glue from the seams. When the mastic has completely hardened, it can be tinted a different color, which will enhance the expressiveness of the decorative stone. As for the width of the seam, everything will depend on the tile you choose. The seam can be millimeter wide or several centimeters wide. For example, when laying a brick under jointing, the standard seam width is 1.2 cm. In the case where there should be no seams between the stones in the masonry, it should be laid as closely as possible to each other. If the process of gluing the tiles was carried out correctly, then the glue that came out into the seams may be enough to form a seam. To form it, you should wait a little so that the mixture hardens slightly. Forming can be done using a special wooden spatula, which must have a certain shape and appropriate thickness for the seam.
Joining seams
If the squeezed out glue is not enough to form a beautiful seam, then you should prepare an additional mixture. To apply it, you will need a special bag from which it will be convenient to squeeze the mixture into the seam. This way, there is less risk that you will stain the tiles. When the seams have dried and the mixture is crumbly, the surface of the stone can be cleaned of any remaining glue that may have gotten on it. This can be done with a dry brush, but under no circumstances with a wet and hard brush. This can cause irreparable harm to the decorative stone.
Decorative stone finishing technology
At the very beginning, a layer of primer is applied to the drywall or plastered surface. While it dries, the glue is prepared. It is very important that the stone is laid evenly. To achieve this goal, markings must be applied. This is done using a paint cord or you can simply draw with a pencil, using a level for these purposes.
Wallpaper options for the living room in an apartment or private houseHow to correctly cut and join plinths in corners
Types of decorative plaster for interior wall decoration with photos and names
You need to start the process of laying decorative stone from one of the corners. If you have corner tiles, you can use them. In the absence of corner tiles, stone with decorated edges is used. The same option is used at the end of the row in order to give a certain pattern.
At the very beginning of installation, it is necessary to take a good look at the decorative stone, because there may be a coating on it that will interfere with installation. You can remove it with a wire brush.
If the work takes place in a dry place with a high temperature, then first the surface of the stone is moistened with water and then only the glue is applied with a spatula.
A piece of stone needs to be rested against the surface treated with soil, placing it in the correct position. To make good contact, you can tap the surface of the fragment with a rubber mallet. The photo shows the best way to decorate with decorative stone, and the result that was then obtained.
This finishing method takes a lot of time and is used mainly when you need to process a small area. If you need to lay a larger volume of tiles, then it will be easier to simply smear the glue directly onto the wall itself, and simply press the tiles moistened with water to the glue on the wall. And after installation, remove the excess with a spatula.
Tools needed for laying natural stone
When learning how to lay natural stone with your own hands, you cannot help but study the tools that are needed for this.
There are not many of them:
1.
Container and shovel for mixing and (or) storing the solution. A shovel will also be needed to feed it onto the masonry. Buckets are often used to carry the mortar mixture.
2.
A mason's trowel is a “trowel” for applying and leveling the masonry mixture.
3.
Kirochka. They use it to tease, tap and knock on stones. If necessary, it can be used to hammer a nail for tightening laces, minor repairs to scaffolding, etc.
4.
A hammer with teeth - a bush hammer, for processing and chopping large stones.
5.
Tools for marking: tape measure, thin cord (“lace”) stretched for marking and orientation during masonry, construction angle, plumb line, to improve the accuracy of masonry, special slats - orders, for pulling laces.
In addition to the above, you may need additional equipment: a stretcher for carrying stones and mortar, wedges and chisels for splitting stone, etc. And, of course, you will need such devices as → scaffolding or scaffolding (the link tells you how to make a scaffold with your own hands).
Progress added power tools:
1.
An angle grinder (“grinder”) cuts stone faster and easier, although it requires special care in operation. Preferably a larger one, with a 180 mm disc. Of course, a stone-cutting machine is best, but that depends on who’s finances allow it and the need to use it in the future.
2.
Hammer. Useful for chopping stones. It successfully replaces the bush hammer, especially considering that today the trade offers various shaped attachments for these purposes.
Photo of decorative stone finishing
Ceiling decoration: choice of materials, modern finishing methods and application of different design ideas- Sliding wardrobes: TOP best models and new products. Photo of exclusive design + placement instructions
Bathtub tiling: modern design ideas and recommendations for decorating a bathroom with tiles
Even more ideas can be found on the website: https://interer.guru
Read here! Balcony finishing - choosing the best design option and tips on selecting materials
Did you like the article?
2+
Now the process itself is step by step.
Laying the stone begins with corner elements, alternating short and long stones. To create support, the cladding is carried upward from the floor. When the glue in the bottom layer dries, you can begin further installation. The polymerization time of the glue depends on the specific brand. For some adhesives, no polymerization time is needed at all. In each specific case, you need to read the instructions. If seamless installation is used, you need to ensure that the glue also reaches the end parts of the stones, without getting on the front part of the decor. Features of the design of curved or complex sections: Complex elements are performed using a file and (or) a chisel.
This skill will come in handy if you need to gracefully bypass a socket or switch, as well as when designing slopes, entrance doors and interior arched openings. For perfect corner cutting, use a miter box. When laying stones cut at an angle, make sure they fit tightly. It is convenient to use a miter box for forming right angles. If you don’t have a miter box on hand, you can use an object with a precisely adjusted right angle. Figured cutting is performed along the contour of the texture.
Sealing joints with putty can be done using a plastic dairy bag. Fill the bag with putty solution, and then release it through a small hole directly into the seam. Excess is removed with a sponge from under the dishes.
Mistakes to avoid when laying stone
Novice craftsmen often make the following mistakes when covering walls with decorative stone:
- A wide seam that does not decorate, but spoils the entire impression of the composition;
- Poor priming of the wall. After some time, the lining begins to fall off;
- Damage and chipping of individual finishing elements during trimming;
- Wrong choice of texture and shade;
- Rowing errors made from the very beginning. This leads to the material being stacked chaotically. The appearance of the wall is greatly affected by this.
How to create a stone retaining wall on a site
From turning steep slopes into terraced backdrops to creating focal points in a landscape, retaining walls serve many purposes. Indeed, they are one of the most common ways to eliminate problems caused by hilly terrain!
Well-built retaining walls transform unsightly slopes into functional garden space.
Despite their simple appearance, these walls require careful planning - sometimes when building tall and long walls you need to call in the services of a professional. Most walls should not exceed one meter in height unless designed by a specialist.
In this article, we'll look at building smaller, decorative retaining walls using different types of stone.
What type of natural stone to use to build a retaining wall
Retaining walls can be built using a variety of materials, from poured concrete to natural stones and even brick. For self-assembly, there are ready-made stone blocks that are designed specifically for retaining walls. They have a locking flange along the bottom edge to create a secure connection between rows. These blocks can often be found in construction supermarkets. But you can use natural types of stone, not only strengthening your slope, but also giving your site a “natural” landscape.
The most popular manufacturing option is the use of natural stone. A structure created on the basis of natural cobblestones will have a spectacular and beautiful appearance. The following natural stones are most often used in construction:
- sandstone;
- basalt;
- dolomite;
- cobblestone;
- granite;
- quartzite.