Features of using PVC panels in the bathroom
PVC panels have recently begun to gain popularity. This finishing material has a rectangular shape, and it is made of polyvinyl chloride - a colorless transparent plastic. Photos of decorative panels for the bathroom can be seen below.
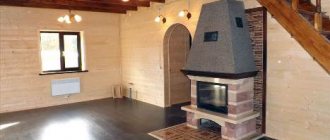
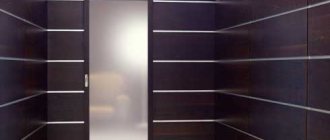
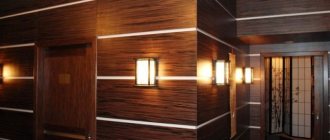
The chocolate shade of PVC panels makes the interior more elegant, and the installation method helps to visually expand the space
Advantages of the material
The advantages of PVC finishing include:
- Economical. The affordable price allows you to use this material even with a limited renovation budget. The cost of panels depends on the quality of workmanship and decorative elements.
- Compliance with sanitary and hygienic standards. The panels practically do not absorb odors and are easily cleaned of dust and dirt with a damp cloth soaked in soapy water.
- Moisture resistance.
- Easy to install and dismantle. The panels are fastened using a screwdriver or a construction stapler. You can install them yourself. The process of decorating a bathroom with plastic panels is demonstrated in the photo.
- Ability to hide communications. Sewage and water pipes can be hidden under the finishing. This option must be thought through at the planning stage, and then a box for the pipes must be made.
- Fire safety. A short circuit may occur in a room with high humidity levels. In such a situation, under the influence of fire, the plastic will begin to melt, but the fire will not spread to it.
- High noise and heat insulation properties.
- Large selection of colors, designs, patterns. The surface of the plastic coating can imitate natural wood, stone, tile, or photo wallpaper.
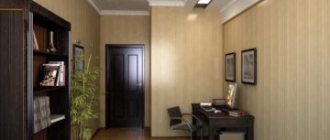
Thanks to plastic panels you can create a stylish modern interior in the bathroom at a low cost
Disadvantages of plastic finishing
The disadvantages of PVC finishing include:
- Low environmental friendliness.
- Fragility. If you press too hard on the material during installation, cracks may occur.
- Harmful effects on the human body. We are talking only about the cheapest models of panels that emit phenol into the air.
- Simple design. Ceramic tiles look more expensive and more impressive than most PVC models. Plastic design options for the bathroom can be seen in the photo.
- Reducing the usable area of the bathroom. PVC finishing is not recommended in small spaces.
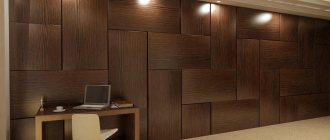
PVC panels help visually make ceilings higher
Features of PVC panels
The advantages of the panels include:
- their low cost;
- environmental safety under adequate conditions of use;
- resistance to fungi and mold;
- long service life;
- no deformation when humidity and temperature change;
- speed and ease of installation;
- the ability to place communications under the panels;
- installation of insulation and sound insulation;
- a large selection of design solutions for PVC panels in the interior;
- easy care.
The disadvantages include such properties as:
- extremely low impact resistance;
- low wear temperature. Therefore, placement near hot springs is not possible;
- loss of color due to direct exposure to bright rays.
Types and sizes of PVC finishing
The classification and requirements for PVC products for internal cladding are set out in GOST 19111–2001. From the variety of panels produced, we will highlight the main criteria by which products are classified.
By purpose:
- Wall. The thickness of the products is from 8 to 12 mm.
- Ceiling. This cladding is available in thicknesses from 5 to 8 mm.
Width:
- Rack (lining): strips with a width of 12 to 30 cm.
- Sheet cladding or wide panels: width from 30 to 50 cm.
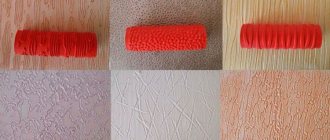
According to invoice:
- Smooth. As a rule, these are colored products or stripes with a pattern applied using photo printing.
- Embossed or textured. This cladding imitates various textures, most often tiles or mosaics. Embossed seams allow you to imitate tile laying as accurately as possible.
All types of PVC cladding materials have grooves for interlocking the two strips. Depending on the joint formed, the material is divided into three types:
- Seamless connection.
- Lamels with a chamfer to highlight the seam.
- Relief lining, the joint in which is masked when connected.
Finishing a bathroom with PVC panels is considered a cosmetic renovation option. But that doesn't mean cheap finishes can't be attractive. Modern technologies make it possible not only to produce plastic of any shade, but also to apply almost any design or pattern, and even a three-dimensional image, onto it. Therefore, plastic finishing looks very nice, as can be seen from the photo selection of options for decorating a bathroom using PVC panels.
Where to start repairs
It is best to decide before the renovation where the communications will go, after which they will disappear under the panels and it will be much more difficult to carry out any work. It is also necessary to take care of expanding the bathroom; the sheathing along with the panels hides part of the space. How to prepare a bathroom for finishing with plastic panels with your own hands can be seen in the training video.
Expansion of space
Where to start with DIY paneling using PVC panels for the bathroom? Before starting repairs, it is recommended to remove the old layer of plaster from the walls. This will not add extra centimeters, but will allow you to equalize the ratio of the thickness of the walls - the panels together with the sheathing will take up about the same amount of space as plaster together with the old finish.
Space savings depend on the thickness of the plaster layer. Taking into account one wall, this seems like too little of an achievement, but when moved to the entire area of the bathroom, there may be enough free space for a narrow cabinet or hanging shelf. Considering the dimensions of the premises in houses built during the Soviet period, even a few extra centimeters are important.
In Khrushchev-era buildings, the plaster is often made from sand and lime, so removing it from the walls will be quite easy. Dust will become a much bigger problem during the repair process, but you can save yourself from it by using a respirator and safety glasses during your work. In order not to stain the bathtub, it is better to cover it with film.
Pipe replacement
Before installing plastic panels in the bathroom, it is better to completely replace the old pipes. Why is this needed:
- An old, rusty pipeline can leak at any time. If the pipes are hidden behind the panels, in the event of an accident it will be more difficult to fix the problem; you will have to dismantle part of the wall, and this takes time, effort and money.
- It is better to replace the old ones with plastic or metal-plastic pipes. They don't rust.
- Since old pipes are already at least a few centimeters away from the walls, the thickness of the sheathing for plastic panels will be greater. As a result, the bathroom area will be noticeably reduced, which is unlikely to have a positive effect on comfort.
In addition, new pipes will last much longer than old ones, and modern materials are more wear-resistant.
Wiring
Modern bathrooms cannot do without sockets; they are necessary for a washing machine, shower stalls with electronic filling, hair dryer, electric razor, etc. Switches will also be required, especially if there are several levels of lighting. Therefore, even before covering the bathroom with plastic panels, you need to determine exactly where the wires will come out.
But the process of installing sockets and switches in PVC plates is no different from the same on drywall. To better understand how to install wiring under plastic panels in the bathroom and install everything you need during renovation, you can watch the video with instructions.
https://youtube.com/watch?v=yKRbGKGd74c
Installation methods
Before you go to the store for finishing materials, you need to take measurements. Calculate the total surface area that will be decorated with plastic. Its width is multiplied by its height. From the resulting number, subtract the area of doorways and windows, if any in the room. The latter are certainly rare for rooms in Khrushchev-era buildings, but in a private house the bathroom may even have several of them. It is also worth removing the bathtub area from the general meaning if it is adjacent to the wall and the repair does not involve its dismantling. After the calculations are completed, they go for the material. There are two ways to install PVC panels:
| Adhesive (frameless) | The panels are attached directly to the wall. |
| Frame | A special sheathing is installed under the material. |
In addition to a set of tools for work, you will also need:
- Floor and ceiling skirting boards;
- Corners.
These materials perform a decorative function, but without them the interior design will seem unfinished.
Required Tools
The list of tools for finishing a bathroom with polyvinyl chloride panels includes:
- Drill, hacksaw, screwdriver;
- Construction level, tape measure, pencil, square;
- Screws and dowels;
- Construction adhesive, screws or clamps;
- Wooden bars or metal sheathing;
- Sealant for processing joints.
The list may be expanded. The set of tools depends on the method of attaching the panels to the wall surface.
Frame method
This type of installation is not suitable for small rooms. The frame will inevitably “eat up” valuable centimeters. Typically, this method is chosen for finishing the ceiling. As mentioned above, the material has a special structure (no pores), so it will not become a breeding ground for harmful organisms. But, if there are voids under the panels, then entire colonies of bacteria and mold can settle in them over time. In addition, in the presence of a frame, the risk of damage to the material increases significantly; it becomes more fragile, without having a solid surface underneath it. One of the obvious advantages is the ability of the lathing to hide obvious defects in the wall: it can mask their unevenness or curvature.
Finishing work is divided into several stages:
- Applying markings and installing the first slats. The future sheathing is constructed from wooden or metal bars. For a bathroom, it is better to choose the latter, since wood is less durable and susceptible to rotting. The main line is drawn horizontally along the entire perimeter of the room. Focusing on it, attach the first rail using dowels. A second one is installed at the bottom near the floor in a similar way. They will be used as a basis for further work.
- Fastening additional rails. The optimal distance between them is considered to be 50 cm. Before installing additional slats, check their “horizontalness” using a level.
- Fastening moldings. They are necessary for masking joints in the corners.
After work on the frame is completed, installation of plastic panels begins. The process begins with the wall that is always visible (far). The material is attached to the sheathing with self-tapping screws using a screwdriver. The panels are inserted into the corners (moldings) and screwed to the frame. There are special grooves on the sides of each that allow you to connect them together. To ensure better adhesion, they are lightly tapped with a hammer.
Adhesive cladding method
The adhesive method does not have all the disadvantages of the frame method, but is associated with additional finishing work: putty and primer of the surface. The first is carried out only if necessary, it does not belong to the mandatory preparatory stages. If the walls have obvious unevenness, chips or damage, then applying putty is indispensable. Defects are smoothed out and the surface is leveled. After the putty has dried, the wall is primed to ensure good adhesion to the glue. Panels are cut if necessary before installation.
A layer of glue is applied pointwise to the surface of the wall (so-called “liquid nails”). At the same time, try not to cover up the places where the panel seams will be located, since the substance may leak through them. As in the glue method, it is necessary to monitor how smoothly the material lies on the surface. The process is completed by installing the framing profile.
Frame methods of wall finishing
You can cover walls with your own hands using various methods. Before choosing the most suitable method, you need to prepare tools and purchase material.
For this work you will need:
- Drill and drill bits.
- A set of drills and a hammer drill.
- A set of screwdrivers or a screwdriver.
- Construction knife and level.
- Caulk gun.
- Hardware and other consumables.
- Hammer.
- Stapler.
- The necessary material, as well as additional elements for it.
Preparation for the process
When all the necessary calculations have been made, it is necessary to prepare the surface for cladding with plastic panels. This is done depending on the chosen method.
- Regardless of the option, you need to make the necessary calculations and take measurements.
- Mark and cut the posts for the frame, and also number them in order.
- Remove all excess trim from the walls. If there is any damage, for example, cracks, then they are puttied.
- The surfaces of the walls are covered with an antiseptic. It is best to use two in one for this: a primer with the addition of special substances against mold and mildew.
- If the surface peels off, it must first be leveled.
- The use of wooden elements begins with their impregnation. Antifungal compounds are used for this.
Please note that the primer must be applied in two layers. The first layer strengthens the wall surface, and the second already fixes the result. In this case, you need to wait until it dries completely, as a rule, this takes at least 9 hours.
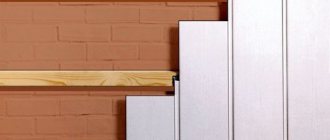
Installation of sheathing
The frame must be made when there are any surface imperfections, and to correct them you will have to put in a lot of effort. Finishing the walls with PVC panels on the sheathing helps to get rid of all the unevenness on the surface. This method has two more noticeable advantages: you can install additional insulation elements, and also hide existing communications. To achieve the desired result, various materials are used, which do not differ much in the method of installation.
Wooden frame
For this, wooden blocks are used, the cross-section of which is 40x40 mm. They must be fastened with dowels to concrete bases, and also with self-tapping screws to wooden ones.
If the sheathing will be carried out vertically, then installation should begin from the edges. To do this, two initial guides are screwed on. Then you need to calculate the same distance and install the remaining racks. Cross members are attached between them. To achieve greater rigidity, additional vertical slats must be installed.
It is also necessary to take into account that each part must be checked for level. And if it is necessary to level, then linings from the remains of the block are used. They are pre-attached to the wall. For greater effect, the joints of the crossbars and racks should be coated with silicone sealant.
Wooden cladding material is recommended for dry rooms with a moderate internal climate.
Metal and plastic profile
After installing the profile sheathing, a lot of scraps remain, which, if desired, can also be used to cover the walls with PVC panels. This method is not used as often as others. The cost of such a frame is very high.
First you need to secure the lower and upper guides. This is done to the ceiling and floor respectively. They must first be aligned with each other. After this, the vertical guides are aligned with each other and fixed to the wall. This can be done using U-shaped brackets. Horizontal cross members are attached at equal intervals. This is optional, since the metal profile creates sufficient rigidity.
A more modern method of finishing panels is a plastic profile. It is in many ways superior to all the types described above, but its popularity in our country is not yet so high. This can be explained by the high cost, as well as increased surface requirements. The main advantage of this material is the absence of fear of mold and moisture.
This design can be installed in a very short time. As a rule, this is done using dowels. Often such guides already have drilling, which greatly facilitates the work process. They are attached with a small distance of 30 cm. This should be done in order to give greater rigidity. It is important to maintain complete perpendicularity during work. This is the only way to ensure correct cladding with PVC panels.
Equipment and additional elements
We will discuss how to calculate the number of panels and additional elements below, but now we will tell you what is included in the package for finishing walls with PVC panels. Select the appearance and specific dimensions taking into account the parameters of the panels.
| Name | Brief description and purpose |
| Universal corner | It looks like a plate bent at an angle of 90°. Used for finishing internal and external corners of the room. |
| Ceiling and floor plinth | Complex profile, part is installed under the panels, the outer side hides uneven cuts or surfaces. |
| Outer corner | Consists of a corner, the inner part is wider than the outer. Hides unevenness of the outer corner. |
| Inner corner | Differs from the external one in the width of the sides. The wide one is installed under the slats, the outer narrow one hides the unevenness of the inner corner. |
| Connecting profile | Allows you to connect lamellas without a lock, used if the length of the lamellas is insufficient for finishing the surface |
| Start/finish profile | Installed first and last, sometimes can be used instead of a universal or special corner. |
| F-profile | Installed at junctions, can be used as a platband. |
| Sheathing mounting strip | The supporting element of the frame can be plastic or made of metal profiles. |
| Klyammer | Made of metal, it presses the panel to the mounting plate. Allows you to dismantle panels without losing factory quality. |
pvc panels for bathroom
The panels are fixed with self-tapping screws with a press washer, staples using a stapler, clamps or liquid nails. The choice of method depends on the materials used to manufacture the supporting frame and the quality of the walls and ceilings.
Methods for installing PVC panels on walls
Calculation features
Decorating walls with plastic panels requires preliminary calculations. Calculations concern absolutely all stages of work. Thanks to this, it will be possible to avoid possible problems, as well as save money and time.
Frame:
- The location of the profiles must be taken into account. The location can be horizontal or vertical. This will depend on the installation of PVC panels. In any case, they will always be perpendicular to the sheathing posts.
- The distance between them should also be taken into account, which is usually from 30 to 45 cm. From all this, the required number of frame parts plus two profiles along the edges of the wall surface is calculated.
Fasteners:
- The number of clamps per square meter of surface is from 20 to 25 pieces.
- The number of dowel nails should be taken into account in increments of 35-50 cm.
Panels:
- You need to measure the size of the wall, as well as the selected panel. One indicator is divided by the other, resulting in the required amount.
- Panels in the form of tiles must be calculated based on square meters.
All other moldings and parts must also be included. For the calculation, the entire perimeter of the walls of the room is measured, the number of internal and external corners is taken into account.
It is important to note that all calculations must be made with a margin of 10%. This reserve is due to the possibility of various damage to the product or other unforeseen circumstances. It is also worth considering window and door openings.
Style selection
Marine style is considered traditional for the bathroom. It most clearly reflects the functional purpose of the room. A combination of white and blue is usually used in wall decoration. The texture of the panels can imitate sand, small pebbles or water surface. High tech prefers imitation steel, and Provence prefers aged wood. In designs with more expensive decor, special panels are purchased that are assembled in the manner of a mosaic. A drawing is applied to their surface: dolphins, starfish, skates, jellyfish and other inhabitants of the depths. For a romantic atmosphere, panels with appropriate images are used: roses, irises, tulips, orchids. Japanese style always includes pagodas and branches of cherry blossoms. For timeless classics, choose panels with floral patterns and imitation stucco around the perimeter. In minimalism, only monochromatic options in calm shades are allowed: white, gray, blue. In small bathrooms it is better to use light, modern trends, where designers choose functionality at the expense of the complexity of finishing. In spacious rooms, you can experiment by dividing them into zones (bath, toilet, washbasin) using different finishing textures.
Design options
The panels with the drawings transferred to them are coated with varnish. The result is a matte, smooth and silky or glossy surface - a wear-resistant and durable varnished canvas.
The material is laminated on top with a decorative film that imitates natural material. The design on laminated panels does not wear off.
Interesting but expensive panels with 3D photo printing: gypsum stucco, tiles, stone, natural compositions.
Neat self-adhesive mirror PVC tiles instead of glass surfaces - inexpensive and less fragile.
For the bedroom and living room, choose panels with silk-screen printing in a calm and neutral color.
More often, panels are purchased in white, beige and peach, cream or soft pink, light chocolate and caramel tones.
From the original paintings, choose the color of bronze, gold and silver with sparkles.
Ceiling methods
Installation of panels on a rough ceiling
The rough ceiling does not require special preparation. The finishing elements are laid as follows:
- Treat the surface. Antiseptic compounds are applied to the base and left until dry. It is recommended to install a waterproofing material, such as polyethylene film. The joints are taped.
- Measure the distances between walls located opposite each other. The skirting boards are cut so that when two parts are combined, an angle of 45° is formed. It is not recommended to fasten the part with self-tapping screws. When installed on an uneven surface, the additional element will sag. Liquid nails are used for fixation. At this stage, only 3 skirting boards are installed, the fourth is installed after laying the cladding.
- Panels are cut. The element fits into the plinth by 2 cm. Having measured the distance between the walls, add 1.5 cm to the resulting value. The remaining 0.5 cm makes installation easier.
- Re-measure the ceiling. If there are minor errors, they are eliminated by changing the size of the gaps between the lamellas. It is recommended to align the panels in hidden places. Open areas must have smooth joints.
- The end of the lamella is inserted into one plinth. The element is slightly bent and the second end is inserted into the opposite profile. The long side is inserted into the third plinth.
- Pressing the lamellas tightly against each other, they are fixed with staples. The more tightly the elements are installed, the stronger the connections will be. When fixing on an uneven ceiling, pieces of plastic are placed under the end of the panel. This will help prevent cracks from appearing.
- After installing the entire elements, measure the width of the uncovered part of the ceiling. Taking into account the obtained value, the material is cut using the previously selected method.
- The lamella is inserted into 2 skirting boards. One edge is connected into a lock, the second is secured separately. The element is fixed with liquid nails or self-tapping screws.
- The fourth plinth is removed from the base part. The remaining part is treated with glue and installed on the wall.
Installation of panels to the ceiling on a metal frame
This method is used when finishing an uneven ceiling yourself. The work is carried out as follows:
- Mark the installation locations of the supporting profiles. The parts are placed in increments of 0.5 m. If there are pronounced irregularities, hangers are used. They are mounted in the same way as on the walls.
- 3 skirting boards are glued using liquid nails. If there are no right angles, the cuts will have to be adjusted. The plinth is attached both to the wall and to the metal frame. After applying the plastic element, it is removed for 2-3 minutes. After reinstallation, the correct position is checked with a level. The corners are sealed with sealant.
- The ends of the lamellas are inserted into the baseboards. The finishing material is laid along the long side of the ceiling. This reduces the number of cuts and waste. The plastic sheathing is attached to the profiles with self-tapping screws. To prevent the screwdriver bit from coming off from damaging the finish, place a metal spatula on the ceiling when screwing.
- The finishing panel is cut, taking into account the dimensions of the uncovered part of the ceiling. The back side of the fourth plinth is removed. The remaining parts are lubricated with glue and pressed to the base. After the glue has dried, they proceed to placing the lighting fixtures.
Fastening plastic panels to the ceiling in the bathtub.
How to install panels when mounted on a ceiling diagonally
This idea is difficult to implement. Installing the frame and adjusting the cladding elements is a labor-intensive process. The work is carried out as follows:
- Determine the area of the base and the longest length of the lamella. To do this you need to measure the diagonal of the ceiling. The volume of waste when using this installation method increases, so the material is purchased with a reserve.
- 3 skirting boards are installed in the standard way. When the glue dries, the height of the additional elements should not change.
- The end of the panel is cut at an angle of 45°. The second end of the lamella is cut off at the same slope. The result will be a starting element with the shortest length. It is installed in the corner.
- Measure the length of most of the installed part. This is how the length of the shorter side of the second element is determined. Markings are applied to the panel and cuts are made. Use the same method to cut and fasten the remaining parts. You can see what the ceiling will look like in the photo.
Installation of plastic panels
PVC panels are attached with glue or lathing.
Installing PVC panels with glue
Cracks on the walls are covered, smoothed and coated with an anti-fungal agent. The panels are fastened with liquid nails or colorless, waterproof and quick-drying glue.
Apply it in a checkerboard pattern, leaving visible drops. When applying glue to walls, a notched trowel is used for leveling.
Frame mounting
A wooden or metal frame is used in rooms with high humidity and uneven walls.
1). Marking the wall with lines and level. The first horizontal line is drawn 1-2 cm above the floor. The next lines are every 20-40 cm, the frequency affects the strength of the fastening.
Then wooden or metal slats are attached along the lines (buy dowels - nails or screws).
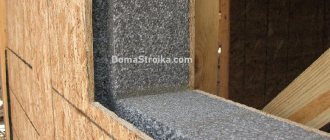
2). Before attaching the panels, the wooden frame is impregnated with an antiseptic compound, and the end wall is insulated with roll insulation laid between the slats.
3). The panel plates are attached vertically to a horizontal frame, or vice versa, with a stapler or small nails. The first sheet is attached to the far corner from the door. Insert all the way, then pull out slightly, and level with a level and plumb, lightly nail and check the parallel position.
Remove the nails and insert the part into place. The following plates are inserted into the locks and nailed. The last part is not fastened, but inserted.
Joints, gaps, connections are decorated with special profiles of suitable thickness and color.
Construction of a supporting frame for plastic panels
A very important step when finishing with plastic panels in the bathroom is the construction of a supporting frame - a structural unit intended for fastening materials. After all, the outcome of all finishing activities largely depends on the quality of its manufacture.
Both wooden slats and specialized metal profiles can be used as materials for the manufacture of the supporting frame. Whereas the choice in favor of the most acceptable option should be made based on the individual characteristics of the object and actual operating conditions.
Design and decoration of plastic panels video lessons
The use of wooden blocks as the starting material is a less labor-intensive undertaking, because in this case the sheathing is simply attached to the surface of the enclosing structure using dowels and self-tapping screws. However, such an arrangement can only be allowed if there are perfectly smooth walls in the bathroom. And as a building material, use exclusively dry, smooth, knot-free slats.
If the base foundations have significant deviations from vertical or horizontal planes, then a more acceptable option is to assemble the frame using metal profiles, which are attached to the enclosing structures using adjustable hangers. In addition, such a layout allows you to easily arrange all kinds of insulators and utility elements (lighting, piping, ventilation).
Plastic panels in the bathroom interesting photo design ideas
However, regardless of the type of materials used during the assembly of the supporting frame, it is advisable to follow certain recommendations:
- The frame elements should be fastened to the base bases using high-quality fasteners, ensuring high rigidity of the system (the spacing of the fastening points should vary from 30 to 50 cm);
- The spacing of the profiles should ensure the subsequent rigidity of the wall modules (the optimal range is from 40 to 60 cm);
- To strengthen the structure, additional jumpers made of profiles or wooden blocks can be used.
Advantages of finishing and renovating a bathroom with plastic panels
The most important advantages of modern plastic cladding panels, which are used as bathroom finishing, include:
- high level of moisture resistance;
- the ability to act as reliable protection for wall and ceiling surfaces of the bathroom;
- increased practicality and suitability for cleaning facing materials with non-abrasive cleaning agents;
- the ability to perform independent installation without a lot of waste;
- democratic cost of finishing materials and components;
- excellent soundproofing qualities;
- a wealth of choice of colors and shades;
- possibility of making matte, glossy or textured cladding.
A fairly wide selection of products, differing not only in design, but also in size, allows you to choose the best option for cladding while minimizing waste when cutting the material.
Before purchasing, you need to take into account that plastic is characterized by relative fragility, a low level of resistance to mechanical damage, as well as insufficient environmental friendliness and the presence of toxic components in its composition.
Material selection
Of course, everyone wants to cover the walls with plastic panels as soon as possible, but they must be selected first. The choice must be approached with the utmost care . The final result will depend on this. In this case, the following nuances and rules must be taken into account:
- For showers and bathrooms, as well as for all types of wet rooms, it is necessary to select panels that are moisture resistant and lack protrusion.
- For balconies, corridors and loggias, it is recommended to select products that are resistant to various mechanical damage.
- The finishing of walls with panels in living rooms should be done with PVC coatings having various reliefs and patterns. You can also imitate natural materials.
When purchasing, you should also pay attention to the following indicators:
- Appearance of the packaging. The packaging must be intact, without any damage. It is important to select material from the same batch.
- Number of cells. The more cells there are, the better. You can also focus on weight. Light panels are a sign of deficiency.
- Lock. To do this, you need to check the two selected panels for connection. The connection must be as reliable as possible.
- Price. As a rule, very cheap products are fake.
Interesting design ideas
Every owner of an apartment or country house wants his home to have a unique design that will attract attention and surprise guests. To do this, you can familiarize yourself with design examples or seek help from a professional designer who will offer different options.
Before choosing a design, you should study its features:
Most people think that plastic panels are a cheap option that only comes in one color and looks boring. However, manufacturers offer original decorative options that are ready to diversify the interior of the room.
You can often find a bathroom lined with plastic panels in a minimalist style. This interior implies a minimum number of items along with free space. It should contain clear lines and restrained shades. To make the interior look complete, it is recommended to add metal and glass accessories.
The rustic style and country style look beautiful. The interior suggests that it will use natural elements, but plastic allows you to imitate a similar atmosphere. When using PVC panels with wood imitation, you should take a responsible approach to the choice of other elements. Designers recommend choosing simple pieces of furniture made of wood. Spotlights should be replaced with a chandelier that matches the style.
Provence is considered the spirit of simplicity and comfort. Such an interior is easily created by covering it with plastic panels. The interior should be created in light pastel colors, the furniture should be simple. You can complement your bathroom with ceramic and porcelain decor, as well as floral-themed patterns.
Many owners of houses and apartments decide to combine a variety of color options. This solution allows you to decorate the room in an unusual design. A combination of red and black, blue and pink, white and light green will look original. A Khrushchev building decorated in this style will look creative and modern.
Since the bathroom is a room in which a person takes water treatments and relaxes, decorating in a marine style will be relevant. For sale there are panels with drawings on similar topics (ocean, sea inhabitants, vegetation, etc.). It is also recommended to decorate the floors in a marine style.
Modern style involves choosing glossy white products. An interior decorated in this style makes it possible to refresh the bathroom and make it modern. Due to the shiny surface, you can visually enlarge the room and make it lighter. In a large room, you can use glossy panels of other shades. Red, blue or yellow products will look beautiful.
The panels can also be combined with different finishing materials. You can often find a bathroom where the lower part of the walls is covered with clapboard along with a plastered upper part.
You can line the walls with plastic panels with patterns, which should be combined in a certain order. Such products have an increased cost, but this is justified by the result obtained after covering. The room takes on a stylish and modern look. You can use panels with a pattern next to mirrors or in the shower. The remaining walls should have a uniform surface.
It is allowed to use panels with different textures. They should be arranged in stripes, due to which the room acquires an original play of surfaces. Such techniques are relevant for large rooms with low ceilings. Due to this kind of play, the walls become visually higher, and the proportions of the room look organic.
Some buyers purchase PVC panels with a 3D pattern
The image will attract attention and transform the room. Due to the “volumetric” panel, you can visually increase the area of the room, adding an additional dimension
However, 3D panels can only be used in spacious bathrooms, since adequate perception of the picture occurs from a certain distance.
To learn how to decorate a bathroom with plastic panels, see the following video.
Advantages and disadvantages
Due to their specific properties, the panels can be used in places where other materials would suffer. For example, in a bathroom or toilet, plastic panels will fit just right. Or, if repairs need to be done, but there is no money for natural materials, plastic can also come in handy.
PVC panels look good everywhere
But in order for it to look good, not leave the walls and complement the interior, instead of completely breaking it, you need to approach the choice and placement in the house wisely and consistently.
Before we figure out what types of plastic panels there are, where they should be placed, and where it is better to use another material, let’s first look at their basic properties.
The following are useful:
- Low price . This is one of the main advantages - plastic is a cheap material that can still look good, stylish, and interesting.
- Lightness . Typically, wall finishing materials are quite heavy - especially when it comes to tiles or natural wood panels - but plastic does not have this drawback. Even a child can lift one element, therefore, there will be no problems with delivery and mounting on the walls.
- Moisture resistance . One of the materials that is completely insensitive to moisture. Even the joints between the panels can be sealed so that no water gets into them.
This material has a low price
- Easy to care for . Plastic does not like aggressive chemicals, but practically no dust, dirt, or various kitchen liquids stick to it. If you don’t start it, you can simply wash off all the dirt with a cloth soaked in soapy water.
- Resistant to temperature changes . Only the cheapest plastic melts, but nothing is usually made from it in construction. Although expensive PVC panels, of course, should not be placed directly above a gas stove or fireplace.
- Soundproofing . Despite the fact that PVC is usually thin, it dampens sound quite well. Especially if you put a thin layer of insulation between it and the wall.
- Insensitivity to biological stimuli . Plastic does not mold, and the distance from it to the wall is usually so small that parasites cannot grow there, even if we are talking about cockroaches and not rats.
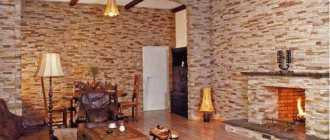
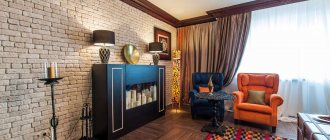
Brick finish
- Variety . Plastic, like any synthetic material, is easy to paint. That’s why you can find all sorts of panels on the market - single-color and multi-color, patterned and plain, with and without patterns. They can also be made with different textures - waves, imitation wood or stone.
- Easy to install . Structural elements are usually equipped with a simple device for coupling of the “spike-lock” type. Even a person who has never undertaken a renovation in his life can put them together. No specific skills are required.
The material dampens sound well
But, of course, not a single material can have only useful properties.
There are also unpleasant ones:
- Lack of resistance to mechanical damage . Plastic is a thin, lightweight material that is easy to damage. You can scratch it even with a brush that is too hard, but a blow inflicted accidentally and casually will probably leave a crack. Therefore, both use and transportation must be careful.
- High probability of buying a low-quality product . It’s difficult to mess up with natural stone, just like with wood - they won’t cost less if you violate the production technique. But plastic will, so there is always a chance of buying panels that will melt, have a very unpleasant smell, or quickly deform.
- Specific smell . Despite everything, even expensive PVC, made according to all the rules, at first emits an odor that may seem unpleasant.
- Difficulty fitting into the interior . Natural materials can be adapted in one way or another to suit any style. But PVC is suitable only for those that are democratic enough to tolerate synthetics - all these are modern styles.