Today there are many unique design solutions for apartments. Therefore, the plasterboard ceiling is of interest to many who prefer non-standard ideas for renovation transformations in their own home. Before you finally decide in favor of such an interior item, you need to clearly understand how to make a wave from plasterboard. There are several embodiments and these are:
Design and design of wave plasterboard ceiling
- ceiling with vertical wave;
- ceiling with horizontal wave.
Depending on the skills of the owner of the square meters, one of these options is selected.
Vertical waves
The most difficult part of creating a ceiling with vertical waves is designing, creating and attaching the frame.
In order for the coating to be of the correct shape and neat, you need to put a lot of effort into perfectly executing the symmetrical lines of metal profiles.
If you do not pay due attention to this nuance, then the gypsum board will not be able to be laid evenly. Difficulties may also arise at the stage of attaching plasterboard sheets to the base of the frame. It is necessary to carefully cut out parts of the sheets based on the detailed drawing.
Features and nuances
Example of a ceiling with vertical waves
- In order for the ceiling with vertical waves to turn out smooth and as intended at the planning stage, special attention should be paid to the process of creating the drawing. You can do it either manually or using a special utility;
- Detailed markings should be applied to the ceiling surfaces where the structure is planned to be installed in waves. Even a deviation of 0.5 cm can cause the plasterboard structure on the ceiling to look skewed and with noticeable differences in height;
- Vertical waves on the ceiling surface are quite difficult to assemble. To carry out such a mission, you need to have enough skills in working with drywall. After all, the process of attaching vertical waves from gypsum plasterboard differs significantly from the classics. Such work requires maximum precision, care and caution.
Design option for a plasterboard ceiling with vertical waves
Installation technologies for curved ceilings
The main difficulty when laying drywall on curved surfaces is the need to give individual gypsum board segments the appropriate shape. This can be done by using two different technologies that allow you to give the plasterboard sheets the required bending radius. Before you begin bending work, you need to make appropriate templates, with a slightly reduced radius than on the frame structure itself.
Wet bending technology
In this case, a needle roller is used, with which small indentations are made on the compressible side of the gypsum board. After this, the sheet is soaked in water and placed on the template. Then, over time, thanks to the ability of gypsum to bend well when wet, the drywall takes the shape of a template. Here are some more related recommendations:
- for the manufacture of radial and curved elements, it is better not to use gypsum boards with a width of more than 60 cm;
- The minimum bending radius of a plasterboard board depends on its thickness. If you are working with gypsum plasterboard with a thickness of 9 mm, then the minimum radius will be 50 cm, and if the thickness of the plasterboard is 12 mm - 1 m;
- the wet fragment must dry in this state to give stability to the shape.
Dry bending technology
Dry technology makes it possible to create bends of very small radii, and when using reinforced drywall, it allows you to completely abandon the use of templates for bending sheets. Reinforced plasterboard boards are stronger than regular ones and bend well using the dry method, so they have a thickness of only 6.5 mm.
Dry technology is distinguished by the following subtleties:
- When using this method of bending gypsum boards, a manual router is required. It is necessary to make cuts and cuts along the entire length of the sheet on the supposed convex side;
- when the shaping process is completed, the side containing the slots must be treated with a primer and putty;
- ordinary drywall needs to be additionally reinforced with sickle mesh;
- The finished sheet is attached to the frame. When work is carried out at a high level of complexity, this option may become almost the only installation option;
- The elements are fastened to the frame after all the parts have been made.
When the workpieces are ready, they can be lifted onto a spacer stand and screwed into place with self-tapping screws from the middle to the edges. Processing of the edges of individual gypsum board elements is carried out with a plane.
Now, to make your wave on the ceiling look even more convincing, you need to properly seal all the seams, treat the surface with putty, sand and paint.
Also read: Semicircle of plasterboard on the ceiling.
Horizontal waves
If you don’t have the experience to create a plasterboard ceiling with vertical waves yourself, then it’s better to pay attention to ceilings with horizontal waves. This idea is much easier to implement.
Features and nuances
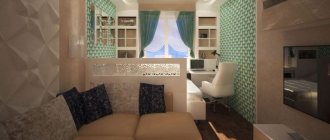
- when installing a plasterboard ceiling with horizontal waves, many people add different lighting to the levels, which improves the design of the room a hundredfold;
- due to the fact that plasterboard ceilings with horizontal waves are presented in different designs, you can create a unique picture in the interior of your own apartment or house;
- by installing plasterboard structures with waves on the ceilings, that is, under the plasterboard ceiling, hidden communications are often installed, such as electrical wiring, ventilation units;
Ceiling design option with vertical waves - It is necessary to decide on the question of whether a person makes vertical waves or horizontal ones at the stage of planning the repair of a plasterboard ceiling and creating a project. This nuance determines how much you need to prepare for the process and how much materials to purchase.
Wave height
Usually the difference in height between the 1st and 2nd ceiling levels is within 10-15 cm, rarely 20 cm, although there are no technical restrictions on the height of the wave, the main limiter is aesthetic perception. If you want to make a very voluminous ceiling, then in such cases they make waves in two, three or even four levels. But even if you make a wave 10-12 mm high, i.e. according to the thickness of the sheet, the ceiling will already become embossed. And if you sew 3-4 sheets at the transition point, then in addition to the difference in height between the ceiling levels of 30-50 mm, you can also get a rather complex shape of the wave end:
Figure 5 . General plan and cross-section of the ceiling with waves on 3 levels.
for apartments and houses with a small initial ceiling height, this solution may be optimal. In places where there will be waves, it is advisable to strengthen the main frame with additional profiles. The advantage of this option is that there is no need to sew up the end of the wave, there is no need to bend plasterboard sheets and, accordingly, there is no need to bother with making a rather complex frame for the waves. However, it will be quite difficult to properly putty such a ceiling. In all other cases, you need to make a special frame for the waves.
Required materials and tools
To install a plasterboard ceiling with waves, you must first purchase the following plasterboard tools and materials:
- Plasterboard sheets in the required quantity.
- Various types of profiles for drywall.
- Mixtures for priming and puttying plasterboard fixed to the frame.
- Water-based paint for finishing.
- A special pencil for marking the ceiling covering.
- Measuring tape, painting cord.
Scheme for installing a ceiling with horizontal waves - A hammer drill for high-quality fastening of the frame to the ceiling, gypsum board on top of the frame.
- A screwdriver is indispensable for high-quality fastening of metal profiles to the ceiling, for fixing gypsum boards to the frame.
- Scissors for metal. When a design that is different from the classics is planned for a suspended ceiling, special attention should be paid to the choice of this material.
- Spatulas and a brush will be needed for applying leveling mixtures and finishing work.
- Knife for cutting drywall. This tool must be selected with extreme care to ensure it is sharp and functional.
- It is best to take screws, spare drills, butterflies and other fasteners that will help carry out all the necessary manipulations above the ceiling with waves.
An example of attaching plasterboard to a ceiling with waves
Be sure to purchase all of the above materials in advance so that you do not encounter problems during the installation of the frame or fixing the gypsum board.
Drawing up a diagram of a two-level ceiling system
- Measure the length and height of the walls, check the corners.
- Focusing on the lowest angle, determine at what distance from the floor the lower level will be. The height of the box should not be so large that the entire structure looks bulky. When making calculations, be sure to take into account what communications will be behind the drywall. For electrical wiring, it is enough to leave 5 cm; for some types of lamps, pipes, ventilation ducts, a larger distance will be needed.
- Draw a sketch to scale by hand or on a computer.
- Draw up a drawing of the frame with the location of intersections and connections. The step between the elements of the guide profile is 30-40 cm, for the supporting profile - no more than 60 cm.
- Mark on the drawing the location of the electrical wiring, junction box, pipes, and fixtures.
Frame materials
To work you need:
1. Ceiling guide profile (UD) to create the perimeter of the sheathing. It is made of galvanized steel with a thickness of 0.4-0.7 mm. There is an option with already made mounting holes. This simplifies and speeds up the work, but does not affect reliability in any way. UD profile dimensions: length 3 or 4 m, width - 28 mm, height - 27 mm.
2. Support profile (CD) to create the base of the frame. It is inserted into the UD and secured with hangers. It holds up all the drywall. For its manufacture, the same material is used as for the guide. CD profile dimensions: length - 3 or 4 m, width - 60 mm, height - 27 mm.
We advise you to study - Which heat gun is better - an overview of types and popular models
3. Suspension. This is an element made of galvanized steel strip 0.9 mm thick. With its help, the lathing is additionally attached to the ceiling, preventing the profile from deflecting. The suspension is cut with metal scissors and then bent. Along the perimeter of this part there are protrusions that ensure reliability and rigidity of fixation. Dimensions: straight - 125x60x30 mm, folded - 60x27 mm.
4. Cross connector (crab). Designed for installation of its secondary sections to the frame base. It has the shape of a cross and is equipped with four clamps.
5. Pre-compressed sealing tape (PSUL). This is a self-adhesive material made of gray or black polyurethane foam in the form of a strip, impregnated with a neoprene composition. It goes on sale rolled into a roller. The gray tape has better characteristics. After placing the PSUL in the seam, it expands independently and fills cavities and gaps, which increases reliability. Many builders do not use tape, citing the fact that it is not necessary. But professionals advise not to skimp on this addition, since PSUL dampens shocks, sounds, and increases mechanical strength.
6. Dowels for fastening profiles and hangers to walls and ceilings. They are selected for the base to which the sheathing of the plasterboard structure will be mounted.
7. Self-tapping screws for the profile. To connect the guides and load-bearing parts together, screws of the bug type with a cross slot for a PH-2 bit are used. They also attach the profile to the hangers.
The profile is easy to cut, which allows you to create curved elements from it. To do this, the whip is cut through equal sections and bent along the required radius. It is possible to manufacture a ceiling frame from gypsum plasterboard from dry wooden beams measuring 50x30 mm. The only advantage of wood construction is environmental friendliness. Timber is more expensive than a metal profile, less durable, and requires processing before installation. All products are purchased with a reserve.
Choosing drywall
GKL is commonly called dry plaster. This is a construction and finishing material consisting of a gypsum core, lined on both sides with thick cardboard. The properties of the sheet allow it to be bent and cut, creating shapes of any shape, including curved ones. Antifungal components can be added as a supplement.
| Sign | Ordinary | Moisture resistant | Fire resistant | Moisture-resistant |
| Marking | GKL | GKLV | GKLO | GKLVO |
| Color | grey | green | pink | green |
| Marking color | blue | blue | red | red |
Fire-resistant and moisture-resistant sheets can withstand direct exposure to an open flame from 25 to 60 minutes. If there are no high fire safety requirements for the premises, then conventional gypsum board is suitable in almost all cases. For the kitchen it is better to choose GKLV or GKLVO.
Drywall has the shape of a rectangle. Standard sizes:
- thickness - 6-24 mm;
- length - 2500-4800 mm;
- width - 1200 mm, for slabs with a thickness of 24 mm - 600.
Sheets up to 9.5 mm thick are suitable for ceilings. They weigh less, which makes installation and the system as a whole easier. Special arched gypsum board is particularly flexible and allows you to create structures with bends.
Sequence of actions
In order to independently carry out the process of creating a plasterboard ceiling, you should clearly understand the sequence in which to carry out the work. It is as follows:
- Applying markings to the ceiling surface.
- Assembling the first level of the ceiling.
- Assembly of the second level of a multi-level plasterboard ceiling.
- Installation of lighting fixtures.
- Covering the surface with plasterboard.
- Finishing plasterboard walls and finishing work.
Be sure to carry out actions in the correct order. Detailed video instructions for installing a wave plasterboard ceiling.
Peculiarities
Now designers, developers and homeowners do not want to think in the same way and in a standard way. We want to surround ourselves with an unusual interior, and multi-level ceilings in the form of geometric shapes help a lot in this. And if the first such plasterboard structures look boring and angular, now there are technologies that make it possible to make the ceiling sophisticated and elegant.
Curved ceilings are classified as stretch and suspended ceiling systems. Their main feature is the ability to create unique figures based on a two- or three-level design. A system of several levels and a selected figure is created on a frame of the desired shape by covering it with plasterboard.
A system of several levels and a selected figure is created on a frame of the desired shape by covering it with plasterboard
The originality of such a ceiling is one of its main advantages. But besides this, there are other advantages.
Advantages
- Drywall is a very easy-to-use and inexpensive material. It is easy to maintain, practical, which means that such a ceiling will not cause you inconvenience in the future.
- A multi-level plasterboard ceiling makes it easy and quick to install lighting. You can choose several types of lighting fixtures, even in different styles.
- The installation of a figured multi-level ceiling allows you to visually increase the space of the room and its height. In addition, you can easily divide the room into functional zones.
- Plasterboard slabs will save you from the need to make serious surface repairs. You do not need to carefully level and putty the ceiling, sealing cracks and irregularities - drywall will hide all imperfections. In addition, it can be given any color by covering it with wallpaper or painting it.
- Under a multi-level plasterboard structure you can easily hide various communications - electrical wiring and ventilation pipes, for example. Thanks to the ease of working with the material, this will not be difficult even for a beginner.
Please note: if your house or apartment has low ceilings, installing a multi-level shaped structure is not advisable. Drywall itself is thick, and taking into account the difference in levels, such a ceiling can lead to significant losses in height.
Flaws
- Final mass. Drywall is a fairly heavy material, and one square meter of such a finished ceiling can weigh up to 20 kg. Therefore, during installation you need to pay special attention to the correct fastening.
- Drywall is very unstable to flooding. The material absorbs moisture, causing it to become severely deformed. If this happens, the figured ceiling must be completely repaired.
- After final repairs, the plasterboard ceiling structure must not be disassembled under any circumstances. Therefore, it is necessary in advance, before starting work, to accurately determine the installation of all electrical communications and the installation locations of lighting fixtures.
Surface marking
The most decisive thing in the process of installing a plasterboard ceiling with waves is the correct application of markings to the surface. The success of further installations depends on the accuracy of this action. Marking is carried out in two stages:
- first it is done on the inner surface, that is, marks are made on the ceiling itself and the height of the second level is noted;
- the second stage is carried out when the first level of plasterboard has already been fixed to the ceiling.
Features of marking
- Curvilinear figures are made up of arcs. In this case, the circumference of each wave can be drawn on the surface of the ceiling with a special pencil. It is best to make a project for the future ceiling in a special program. You can draw a detailed plan with your own hands, taking into account all the parameters, clearly displaying every centimeter of the future structure on the sheet;
Scheme for marking a curved ceiling - It is important to determine at which points the wave will be recorded. This will help make the most accurate markings indicating points of contact. And this is very important so that the ceiling after finishing work has an aesthetic appearance and becomes a worthy means for transforming the interior design;
- It is important to correctly mark not only on the ceiling itself, but also on the gypsum board. This procedure is not difficult to carry out. It is necessary to correctly calculate the diameter and, using a compass or other available means, draw circles on the plasterboard;
- It is very important to clearly mark the ceiling, and also to correctly cut the first level. The second level should be ideally combined with the plasterboard sheet that is located on the surface of the ceiling;
- It is most convenient to make markings on a flat surface, usually this surface is a table;
Drawing with dimensions for installing a ceiling with waves - Thin plywood can be a handy tool that will help you draw the most accurate wave bends on the gypsum board. A waveform is drawn on it, then transferred across the drywall;
- Having experience in such work, you can cut out shapes from plasterboard sheets by eye. In this option, you may encounter difficulties in the form of uneven surfaces, which can be leveled using a jigsaw or ceiling putty, depending on the visibility of the flaws.
How to make a wave from plasterboard on the ceiling?
Drywall, which has recently gained great popularity in construction and finishing work, offers the widest scope for design ideas. For example, a wave made of this material on the wall can visually divide a room into zones and make it possible to arrange them differently. There are many options.
Layout diagram of a plasterboard sheet.
An interesting solution could be to perform various geometric shapes on the ceiling or wall.
A wave of plasterboard will help make the design of the room unique and memorable.
This will leave room to mount hidden lamps or hide ventilation and wiring. This type of ceiling is more difficult to install than a single-level ceiling, but the result justifies the effort.
To make a wave, you will need the following tools and materials:
Types of profiles for drywall.
- GKL;
- pencil;
- self-tapping screws;
- yardstick;
- a thread;
- sheets of cardboard;
- nails;
- guide profile;
- drill-perforator with a set of drills and drills;
- drywall knife;
- metal scissors;
- screws;
- screwdriver;
- primer and brush;
- putty and spatula;
- safety glasses;
- water-based paint.
Marking
An example of marking a ceiling under a wave of plasterboard.
Creating a wave implies the presence of two levels that have a noticeable transition in height relative to each other. Installation must begin by marking the pattern of the future wave on the ceiling. Ideally, it is better to do the markup twice:
- On the ceiling. Placing the future height difference will make it possible to more accurately calculate the placement of profiles and sheets of the first ceiling level.
- On first level sheets. A profile will be attached to them, forming a curved surface.
Marking can be done in various ways. A curved surface can be composed of arcs. In order to draw them, you can use any homemade compass. The simplest option is a section of profile secured with a self-tapping screw with a pencil attached. Or you can use a combination of a ceiling screw, a pencil and a string. The stretched cord will be the radius of the marked circle. Then the arcs are connected by straight lines. Now you can proceed to installing the profile.
You can apply markings point by point. This method is used in large areas when marking waves with a very large radius. In this case, dozens of points are marked, which are then connected by a smooth line.
You can use a template. It is much more convenient to mark on the floor. To create a template, we again use a compass, a steel m or a piece of profile and a sheet of cardboard as material for the template. In this case, the line of the future wave can be drawn twice: on the ceiling and on the ceiling of the first level. Markings are often done by eye. It was originally intended that the wave would have an asymmetrical shape. Therefore, you can draw an arbitrary curve by hand, and then eliminate inevitable flaws with putty.
The average height of the difference between waves is 10-15 cm. With a larger difference, vertical surfaces can be used to place additional lamps, but not everywhere the height of the room allows this. The minimum height of the difference is 10-12 mm. It is performed by sewing two or more sheets of drywall onto each other. Even such an insignificant difference can make the ceiling look voluminous.
Basic Operations
Installation of a suspended ceiling made of plasterboard.
Traditionally, the first level frame is made. A small subtlety: where the wave will pass, ceiling profiles for plasterboard are mounted more often than usual, at a distance of no more than 40 cm from each other. A wave pattern previously applied to the ceiling will help you navigate. The outermost profile, which is located closest to the height difference boundary, is attached to the ceiling with suspensions more often than the others. It is best every 50 cm.
The first level sheets are filed. They must extend beyond the wave line. Self-tapping screws are placed every 25 cm; next to the wave line at a distance of 15 cm.
A line is drawn on the ceiling of the first level, indicating the boundary of the wave. A bent profile is attached to it. To bend it, it is cut from the inside, and U-shaped slots are cut in the inner wall.
The profile is attached with self-tapping screws to the ceiling profiles of the first level. It is necessary to retreat a distance equal to the thickness of the drywall from the wave line, because the profile will need to be sewn up. Where there are no profiles, you can place pieces of fiberboard, plywood or profiles on top of the plasterboard sheet, which will prevent the screws from breaking out of the sheet and distribute the load evenly.
Next, the second level frame is mounted on the hangers. If the curved plasterboard ceiling is two-level, the distance between the profiles and hangers can be standard. If a third level is planned, then profiles should be mounted and secured with suspensions at the line of the next wave more often.
The ceiling is being hemmed. When cutting sheets, it is necessary to leave an extra 1-1.5 cm. It is advisable to make the final adjustment to size after the curved surface has been sewn.
On the ceiling of the second level, along the wave line, the lower profile is attached exactly under the upper one, without displacement. It is necessary to connect two profiles with vertical posts only when the curved plasterboard ceiling has a height difference of more than 20 cm or the edge of the wave is far from the nearest suspension.
Then the vertical surfaces are covered with plasterboard. For such surfaces, a special arched sheet 6.5 mm thick is used or a regular sheet is cut from the outside of the bend. The smaller the bending radius of the sheet, the more cuts there should be. When a plasterboard ceiling is installed, the wave can also have bends with a radius of 3-4 m. Then the sheet is well moistened with water and after a few hours it is fastened tension-free, without cuts.
Finally, the ceiling is plastered. You can use acrylic and gypsum putties. When they are completely dry, you can start painting the surface. Good luck with the renovation!
Assembling the first level frame
The first level of a plasterboard ceiling in waves requires effort and clarity. To carry out the mission, you will need guide profiles, ceiling beams of profiles, as well as additional suspensions and profiles, the need for which is calculated depending on the design parameters.
Before attaching the frame, markings are applied. Installation of the first-level frame is carried out according to the scheme of a single-level ceiling covering.
Nuances and features
- It is worth understanding that ceiling profiles installed under plasterboard surfaces in waves should be placed on the surface more often than in a situation where the ceiling design is carried out in the “classic” style. The distance between ceiling metal profiles should be no more than forty centimeters.
- Profiles (suspensions) that are located in places where there are differences in level heights must be installed at a distance of no more than 50 cm from each other.
- The first level gypsum board should be fixed with screws located at a distance of 25 cm from each other. In places where there is a wave, screws are screwed in at a distance of 15 cm.
- Metal profiles should be fixed clearly, adhering to the smallest details. Only in this way will the frame withstand the load of the plasterboard and the fasteners that secure it.
Step-by-step installation of a gypsum board ceiling
The building material is economical and reliable; it can be used to create single-level, two-level, and complex ceiling structures. It allows you to implement any design solutions. Many people choose plasterboard ceilings for their abode. At the same time, some of them use the services of specialists, others build the structure with their own hands. But it will be useful for all of them to familiarize themselves with the step-by-step instructions, reflecting all the moments and subtleties of finishing.
How to prepare the ceiling
Before installation begins, preparatory work is carried out in the room, which includes the following steps:
- Cleaning the room. It is necessary to remove all furniture from it, remove curtain rods, and household items that interfere with events.
- If available, the old finish is removed from the ceiling and the surface is cleaned of stains.
- The joints of the slabs and cracks are covered with a layer of putty, after which the entire surface is covered with a primer, which contains antiseptics.
- After the primer has dried, turn off the power to the room and begin work on installing the frame.
Equipment and materials
Any work begins with preparing the tools used to complete it, counting and purchasing the necessary materials. After all, if there is a lack of consumables, a pencil, or a level at hand, the work will have to be interrupted in search of the missing component. So, to carry out the activity you will need:
- hammer drill, screwdriver, jigsaw;
- measuring instruments (tape measure, level), pencil, marker;
- hammer, metal scissors, construction knife;
- consumables, screws, dowels, anchors;
- main guide ceiling profiles;
- hangers, connectors;
- heat-insulating, waterproofing, sound-proofing building materials;
- sealing tapes;
- gypsum board sheets;
- Decoration Materials.
Marking the ceiling and assembling the frame
The work begins by determining the lowest angle in the room. A laser level is ideal for this; if you don’t have one, use a regular tape measure. The first mark is placed at this point. Depending on the presence of built-in lighting elements, the distance from the ceiling will be 5 mm if they are absent, 9 mm when placed.
Points in other corners located at the same height are marked by level. After that, a level in the form of a string is pulled between the marks, or a line is drawn connecting all the marked points. Next, according to the markings, the UD guide profile is installed. To do this, use a drill to drill holes into which dowels are driven. The joining seams are further strengthened; a piece of tin or plywood is inserted between the two profiles on either side of the joint.
After installing and securing the guide profile, proceed to the installation of the main one. Considering the dimensions of a standard gypsum board sheet of 1.2 x 2.5 m, markings on the ceiling should be made in parallel lines with a step of 40 cm, perpendicular - 250 mm. This will allow you to secure each edge of the sheet. When crossing, the joints of the main profiles are connected to each other by crabs.
The next step is to secure the hangers. They are connected to the ceiling using anchors. The distance between hanging fasteners is made within 50-60 cm. The first one is installed, retreating 25 cm from the wall. After connecting the hangers with the profile, a finished frame is obtained.
Insulation - which one to choose and why it is needed
The construction market offers a huge range of plasterboard sheets. They have an additional layer of insulation, such as a standard sheet of foam. Products are protected from moisture and fire. Multilayer partitions themselves become a soundproofing layer.
Depending on the floor material, insulation suitable for a particular structure is selected. If you take a wooden ceiling, then you cannot do without a layer of vapor and waterproofing. Moisture penetrating through the gaps can lead to rotting of the wooden, profile frame, and swelling of drywall.
For concrete slabs and monolithic floors, additional thermal insulation is required. Most often, mineral wool and polystyrene foam are chosen. Empty areas of the frame are filled with insulation. This takes into account the presence of built-in lighting lamps. Overheating of the wiring may cause a fire.
If necessary, additional sound insulation can be installed. Mineral wool, slabs, polyurethane foam, cork, coconut fiber, and others are used as such protection.
Electrical wiring
Installation of electrical wiring begins with the development of a diagram where all the key elements are indicated, from the distribution box to each switch and light bulb. The work is carried out before the installation of drywall sheets.
After laying the cable from the junction box to the electrical points, the wires are connected to the end element, if one has not yet been installed, the contacts are insulated. The connection of the cores is carried out only through terminal blocks. It is forbidden to lay wires in bundles near metal pipes.
Covering the frame with plasterboard slabs
The building material is sensitive to changes in humidity and temperature fluctuations. Therefore, it must be brought into the room where it will be installed and given a couple of days to adapt. Afterwards you can start covering. Installation begins with installing the sheet in one of the corners. Having retreated 10 cm from the beginning of the profile, the first screw is screwed in, the distance between them is 20 cm.
The head of the screw is recessed into the sheet. On panels running parallel to each other, the screws should not be on the same vertical line.
Next, the subsequent sheets are attached, with each edge being screwed to the frame. For places where a solid panel does not fit, the sheets are cut off.
Ceiling finishing
Having completed the main work, they begin the finishing work. The first thing you need to do is level the resulting plane. To do this, joints and gaps are puttied and the surface is primed. The following materials are chosen for decorative finishing:
- Water-based paint. It is resistant to moisture, does not wipe off, and has no odor. For small surface defects left after puttying, use a matte base to mask them. Glossy paint, on the contrary, will highlight all the roughness.
- Wallpaper. Classic option. The choice is unlimited, depending on the preferences of the owner. Their shade should be taken into account. Light colors will visually increase the height, dark colors will reduce it.
- Plaster. You should choose acrylic-based raw materials. You can choose any type of plaster (thin, small, medium texture, coarse). At the same time, take into account the fact that thin fillers are not able to disguise an uneven surface.
- Tile. The materials mainly used are polystyrene and polyurethane. Ceramic products are rarely used and require additional surface treatment and a reinforced frame.
Combined ceilings look very interesting. For example, a combination of a tensile structure with a plasterboard curtain.
Assembling the second level frame
When the gypsum board is fixed at the first level, proceed to the second level. To do this, aluminum profiles with bent ends are fixed along the contours of the first level. The process is carried out by cutting U-shaped elements on the inside of the first level, through which curved aluminum elements are threaded. A second-level sheet of drywall is installed on these protrusions.
Example of ceiling cladding with horizontal waves using plasterboard
Nuances and features
- the frame of the second level is attached with self-tapping screws for the profile, through a through line through the gypsum board of the first level;
- in order for the second level to be symmetrical and of the correct shape, it is necessary to attach spring hangers to the fixed metal profile of the second level;
- When the metal profiles of the second level are fixed, you can begin installing the gypsum boards and installing the backlight.
Waveform
A ceiling with a wave usually means a two- or three-level ceiling with a difference in height in the form of a curved or broken line. From a geometric point of view, this line is formed by adjacent circles of different diameters. This line can also be considered as a broken line, consisting of a certain number of straight segments of different lengths, the angle between such segments is always greater than a straight line, or, more simply, obtuse, and the more such segments and their shorter length, the more the angle between the segments approaches 180°. For example, there was a strong desire to make a suspended ceiling from plasterboard approximately like this:
Picture 1 . Possible diagram of a suspended plasterboard ceiling with waves.
When installing the ceiling, you can draw a line on the main ceiling and on the ceiling of the first level, indicating the wave relative to which the frame of the second level will be attached, in different ways:
1.1. Using a compass
In this case, the line is considered as a curve formed by adjacent circles:
Figure 2 . A wave on the ceiling made of adjacent circles.
As can be seen from Figure 2, in order to obtain the wave shown in Figure 1, it is necessary to draw parts of at least 5 circles on the main ceiling, on the first level of the ceiling and on the sheets of drywall hemmed to the second level. The advantage of this method is that having a ceiling plan, you can calculate the diameters of the circles and the position of the centers of the circles, shown in the figure in blue for a small wave and in red for a large wave, with an accuracy of a millimeter. This can be done in almost any graphic editor that displays the dimensions of geometric shapes. First, a ceiling plan is drawn, and the size of the rectangle indicating the ceiling should be proportional to the size of the designed ceiling. Then a waveform that suits you is selected, indicated by a thick line in Figure 2, after which circles of the required diameter are selected using the approximation method. Those. First, a circle is drawn and substituted for the wave. If the circle touches the wave at two points, but does not touch in the middle, then you need to increase or decrease the diameter of the circle so that the circle touches the wave at three points. Once the circles of the required diameter have been selected, it is not difficult to determine this same diameter and the centers of the circles in a graphic editor. The disadvantage of this method is that the ceilings on which the waves are made are usually not small and an ordinary compass from a drawing room will not help here, so you will have to make the compass yourself.
There are also many options for making a compass; the simplest is to make a compass from a guide profile. All you need for this is a guide profile of the appropriate length, a drill, a simple pencil and tape. Such a compass will look something like this:
Figure 3 . Homemade compass from a guide profile.
As you can see from Figure 3, all you need to do is drill a hole at the end of the profile for a self-tapping screw to screw the compass to the plasterboard sheet, screw the compass to the plasterboard sheet with a self-tapping screw, and secure a simple pencil to the profile with electrical tape or tape at the required distance from the self-tapping screw. True, if you have a certain skill, you don’t need to fasten the pencil; it’s enough to put it in the desired position and hold it tightly when drawing circles. The distance from the screw to the tip of the pencil is the radius of the circle. The easiest way is to mark sheets on a desktop or on the floor; for plasterboard sheets hemmed to the second level of the ceiling, this is an acceptable option. But it is better to draw a line on the ceiling after the first level of the ceiling is installed, since when installing sheets with an already drawn wave, the drawing may shift due to installation errors. This is another drawback of this method, since drawing circles on the ceiling with a compass is not very convenient. And not all circles can be drawn on the ceiling. So, for example, in Figure 2 the center of a circle is shown in dark blue, which cannot be drawn on the ceiling for the simple reason that the center of the circle is located outside the ceiling. In such cases, other methods are used to apply the wave outline to the ceiling:
1.2. Point by hand
In this case, you also cannot do without a ceiling plan; it will allow you to accurately determine the coordinates of points along the x and y :
Installing the backlight
When it comes to a multi-level curved structure, you need to think about the options for lighting a plasterboard ceiling in advance. Lighting fixtures are installed in advance, before the ceiling structure takes on its final appearance. Special sockets are fixed to the first level of the ceiling, into which LED strips are placed or spotlights are installed. The placement of lighting fixtures needs to be thought out in advance. After all, this directly determines how best to install metal profiles that fold into a frame, as well as how best to cut drywall.
An example of installing lighting on a ceiling with waves
Lighting and ceiling lighting
Lighting for plasterboard ceilings is very diverse. You can use regular chandeliers, modern LEDs and fashionable decorative lighting.
There are several classic ways of arranging lamps: along the perimeter of a plasterboard structure, taking into account the zoning of space, and placing design accents in the interior.
Spotlights
Spotlights are ideal for suspended plasterboard structures. They are convenient for zoning, provide light of different brightness and intensity, and differ in shape and configuration. They also come in rotating and non-rotating types, open or with protective glass. You can assemble a complex system of several groups of lamps: for different zones of the room or for different lighting intensities. There is no need to increase the height of the box for installation. For compact light bulbs, 3-6 cm is enough.
To visually lengthen a room, place small spotlights in even rows. And for interesting artistic solutions - complex curvilinear forms.
Another advantage is ease of installation. Cut out the sockets using a special drill bit, secure the wire strands to the terminals and insert the lamp into the socket.
Pendant lamps
You can install regular chandeliers and other pendant lights on plasterboard ceilings in the same way. But here you have to take into account the fragility of the sheets.
There are two options! Attach them not to drywall, but to profiles and frame elements. To do this, think about the location of the lamps in advance. Or choose only light lamps and attach them to plasterboard sheets with butterfly dowels. They redistribute the load over a larger area.
If the chandelier is too massive, you will have to screw it directly to the concrete ceiling using special extension pins.
LED strips
LED strips are a stylish and fashionable option for modern interiors. They come in a variety of colors and dynamic effects. You can not only adjust the lighting, but also create a full-fledged light music.
An alternative to tape is duralight. This is a flexible luminous cord made of colorless plastic with light bulbs inside. But this is more of a decorative solution, because the light from it is beautiful, but not powerful enough.
Hidden backlight
Lamps hidden in multi-level plasterboard structures create the effect of illumination from within. Basically, LEDs are also used for this.
The tape is laid in a niche along the perimeter of the structure. Lay it on the top tier and at the same level. The optimal niche height for uniform light distribution is 15 cm.
Drywall arches (100 photos): design ideas
Fastening plasterboard sheets
When the lighting communications are installed, you can begin fixing the second-level plasterboard sheets.
Nuances and features
- It should be noted that in the sheets of drywall that will be fixed on the second level, it is necessary to make cuts through which the lighting fixtures will be installed;
- You don't have to cut out the perfect shape, just choose the right size. Defects in cut parts can be easily hidden with the help of special clamps that will hold the lamps in the desired position;
- Drywall should be fixed with screws at a distance of no more than 15 centimeters. In places where a bend is made, the sheet needs to be fixed more tightly.
Sequence of a ceiling with waves
4.1. First level frame
First, a frame is made for the first level of the ceiling, while in places where the wave will pass, hangers for the ceiling profiles are placed more often than usual. It is advisable to make the distance between the axes of the ceiling profiles in places where the waves pass no more than 40 cm:
Figure 6 . Frame installation diagram for the first level of ceiling with waves
In Figure 6, guide profiles are indicated in blue, ceiling profiles in beige, additional profiles installed at the transverse joints of plasterboard sheets in purple, hangers for ceiling profiles in red. As can be seen from Figure 6, the starting point for installing the frame is the ceiling profile, highlighted in orange in the figure; it is this that needs to be attached to the main ceiling with suspensions as often as possible. Figure 6 shows the fastening of the suspension every 50 cm. Before making the frame of the first level, it is advisable to apply the contours of the wave, indicated in Figure 6 with a black line, to the main ceiling. The principles of marking under the frame and the rules for installing a metal frame under the first level of the ceiling are the same as for a simple single-level plasterboard ceiling.
4.2. First level gypsum board filing
Unlike a simple single-level ceiling, plasterboard sheets on the first level of the ceiling are attached not from the wall, but from the starting profile, indicated in orange in Figure 6. The sequence of filing sheets can be any, for example, this:
Figure 7 . The sequence of fastening plasterboard sheets of the first level.
Finishing
When all the sheets are fixed, you should begin to putty and finish the surface. Putty needs to be treated with special care. The gypsum board coating must be perfectly smooth, without depressions or gaps.
Option for finishing a plasterboard ceiling with a wave in the bathroom
On top of the treated gypsum board you can apply paint to the ceiling or wallpaper. When it comes to the ceiling, paint is most often used as a finishing coat.
Tools and materials required for work
Before we begin the preparatory stage, we will provide ourselves with everything necessary for work. The list will turn out to be voluminous, but it’s better to have some left over than to not have an important detail at hand at a crucial moment. So, you need to purchase:
- plasterboard with a thickness of 6 to 12.5 mm, depending on the desired result;
- metal ceiling profiles CD;
- UD guide profiles;
- self-tapping screws;
- profile extensions;
- putty;
- connectors;
- anchor wedges;
- pendants;
- dowel-nails;
- reinforcing paper;
- photographs of finished figured plasterboard ceilings.
To work you will need a number of necessary tools
For installation work you will need the following tools:
- rule;
- level;
- perforator;
- roulette;
- screwdriver;
- cutter;
- plane;
- spatulas;
- square;
- construction knife;
- grinding device.
In order to accurately calculate the amount of materials needed, you need to decide on the design of the future ceiling. The easiest way is to look at photographs of figured plasterboard ceilings on the Internet or in specialized magazines. You can turn to professional designers or try to develop the design yourself. In the latter case, you will need skills in working with special computer programs.
Once you have decided on the design, you can begin designing and marking the ceiling. First of all, you need to create a sketch of the structure on paper, and then transfer it to the work surface.
Photo selection of plasterboard ceilings decorated with waves
general characteristics
Advantages of two-level gypsum board ceilings:
- the room maintains an optimal microclimate for residents with the required level of humidity;
- GKL material, profiles do not burn;
- the sheets used, the profile is environmentally friendly, do not contain toxic compounds;
- the design is “breathable”, which provides comfortable living conditions.
kitchen bathroom
- GCR is a standard material, painted gray. Suitable for dry rooms.
- GKLV - sheets with a moisture-resistant green coating for finishing rooms with changes in humidity and other microclimate fluctuations.
- GKLO - pink and gray slabs with additional resistance to high temperatures and flames. They are used for finishing rooms where there is a high level of fire hazard.
- GKLVO - sheets of plasterboard, which are produced in green color and have increased resistance to fire and moisture, are used for cladding surfaces in rooms with increased fire hazard and humidity.
- thickness, which is 9.5 mm;
- type of edge on the larger side of the sheet - rounded, round, thinned or straight;
- dimensions - up to 1.2 m wide and no more than 2.5 m in length.
Attention GKL dimensions for mass production are standardized, but may vary in case of special order