You can use different materials to decorate the ceiling, but PVC panels are the most practical, accessible and easy to install.
Any home craftsman can make a ceiling from PVC panels with his own hands; to do this, you need to purchase or rent the necessary tools, study the installation sequence and recommendations of specialists.
In order to independently install a ceiling made of plastic PVC panels, you first need to correctly calculate their number and the required length, figure out how to install the supporting structure and the panels themselves, after which you can begin to carry out the work.
Length Determination
Before you start calculating the amount of materials needed, you need to decide which PVC panels you will use, since they have different sizes. When purchasing, make sure that the panels are ceiling panels and not wall panels. Since they are not subjected to serious loads on the ceiling, their strength will be less, and the cost will be correspondingly lower.
Standard sizes of ceiling panels will be as follows:
- thickness within 3-5 mm;
- width from 125 to 350 mm;
- length is usually from 2.7 m to 6 and even 10 m.
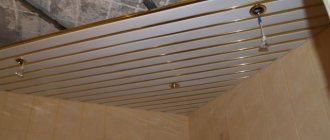
Ceiling in the bathroom
A parameter such as the width of the material is of great importance. If you cover the ceiling with wide panels, there will be fewer seams, so the surface will look more seamless. Narrow panels have their advantages: they are much easier to work with, but they result in a large number of seams. Experts recommend using medium-width material for finishing the ceiling, so it should be 250 mm.
When you decide on the length and width of the panels, be sure to pay attention to the quality of their manufacture. When choosing a material, pay attention to the following characteristics:
- the geometry of the products must be observed, and their surface must be even and smooth;
- if there is a pattern, it must be applied clearly and evenly;
- The stiffening ribs should not be visible on the front side;
- compare several types of panels, the more stiffeners they have, the stronger the structure;
- pay attention to such characteristics as the thickness of the stiffeners and external walls;
- try to connect two parts, the joining should be easy, and the gap should be minimal, almost imperceptible;
- check the material for bending, it should not crack or change its shape.
Harmful or not
There are conflicting opinions about whether a PVC panel ceiling is harmful when used in places where people are predominantly present. Moving away from the subjectivity of assessments, we can state:
- Today, plastic is used everywhere in everyday life - from packaging goods to kitchen utensils. In the production of panels, raw materials used for medical and food products are used, which undergo mandatory certification.
- The structure of the product has no pores. Bacteria and microorganisms do not have conditions for cultivation. That is why the Sanitary and Epidemiological Service recommends panels for use in the buildings of the Ministry of Health and other institutions with large public visits.
- Plastic is easily kept clean using simple household products. At the same time, user properties and aesthetic qualities are not lost.
- The combustion temperature of PVC used for the production of panels is 360°C. At the same time, chipboard, fiberboard, and OSB, which are often used for repair, begin the combustion process at 250°C. The smoke emission of the latter is 40-50% higher.
- The plastic ceiling “does not breathe”, that is, it does not allow air to pass through, does not deform, and condensate is not removed. It is a fact. But all apartments and modern private houses are equipped with ventilation. The same applies to houses of old construction, where the owner is allocated space for bathrooms and sanitary facilities, if they were not provided for when the building was built. The issue of air exchange and humidity control is not resolved through the ceiling of the room.
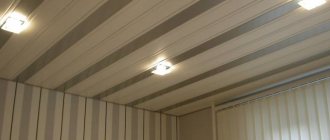
Plastic panels with backlight
Thus, the statement that the use of plastic panels destroys the microclimate of the room and is potentially dangerous for people to stay in has no basis.
Calculation of the number of panels for the ceiling
To calculate the number of PVC panels, you first need to determine the area of the room in which the ceiling will be finished. To determine the area of the ceiling, multiply its length by its width. The packaging of PVC panels must indicate the area of one element. All you have to do is divide the resulting ceiling area by the area of one element, and you will get the number of required panels.
When determining the number of panels, you usually get a fractional number, round it up, add 15-20%, which will be spent on cuts, and you get the number of panels you need to purchase. You need to focus on the length and width of the room, decide how the panels will be installed, lengthwise or crosswise, and, in accordance with this, select the required length of the elements.
Ceiling with LED lights
In addition to the required number of PVC panels, the number of metal profiles used for lathing is calculated. To do this, make a diagram of the room on paper and draw parallel lines along the wall at a distance of 0.6 mm from each other. Calculate and obtain the required length of the profiles.
The standard length of a galvanized profile is 3 m, so the resulting length is divided by 3 and the number of profiles is obtained. If the room area is more than 6 m2, then transverse strips are also installed, the number of which is calculated separately, in accordance with their installation diagram.
Ceiling finishing option
A more rigid profile is installed on the walls along the perimeter; to determine its quantity, it is necessary to calculate the perimeter of the ceiling. Calculations are being carried out for dowels for attaching profiles to the ceiling and self-tapping screws with which PVC panels are attached to the sheathing. For every 50 cm of profile or panel you will need one dowel or self-tapping screw.
To determine the length of the ceiling plinth, you need to divide the resulting perimeter of the room by 3 (the length of the plinth), round it up to a larger integer, and you will get the required number of elements.
Instead of a galvanized profile and self-tapping screws, when creating sheathing in a room with normal humidity, you can use wooden elements and staples.
Advantages and disadvantages
The use of plastic panels for ceiling finishing has a number of advantages. Let's note the main ones.
- Ceiling installation, including cutting and fastening, is simple. This will take a little time, but the result will please you with its aesthetic appearance.
- You don’t have to turn to specialists: you can do the work yourself without unnecessary debris or preliminary preparation of the base.
- Plastic panels have a reasonable price. Anyone can buy them: it won’t hit the planned budget.
- Plastic ceiling panels are available in a wide range of colors. You can choose varieties in any color and pattern, choosing between a variety of textures and color contrasts.
- Plastic panels can become a bright accent of any design. They fit well into the interior of classical, modern, ethnic, environmental and vintage styles.
- They are easy to transport. You don't have to worry that it will break during transportation.
- They are available to everyone. You can buy them at any hardware store, choosing according to your own taste. If desired, you can decorate the ceiling with fragments of contrasting shades. This will bring freshness to the design and emphasize the individuality of a particular room.
- The plastic trim comes in standard sizes. Cladding allows you to make the ceiling smooth, without defects, with little labor costs.
- Plastic ceiling panels are easy to clean. You won’t have to scrub away dust, dirt and soot for a long time. The surface does not absorb dirt; it can be removed with a damp cloth or semi-dry sponge.
- The ceiling covering can withstand temperature changes. Plastic does not deform from moisture, it is protected from soot and fumes.
- If one of the elements breaks, it can be replaced. This is easy to do and you don't have to start from scratch.
- This coating hides all the imperfections of the base, which is not the case with whitewashing and painting.
- This facing material can be an independent decoration of the ceiling or its bright center. It goes well with other finishes, so you can create a unique design in the style you want.
Due to its high-quality performance characteristics, it can be used in different living rooms and utility rooms. You can decorate the ceiling of a bathroom, toilet, kitchen, or dining room with this material. You can use it to add a bright accent to the interior of your living room, study, home library, or decorate the ceiling of a glazed loggia or balcony.
With a thorough choice of material and texture, they will look harmonious in the interior of a city apartment or wooden house, as well as in a country house. Despite its apparent simplicity, it allows the installation of two-level ceilings. If the need arises, it can be dismantled and reinstalled. The technology allows the installation of insulation between plastic panels and the ceiling.
The use of plastic panels for the ceiling allows you to visually play up the design features of the premises. For example, they can be used to zone space. By choosing such decor, you can unobtrusively highlight one of the functional areas of the room.
Installation of ceilings made of PVC panels
Regardless of the material used to create the frame, the markings are done the same way. Typically, the distance between the profiles is 60 cm; marks are made on the ceiling across the direction of laying the panels on opposite sides, and markings are applied using a tapping cord.
Ceiling installation
If the frame will not be attached to the ceiling surface, but on suspensions, then the line marked on the walls around the perimeter of the room is lowered to the required distance. In addition, marks are made on the marked lines for the profiles every 50-70 cm for attaching hangers.
Load-bearing structure
If the PVC ceiling is lowered, then first hangers are fixed at the marked points, this is done using dowels. At the next stage, a metal profile is attached to the wall along the perimeter of the room. First, it is installed on the marked line, then holes are made in the wall at a distance of 30-40 cm, they are made through the profile and immediately fixed with dowels.
Now the ends of the profile cut to length are inserted into the wall profile, and it is fixed with self-tapping screws to the hangers; for the reliability of the structure, this must be done on both sides of each hanger. After this, the ends of each element are fixed with self-tapping screws.
Headlining
After installing the frame, electrical wiring is carried out; for this, corrugated pipes are attached to the hangers, and the cable is laid in them.
If the area of the room is more than 6 square meters, then transverse jumpers must be installed between the longitudinal load-bearing profiles, which are needed to enhance the rigidity of the structure.
Ceiling cladding with PVC panels
Regardless of what material was used to create the frame, the installation of PVC panels is carried out according to the same scheme. Please note that working with wood is easier, but metal elements are lighter and more durable.
Installation of PVC panels is carried out in the following order:
- a starting strip is mounted around the perimeter of the room on the installed profile;
- if you plan to install a ceiling plinth, then a special rail is installed for it;
- after this, the ceiling plinth is installed;
- the first panel is inserted into the gap on the plinth or starting strip, which is U-shaped;
- the first element is aligned and fixed with screws or staples to each supporting profile;
- the next panel with its tenon should fit tightly into the groove of the previous one, the parts should be tightly connected so that the gap between them is minimal;
- after this, the panel is fixed, and all subsequent elements are mounted in this way;
- in those places where the lamps will be installed, holes are first made in the panels, and during installation the cable is routed through them;
- the last panel is inserted into the groove of the previous one. If its width is large, then you have to trim it to the required parameters;
- near the wall, the panel can be fixed through and through with self-tapping screws, since they will then be hidden under the baseboard;
- All that remains is to install the ceiling plinth, which will close the gap between the wall and the suspended ceiling;
- Spotlights are installed and connected to ready-made locations.
Advice from experts when finishing the ceiling with PVC panels:
- in order to prevent the growth of fungus and mold, the surface of the panels, as well as all wooden elements, must be treated with special means before installation;
- even if the ceiling is flat, you cannot glue plastic panels to concrete, as there will be no ventilation;
- buy only high-quality material, an attempt to save money by purchasing cheap materials leads to the fact that they quickly lose color and shape and can release harmful substances;
- Before installing the panels, be sure to do the electrical wiring and check its functionality;
- in rooms with high humidity, you cannot make a frame from wooden elements.
Briefly about the main thing
Plastic for the ceiling in the form of long panels is an opportunity to quickly and efficiently finish the ceiling. This material meets all sanitary and hygienic standards.
This material is divided into ceiling material with a thickness of up to 8 mm and wall material with a thickness of 9-12 mm.
On sale there are plain models and with patterns, coated with a special varnish and without it.
The panels are connected to each other using a tongue-and-groove lock.
There are two installation technologies: frame and frameless. The first is a frame made of galvanized or plastic profiles; you can use wooden blocks. The panels are attached to it with self-tapping screws. The second is the emphasis on starting rails or ceiling plinths with additional fastenings to the base ceiling surface.
Read later