Harmful or not
There are conflicting opinions about whether a PVC panel ceiling is harmful when used in places where people are predominantly present. Moving away from the subjectivity of assessments, we can state:
- Today, plastic is used everywhere in everyday life - from packaging goods to kitchen utensils. In the production of panels, raw materials used for medical and food products are used, which undergo mandatory certification.
- The structure of the product has no pores. Bacteria and microorganisms do not have conditions for cultivation. That is why the Sanitary and Epidemiological Service recommends panels for use in the buildings of the Ministry of Health and other institutions with large public visits.
- Plastic is easily kept clean using simple household products. At the same time, user properties and aesthetic qualities are not lost.
- The combustion temperature of PVC used for the production of panels is 360°C. At the same time, chipboard, fiberboard, and OSB, which are often used for repair, begin the combustion process at 250°C. The smoke emission of the latter is 40-50% higher.
- The plastic ceiling “does not breathe”, that is, it does not allow air to pass through, does not deform, and condensate is not removed. It is a fact. But all apartments and modern private houses are equipped with ventilation. The same applies to houses of old construction, where the owner is allocated space for bathrooms and sanitary facilities, if they were not provided for when the building was built. The issue of air exchange and humidity control is not resolved through the ceiling of the room.
Plastic panels with backlight
Thus, the statement that the use of plastic panels destroys the microclimate of the room and is potentially dangerous for people to stay in has no basis.
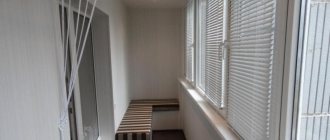
Features of the material
Ceiling plinths have their pros and cons.
Advantages of ceiling plinth:
- Installation of skirting boards provides an opportunity to achieve a certain sophistication in the interior. If the choice fell on a foam plinth, then it will clearly stand out against the background of the panels.
- Polystyrene foam has another negative property - porosity, that is, such skirting boards are in some way dirt accumulators.
Plastic skirting boards do not have such properties.
- Plastic plinth is quite easy to use.
- Plastic is not afraid of fading compared to foam.
Types of ceiling plinths
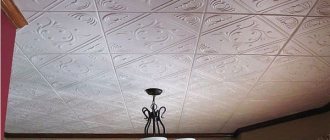
Types of plastic ceiling panels
PVC ceiling panels are classified according to several criteria:
- Density of the material.
- Element size.
- Connection type.
- Color and texture design.
The type of joint determines whether the finished surface will have a visible seam or be completely seamless. The final processing method gives the product color and texture, and the surface can be:
- plain, does not fade when exposed to ultraviolet light;
- varnished, with a special coating applied that gives a special shine, but scratches can ruin the appearance;
- printed with a variety of designs, but the plastic is soft. And the service life is limited;
- laminated, completely replicating natural materials and their derivatives, subject to delamination during prolonged direct exposure to ultraviolet radiation.
All options are resistant to water or steam and do not change structure under moderate temperature changes.
Examples of PVC panels
When producing PVC panels for ceilings, manufacturers are guided by standardized dimensions, where width can be 100, 200, 250 mm, length - 2700, 3000, 4000 and 6000 mm, with a thickness of 10 mm.
The presented photos show design options for the kitchen, bathroom, toilet, bedroom, hallway and corridor.
Advice! The service life, in addition to the recommended conditions of use, depends on the density of the elements. Almost all panels are in an affordable price category, but less dense (soft) panels are cheaper. Saving on purchases may lead to new expenses in the near future.
Flaws
Like any building material, along with its advantages, plastic also has negative qualities. The main disadvantages are:
- Specific smell. After installing the suspended ceiling, the smell of plastic persists for some time.
- There is a possibility of deformation due to sudden temperature changes.
- Impact may damage the plastic.
- Plastic does not belong to the category of natural materials, therefore this kind of material is not recommended for mounting on the ceiling in residential premises.
Important! Plastic is no longer as prestigious as when it first appeared on the market, since there are many better materials available.
Preparatory activities
Like other finishing work during repairs, it will not be possible to attach panels to the ceiling without preliminary preparation. A number of activities need to be carried out:
- Calculate the number of panels, accessories, and fastening materials. The plan takes into account the placement of lamps and wiring routing.
- Check the readiness of the tool and accessories.
- Clear the room of furniture that interferes with the pre-treatment of the ceiling and direct installation.
- Remove the remains of the old finish from the ceiling surface.
- Check wiring. If it is in a deplorable condition, as well as if a change in the position of the lighting devices is planned, it is dismantled, having first disconnected the input wires from the electrical network.
- Inspect the ceiling for defects. Pay special attention to the joints of floor slabs and wall joints on the street side. Putty on the cracks.
- Prime the ceiling plane with antibacterial mixtures.
Attention! If the installation is planned to be carried out on suspensions (suspended ceiling), then the scope of these measures is sufficient. But in the case of attaching the guides directly to the ceiling, the plane is additionally leveled with gypsum-based putty.
Principles of calculation
A simple mathematical calculation makes it possible to purchase the required number of panels and other consumables. First of all, determine the installation area by multiplying the length and width of the room. Then the result is divided by the area of one PVC part, and the required number of parts is obtained. You should add 10-15% to the result obtained, rounding the value to the whole panel. This reserve will come in handy in case of erroneous dissolution or installation errors.
Installation of panels
The following is calculated:
- purchase volume of ceiling profiles, as well as suspensions (fastening interval 500-600 mm);
- the length of the starting profile, where it is equal to the length of the perimeter and 100 mm of margin;
- dowels, if the metal profile is fastened in increments of 500 mm;
- self-tapping screws, with a consumption of pcs./meter, respectively, 1/0.5.
Additionally, you should purchase a profile for connecting the end parts of the panels, internal and external corners for joining the structure.
Tools and accessories
To perform the work, you should prepare the following tools and accessories:
- Drilling holes. This can be an electric or hand drill, a semi-professional or professional screwdriver with a set of drills and bits.
- Dissolution of blanks. Carpenter's knife, hacksaw with blade for cutting metal.
- Measurements and markings. Tape measure, building level, twine, marker or pencil. Hangers.
- Metal profiles for installation of ceiling structures: UD – 25/25 mm and CD – 25/60 mm in the calculated quantity.
Advice! Repair is a planned event. Therefore, it is recommended to prepare tools and purchase consumables in advance.
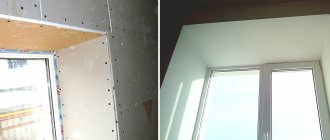
How to install a plastic suspended ceiling
There are several options for mounting panels. Simple is represented by direct lathing of the ceiling surface with timber at intervals of 500-600 mm, sequential interlocking assembly of panels. This option is applicable if, as a result of preliminary preparation, the surface is leveled close to ideal, as well as with low ceilings. But it should be taken into account that the wooden beam “takes” moisture and becomes deformed. Consequently, the plane of the finishing surface will undergo a change.
Installation of plastic panels
Another method is a do-it-yourself suspended ceiling made of plastic panels using metal profiles. In this case, the structure will not lose its consumer properties regardless of humidity and temperature changes. This is what will be discussed further.
Assembling the frame
Work begins with markings. For this purpose, previously prepared measuring and marker accessories are used. The order is as follows:
- Record the height of all corners and the value in the center of the room (floor - ceiling).
- The lowest angle compared to the base values will be the starting angle. It is from this that the interval of the formed inter-ceiling space (ceiling - panel) is measured. For ease of fastening the cord, fix the point by screwing in a self-tapping screw.
- Using a level and a cord, “beat off” a plane along the entire perimeter of the room, where the outlined line will be the junction of the plastic structure.
- Places for placing metal profiles are added on the opposing walls. Planned intervals are no more than 500 mm.
- Lastly, mark the installation locations of the hangers. It is important to apply the markings with maximum accuracy, since errors during installation are difficult to eliminate.
Frame for PVC panels
You should check whether there are hidden electrical wiring at the mounting points of the hangers. To do this, use a special detector or seek help from a professional electrician. Further activities include:
- According to the wall markings, the guide profile is fastened along the entire perimeter, with the exception of the side where the installation is planned to be completed, to facilitate the adjustment of the end slab;
- holes for dowels are drilled in previously designated places and hangers are attached;
- next, cut the profile to the required length, insert it into the guides, and fix it on the hangers with self-tapping screws;
- carry out constant control of the horizon of the plane using a stretched cord.
Attention! This stage of work is completed by tracing the wiring and, if planned, communications. It is recommended to place the wires in special corrugated sleeves. Their use makes it possible to timely identify wiring during drilling, simplifies the complete replacement of part of the wire and additionally protects against moisture penetration.
Installation of plastic panels on the ceiling
The ceiling panels are installed perpendicular to the guides in the following order:
- Measure the distance between the guide profiles. Transfer the measurements with markings to the panel. Cut off the excess. To do this, use a sharp knife or hacksaw with a fine tooth and a thin blade.
- Remove nicks from the cut edges with fine-grained sandpaper. Release the panel from its individual packaging if it has not been removed previously.
- One end is inserted into the starting profile, bending the palatine, the second end is placed in the oppositely located wall mount.
- With little effort, move the plastic element to the installed perpendicular mount. Thus, it turns out to be fixed in three planes.
- On the side with the locking device, the lower part is fixed to the sheathing with a self-tapping screw.
- Repeat the operation with the next panel, with the difference that it is necessary to ensure precise fit into the grooves along the entire length of the part.
- On the panels where lighting fixtures are supposed to be installed, technical holes of the recommended diameter are drilled. To avoid unintentional fracture of the plane, work is carried out with extreme care, avoiding excessive physical effort.
- Elements are installed in a similar way along the entire length of the room, while the installation of the end panel has some features.
The installation of plastic lining on the ceiling is presented in the following video:
Installing the last panel and baseboard
The last panel for the ceiling fits completely into the remaining space in very rare cases, trimming is usually required. The procedure is as follows:
- take accurate measurements on both sides of the panel; a slight error may have occurred during installation;
- the measurements are transferred to the workpiece, the points are connected with a piece of profile and cut off;
- together with the finishing wall profile, they are placed on the seat of the pants;
- the latter is secured with an adhesive mixture called “liquid nails”.
Molding for plastic panels
Ceiling plinth is a mandatory attribute of a plastic ceiling. Molding gives a finished look to the room and ensures a smooth transition between wall and ceiling planes. To properly fit the baguette at the corners, you will need a miter box. If it is not there, then using one of the simple marking techniques will be sufficient. You can use a squared notebook sheet. It depicts two lines intersecting in the center. Then the bisectors of the corners are drawn and the required 450 for even trimming is obtained.
Advice! Before fixing with adhesive solution, preliminary fitting is carried out. If necessary, the butt ends are adjusted additionally.
Sealing cracks with acrylic
The installation work on installing plastic panels for the ceiling is completed by gluing the baseboards and sealing the acrylic cracks. After installing the last panel, as a rule, there is a need to seal the joint. At the same time, to make the ceiling plane look monolithic, the joints are filled with acrylic compounds. The order of work is presented as follows:
- You can carry out culling by preliminary inspection of the entire plane, but it is more practical to visually divide the plane into squares, and sequentially seal all the cracks as you move through the sections.
- It is recommended to remove flaws using a construction gun with a tube filled with acrylic.
- Simultaneous filling of cracks is carried out in small areas (350-450 mm). Excess is removed immediately and the seam is smoothed.
- The hardening speed of acrylic is quite high, therefore, if the area where the composition was placed is missed and it has time to dry, it is carefully removed with a spatula or knife, followed by rubbing the area with warm water.
Attention! The drying of this type of grouting material is accompanied by slight shrinkage, and it may be necessary to re-grout the flaws after the first layer has completely dried, that is, 7-11 hours.
Frame installation
How to install a suspended ceiling
Stages of installation work:
- Install the frame (wooden or metal).
- The PVC skirting board should be attached to the sheathing.
- Install the panels into the baseboard and secure them.
Important! If a collapsible plinth is chosen, then the decorative part of the baguette should be attached last, after attaching the panel.
Plastic ceiling lamps
Changing the ceiling finish makes it possible to check the condition of electrical wiring, change the location of lighting fixtures, and install modern models. If the ceiling in the bathroom is made of plastic panels, then you can zone the lighting without damaging the wall tiles and place the wires hidden above the panels.
Ceiling lamps made of PVC panels
When independently tracing and connecting peripheral electrical devices, you must adhere to safety rules, namely:
- Dismantling and subsequent work are carried out after disconnecting the room from the general electrical network. A household “indicator probe” in the form of a screwdriver will help you make sure there is no voltage.
- It is recommended to first prepare an electrical wiring diagram for the location of lighting devices and switches.
- Wires for new wiring are purchased with a cross-section corresponding to the maximum load when all devices are turned on. Consultation on this issue can be obtained from trade organizations.
- In the places where lamps and switches are connected, the wire is left with a reserve - the “loop” will be useful if you have to carry out repair work or change equipment if it malfunctions.
- After tracing the wires, it is useful, without connecting to the network, to check the correct execution of the circuit using a household voltmeter.
Attention! If the home technician does not have experience in independently installing wiring and connecting devices, in order to avoid accidents from electric shock during subsequent operation, you should invite a professional electrician.
Features of the selection and installation of 220 V lamps
When choosing lighting fixtures, consider the following:
- The ignition temperature of plastic is high and it is almost impossible to achieve it by contact with a light bulb. But exceeding the heating norm will lead to melting of the seat, a change in color, structure and the appearance of an odor. In this regard, light bulbs with a power not exceeding 40 W are used.
- Security parameters of the lighting device itself. Their importance increases when used in rooms with high humidity levels. Therefore, it is recommended to use lamps with a protection level of at least IP44.
- Based on safety requirements, lighting devices should not be located closer than half a meter to the location of the bathtub or shower stall.
- The distribution panel of lighting devices in rooms with high humidity is located outside the room.
- Places for installing lamps are prepared during the direct installation of the panels. The diameter of the seat for the lighting system, depending on the brand and manufacturer, ranges from 58-74 mm. There are two ways to make a hole.
The first is represented by the use of a suitable-sized wood crown.
The second one takes a little longer, but does not require the use of a special tool. The installation site is marked using an ordinary compass. A small incision is made with a sharp knife, and the outline is cut out with a household jigsaw. With all the increase in time for the procedure, the likelihood of damage to the panel as a result of careless use of an electric drilling tool is reduced significantly.
Halogen and LED
What distinguishes halogen and LED lighting devices from standard ones is a twelve-volt supply voltage, and to create it, a step-down transformer is included in the electrical supply network. The location of its installation should exclude the possibility of penetration of condensate, and especially water. Safety requirements require the installation of a separate automatic fuse with a rating of at least 8 A.
LED lightening
When determining the number of spotlight sources in any rooms where it is planned to install a plastic ceiling with a height of more than 2.6 meters, take into account the following:
- the cone of lighting when they are turned on does not exceed an angle of 300;
- for good light density, lamps are installed at intervals of no more than one meter;
- the distance from the wall plane to the first lama is 0.6 m or more;
- to connect groups of lamps, special blocks are used; even soldered “twists” are not recommended;
- to ensure accurate polarity at the device’s power terminals, the wire should be routed uniformly, for example, black – plus, white – minus, wire with a notch – “ground”;
- When attaching lamps to the frame, special devices (latches, clamps) must be used.
The installation procedure for a spotlight is as follows:
- Disconnect the base part from the light element.
- The block is connected to the wire terminals.
- The light element is placed in its normal place and the operation is checked.
- If the result is positive, the spotlight is attached to the base with clamps.
- The installation of the decorative trim and thermal insulator completes the installation. It should be noted that the designs of lamps differ, and therefore it is recommended to study the instructions for the device before installation.
How to install lighting elements is presented in the following videos: