Features of plastic panels
Modern plastic is a polymer synthetic material made using polyvinyl chloride and phenol-formaldehyde resins. Despite its artificial origin, this material is slightly toxic, which means that under normal operating conditions it is absolutely safe for both human health and the environment.
Read more about floor insulation on the balcony here.
Advantages
High-quality plastic coating has a long service life. With proper care, this material can maintain its aesthetically attractive appearance for many decades. Almost all products made from polyvinyl chloride have the same properties.
Positive characteristics:
- low cost compared to other coating options: wooden lining or ceramic tiles;
- light weight - this parameter is especially important for old buildings;
- very low water absorption, especially in comparison with particle boards and facing coatings based on them, for example, MDF panels and chipboards;
- variety of colors, imitations of different surfaces.
Flaws
When planning to decorate a balcony with plastic panels, one cannot help but think about the disadvantages of this material. Its main disadvantages are its unnaturalness and a sharp, specific smell that appears immediately after installation.
As a rule, the smell disappears completely after a few days, but low-quality material can emit harsh and unpleasant volatile substances for a long time. To avoid this problem, you need to purchase only high-quality certified products from specialized construction stores.
Advantages and disadvantages of PVC panels on the balcony
The ceiling on the balcony and its paneling significantly save time and money for the owners, especially if you carry out all the work yourself. The following types of panels can be used in decoration:
- Typesetting. These panels imitate lining, their average size varies from 1.5 to 3.5 m in length and from 15 to 30 cm in width. They are connected to each other using the tongue-and-groove method and, when installed, give a relief structure to the sheathed surface. It is installed on balconies extremely rarely, since it is the relief surface that contributes to the accumulation of street dust at the junction points.
- Tiled. These panels can be square or rectangular in shape. They often imitate ceramic tiles and may have a relief surface with embossing or a pattern. Such panels require a complex frame system and are also used extremely rarely.
- Leafy. It is this type of ceiling that is most often used for finishing balconies. The slats can reach up to 40 centimeters in width, have various design options and significantly save time during installation.
Like any other finishing material, PVC boards have their advantages and disadvantages. The advantages of the material include:
- relatively low cost,
- ease of care,
- high speed and ease of installation,
- the ability to quickly replace a damaged element.
- resistance to mechanical stress and moisture.
The disadvantages of PVC panels include their inability to retain the paint color of the design. When exposed to direct sunlight, the paint loses its color very quickly.
For your information. Many people mistakenly believe that balcony ceilings made of PVC panels emit a lot of toxic fumes when exposed to heat or sunlight. However, this is a false belief. PVC panels are made of the same material as metal-plastic windows; of course, there are toxic fumes from plastic, but their share is negligible and does not cause harm to the human body.
Classification of plastic panels
The modern construction market offers a wide range of different PVC panels. Depending on their purpose, they are classified into ceiling and wall. They also differ in many other ways, such as the type of coating and production method.
By type of coverage
Modern technologies make it possible to produce products from polyvinyl chloride with a wide variety of decorative designs.
Depending on the type of the upper facial layer, they are divided into three main types:
- Laminated. They are inexpensive, easy to install, and have unique qualities that allow them to be used for finishing premises for any purpose.
- Offset. Strong, resistant to ultraviolet radiation, humidity, mold, mildew and corrosion. The panels will fit harmoniously into any interior and will serve for a long time.
- With thermal printing. Practical, functional, durable and always relevant. They are distinguished by the clarity and brightness of the image, the resistance of the pattern to abrasion and UV radiation. The color scheme and original design allow the product to be used as a design element when decorating premises in any style.
As a rule, material with a protective laminated coating has higher wear-resistant properties. It is less susceptible to scratches and various other mechanical damage.
Offset printing is the most popular type of applying various types of decor to PVC panels. Provides the highest level of image quality, gives clear outlines of the picture and contrast of colors.
Thermal printing is a modern technology for decorating panels that allows you to create a pattern of any complexity and color. First, a pattern is applied to a thin polymer film. This work is performed by specialists from the printing company. Next, using special equipment under the influence of high temperature, the design is transferred to the surface of the panel.
According to production method
Depending on the manufacturing technology, PVC wall products are divided into two types: press-stamping and sandwich panels. Products made using the first method are ordinary plastic made from polyvinyl chloride and covered with a special polyethylene film on top.
Sandwich panels are produced using a more complex method. They are multilayer wall boards consisting of two sheets of PVC and insulation sandwiched between them. This material is distinguished by higher quality indicators: it has higher strength, as well as increased heat and sound insulation properties.
Materials from which wall panels are made
Natural wood panels
Most often made of oak, cedar, maple or alder wood. Ideal for residential premises, primarily due to their environmental friendliness.
Chipboard panels (chipboard)
The manufacturing process is based on the method of hot pressing of shavings and sawdust, similar to wood, but less durable, because are subject to changes in temperature and humidity levels, and therefore are suitable only for finishing dry rooms.
Fiberboard panels (fibreboards)
Also made by hot pressing, but using wood and other plant fibers, they are less susceptible to moisture, environmentally friendly, however, not recommended for rooms where there is direct contact with water.
MDF panels
This is a new material based on MDF boards created by dry pressing (fine wood chips are pressed) at high temperature and pressure.
During the heating process, lignin is released from wood, which serves as a binding element.
The material can withstand sufficient loads (hanging cabinets and shelves), and is also resistant to high humidity, has heat and sound insulation, is hygienic, durable, in other words, it is of sufficient quality. Moreover, there are even fireproof MDF.
Glass panels
They are intended for creating photographic drawings that require a durable base, and therefore have a number of disadvantages.
But with careful use they can last quite a long time, especially since manufacturers are interested in using modern technologies, which has a positive effect on the strength and protection of the glass surface.
Gypsum vinyl panels
The material into which today the well-known plasterboard has grown, used to create walls, partitions and even ceilings.
The new material is the same plasterboard with the only difference that instead of cardboard it is covered with vinyl, which compares favorably with its predecessor. The panels are equipped with a finished working surface with a specific pattern, and they are also quite durable and reliable.
3D panels
A new design solution that helps you create your own individual style.
Made from fashion panels and bamboo, a material that represents a new decorative range of sculptural textured panels, painted in different tones using acrylic paints (glossy or matte finish).
The panels can create a stunning effect and turn the interior of a room into a spectacular space.
PVC panels
Plastic wall panels are also a recent material made from rigid polyvinyl chloride with a minimal amount of softener.
The panels can be safely used in almost any room, even in showers, because... they have a number of significant advantages: waterproof, fireproof, hygienic, with a long service life.
Plastic panels are the most popular variety among their “classmates”. This comes with a number of benefits. Let's take a closer look.
What should you consider when choosing?
A high-quality material for cladding a balcony or loggia must have the following properties:
- be durable, which means have a sufficient thickness of the outer side (1.5-2.5 mm, the second value is better, especially for balcony walls);
- have the largest possible number of stiffeners, none of which should be damaged;
- do not contain a large amount of chalk in the plastic, which makes the material unreliable: unable to bend, easily cracking.
The gray tint of the panels indicates poor recyclable materials. When purchasing, you must follow the rule - purchase plates from the same batch, as color discrepancies are possible.
What kind of material is this
Popularly this method is simply called plastic finishing. A balcony or loggia is not a primary and vital space, but, nevertheless, it needs high-quality finishing . This type of balcony or loggia decoration is popular due to many factors.
Assortment of panels.
Pros of plastic
- First of all, the price of such cladding is quite affordable for the budget of a family with average income.
- The second, no less important factor is the availability and ease of installing the panels yourself. Moreover, if you assemble it yourself, you can easily dismantle or perform fragmentary repairs to the coating in the future.
- The panels are quite durable, the warranty period ranges from 25 to 50 years.
- The coating is environmentally neutral and at the same time resistant to decay, easily withstanding exposure to aggressive detergents or accidental contact with chemicals.
- High-quality material: does not fade with prolonged exposure to sunlight, so taking the product with a reserve, you can always replace a damaged strip without damaging the appearance.
- Although the coating looks monolithic, it has ventilation gaps, so that fungus or mold will not grow under it.
- The panels have a cellular structure, which provides increased heat and sound insulation. Plus they do not attract dust and are antistatic.
- This product has the widest palette of colors, shades and patterns.
Pine color.
Disadvantages of plastic finishing
There is no ideal material in nature; finishing balconies with PVC panels is also not a universal option.
- The main and indisputable disadvantage of this coating is its low mechanical stability. If you accidentally catch the panel with a sharp or hard object, you can easily tear it. In addition, at a relatively small point pressure, the surface is deformed. Such defects cannot be repaired; they only need to be replaced.
- The disadvantages, of course, include the fact that in the event of a fire, this material will release toxic substances. But to be honest, most materials nowadays have this disadvantage.
- From a psychological point of view, a material that has such an affordable price is not prestigious for use in luxury renovations.
Broken panel.
Some selection rules
Of course, it is stupid to argue with the folk wisdom “The miser pays twice,” but this does not mean at all that you should take the most expensive material.
The choice should also be made wisely.
- Unscrupulous manufacturers may add excessive amounts of chalk during production. Such a panel will practically not bend, it will burst immediately.
- Press your finger on the surface, if the plastic gives in easily and the dent does not disappear, then the material you have is too thin and not suitable for finishing a balcony or loggia. If the plastic is elastic and hard, such a coating will serve you for a long time.
- As mentioned earlier, the structure of the panel is cellular, it has internal stiffeners. Take the bar and squeeze it from the end with your fingers; if the stiffening ribs are broken, the bar is pressed through, then you have a defect. A high-quality product will hold up, at most, it may be slightly deformed.
Fastening with self-tapping screw.
- It should be remembered that pricing is also affected by the width and length of the bar. It happens that a thinner bar costs much more, due to the fact that it is wider and longer.
- When choosing, look at the surface at an angle; if the internal stiffeners appear and you can see them, this is a sign of an obvious defect. Manufacturers saved on technological equipment and the thickness of the front side.
- The grayish tint indicates that this plastic was probably cast from recycled materials.
Important: when buying plastic panels in large quantities, make sure that all the material is from the same batch. Otherwise, after installation, you may find a discrepancy in shades.
Installation on metal lathing.
Panel calculation, materials and tools
To avoid large excesses, it is necessary to measure the surface area to be worked. First, the walls under the panels are measured separately, multiplying the length by the height. Then all the results obtained are summed up. From them, the area of the openings - door and window - is subtracted.
Having calculated the area of one plate, the overall result is divided by this number. Another 10-15% is added to the “found desired item”, since it is always necessary to take into account possible defects found in the batch, as well as installation errors.
Before working on the balcony, it is better to prepare everything that will be needed later. You need to stock up on the following tools:
- drill or screwdriver with a magnetic attachment;
- Phillips screwdriver;
- hacksaw for metal;
- knife for cutting drywall;
- hammer drill;
- construction stapler with staples;
- level.
And materials for installation work:
- sealant (preferably silicone);
- wooden slats (or metal profile for sheathing);
- additional profiles: internal/external corners, connecting strip, starting and finishing;
- panels, including corner dihedral and trihedral - for slopes;
- fastening elements: dowels (length 80 mm, thickness - 6), self-tapping screws, clamps;
- liquid nails, polyurethane foam;
- paint padding;
- metal hangers.
Basic properties
PVC cladding panels have an impact-resistant surface that is easy to clean and does not require maintenance.
All colors available.
Classic and timeless gray color is calm and does not visually diminish the room. Gray PVC panels are the perfect neutral color for walls and ceilings. If you need to visually raise the ceiling, use a lighter color than the walls.
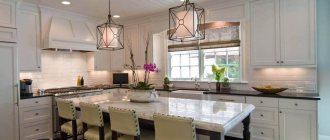
Choosing a suitable balcony wall covering is important when placing plants on it. The glossy bright white surface of the panel will reflect additional light onto them.
After installing the panels, they can be painted. To do this, buy a special type without coating.
PVC products will burn when exposed to fire. However, due to the high chlorine content, PVC products have good fire safety (flammability group G1). They are difficult to ignite. They char rather than generate flaming droplets.
But if there is a larger fire in the building, PVC products will burn and release toxic substances, just like all other organic products.
PVC wall and ceiling panels are easy to install and do not require special tools or training.
Although the warranty on the panels is 10, and the service life is 30 years, careful handling during operation is an axiom. Avoid temporarily applying adhesive tape to the front side of the panel, including masking tape, electrical tape, etc. The gloss or design may come off with the tape.
You should not test the material for strength by mechanical force.
Paneling on a metal frame
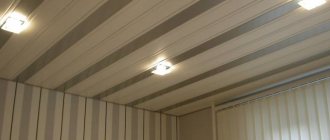
When the preparatory stage is completed, facing work begins. They usually start with the design of the ceiling, since this process is somewhat more complicated.
Headlining
Using a paint mark, find the center of the surface, then draw a longitudinal line through this point. From the ceiling on each wall they step down 50 mm and place marks. A profile is applied along the perimeter, holes are made, the depth of which is 50 mm, the pitch is 250-300 mm.
The guides are fixed with dowel screws, then, depending on the footage, 1 or 2 longitudinal profiles are added. They are mounted on suspensions. At the same stage, wiring is done if the plans include installing lamps. Starting strips are attached to the central profile.
The first panel is inserted into them, which is fixed with self-tapping screws to the profile and edging. The following ones are attached in the same way. The last part is cut to size so that it extends beyond the penultimate one by 5 mm. Then they are swapped, the last panel is pushed in so that the gap between it and the profile is not visible.
Wall covering
First, 100 or 150 mm are measured from the floor and ceiling. Horizontal profiles are installed at these marks, making sure to check the correctness of the lines. Vertical cladding elements are attached to them in increments of 500 mm.
First, the starting profile is attached, and internal (external) corner profiles are installed in the corners of the room. The fastening of the first panel begins from the corner, each element is tested with a level. The planks are inserted until they click, then secured with self-tapping screws. The last panel is trimmed and inserted into the groove of the previous plank.
Space under the window
This is the penultimate stage of working with walls, but some people begin cladding vertical surfaces with it. In this case, when installing the frame, they are guided by the location of the guides on adjacent walls. First, the metal profile is attached to the window sill from below. Then fix the guide to the wall near the floor.
In the middle, under the window sill, several hangers are installed in increments of 500 mm. The voids between them and the wall are filled with insulation, and the cracks are sealed with polyurethane foam. The guide is fixed to the hangers. PVC panels are secured with self-tapping screws or dowel nails. The final touch is to eliminate the gaps between the panels, floor and ceiling. In both cases, plinths are used - ordinary plastic ones on the bottom, special ceiling ones on top.
After installing the last camouflage product, we can consider that finishing the balcony with panels is completed. The work will not cause any difficulties, but in order to understand this, it is better to “arm yourself” with other people’s tips in advance. And this is where a detailed video will help. For example this:
Some finishing details
The standard technology for finishing surfaces on a balcony is described above. But there are also some tricks that will make the coating last longer and have a presentable appearance:
- The joints and walls must be decorated with plastic starting material to disguise the transition.
- On the floor, the joint will be hidden by the plinth, but it is better to cover the corners with a special profile.
- Instead of a profile, you can use a homemade plug. To do this, you need to remove a strip of plastic 0.5-1 cm wide from the remaining panel, after which you should heat it with a hair dryer and bend it, placing a block. The result will be a corner.
Homemade corner from a panel
After all of the above, the dilemma of how to make repairs on the balcony with your own hands should not arise. The main thing is to follow the recommendations given and carefully select materials. When going shopping, it would be a good idea to take with you a person who has competence in this matter, so as not to purchase low-quality products.
PVC materials
The interior or facade of a balcony can be sheathed with seamless panels, which in the finished version look like a homogeneous fabric (without installation gaps) or with seam panels, which have small gaps between the plates.
Also, plastic panels are distinguished by the following characteristics:
- size;
- surface finishing of the material;
- preparation method.
For facing work on the inside of a loggia (balcony), PVC material is often used, the average width of which varies from 0.25 to 0.4 m. A good alternative is plastic lining with an even smaller 0.2 meter width (not bad for ceiling cladding).
Thermal printing
Plastic panels have a variety of surface finishes, one of which is thermal printing. Using thermal printing, artistic designs of any degree of complexity are applied to the surface of the finishing material, from bright, rich but simple drawings to exotic episodes, photographs and complex mosaics. Each design is transferred to plastic using a special thermal film, after which it is fixed with varnish to protect the artwork and create a more attractive, shiny surface.
Offset printing
Another equally practical way to transfer a design is to use offset printing. It can be used to convey almost everything, including complex paintings, photographs, etc., but as practice shows, various imitations of stone are in great demand. Displayed through a typographic printing form and varnished to create a beautiful, glossy plate surface.
Lamination
The third option for finishing plastic is laminated film with a finished image. A sticker on a PVC surface made of laminated film can convey a high-quality image of any drawing, photograph, etc., as well as high-quality imitations of natural elements of nature: stone, wooden materials, leather, etc. Plastic panels covered with laminated film are considered an excellent material for finishing work, which is characterized by antistatic properties, low price and ease of cleaning.
Options for finishing with plastic panels There are several methods for manufacturing PVC material: the so-called “sandwich” and pressing and stamping.
- Conventional plastic for cladding is produced by pressing a polymer substance or polyvinyl chloride, which is almost half composed of rock salt and various components such as petroleum products, dyes, etc.
- The standard “sandwich” panel consists of two-layer PVC with heat-insulating material inside.
The single-sided panel has a surface that is stronger than the standard one and is successfully used for interior cladding.
“Sandwich” slabs, in most cases, do not need additional hydro, steam or thermal insulation, but when carrying out plastic cladding, sometimes minor difficulties arise due to the size of the products.
Practical advice
Here you need to dwell on a number of points that must be taken into account when choosing a material.
First. Plastic ceilings are practical and durable. Good and high-quality plastic can easily withstand 10 years of intensive use, without losing either its appearance or its structural and technological properties.
Second. The finished ceiling on the balcony, made of PVC panels, is easy to dismantle. In case of mechanical damage, individual fragments can simply be replaced with new and whole pieces, without wasting time on disassembling the entire array.
Third. The finished plastic ceiling on your balcony does not need to be treated with special protective coatings or painted.
It is better to install a ceiling on a balcony made of plastic panels on a frame and insulation. The concrete surface freezes strongly at low temperatures, which negatively affects the physical properties of plastic coatings. Insulation of balconies and loggias in this case is a key factor in the quality of finishing.
For these purposes, it is better to use rolled insulation materials. Mineral foil wool and polystyrene foam are quite suitable for such purposes. In addition, when installing insulation of this type on the ceiling, no special difficulties arise. Mineral wool is easy to install into empty spaces of the frame structure. Sheets of expanded polystyrene and polyurethane foam simultaneously play the role of insulation and leveling surface. Polyurethane foam boards can be installed directly on a concrete surface using mounting adhesive or mounting dowels. The joints between pieces of insulation are foamed with polyurethane foam.
Pros and cons of working with panels
Working with plastic is beneficial, because slats made from it:
- will not overload the main structure of the loggia due to its low weight;
- make it possible not to level the cornices, ceiling, window sills, walls before installation;
- Install easily, in a matter of hours;
- They do not require special care, you just need to wipe them periodically with a damp cloth.
PVC panels are a universal building material due to their components: polyvinyl chloride, softener. They are used everywhere for arranging rooms with different functional purposes.
Advantages of PVC panels
The building material made from polyvinyl chloride (PVC) is called plastic by experts.
According to their purpose, there are two types of material on the market:
- wall panels are durable and low in flexibility. Thanks to these qualities, they are not afraid of heavy loads, so they can withstand the weight of a small cabinet or shelf;
- ceiling panels have low strength, as they must only support their own weight. Sold at a lower price than wall panels.
Depending on the size, plastic panels belong to one of the groups:
- plastic lining ― width up to 10 cm, length 300 cm. The material is intended for any type of finishing. It is convenient that it is painted on both sides, but during installation a seam is formed;
Balcony covered with plastic lining
- sheet panels ― width up to 203 cm, length 405 cm. The most popular material from the PVC family, which is attached with self-tapping screws or glue;
- sandwich panels ― width up to 150 cm, length 300 cm. Multilayer material in which insulation is laid between two sheets of plastic.
PVC panels are popular among balcony owners due to the following features:
- During installation, no special tools are needed and no great construction skills are required. The work is simplified due to the light weight of the panels. In addition, there is no need for high-quality surface preparation;
- communications are easily hidden under the paneling;
- the thermal and sound insulation of the room is improved;
- easy replacement of damaged areas;
- Easy care, just wipe the surface with a damp cloth;
- remains attractive for more than 20 years;
- environmental safety is ensured by the absence of toxic components;
- a large selection of color and texture options to create a unique interior;
- affordable price.
Panel cladding algorithm
The main thing when covering PVC is to follow the stages. The whole process can be divided into the following steps:
- Leveling walls and ceilings.
- Seal gaps and cracks with waterproof putty, because the panels will not stick to curved areas.
- Padding. Antiseptic, sealing solutions can help.
- Installation of sheathing. Wooden slats and metal profiles are used. The option is easy to disassemble, assemble, and replace with other building materials if necessary.
- Laying polystyrene foam, extruded polystyrene foam as insulation.
- Installation of panels, starting with inserting the initial strip into the profile, vertical alignment with a building level, firmly attaching the strip to the sheathing until a click occurs.
Reference! The slats are attached to the sheathing in 3 ways: vertically, parallel or in a checkerboard pattern. You can cut the planks with a production knife or a hacksaw to give the surfaces a special design. More often, the material is fixed to the wall vertically, and to the ceiling - in the transverse direction. Some builders prefer to lay diagonally, although the method is not economical, because a lot of waste remains.
Glue mounting
If the balcony surfaces are perfectly flat and there is no need for insulation, then installation with glue may be an appropriate solution. Doing it yourself is quite simple. The technology for finishing a balcony with plastic in this case is as follows:
- The walls are cleaned of the old finishing coating.
- If necessary, level with plaster.
- Prime the surface twice and dry well.
- Using a level, attach the starting strips.
- PVC panels are cut to the required size.
- Apply glue to the lamella and press it against the wall.
- They finish the balcony by gluing the planks one by one.
With this installation method, you should remember some nuances. Firstly, holes for sockets and switches are made in the material before applying glue. And, secondly, work starts from the most difficult angle.
How to calculate the number of panels for work
Building materials are purchased when measurements and calculations of the height and width of the loggia are ready. For the calculation, the area (S) of the ceiling is measured, divided by the parameters of the length and width of one panel.
Wall measurements are taken along the perimeter. The desired figure is multiplied by the height (h) of the ceiling, and S is divided by the width of the slats.
Attention! Balcony walls vary in configuration. If the room is insulated and glazed, then the panels will fit any width. With a complex wall configuration, it is wise to purchase narrow slats (10-12 cm), or medium ones - up to 25 cm. For regular cladding, it is worth purchasing with a reserve. Especially if after calculations you get a fractional amount.
To obtain the final result, it is worth calculating the perimeter of the openings by multiplying the width by the height. Next - add up all the perimeters, subtract meters of openings.
The required number of slats for the sheathing is calculated by measuring the distance to the ceiling and the length of each wall. The desired figure is divided by 50, but with the same sampling of the distance between the panels. Next, it is multiplied by the number obtained by calculating all the lengths of the walls, rounded and another 5% is added to the total length of the panels. To calculate their length, you need to add up the lengths of the openings (windows and doors).
Tools
When arranging PVC space on the balcony, you should prepare:
- hacksaw for metal;
- building level, ruler;
- drill, long screws, dowels if there is a wooden sheathing;
- stapler for placing panels on staples to wooden beams;
- screwdriver, screwdriver;
- glue, but only for smooth walls, right angles;
- profile
- slats (40x20 mm), if the repair begins with rough work and initially you need to install the sheathing.
Reference! Before use, slats must be coated with a protective compound (putty, machine oil). Next, they are adjusted to the wall in a vertical position and at 3 levels of human height: knee, waist, shoulder, i.e. after about 40-50 cm.
Step-by-step instructions for covering a loggia
In order to cover a balcony with plastic panels with your own hands, you need to follow simple instructions. The master does not require any special training for the job.
Preparing work surfaces
In order for the cladding to be of high quality and durable, you first need to take care of the base:
- First, we carefully inspect the walls for cracks and imperfections - we need to get rid of them favorably.
- Then you need to slightly enlarge the crack. To widen the gaps, you can use a grinder.
- Then the crack must be thoroughly cleaned of dust and debris.
- The resulting depression must be sealed with waterproof putty.
- The entire surface must be primed with a protective composition (sealing and antiseptic properties). There are a huge number of them on the construction market, but if you need an economical option, then you should use PVA putty. It has a low cost and acceptable quality.
Surface primer
Fastening the sheathing
The lathing is a special frame that is attached to the wall and on which plastic panels will subsequently be fixed. It comes in two types - wooden and metal. The latter is well suited for damp rooms, because... the profile will not absorb moisture and become damp, but the cost will be significantly higher than wood and installation will require certain professional skills.
High-quality installation of the grille, in the future, will make it possible to make partial repairs, replacing only one or several damaged plates. When completely replacing plastic with some other material, there is no need to change the sheathing - the old one perfectly withstands the same thickness of the material.
- Before installing the sheathing on the walls, you need to make markings. This will greatly simplify the installation of the guides. When drawing lines, you should use a level. Such actions will be useful later in checking the quality of installation.
- Before fastening, wooden blocks must be treated with a protective compound. To do this, you can take PVA putty or motor oil. This impregnation will protect the wood from rotting, mold and fungi.
- Now you need to fill the slats every 40-50 cm. The first one needs to be attached 5 cm from the ceiling, checking the clarity of the direction with a building level. All subsequent bars must go in strict parallel to the previous one.
- The planks are fastened using dowels or self-tapping screws with plastic tips. There is no need to rush to tighten the rail to the wall. A situation may arise when the level shows a skew and then you will have to add small plates to restore a perfectly flat surface. The dowel should extend into the wall by 3-4 cm (excluding plaster).
Important! When attaching the grille, you should take into account the places where plastic breaks most often - at the level of the knee, waist and shoulder. In these places, fixing the panels to the wood is mandatory.
Lathing for plastic panels
Preparatory work
Covering a balcony with plastic panels with your own hands begins with preparing the surfaces. To do this, you need to perform the following operations:
- Remove the old coating, clean the walls from paint, wallpaper residues, and so on.
- Tap the walls and ceiling with a hammer to identify weak spots. Remove loose fragments.
- Knock out any bulges with a hammer drill and remove dust from the surfaces.
- Seal the holes with cement-sand mortar and leave it to dry for 2-3 days.
- If your flooring isn't ready yet, now is the time to get started.
Preparing walls for finishing with PVC panels
At the very end, you should treat the walls and ceiling with an antiseptic primer 2-3 times at intervals of 4 hours. This is required to protect surfaces from the formation of mold and mildew.
It is important to remember that finishing work can only be carried out on a glazed and insulated balcony. Also, a layer of waterproofing must first be laid, which will keep the base dry. If mineral wool was used as a thermal insulation material, then it is necessary to lay 2 layers of waterproofing to prevent it from getting wet.
Balcony waterproofing
Installation of plastic panels
Installation of plastic on walls is usually done vertically, and on the ceiling - in transverse stripes. There is also a third installation option - diagonal, but here you cannot do without the help of specialists - you need very good dexterity. In addition, the amount of waste will be significantly greater than with other methods.
- First you need to staple the first guide. They come in different types: U-shaped, for the initial installation of the first strip, H-shaped for extending a short strip, F-shaped for hiding cavities, L-shaped, corner, ceiling and floor, respectively, each for its own purpose.
- Fixing the first plank. The sheathing process should begin from the farthest and most difficult corner of the balcony. The bar must be inserted into the guide profile and its verticality must be leveled. Then fix it by attaching the thin side to the wooden sheathing with self-tapping screws.
- Subsequent strips are inserted into the grooves of the previous one in turn, using a special lock (by clicking).
- The fastening of plastic to wooden beams should occur in a checkerboard pattern - through one panel.
- In order to adjust the plastic to the desired size, you need to use a hacksaw for cutting crosswise, and a regular stationery knife for longitudinal cutting.
- For reliable joining, the outer plates should be pre-cut to the required size and only then placed in a row.
Thus, you need to go over all surfaces. The joints must be closed with special plastic corners.
Methods for attaching panels to walls
PVC panels can be placed on vertical surfaces in different ways. We list the methods for attaching plastic panels to the wall:
- If the walls are perfectly smooth, then the panels can be fixed to the walls without lathing. To do this, they are attached to “liquid nails” type glue.
- Fastening to a lathing made of plastic mounting strips. This is quite a difficult job, since the planks must be installed perfectly level on the wall. Fastening to such panel profiles is carried out using clips that are inserted inside the profiles. A modern method of fastening plastic lining (PVC mounting strip)
- The panels can be attached to the walls using lathing made of galvanized profiles. This kind of lathing is used extremely rarely in practice. Since these profiles are hollow, it is inconvenient to attach them to the wall.
- Mounting on a wooden sheathing. This is the easiest way, thanks to which attaching PVC panels to the wall is simple and as reliable as possible. The humidity on a glazed loggia is almost never very high, so you don’t have to worry about the wood warping.
Adviсe
Experts advise:
- inspect the panels for dents and chips at the purchase stage;
- pre-insulate a balcony or loggia in order to create a favorable climate after covering;
- start laying sandwich panels or plastic from the corner of the room so that all subsequent rows are even;
- use PVC skirting boards to cover the corners, securing them with glue;
- finish on both sides (external, internal) to create a warm and cozy atmosphere on the balcony.
Video on the topic:
Selecting materials
For the interior decoration of loggias and balconies, all types of wood lining, plastic panels of various textures or MDF panels are mainly used. When applying stone, various types of plaster or tile as a final decorative coating, you must choose excellent sheets of plasterboard for the base.
Balconies that are decorated from the inside with decorative plaster of different structures, block houses, and cork panels
or an artificial stone similar to natural material. These materials are very beautiful and high-quality, but their price level is not affordable for everyone.
Installation of panels on mounting strips and clamps
Installing a plastic coating using clamps and mounting strips has certain nuances, but in general it is not as complicated as it might seem at first glance. Having carefully studied the step-by-step guide and having the necessary consumables available, you can carry out the installation yourself without any problems.
Installation technology:
- At the very beginning, control measurements are taken over the entire surface to be coated.
- The second step is cutting the material to the required size. To cut plastic, you can use either a hacksaw or an electric jigsaw.
- The first panel is fixed with a “spike” in one of the most difficult corners of the room.
- The next one is carefully mounted into the groove of the previous one, after which they are both secured to the frame using a clamping clip and self-tapping screws.
- Installing the last panel can be a bit tricky. If it is not possible to fix it with a clamp, then it is possible to attach the last final element with glue.
Fastening the panels to clamps is carried out quite quickly. The main advantage of this installation method is that it almost completely eliminates the possibility of damage to the plastic during its installation.
Frame installation
If you have to work with curved walls or want to insulate a balcony, then you will have to make a frame. In addition, without a frame it is often impossible to insulate a fence , unless you have a loggia where the partition is made as a solid wall.
So, this work consists of several stages:
The main stages of installing plastic panels on a frame with insulation
Below we will consider each of these stages in detail.
Preparation of materials and tools
Before you begin, you need to prepare the following tools and materials:
- vapor barrier film;
- slats for the frame - this can be a metal profile or wooden slats;
- insulation – mineral wool, polystyrene foam or others;
- screwdriver;
- electric drill;
- wood hacksaw or metal scissors.
In addition, of course, you will need panel guides, corners, etc.
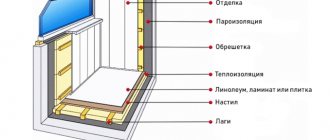
Diagram of the frame structure for wall insulation and subsequent installation of plastic panels
Waterproofing and frame assembly
So, finishing the balcony with PVC panels in this case begins with installing the frame. As a rule, it is based on galvanized profiles, which are used when installing drywall. Such profiles are attached to the wall with brackets.
The frame installation process looks like this:
- You need to start work by drawing markings along which the brackets will be located, taking into account that the step between the horizontal profiles should be no more than 50 cm . It is advisable to make the step between the brackets on the same line less than 50 cm;
- Next, you need to secure the brackets according to the markings using dowel nails. At the same time, place a vapor barrier film under the markings;
- then the profiles are attached to the brackets. To ensure that they are located in the same plane, you should use guides that are attached to adjacent walls. If it is impossible to secure the guides, you can align the profiles using a rule, and then secure them in the brackets with self-tapping screws;
In the photo - laying insulation between the frame slats
- Now you need to lay the insulation in the space between the frame slats. Make sure that it fits tightly to the profile without leaving any gaps. It is also necessary to pay attention to the space between the floor and the profile.
To prevent mold from forming on the wall, before fixing the vapor barrier film, the surface should be treated with an antiseptic primer.
This completes the installation of the frame. It must be said that a frame made of wooden slats is mounted using the same principle. The latter can be secured both with brackets and metal corners.
Example of fastening guides with brackets
Frame paneling
Now that the frame is ready, you can proceed directly to the installation of the panels. This procedure is carried out as follows:
- as in previous cases, work begins with attaching the guides and corners. They can be fixed with self-tapping screws or even a stapler if the frame is wooden, as in the photo above. When installing the guides, do not forget to use a building level so that they are positioned strictly horizontally or vertically;
- the first panel is inserted into the guides, and then its free side is fixed to the frame with self-tapping screws. It must be said that it is better to screw the latter not into the panel itself, but next to it, so that only the edge of the cap presses it. In this case, you do not risk the hat biting the front side of the material and thereby ruining it ;
Fastening the panel to the frame with a self-tapping screw
- then the next plastic panel is inserted into the guides and docked with the previous panel, after which its free side is also fixed with self-tapping screws. The entire surface is sheathed according to this principle;
- the last panel, as in previous cases, should be cut to width and joined to the penultimate panel, and then inserted into the guide.
The panels can be secured to the frame not only with self-tapping screws, but also with the help of clamps. The only thing is that in this case it is more advisable to use self-tapping clamps, since the mounting strips will take up additional space on the balcony.
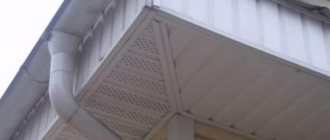
This completes the process of covering the frame. The only thing that needs to be said separately is the implementation of slopes. For these purposes, a U-shaped profile is attached to the door or window frame, into which the slope strip is inserted.
To combine the plastic slope with the wall panels, use a corner profile. In addition, you can bend the panel in an L-shape so as not to use profiles. To do this, you need to cut a strip about one centimeter wide from the back side along the fold line.
Here, perhaps, is all the information on how to decorate a balcony with plastic panels.