Repair work often involves painting various surfaces. To save time and get an even result, you can use a spray gun. But having this device in the house is not always possible; in such cases, you can build it from improvised means. You can make a spray gun with your own hands from a vacuum cleaner, and this does not require a lot of time and skills. This process will be discussed in more detail below.
Spray gun for vacuum cleaner: description
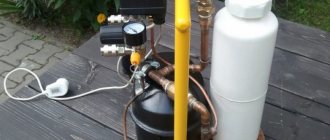
The spray gun for a vacuum cleaner is a design with a tank for coloring agents, located on top, ensuring a uniform supply of paint. Through a special hole, the paint and varnish material enters the spray gun. Its spraying occurs due to the air flow coming from the operation of the vacuum cleaner.
A homemade spray gun attachment for a vacuum cleaner is made from an ordinary lid for cans, covering an existing container with a volume of up to a liter. The hole on the lid should have a diameter of 30 millimeters; if there is no such hole, you can use a special adapter. This design is easy to make and is convenient for painting work.
The spray gun for a vacuum cleaner is a design with a tank for coloring agents, located on top, ensuring a uniform supply of paint.
Preparing paint for a spray gun correctly
Varnishes, paints and other compositions that can be sprayed through a spray gun must be prepared in advance. The quality of work and the time spent on painting depend on this. In principle, you can use any paint and varnish materials for spraying, if you follow simple instructions for preparing them for work.
Any paint must be thoroughly mixed and filtered through filter paper. If this is not done, the nozzle will quickly become clogged and instead of working, you will waste energy, time and nerves to wash it. This will also not have the best effect on the quality of work.
Please note that paint viscosity can be affected by air humidity and temperature.
On the container in which you bought the paint, all parameters are indicated for average values - usually they are given for a temperature of approximately +20C. If the air is colder, the paint will thicken; hot weather will cause the composition to become liquid.
Operating principle of an air spray gun
To make it easier to build a properly working sprayer for a vacuum cleaner, it is useful to understand the operating principle of a factory paint sprayer. The spray gun operates using compressed air, so it requires a device that ensures this movement. In this case, this role is performed by a special compressor; its operation is carried out using gasoline or the electrical network.
Pneumatic spray guns work with powerful compressors, usually having large volumes of receivers - up to 30 liters, and are semi-stationary devices. Also on sale you can choose options with a smaller receiver volume; they are conveniently mounted on the shoulder. When it comes to a compressor in the form of a vacuum cleaner, then the lightweight second option is suitable, because you will get a low-pressure spray gun for a vacuum cleaner, while in pneumatics the pressure is higher.
Speaking about the structure of the sprayer itself, it must be said that it consists of a body with a trigger, a needle, a nozzle, a spray part and a lower container. By pressing the trigger, the master moves the needle, the cone-shaped tip of which closes the flow of paint from the nozzle. There are two tubes in the container: short and long. The first is necessary for air penetration, the second for the supply of coloring agent. Due to air pressure, the liquid is pushed out of the container and exits through the nozzle; part of the air ends up in the channels of the air cap, subsequently following the liquid and breaking it into smaller fractions.
The spray gun operates using compressed air.
What types of spray guns are there: features of the tool and its types
When working with a spray gun, the time spent on repairs is greatly reduced. What previously could be painted in a day with a regular brush or roller can now be done in a couple of hours without much effort. In this case, the paint will lie smoothly, without any complaints. The spray gun also saves materials - you won't need as much paint or primer as when using hand tools.
All spray guns differ from each other in size, functionality, spray speed, and design features. But, all of them can be divided into several types.
1. Pneumatic spray guns
They come complete with a compressor or a receiver, or they buy it separately, which pumps air under high pressure into the paint tank. It comes out through the nozzle in a finely dispersed state and lies on the wall quickly, very evenly and economically. Usually these are semi-professional or professional models.
2. Electric spray guns
The paint is pumped into the nozzle under the influence of a built-in electric pump. It also falls on the surface to be painted in the form of small droplets and the coloring will be even and beautiful. This type of spray gun is usually small in size and not very heavy, so even a teenager or an elderly person can handle it. They are also inexpensive, and great functionality and changing modes have made them incredibly popular.
You can further divide the spray guns according to the type of spraying:
By and large, they all have low material consumption, are easy to use, and highly productive. The most inexpensive and simple spray guns are manual ones. In essence, it is a spray bottle with a container into which paint is poured. Although they are rarely found on sale, they have been almost completely crowded out of the market by modern models.
Types of spray guns for vacuum cleaners
In Soviet times, special sprayers for vacuum cleaners were sold; such a convenient rarity is almost impossible to find on sale at the moment. But modern analogues have appeared on the market.
So you need to purchase a spray nozzle for the vacuum cleaner. You can find such a spare part on sale. a part that is intended for an electric spray gun with a remote compressor.
In total such app. parts go on sale from two brands “ZUBRA” and “WAGNER”. Apart from these companies, no one else produces ready-made versions of sprayers separately.
You will need to purchase a spray nozzle for your vacuum cleaner.
Paint and varnish compositions for spray guns
The paint, whipped by a strong air flow, essentially turns into a fine aerosol mist. If the pressure in the spray gun is low due to its design, then viscous mixtures must be diluted more to work with them. But, at the same time, such spray guns are designed to work with latex-based materials and various alkyd mixtures. Usually, the viscosity of paint is selected experimentally, although there is a special tool for this - a viscometer.
To select the viscosity yourself, you need:
• pour some paint into the tank;
• set the air flow to maximum;
• set the spray width to maximum;
• paint an inconspicuous area of the surface and evaluate the result.
It is also worth comparing what happened with undiluted paint. In this case, it is recommended to change the flow width and power of the supplied air. It is best to keep notes to avoid mistakes and confusion. This way you can gain the necessary experience in diluting various coloring compositions to suit your needs. Instructions are instructions, but in reality they do not always work one hundred percent.
If you have already diluted organic-based paint by 50% of the volume, and it still does not apply well, then rinse the spray gun nozzle. If necessary, change the installed nozzle to one that has a larger diameter.
Don’t be discouraged if you don’t succeed with the spray gun the first time and it’s far from the ideal you’ve seen from professionals. Only experience will make you a master in this matter. Quite quickly you will begin to notice the nuances of the work and learn the subtleties that allow you to apply paint in an even layer without drips or bald spots. In order to reduce the number of defects during work, especially if you have little experience in painting with a spray gun, you need to select the most important area and start applying paint to it last. You should always start work from the place that is most inconspicuous.
A common mistake made by novice painters and those who have picked up a spray gun for the first time is that the painting itself begins not from the edge, but from the middle of the area. In this case, the coloring composition will be applied unevenly and some areas will become brighter, others paler.
Remember: spray painting always starts from the edge of the surface.
The sprayer must be kept at the same distance from the surface during operation. There is no need to tilt it, move it in an arc, or make movements in the opposite direction. The spray gun should move smoothly and evenly, without jerking.
The spray gun button must be released, moving the stream of paint away from the surface you are painting.
If it seems to you that the paint was applied in a very thin layer and there are places that were poorly painted, then go through it again. Wood is painted strictly along the grain.
If you find an unpainted area, correct the defect by spraying it faster than it was during the main painting.
Which vacuum cleaner to use
When choosing a vacuum cleaner that is suitable for painting work as an air blower, first of all, we focus on power. If there is not enough power, then the spraying will not work well enough. Also, the vacuum cleaner must have a special channel; if it is missing, they resort to closing all existing holes in the device so that suction occurs only from one place where the hose will be attached.
Options for vacuum cleaners that already have the necessary hole are the old Soviet models “Ural”, “Pioneer” and others. Among the new models we can note the Samsung SC4140.
But you can make do with the available equipment; this will be discussed later.
When choosing a vacuum cleaner that is suitable for painting work as an air blower, first of all, we focus on power.
What to do with the spray gun before work
First of all, carefully read the operating instructions and correctly assemble the spray gun according to it.
All attachments, handles, hoses must be installed tightly and in accordance with the recommendations in the documents supplied with the tool. It is very important that the hoses do not bend or twist during the assembly of the spray gun, otherwise the paint simply will not be able to pass through them.
During test painting, the paint supply and its pressure are adjusted.
Painting a textured surface: wallpaper
One of the interesting life hacks from designers is coloring textured wallpaper. This way you can quickly change the appearance of the room without spending a lot of money and effort.
You must first close all sockets and switches. Use masking tape for this. The easiest way to do this is to remove the housings and securely seal the holes themselves. Be careful and follow safety precautions. If you are not sure, then it is better to carefully tape the sockets and switches together with the housings.
It is also necessary to hide everything that should not be painted over. Please note that fine paint from the spray gun covers all accessible surfaces. Therefore, remove furniture from the room, cover the floor with newspapers or film. Don’t forget to wear a respirator that will protect your respiratory organs, gloves and a special disposable suit with a hood or clothes with long sleeves and trousers, which you won’t mind throwing away afterwards. Cover your head with a scarf or cap; it is best to also use special glasses or a mask.
It is not necessary to buy the paint that you want in color. Buy a white one and add dye to it. After stirring you will get the desired color. You need to color the solution carefully so as not to overdo it; add color to the paint a little at a time and stir very thoroughly to evaluate the color.
When working, hold the spray gun strictly at right angles to the surface to be painted. Move it smoothly. Without any jerking, do not hold your hand with the sprayer in one place, move it from top to bottom. Spend more time on the corners; often in a hurry they can be poorly painted.
Advantages of a homemade device
An obvious positive factor of such a device is its low cost. You can make it from scrap materials; you don’t need to buy a lot of them. The homemade version copes well with the task and can significantly facilitate painting work. This attachment is also suitable for whitewashing a vacuum cleaner. In addition, if the device is manufactured correctly, it will be able to spray water-based and acrylic paints well, which factory sprayers cannot always spray.
The homemade version copes well with the task and can significantly facilitate painting work.
The spray gun causes problems: what to do?
When painting, inexperienced craftsmen may encounter certain difficulties when working with a spray gun. This is often due to improperly prepared paint materials for the job.
If you do not adjust the air flow to the paint, streaks may appear around the edges of the spray area. To correct this, either use more viscous compounds or reduce the air pressure.
Another situation related to the incorrect composition of the material is the so-called “dusty” painting. If such a problem occurs, then you need to make the paint more liquid. We wrote above how to achieve an acceptable consistency.
Using a spray gun reduces the time it takes to paint. It can be used in a variety of places, for painting or varnishing any surface. It’s convenient that modern spray guns can also help with puttying walls, significantly simplifying the work process.
How to make
If you happen to have a special attachment at hand that came with Soviet vacuum cleaner models, then this is the fastest and easiest option. It is simply put on a liter jar. Next, the outlet hole is adjusted to the desired parameters. And the edge of the hose from the vacuum cleaner is adjusted to the air inlet to the sprayer; if necessary, an adapter is used to adjust the holes to each other. Other manufacturing options are described below.
The edge of the hose from the vacuum cleaner is adjusted to the air inlet to the sprayer.
Preparing the vacuum cleaner
First you need to remove the dust collectors in the device, no matter what they are. The remaining parts of the device need to be wiped and cleaned of dirt. Also, in the room where the paint sprayer for the vacuum cleaner will be assembled, wet cleaning should be carried out.
The room where the paint sprayer for the vacuum cleaner will be assembled should be wet cleaned.
Required parts and tools
To create this unit you will need the following tools and accessories:
- Vacuum cleaner;
- Receiver, a rubber inner tube or a ball is suitable for this purpose;
- Container where the paint will be poured;
- Reducing valve;
- Fasteners
To create this unit you will need special tools and devices.
Manufacturing process
It is necessary to change the direction of thrust in the old device. To do this, the engine should be forced to move in the other direction. You can reverse the terminals going to the rotor and stator. But still, the impeller blades will influence the traction force. If they have an asymmetrical shape, then it is better to change them to a version with symmetrical blades.
Then they proceed to preparing the required pressure on the sprayer. To do this, you need to perform one of the options for preparing any type of existing vacuum cleaner for work:
- All existing holes must be closed; for this purpose, polyurethane foam, hot melt adhesive, epoxy resin and other means are used that can ensure reliable sealing. At the blowing point, make a round hole suitable for the hose. Next, a piece of PVC pipe is placed in it; it should be left outside by about seven centimeters. This option is suitable for an old device that you don’t mind;
- A more humane method in relation to the device. You need to prepare a large, thick bag and a second hose. The vacuum cleaner itself is placed in a bag, and the hose from it is led out, it closes tightly; electrical tape is suitable for this. Thus, the air will circulate in the bag and then exit through the second hose. For the process to go smoothly, the bag must be reliable, and all holes must be properly sealed.
Then the device is cleaned, 150 grams of solvent is poured into the container, and the vacuum cleaner is turned on for ten minutes.
It is necessary to change the direction of thrust in the old device.
Testing and operating rules
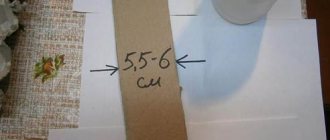
You need to test the device first. To do this, it is advisable to paint a small area of the surface on the street, and you need to keep it at a distance of 20 cm from the object. It is better to keep the nozzle diameter to a minimum.
Operating rules:
- The coloring agent must be strained;
- The conductive channels are washed before and after work;
- Do not allow the spray unit to turn over during the painting process.
Do not allow the spray unit to turn over during the painting process.
Making a spray gun with your own hands
Making a sprayer for painting with your own hands is very simple. To do this, it is enough to use an old vacuum cleaner, as well as improvised materials that can be found in the house. The most important thing is to get a spray gun - this is a tool similar to a gun that is used to spray paint.
To connect the spray gun from a vacuum cleaner, reverse draft is necessary (i.e., the vacuum cleaner motor must supply air for blowing). Unfortunately, most modern models do not have this capability.
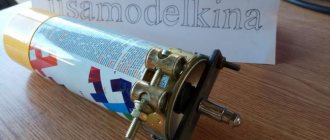
The Raketa 12A model vacuum cleaner was popular in the USSR. The device had a special nozzle in the form of a spray cap, which was placed on a glass container. We talked about this version of the sprayer above. Nowadays, it is difficult to purchase such an attachment, just as it is difficult to find a vacuum cleaner with reverse draft in stores, but both of these devices are easy to make on your own.
To make an electric sprayer, the first step is to get an old or unnecessary vacuum cleaner that you don’t mind disassembling. It would be better if it was Rocket 12A, but a more modern model would also be suitable.
The direction of the air masses in the hose is changed so that the impeller supplies air rather than sucking it in, as during normal operation. In order to make a spray gun from a vacuum cleaner, you need to change the direction of rotation of the impeller blades in the opposite direction. To achieve this, it is enough to reverse the polarity of the power terminals going to the stator and rotor.
Next, it is necessary to achieve a constant pressure sufficient for the compressor to pump up the missing volume of air to atomize the thick liquid (change in the functioning of the impeller). If the blades move in the opposite direction, the air masses will change their direction with an equally proportional force.
If the position of the blades is asymmetrical, this will lead to a decrease in reverse thrust. Therefore, it is better to purchase a more suitable impeller.
When modifying an engine, two important criteria should be taken into account:
- Type of impeller blade design;
- Possibility of turning the engine in reverse direction.
If both of these criteria are met, you should look for a spray cap.
Maybe someone you know has a similar attachment lying around - in the past, such a paint sprayer was supplied complete with a vacuum cleaner. You can also take advantage of online advertisements; there are also master classes on how to make a homemade sprayer.
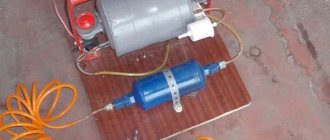
The most difficult step is choosing the right pressure reducing valve for the spray. To do this, put the valve on the hose and make an outlet for the incoming liquid on the lid (and maintain a tight seal). In addition to all of the above, you will need an air duct, with its help air masses will enter the tank, thereby replacing the lost volume of liquid (paint or lime).
Important! When first testing a spray gun, it is best to use water-based paint.
On video: master class on making a spray gun.
Tips for use
You should start working with inconspicuous areas of the surface to be painted in order to be able to get used to the device. The more layers you make and the thinner they are, the better the result. When painting the main part of the surface, you need to move quickly horizontally, this way it’s easier to avoid smudges.
The more layers you make and the thinner they are, the better the result.
An attachment to a vacuum cleaner for painting can make the job much easier; doing it yourself is not that difficult. If you have a suitable vacuum cleaner, this process will not take much time. And the result will please the owner.
Features of whitewashing the ceiling using a vacuum cleaner
If you have a vacuum cleaner of a suitable model and find a special attachment, you can assemble a homemade spray gun and start whitewashing. It is important that all parts of the sprayer, especially if a homemade device is used, are tightly connected to each other. When applying the solution, the sprayer must be kept at a distance of 50 - 80 cm from the ceiling, perpendicular to its surface.
The optimal distance is selected experimentally and depends on the density of the solution and the pressure of the injected air.
A pressure of 3 - 4 atmospheres is considered close to ideal with an average density of the solution. If the whitewash is thick enough, then the pressure should be increased, and for a solution that is too thin, on the contrary, reduced. The distance to the surface to be treated should not exceed 1 meter to avoid excessive dispersion of the solution, and should not be less than 0.5 meter to prevent the formation of drips.
Applying the solution to the ceiling using a sprayer, as shown in the video, is carried out in an even thin layer in small areas. To achieve the best result, it is recommended to apply several layers of whitewash, with each subsequent layer being sprayed onto a dry surface.
Source
Paint viscosity and car preparation
A vacuum cleaner can replace the compressor only when low pressure is acceptable, i.e. materials, a spray gun and, of course, the painter himself have been prepared, because working with such a tool is extremely specific. The surface for painting is prepared based on standard requirements (degreasing and matting before painting), which are covered in many separate materials. It is important to note that no concessions in terms of preparation are allowed, since there is already a weak link in the chain - low, uneven pressure.
Some devices are, in principle, not suitable for use as a compressor: it is necessary that the tool can either switch to blowing air mode or be able to connect a hose on the other side. Both models are found in nature, but the old Soviet ones (“Whirlwind”, “Raketa”) are especially good. Partly due to good pressure, partly due to high maintainability. Soviet models are also good because they have their own nozzles for spraying liquids, nozzles not intended for painting cars, but easily adaptable for this.
In a system using low pressure, specific materials, such as pigment (“metallic”, “chameleon”) and viscous paints, are not allowed. The substance intended for spraying needs to be diluted more strongly, but specific numbers can only be obtained as a result of experiments. For most standard enamels (Sadolyn, Mobihel) this is 3:1 by volume, i.e. three parts solvent (No. 650 or equivalent) to one part enamel. The paint needs to be diluted liquidly, but much again depends on specific conditions, in particular on the pressure created by the tool.
The paint for the developing layer should be diluted even more than for the main one: for one part of enamel there are 4 parts of solvent. Needless to say, when it begins to evaporate, you need to either stay away or put on a gas mask. When applying a developing layer to a car - 0.5-0.7 liters of the finished material should be enough for development - you can not only identify unevenness in the puttying (sanding, priming), but also significantly adjust the percentage ratio of enamel and solvent. It is advisable, of course, to check the ratio on a separate site and experiment with the composition.