Types of spray guns
Household paint sprayers can be divided into 3 groups: pneumatic, electric and mechanical (manual). There are also combined and electrostatic ones, but they are used mainly in industrial sectors. For painting at the amateur and professional level, pneumatic spray guns that operate on compressed air supplied from the compressor receiver are most suitable. Following them, with a slight lag in layer quality, are electric sprayers, powered by a turbine supercharger or plunger mechanism. The most ineffective in terms of productivity and uniformity of painting are mechanical devices that operate due to the physical impact of the user, expressed in periodic pumping of the mixture and air into the tank.
In order to more clearly understand how to make a spray gun with your own hands, it is useful to at least superficially navigate the main varieties of such a wide model range. Since we are interested in exclusively air-type devices, we will briefly go over their classification and move on to an analysis of the principle of operation. Pneumatic spray guns are widely used in both domestic and industrial work. As mentioned earlier, they produce the best paint coat with high productivity. The quality of painting, efficiency and ease of use of a pneumatic spray gun largely depend on its cost, which has a very wide range: from 1,000 to 40,000 rubles per gun. The price segment separates simple, household sprayers from professional, high-precision devices. A beginner will hardly notice the difference between an expensive and a cheap model, but for an expert it will be heaven and earth. For everyday household needs, the most budget devices are excellent, the analogues of which cannot be made independently due to their specific design.
Electric spray guns, like the previous ones, have a decent range of prices. In some stores you can find a working spray gun for 1,000 rubles, and powerful, professional models from famous brands cost about 20,000. And we are not talking about painting stations, which are valued in tens and hundreds of thousands. The price of a product determines the quality, and an electric spray gun is no exception to these rules.
Refrigerator for making a spray gun
To create a spray gun, a compressor is suitable, which is installed on the refrigerator. You can make such a spray bottle yourself if you need to save on the amount of material consumed. In addition, the design features make it possible to spray lime. Among the features of making such a sprayer with your own hands, we note the following points:
- A receiver is required, which can be used as an old cylinder. The container used must have increased tightness.
- For disassembly, you can take an old refrigerator from which the compressor and start relay are removed. Dismantling is quite simple; just saw off all the copper tubes.
- The inlet and outlet openings can only be determined by connecting the compressor to the power supply.
- In order to eliminate the possibility of various debris entering the system, a filter is attached to the suction pipe, an old automobile version can be used. It is secured with sealant.
- The tube through which air is pumped is connected to the previously prepared receiver with strong hoses through a fitting. All connections are also covered with sealant.
- In order to increase the efficiency of the design in question, a diesel filter is attached to the outlet after the receiver. It reduces the humidity of the supplied air.
DIY spray gun from the refrigerator
It is worth considering that the compressor must be located in the same position as at the time of use in the refrigerator.
Otherwise, it may be difficult to start the device. In addition, experts recommend periodically changing the oil, which ensures a long service life of the compressor. In order for it to remain stationary during operation, a special base is created.
Operating principle
Before you start making your own tool, it is important to understand how it works and what parts of the mechanism cause the paint to escape from the tank and quickly transfer to the surface. Since the object of analysis is exclusively the paint sprayer, we will not consider the design of air sources (compressor or turbine), but will take it as a given by default. Let's focus on the design of spray guns.
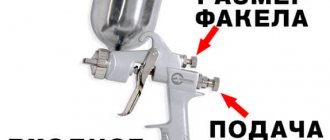
Any air spray gun (both pneumatic and electric) has a body where a needle and nozzle (nozzle) are placed. An air cap with side holes is screwed on top of this to give the torch an elongated shape. In addition, on the body there is a trigger for opening the air valve and a tank with a spray mixture. Pneumatic guns are equipped with regulators for the size of the torch, material supply and sometimes air. Electric models have an air flow pressure regulator on the body and a material with a torch on the air head.
The first thing the air encounters when it enters the nozzle channels is the valve connected to the trigger. When lightly pressed, the path opens, the flow passes inside the housing and flies out of the air cap. In this case, the material is not sprayed, because its path is blocked by the needle cone, which rests against the back wall of the nozzle. Stronger pressure on the trigger moves the needle away from the nozzle, opening a passage for the paint, through which it is picked up by the air flow and rapidly rushes forward in a cloud of small particles. If the tank is installed at the bottom (like most electric models), the mixture is forced out through the tube by the same air entering the container through a second hole open to it. Using this principle, you can make a pretty decent homemade spray gun for painting a car without a compressor, based on an old household vacuum cleaner.
The air cap, screwed onto the nozzle, is inherent only in factory models of instruments. When making a spray gun with your own hands, even the most skilled craftsmen usually do not try to repeat the complex design of a given part, and use the less productive, but simpler principle of spraying. We will talk about this technology further.
Homemade mini oral spray gun
The simplest version of a liquid nebulizer that operates using the user’s breath. The performance of such a device largely depends on the volume of the lungs. The diameter of the tubes determines the amount of paint transferred, but it should not be too large.
The essence of the device is to pull the mixture out of the container through a tube, due to the air flow flying over this tube. Small doses of the mixture are broken under pressure into tiny droplets, flying forward. The task is to fix the two ends of the tubes in a certain position on a frame made of wood, foam plastic, metal and any other available material. Let us describe in more detail, in order.
- The first step is to disassemble the handle into 2 tubes: the body and the rod. Air will flow through the first, and paint will come out of the second. The tapered nose of the rod, from which the writing ball usually protrudes, must be expanded to a diameter of about 3 mm. You also need to prepare the rod by removing the ball from its metal tip. To do this, you need to deform the ball by rubbing it on a grinding stone or sandpaper until it falls out. Don't forget to remove the ink from the refill.
- The prepared tubes must be placed perpendicular to each other so that their ends converge at one point. You can attach them to any element the size of a matchbox. The air tube from the pen body is located horizontally, and the paint supply rod is located vertically. The location of the outlet holes may require slight adjustment, so you should not immediately fasten the elements tightly, but place them on electrical tape or tape and check the quality of the spray. It is best to place the paint outlet exactly in the center of the air tube.
It is better to see the device once than to imagine it by description. For a more detailed discussion of the topic, we present you a video on how to make a mini bullet gun with your own hands with a detailed explanation and demonstration of each stage of the assembly process.
Making your own spray gun
You can make a spray gun at home in the shortest possible time by finding only the necessary components, namely: a body from a marker, flexible hoses, and a spray bottle from a flower sprayer. You will also need a drill with a thin drill bit, glue and a utility knife.
1. Take a small jar of vitamins, gouache or film. It is important that the jar has a lid; it will prevent the paint from spilling out during operation. In the bottom near the walls, drill two holes with a diameter of no more than 4-5 mm.
2. Take two pieces of metal or plastic tube that would fit the diameter of the drilled holes. Using glue, attach the tubes at different levels inside the container (one is located at the very bottom, the other almost under the lid), and on the outside their ends should be the same.
3. Next, take a spray bottle from a regular flower sprayer.
Cut off the large plastic casing, freeing the cylindrical part with the nozzle we need, then drill a hole in the side of the spray bottle that is suitable in diameter for the plastic tube from the dropper. Attach this tube using glue.
4. Next, we will need any old marker, from which you first remove the internal contents. Cut off the front of the housing where the ink stick is located.
5. The next step is one of the most difficult. You need to drill two holes in the marker body, which must be located at an angle of 10-15° to the central axis. The first hole is made at the very edge of the body, and the other almost in the center. To get the correct angle, start drilling perpendicular to the wall of the marker, and then (as soon as the drill goes a little deeper into the plastic) position the drill closer to the product.
6. Now let's start assembling the future spray gun. To ensure that the tool works flawlessly, it is better to use specialized glue for installation. Place the container for future paint on top of the body of the prepared marker exactly in the middle so that the metal tubes are on opposite sides of it. Attach the modified part from the flower sprayer to the marker on the side indicated by the arrow.
Select three pieces of plastic or flexible rubber drip hoses that match the diameter of the tubes.
Connect the first hose to the glued tube of the sprayer, pass it through the central hole in the marker body from bottom to top (the hose goes inside the body) and bring it out. This way the air supply will be organized.
Attach another piece of plastic hose with one end to the sprayer and the other to the container tube (the shorter one). The paint will be supplied through this hose.
And the last piece of hose is connected to the long tube of the container and brought out next to the first.
The schematic location of the hoses is shown in the figure.
A hand-held spray gun made using this technology looks like the photo below:
To get started, you need to pour the required amount of paint into the container (the paint should not be very thick), and then, taking the two tubes coming out of the marker body into your mouth, begin to carefully and evenly blow out air. It is advisable to connect these two outlet tubes with a tee so that the flow of exhaled air is smoother. In addition, it is more convenient to work with one tube. Also, as an experiment, you can connect the spray gun to a vacuum cleaner, hand pump, or inflated chamber. The manual version is ideal for small jobs.
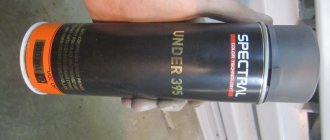
A simple spray gun from a can
A fairly quick way to obtain a spray of mixtures with a low degree of viscosity. This device operates on the principle of an aerosol, containing paint and pressurized air in one container. The system is very compact and does not require connecting a third-party supercharger. Optimal for quickly painting a small area. Filling such a device with paint is not an easy task, and increasing air pressure carries some danger (during pumping). What and how to make a compact-sized bullet gun from is described below.
How to make a spray gun with your own hands - complicate the design!
If you are the happy owner of a compressor, then why not make a spray gun that is inexpensive, convenient and functional. Of course, you can’t paint a car like this, but for many less painstaking jobs, such as painting furniture or walls, it will pay off. The advantage of a homemade device is that its simple design does not require as much care as a factory one, and you will save a lot of money on solvents.
In addition, the spray gun you made will work even with a weak compressor producing 150-200 liters of air per minute, while professional devices require more powerful compressors.
You can make it in a couple of hours maximum. For consumables, you will need three gel pen refills, empty of course, the pen body itself, and half a meter of thin hose. To make a convenient pistol-shaped case, you will need two blocks, seven self-tapping screws to hold the parts together, the most commonplace cap from a plastic soda bottle and three strips of thin sheet metal.
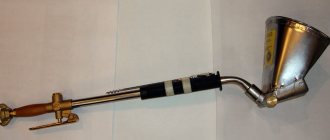
Homemade spray gun from a blow gun
The most convenient, but relatively expensive homemade sprayer, powered by compressed air supplied from a sealed container (receiver), which can be a bottle, canister or durable metal cylinder. The technology for spraying liquid is identical to the first instructions, but the barrel of a blow gun acts as the refill of a ballpoint pen. The main advantage of the design is the trigger, which opens and closes the air supply. Let's begin our analysis of the guide on how to make a spray gun with your own hands for painting large areas by listing the required components.
- Blow gun as a valve for supplying and stopping the air flow.
- Refill and cap from a gel pen.
- Jar with a screw cap (up to 0.5 liters).
- A small piece of wood to hold all the components together.
- Capacity for air injection (bottle, canister).
- Airless chamber nipple.
- Hose and metal clamp.
- A pump or compressor for pumping air into a container.
The operation of this spray gun is relatively simple and boils down to timely replacement of paint in the can and periodic pumping of air into the container. The larger the volume of the receiver, the less often it will have to be pumped. If you have a full-fledged compressor, the last 4 points can be ignored.
- First of all, let's prepare the material supply tube. We take the core of the helium pen and remove the ball from its metal nose by rubbing it against the rough surface of sandpaper or a sharpening stone until it falls out of its groove. You can even remove the metal spout completely, leaving only the plastic rod, but such spraying will require increased pressure or the emerging paint will break into larger droplets.
- Next, you should prepare a block on which the barrel of the blow gun and the handle rod will be attached. We cut it out with the letter “L”, and in the center of the longer edge, drill a through hole with a diameter equal to the trunk. In the center of the lower part, we make another hole equal to the outer diameter of the helium pen core. We pass both tubes through both sides so that they converge inside the sawn element. The position of the tubes can be fixed using self-tapping screws (with a sawed off tip) screwed into the ends of the block.
- We drill a hole in the lid of the jar to the diameter of the handle shaft, and thread it through. If the tube rests on the bottom of the container, shorten it to the required length. You can attach the block to the lid using glue or self-tapping screws on the back side.
- The spray gun is ready, but it needs compressed air to work. We will pump pressure into a sealed container using a conventional pump. It is better to take a canister or bottle with a large stopper, where the holes for air inlet and outlet will be located. To begin with, you need to drill 2 holes in the plug: for the nipple and for the hose. It is worth noting that the diameter of the holes should be 1-2 mm less than the outer diameter of the elements used so that they fit as tightly as possible. After drilling, we thread a small piece of hose (5-10 cm) inside and pull out the nipple with the thread outward. For reliability, you can fill the components from the inside of the lid with glue or epoxy resin.
- All that remains is to tightly screw the plug onto the container, connect the other end of the hose to the fitting of the blow gun, insert the pump into the nipple, pump up 3-4 atmospheres and start painting. This spray gun can operate from a compressor from a refrigerator or a car tire inflator, but to avoid an explosion, do not pump excessive pressure into the container.
A visual demonstration of the spray gun discussed above, with comments from the author, is shown in the following video.
A similar, but somewhat unique design with a miniature tank and a syringe needle for dispensing paint. A convenient option for processing small parts.
And finally, the most productive homemade paint sprayer with a wide spray pattern and good painting quality. Requires decent pressure and some skill to make.
In order to paint with high quality, any experts in this field advise using additional equipment - a spray gun or spray gun. It avoids the formation of unevenness on the painted surface. But since many factory models cost a lot of money, it will be more economical to assemble the spray gun yourself from scrap materials.
Spray gun for a wide range of applications
To build a spray gun with your own hands for a wider range of uses, you will need a plastic or glass container with a neck with a diameter of 20 mm. After preparing the container for paint, you need to carry out the following manipulations:
- You need to take an aluminum or copper tube with a diameter of 5 mm and bend it. The air supply hose from the vacuum cleaner must be connected to the hole at the lower end.
- A brass nozzle is attached to the other end. You can use a bakelite handle as a handle. If the part turns out to be wide enough, then a groove is cut along the profile of the tube. Then the resulting parts of the handle are connected with screws and polished.
- After this, a suction tube with a diameter of 2 mm is taken and inserted into a brass socket. The length of the tube must match the paint container used.
- At the next stage, a steel oval bracket with a hole for the socket is constructed. Then the upper part of the tube is reduced into a cone and cleaned.
- After this, they begin to assemble the spray gun, for which the suction tube moves until the upper end is located on the axis of the nozzle.
- Next, the resulting mechanism is tested and configured. To do this, adjust the height of the end of the tube until a thin, uniform layer of paint and varnish material is obtained.
- After achieving the required result, the suction tube is fixed at the required level by soldering it to a socket, which is attached to the lid of the paint container.
- Now all elements of the spray gun are tightened and it is ready for use
Read also: What is fluoroplastic and where is it used?
To maximize the scope of use of a homemade spray gun, you can use nozzles with different diameters.
Spray gun at home
Such a design can be made from a variety of materials that most people have, for example, from a vacuum cleaner, car camera, refrigerator, ballpoint pen, etc. Moreover, such models will be in no way inferior to their factory counterparts and even surpass them to some extent. This directly concerns the price of such equipment.
A hand-made spray bottle is ideal for painting with water-based paint, for whitewashing or other necessary work. Powder paint, in turn, requires more expensive, high-quality and powerful equipment. Therefore, for many, the question of how to make a homemade spray gun with your own hands remains interesting.
Benefits of using a homemade spray gun
The main advantages of the spray gun when painting any surfaces include the following parameters:
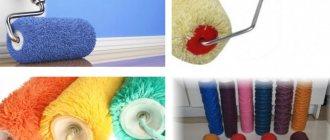
- uniform application of the paint layer;
- there is no lint left from the roller or bristles from the brush on the painted surface;
- all painting work is reduced several times in time than using other tools;
- very economical paint consumption;
- low weight and dimensions of the spray gun;
- ease of use.
Read also: What are the basic requirements for welder clothing?
In most cases, the spray gun is used for the following purposes:
- when painting furniture, fences and other wooden structures;
- painting metal surfaces, including cars;
- to obtain dense structures imitating plaster and other decorative surfaces.
Probably, few people know that sometimes a factory-made spray gun is inferior in quality to applying paint with a homemade spray gun. Naturally, a lot depends on the skills of the person doing the painting, and not just on the tool.
Aerosol can sprayer
An aerosol can sprayer is one of the easiest DIY options for water-based paint. Making it from scrap materials will not be difficult.
To create such a device, you need to prepare the following materials:
- bicycle camera;
- plastic bottle;
- bicycle pump;
- aerosol can (for example, deodorant).
After preparing all the necessary materials, you can proceed directly to the work:
- Remove the nipple from the bicycle tube.
- Drill a hole in the bottle.
- Glue the nipple on the inside of the container.
- Using a hacksaw, cut out the module that sprays paint from the can. In this case, you need to select it in such a way that its diameter is identical to the hole in the bottle.
- Using cold welding, attach the module to the container. It must be taken into account that the connection must be sealed, since air will be supplied under pressure.
- After this, do a test spraying with the device. It is worth remembering that the design is homemade and will not withstand more than three atmospheres.
Such a spray can will cope perfectly with the assigned tasks: painting with water-based paint and lime.
Spray bottle from a vacuum cleaner
If you need to paint large surfaces, a manual sprayer will not be suitable, as the process will be delayed. In such cases, it is necessary to make a device with an automatic air supply system. A refrigerator compressor or vacuum cleaner is perfect for these purposes. It is not difficult to make such a “torch” at home. Such designs are ideal for creating a homemade automated compressor that will cope with water-based paint, but they are not suitable for powder paint.
Refrigerator as raw material
This option is characterized by great reliability and performance; it will work for a long time and be useful in the household. But on the other hand, its production will require a lot of effort and energy, as well as time. Although it is worth it, since in the end you can get a very good device.
To make a spray bottle from refrigerator elements, you need to prepare the appropriate materials and tools:
- large container for paint;
- one hose 45 centimeters long and two 15 centimeters long;
- several clamps;
- machine gasoline filter;
- steel wire;
- screws;
- board.
Before starting work, you need to find something that will serve as a receiver. A fire extinguisher, a canister, or any container that can be hermetically sealed may be suitable for this.
Using a pre-prepared board, you need to attach the compressor from the refrigerator to it. Next you need to understand in which direction the device operates, where the air comes from and where it enters. To do this, you need to connect it to the network and start it. The pipe from which the air will come out will serve as an exit. The second tube will be the inlet, and the third on such compressors is closed.
It is necessary to connect hoses to the inlet and outlet openings, which will clamp the tubes tightly, and additionally clamp the joints with clamps.
As for the third closed tube, it serves to lubricate the compressor itself, and it is not recommended to touch it until the first malfunctions appear.
You need to drill two holes in the receiver. A large hose is connected to one, which, in turn, on the other side is connected to the inlet pipe of the compressor. A smaller hose is attached to the second hole in the receiver and the compressor outlet pipe on the reverse side.
To monitor the pressure in the system, it is necessary to install a pressure gauge. Only after this should you connect the spray gun. For mobility of the device, you can attach wheels to it.
Making a spray bottle at home is not difficult if you apply a little effort.