Cars admin26.02.2020
• Preparing the premises. It should be kept dry, clean and well ventilated. Make sure that the surface to be painted is protected from the effects of strong air currents. The optimal temperature for painting is +10 0 C + 30 0 C with a maximum humidity of 85%.
• Compressor for painting
and the paint sprayer will work productively if there is homogeneous and completely liquid paint. Therefore, before painting, the coloring material needs to be thoroughly stirred and filtered.
• Compressor
assembled and turned on, checking its performance at idle. At this time, the joints of the hoses are checked for complete air tightness.
• Compressor
installed in a position that can ensure the least amount of movement from place to place, both indoors and outdoors.
• To determine the optimal distance and desired angle of inclination, it is necessary to do a test painting of any surface. Typically, the maximum distance from the air gun with paint to the area to be painted is 30 cm.
Stage 2. Painting
• When the compressor is for painting
works, you need to monitor the indicators on its pressure gauges. In addition, the paint sprayer is equipped with a reducer for regulating the air pressure at the outlet, which is also monitored. It depends on how viscous the consistency of the coloring material is.
• Compressor
must be adjusted so that when the compressor unit is first started, air comes out of the pneumatic spray gun first and only then paint. It is imperative to adjust the volume of air supply and paint mass directly on the spray gun. To adjust, turn the screws on the spray gun itself. When a large amount of paint and a small volume of air enters its head during the painting process, the surface is covered with a thick layer of paint, which is fraught with the formation of drips. If air is supplied in excess, then excessive spraying of the paint mass occurs with the formation of fog and, as a consequence, its unjustified excessive consumption.
• Compressor for painting
designed to obtain a uniform painted layer on the surface, which eliminates circular and oscillatory actions with a pneumatic gun. It moves strictly horizontally or vertically. To ensure uniformity of the paint layer, the paint is applied with a slight overlap of one color stripe by another.
• Compressor
it is necessary to install it so that the pneumatic spray gun is held in a strictly vertical position, with its maximum approach to the painting area being 15 cm, and its distance being 30 cm. If it is displaced from the vertical line, the painting will be uneven.
• During operations with a paint sprayer, you should constantly monitor the level of the spray material to ensure its timely replenishment. Compressor
should not supply air to an empty spray gun, otherwise paint emissions will occur.
Step 3: Cleaning the spray gun after finishing painting
• A 1/3 empty paint can must be filled with solvent and the inside must be completely cleaned, using a hair brush 0.3-0.4 cm wide. Then, by pressing the trigger of the gun, the solvent is passed through the nozzle. Take a clean rag to wipe the internal surfaces of the container, after which it is refilled with solvent (about 1/4) for the same passage through the nozzle.
• Compressor
and the spray gun are disconnected from each other. The removed head and nozzle are placed in a small vessel with solvent. The shut-off needle is removed for thorough rinsing and wiping. The connection between the nozzle and the gun is washed with a brush and solvent. The spray head along with the nozzle is thoroughly washed with solvent using a hair brush. After washing, all parts are wiped dry with a clean, lint-free cloth, then the pneumatic sprayer is assembled. You need to pour about 50 g of solvent into a paint can and pass it through the nozzle.
• Fill the bottle again with 50-70 g of solvent, close the lid and put away until you need to use the compressor again for painting.
. The spray gun should be left with solvent, which ensures its working condition for the next painting.
The application of paint and varnish material to a surface has certain features, the observance of which determines the overall quality of the applied coating. When working with a pneumatic spray gun, you should adhere to the established sequence of actions to ensure the best result, without smudges, streaks or peeling of the material. If you have started paint spraying procedures, but do not yet have experience in carrying them out, this publication will help you understand the technology of the process and will bring your work closer to a professional level. We hope that the presented theoretical basis will become a good basis for your further development in the field of painting.
Thinning paint
Not all paint and varnish mixtures are a finished product suitable for spraying with a spray gun. Most compositions are a concentrate that requires additional dilution with a more fluid liquid (solvent or water for water-based paints). Information about mixing proportions is often indicated by the manufacturer on the container, but the optimal viscosity can be selected experimentally.
Most solvent-based paints can be thinned to a ratio of 4 to 10 (solvent/paint). Water-based compositions are recommended to be diluted no more than 1 to 10 (water / paint). The products offered are very diverse, and each material has its own characteristics. In order not to make the mixture too liquid, reducing the quality of its application, it is recommended to add solvent in small portions.
Not all paints and varnishes and solvents can be mixed successfully. For example: painting with hammer paint with a spray gun requires dilution with xylene or solvent, and when using other compounds, its characteristic texture disappears.
You can check the viscosity of the paint using a viscometer or an ordinary wooden stick and a little idea of the required thickness. The optimum density can be determined by test sprays. If the drops do not stretch into an even film, but retain the shape of the smallest tubercles, then the mixture requires more dilution. The mixture ready for spraying should have a fairly liquid consistency, reminiscent of fatty kefir.
To avoid clogging the spray nozzle, the diluted mixture should be passed through a special filter or nylon stocking in advance.
Painting surfaces of different textures
Vertical walls should be painted from top to bottom. The paint must be applied across the wall using horizontal movements.
When painting wooden furniture, it is quite possible to use different types of paint. If you want to give furniture parts a decorated look, you can use hammer enamel. Do not forget that wood, especially old wood, is quite hygroscopic, so you need to apply paint to wooden furniture in several stages, waiting until it dries completely. In addition, furniture is painted along the location of the wood fibers. This way the paint will lie flat and blend into the natural fabric and grain of the wood.
The most common use of a spray gun is painting walls, ceilings and other large, flat areas. Painting them with a brush or roller takes a long time, is difficult and not always evenly and efficiently. Therefore, painting such surfaces is most often done with a spray gun. It is also convenient to use a spray gun for painting furniture, especially figured and carved ones.
Safety requirements
The operating principle of a pneumatic spray gun poses virtually no risk of serious bodily injury, but poses a more hidden threat to the eyes and respiratory organs. Paint mist generated during tool operation easily penetrates into the lungs and other unprotected areas, causing serious damage to health. LMCs based on organic solvents have an accumulative effect, which means that their sediment cannot be removed from the body. Safety precautions when working with a spray gun boil down to the use of protective elements and preparation of the room.
The main protective equipment of a painter:
- Respirator mask (or half mask) with a filter.
- Safety glasses (if half mask) with a tight fit to the face.
- Painting overalls. If the painting process becomes your daily activity.
The room where the material is sprayed must be dry and well ventilated (no draft). The surface should be installed at an obtuse angle in relation to the light source (or vice versa, the light in relation to the surface). Thus, the smallest unevenness of the layer will be noticeable. Painting should be done outside in dry, windless weather.
Surface painting works
After this, they begin to apply paint to the surface. The choice of method depends on the specific surface. If you plan to paint horizontal parts of the house, for example, the ceiling, you should start from the perimeter, gradually approaching the center. Apply paint to the surface using uniform transverse movements so that the next layer overlaps slightly with the previous one. The same technique should be used when painting car parts, regardless of their position - horizontal or vertical.
- You need to carefully ensure that the junctions of the layers are not too dense, otherwise they will stand out against the general background of the paint.
- The distance from the device to the surface to be painted must be the same all the time.
- The sprayer does not need to be tilted or otherwise repositioned.
- The speed of movement of the spray gun should also be the same.
This way you can avoid errors when applying paint, the surface will be smooth, with an equal layer of paint and a uniform shade of color.
Painting the ceiling with a spray gun is very convenient compared to using a roller or brush. The spray gun allows you to apply paint in a thin, even layer. You don’t need a stepladder to get closer to the ceiling surface; in addition, paint consumption is significantly reduced when working with a spray gun.
Read also: Small soldering iron for microcircuits
Test Spray
Having prepared the surface, paint, room and protective equipment, it’s time to move on to painting. If you have previously had positive experience working with a spray gun, you can proceed to the main surface. If there is no previous experience or it is unsuccessful, it is recommended to carry out a series of test sprays on waste paper (cardboard, newspaper) in order to calibrate the air supply, material and torch size (so that the spray gun can work most effectively).
Calibration of a pneumatic spray gun is a rather delicate process with many features, to which we have dedicated a separate topic on our website. If you want to make your work easier and get a decent result, we recommend that you read the detailed guide “ How to set up a pneumatic spray gun
».
Essentially speaking, you must obtain the correct shape of the spray torch (an elongated oval) by rotating the tool's controls. This process, with commentary, is clearly demonstrated in the video below.
What should you know about the design of the device?
There are different models of spray guns, differing in the way they are powered and how they work. In the future, the nuances of operating electric and pneumatic devices will be considered, but for now it is worth familiarizing yourself with their general structure. Regardless of the power base, all spray guns have the following elements in their design:
- Tank. Paint reservoir.
- Housing provided with a handle and trigger.
- Nozzle. Nozzle spraying the mixture.
- Elements for regulating paint supply parameters.
- Inlet fitting. Connecting element for connecting the tank to the device.
Now we can move on to the question of how to use a spray gun with a standard design. The operator is required to first carry out preparatory work, then perform refueling with setting the tool, and then apply the mixture to the target surface using the trigger. In general terms, this is how the workflow is built, but now it’s worth considering it in more detail.
Cleaning the spray gun after use
Having figured out how to properly paint with a spray gun so that it is even, and having carried out the required work, all that remains is to clean the device from any remaining material and put it aside until the next “combat” task arises. To maintain the performance of the tool and effectively use it in subsequent work, it is necessary to keep it clean. Since paintwork materials tend to dry out, clogging all possible holes, it must be removed from the internal channels of the spray gun as quickly as possible. This is quite easy to do. You will need a solvent, a small container and a brush (preferably).
Preparing and painting a car with a spray gun
Parts must be sealed with newspapers and masking tape very carefully so that the aerosol does not get on the headlights or glass. The newspaper should cover the parts very tightly from painting. If during the inspection of the car shallow or deep dents or cracks are revealed, then the problem areas must be straightened.
If your own personal experience is not enough, then it is better to seek help from a specialist who will answer questions about how to properly paint a car. Straightening is carried out using extraction devices, as well as special straightening hammers and supports, which are included in the kit.
In order to answer the question: how to paint a car correctly, it is necessary to take into account that painting a car will be successful only if great attention is paid to thoroughly preparing the car for painting. Preparation takes up 84% of the entire painting process.
After the dents have been removed, you can clean and smooth out chips, welds, and matte old paint. To do this, use a special plane, a grinding machine and a set of sandpaper. It is necessary to remove rust to its base, to the metal.
After this, degrease the surface and fill any uneven areas. It is best not to waste time on cleaning and degreasing the surface, because these are the problem areas that become the main sources of corrosion.
There are several stages in preparing a car for painting with a spray gun:
After removing the old coating, it is necessary to level the surface. This can be done by straightening and without putty. The putty should be applied with a special spatula in two thin layers. It is best to use a two-component, universal putty.
Any master who is ready to answer the question: how to paint a car correctly will recommend applying a thick layer of putty during preparation for painting, because otherwise it will definitely come off and crack. Preparing a car takes much longer than painting it.
Read also: How to measure amperes with a tester
After the putty has been applied, it is necessary to sand the surface. Before painting, the surface must be perfectly correct, smooth, and free from even the smallest damage or irregularities that may appear after painting.
Before fully or partially painting a car, it is necessary to remove bad paint, if any. Smooth areas are washed with water, wiping the tape with Brite.
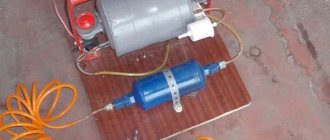
Compressor operating principle
The device is capable of supplying paint composition under pressure. This allows you to process large areas efficiently and quickly. The compressor is responsible for supplying air at the required pressure. Externally, it is a cylinder containing compressed air. The role of a pneumatic paint sprayer is played by a spray gun, consisting of a paint container, a handle and a working spray nozzle.
Today you can purchase equipment of various types and capacities. To carry out paint and varnish work, an oil-type air compressor is used. The option that works without the use of oil is more suitable for purposes such as inflating wheels.
Before spray painting, you should select the correct equipment model. The metal version is rightfully considered the most reliable. It is better to choose a medium tank volume. A tank that is too small will require constant refilling of paint; a tank that is too large will create difficulties in work.
How to use a pneumatic spray gun?
Pneumatic devices operate using compressed air, which releases paint particles under pressure. In terms of processing quality and convenience, this is the best solution in the class of spray guns. But working with such a pistol requires serious organization. Initially, auxiliary equipment is prepared, including a compressor with a receiver. Next, the source of compressed air is connected to the spray gun via a hose, after which a tank with a spray nozzle is included in the design. How to use a spray gun with a compressor to achieve high-quality results? Such devices themselves are quite maneuverable and ergonomic, so painting accuracy will be guaranteed in any case if you have the proper skills. Another thing is that there are certain nuances regarding the technique of working with a gun, which, however, can also be attributed to electric spray guns.