Every car owner sooner or later is faced with the need to purchase a car compressor. This device is needed in the home garage to perform many operations, which are discussed in detail below. Choosing the right car compressor in today's market is not so easy. There are a lot of manufacturers, models, varieties and types of such equipment. And here it’s easy to get confused and make a wrong choice. That is why, before making such a purchase, it would be correct to first understand some of the features of compressor equipment. The article discusses the main types of compressors and their parameters that you should pay attention to. There are also some practical tips on choosing a compressor for inflating tires, for an airbrush and for a spray gun.
Should I buy a unit or assemble it myself?
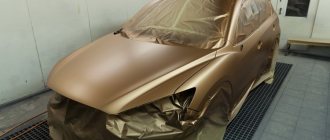
Therefore, it makes sense to make a compressor for painting a car yourself. To do this, it is worth studying in detail the structure and operating principle of a real, factory compressor. And it is the same for all samples. High pressure is created in the cylinder. The method of air injection is not important - it can be mechanical or by hand. In the case of manual supply, we save a lot of money, but where can we find a slave capable of pumping air continuously? The automatic process will eliminate many disadvantages and problems. An exception is changing the oil in the compressor. Only the mechanism is capable of continuously supplying a stream of air into the cylinder! The theory is simple; making a personal compressor station with your own hands is quick and easy.
Compressor characteristics
The main characteristics of compressors that are relevant for different types of devices are:
- operating pressure;
- power;
- performance.
Working pressure is measured in bars or atmospheres. This parameter determines how strongly the device can compress air. Performance shows the rate at which air is pumped into the receiver over a certain period of time. It is measured in liters or cubic meters.
The power parameter indicates the operating efficiency of the electric motor. It is measured in kilowatts.
Productivity depending on the type of spray gun:
- HP - less than 300 l/min;
- HVLP - 360-520 l/min;
- LVLP - 150-360 l/min.
When choosing a device, you need to consider its main characteristics
Compressor from a car chamber
How to make a paint application installation from a simple car camera? List of required materials:
- pump with pressure gauge for blower function,
- car camera for receiver function,
- awl,
- repair tool kit,
- nipple from a car camera.
The difficult stage is the creation of a compressor station. The camera should be checked for leaks. She's being pumped up. If there is an air leak, the problem is solved by gluing or vulcanizing the raw rubber. Then a hole is pierced with an awl. We place the nipple in it for uniform air flow. The auxiliary fitting is secured by gluing. A repair kit will help you cope with this work. Then the fitting is attached to the spray gun. To control the release of the air stream, unscrew the nipple.
But it is noteworthy that the old nipple is not removed. It will act as a valve and hold excess pressure. A control check of the pressure value is carried out by spraying a dye onto the metal surface. If the paint lays down in an even layer, then the installation is functioning perfectly! Additional control of the pressure value can be checked with a pressure gauge. The air flow, even after turning on the aerator key, must be intermittent!
Designing a home compressor is easy. And after using it, car painting will be of better quality than using a spray can. When working at home, you should avoid the penetration of dust, foreign bodies, and water into the car chamber. These things can get into the spray gun and the painting will have to be done again. With proper operation, our unit will work for a long time, and it is advisable to automate air injection.
Craftsmen often noticed that a homemade compressor can last much longer than a factory one. And regardless - domestic or imported. An item assembled with your own hands has positive energy. It is easier to repair and maintain - after all, you are well aware of its weaknesses and design.
Where are certain types of compressors used?
You need to select a compressor taking into account your tasks:
- For small one-time jobs, such as painting a wooden door, a small section of a wall or ceiling, it is worth using a piston compressor. Its resource will be sufficient for painting work.
- For complete car painting work, it is recommended to use a powerful oil device that is belt driven. You can also opt for a screw model.
- For a shop that does a lot of automotive work, an industrial-type screw device is a must. It must be belt driven. Such equipment can function all day.
Compressor from an old refrigerator
The unit, made from components of an ancient refrigerator, will not be inferior in performance to compressors from elite manufacturers. To construct it you will need:
- pressure gauge,
- rust converter,
- compressor receiver,
- threaded adapters,
- relay for high-quality control of the flow pressure force in our compressor,
- fuel filter element for gasoline,
- oil moisture separating filter and its gearbox,
- the engine driving the installation,
- cross with 3/4 inch thread for water pipes,
- switch for 220 V voltage,
- sealant,
- motor oil grade 10W40,
- brass tubes,
- oil hose,
- simple syringe,
- thicker board
- metal paint,
- filter element of the power supply system for a diesel engine,
- furniture wheels,
- needle file,
- studs, nuts, washers,
- fum tape,
- car clamps.
A compressor unit from a rare Soviet refrigerator can be useful as a motor.
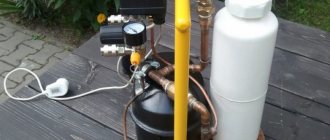
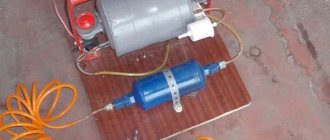
In our example, a compressor from a refrigerator is the most optimal solution. It has one great benefit - a compressor start relay! Very old Soviet models have an advantage over foreign competitors. They are capable of pumping up very high pressures. During assembly, it is necessary to carefully remove rust from the actuator unit. The rust converter will be able to perform high-quality treatment of the compressor and prevent further oxidation. This will simultaneously prepare the working engine housing for painting. Then they move on to changing the oil. It is clear that if the old refrigerator was subject to maintenance, it was a very long time ago. This also applies to changing the oil in it. But this situation also has a justification - the system is absolutely completely isolated from the environment. Semi-synthetic oil is suitable. This modern lubricant has properties no worse than compressor oil. It will cope with the task remarkably well - it contains many high-quality and effective additives. On the compressor body we find 3 tubes: two of them are open, the remaining one is hermetically sealed. We supply power to the compressor unit and determine the nature and direction of the air flow. It is better to immediately write down or mark the intake and exhaust ducts.
Receiver
How to make a receiver?
It is good to use a cylinder from a simple fire extinguisher. It can withstand high pressure perfectly and has a good margin of safety. The cylinder is an excellent solution for attached technological equipment. As a basis, you can take a fire extinguisher of the OU-10 brand with a volume of 9.99 liters. It is able to withstand pressure up to 16 MPa. We unscrew the locking and trigger mechanism from our workpiece and screw in the adapter. If we find corrosion, we will mercilessly remove it. It is difficult to remove internal rust; to do this, pour the rust converter into the container of the cylinder and shake out the contents. After cleaning is completed, screw in the crosspiece for the water supply. A wooden board will be a good base for mounting the motor and fire extinguisher body. It is advisable to place all working parts and assemblies on one line. Threaded rods will serve as fasteners; they must be threaded into the holes obtained by drilling. You will need nuts and washers. Then take the receiver and place it vertically. You will need 3 sheets of plywood. One sheet is for a through hole for the cylinder. The remaining 2 sheets are fastened with self-tapping screws to the main board and glued to the sheet that holds the receiver. At the base, a recess is made from wood for the bottom of the receiver. To move the unit, we attach furniture wheels.
The system should be protected from dust using a gasoline filter for rough cleaning of the fuel. It will act as an air intake. A rubber hose and an inlet tube from the supercharger will come in handy. The air pressure at the inlet is very low, clamps are not useful. An oil dehumidifier is installed at the outlet to block liquid droplets. A filter element for the power supply system (in simple terms, a filter) is suitable. You will need clamps for the car. The oil moisture separator is connected to the input of the gearbox, and the output is screwed into the crosspiece we have already prepared on the left side. A pressure gauge is screwed into the right side to monitor the pressure value. And on top of the crosspiece we screw in a relay for adjustment.
Technology
What does painting walls and ceilings with a compressor look like?
Preparation
- The paint is diluted with solvent by 15-20 percent and thoroughly mixed with a mixer. The target consistency corresponds to the thickness of full-fat milk. The type of solvent corresponds to the type of paint: water for water-dispersed dyes, white spirit for alkyd dyes, and so on.
- Furniture and other household items are removed from the premises. Anything that cannot be taken out is wrapped in plastic. The floor is covered with it; The edges of the film are fixed with masking tape.
The room is ready for painting.
Advice: completely removing linoleum and baseboards during work is much easier than cleaning them after painting.
- The surface to be painted is cleaned of dust and other contaminants; Before painting with dyes based on organic solvents, the base is thoroughly dried.
- The porous base is pre-primed before painting with a penetrating primer. It will improve paint adhesion and reduce paint consumption.
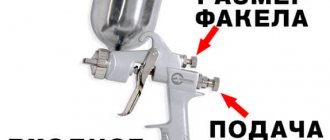
How to prepare a spray gun for use?
- Connect the spray gun to the compressor.
- Pour a small amount of solvent into the spray bottle.
- Set the pressure regulator on the compressor to the appropriate level for the type of spray gun and turn on the compressor.
- After unscrewing the dispenser screw (usually it is the lower one, located above the handle itself), blow out the sprayer. After a small amount of air the solvent should come. If this does not happen, the spray gun will have to be disassembled and cleaned.
- After the tank is empty, fill it 2/3 with paint and attach it to the sprayer.
Attention: it is advisable to filter the paint through double-folded gauze or, better yet, through nylon tights. The instructions are due to the fact that small lumps of thickened paint very effectively clog the nozzle.
A clogged sprayer will have to be completely disassembled and washed with solvent.
Painting
Painting itself is not much different from using an aerosol can of car enamel.
However, let's pay attention to the main points of painting.
- To adjust the flow of dye, it is better to practice on a piece of cardboard or hardboard. The paint should be applied in a thin layer, without drips or sudden bursts.
- The optimal distance to the surface to be painted is 15-25 centimeters. With further increase, more dye will be uselessly deposited on the floor.
- The stripes of paint should overlap each other by several centimeters.
- The speed of the spray gun should not be too low. It is better to apply several thin layers than one excessively thick one, which will cause untidy streaks.
- The next layer of paint is applied only after the previous one has completely dried. For alkyd and oil paints, the drying time of the layer is at least a day, for water-based paints - from an hour to two, for nitro enamels - 30-45 minutes. The movements of the spray gun are perpendicular to the previous layer.
Painting sequence in two layers.
- Every two or three tanks, rinse the spray gun nozzle with solvent.
Shutdown
After the painting is completed, we have to do a few more simple operations with our own hands to prepare the tools for storage.
- The remaining paint is drained from the tank into a container for storing it..
Note: the exception is two-component paints, which are mixed with a hardener before use. For obvious reasons, once cooked they are used as completely as possible; the remains are disposed of.
- The tank is washed with solvent . It can be poured into a separate container for later use when thinning the paint.
- A small amount of solvent is then poured into the tank and passed through a sprayer . The goal is to remove any remaining paint from the nozzle; The criterion for the spray gun to be ready for storage is a transparent solvent at the outlet.
After washing, all equipment is ready for storage. You can start cleaning.
The washed spray gun is disconnected from the compressor and put away for storage.
Adjusting the pressure force in the system
The adjustment relay allows you to set the desired range or limit of the receiver pressure.
And at the required moment, interrupt the power supply circuit of the system supercharger. It is recommended to use RDM-5 as a performing unit. With its help, the compressor will start when the air pressure in the tank drops below the required value and will turn off if the parameters are higher than permissible. The required amount of air flow is adjusted to the relay using a pair of springs. The purpose of a large spring is to apply light pressure. A small spring allows you to adjust the upper limit and set the final limit for turning off the entire compressor installation. RDM-5 was designed for water supply lines. In reality, this is a simple two-pin switch. In this example, one contact is needed for switching with the network zero, the other is needed for switching with the supercharger. The mains phase is carried out through a toggle switch for connection to the second input of the compressor installation. The toggle switch will help you quickly disconnect the system from the power supply. All electrical contacts are well soldered. Then the compressor unit is painted and tested. During a test run, the operation of the relay and the tightness of the system are checked. A test run will allow you to determine the optimal pressure for painting with a uniform layer. To ensure high-quality and long-term operation of the compressor, maintenance is required. An important step in this case is changing the oil.
If you decide to buy a factory-made air compressor, study its parameters and capabilities. Give preference to well-known companies.
Choosing a compressor for a spray gun
To understand how to choose a compressor for a spray gun, you need to consider the following features:
- Select a sprayer for the compressor. Otherwise, the system will not work normally.
- If you do not plan to paint frequently, you should not buy a device at a high price.
- The sizes of nozzles depend on the types of coatings. It is best to buy a device with the ability to replace nozzles or a universal size of 1.4 mm.
What compressor capacity is needed for painting with a spray gun?
Many craftsmen are interested in what specific compressor performance is needed for painting with a spray gun. This parameter varies - from hundreds to several tens of thousands. The indicator is measured in liters per minute.
Paint sprayers require an average of 100-300 l/min. In this case, specific indicators depend on the diameter of the nozzle. The lower this indicator, the lower the consumption.
Note! To paint a car, small diameter nozzles are used. Therefore, the required consumption level does not exceed 180 l/min.
Average performance is sufficient for painting a car.