4896 0 0
SlavagodM October 21, 2016Specialization: master of interior and exterior finishing (plaster, putty, tiles, drywall, lining, laminate, etc.). In addition, plumbing, heating, electrical, conventional cladding and balcony extensions. That is, the renovation of an apartment or house was done on a turnkey basis with all the necessary types of work.
A plasterboard ceiling can be shaped
A plasterboard figure on a ceiling or wall can be made in two ways - by gluing a cut sheet and a frame (lathing) structure. The choice of such methods most often depends on the ability to occupy free space, which is so lacking in most of our apartments.
I suggest you familiarize yourself with the methods of manufacturing both structures, with the types of gypsum boards, and the video in this article will complement this knowledge.
Design options
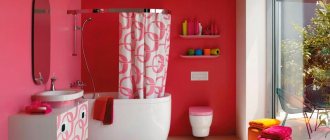
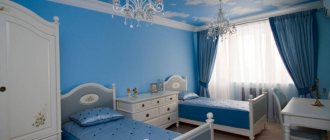
The use of plasterboard to decorate the ceiling in the bedroom is the optimal solution.
Important! The technology for constructing ceilings of the most complex and even intricate shapes has been carefully developed and, most importantly, mastered by the majority of builders. Manufacturers produce many components for them, the use of which allows you to solve any problem.
The shape of the structure will be determined only by your ideas; today it is possible to bring any of them to life.
Color selection
Giving advice on what color to choose is a thankless task; each person has his own preferences. Let us just remind you how different colors affect us:
- Blue and blue colors have a relaxing and calming effect on our muscles. May give the impression that the room temperature is lower than it actually is.
- Green helps relieve fatigue and calm you down - it is the most “natural” color, it is most often found in nature.
- Yellow is associated with joy and activates brain cells and hormones. For humans, yellow, like green, is the optimal color.
- Red excites, increases muscle tone and stimulates the nervous system, but can cause aggression.
- Purple and orange colors can be present in the bedroom, but they should not be the main colors or dominant ones.
- Traditional white is considered boring by many. They are partly right. However, on a multi-level plasterboard ceiling with complex combined lighting, matte white will definitely not seem boring.
Shape selection
For a bedroom, a design with rounded, smooth shapes is preferable. Designs with irregular shapes and wave-like lines will look and “work” well. A plasterboard ceiling can fit into any bedroom interior style.
Very important! The structure must not be “overloaded”! Remember that it is a means to an end, not the end itself. The goal is to create an original, comfortable and cozy design in your bedroom
However, even a flat (single-level) suspended ceiling in the bedroom can be made unusual due to finishing materials and lighting. However, two-level and multi-level structures provide much more opportunities to make the ceiling truly original and interesting.
Two-level plasterboard structures
Despite all the obvious advantages, plasterboard structures also have certain disadvantages, primarily the reduction in the volume of the bedroom due to the peculiarities of their installation and significant weight, which does not allow installation alone. Although, as usual, in our country there are craftsmen who, with the help of small-scale mechanization, manage to install plasterboard structures without assistants.
Two-level and multi-level designs, in addition to decorative functions, help visually return to the bedroom the volume that the suspended ceiling structure “eats.” And even increase it. For this purpose, niches are used in which lighting is usually mounted. This technique “raises” the ceiling.
Changing the height of the suspended ceiling in different areas is used by designers to zone the bedroom space or focus attention on individual interior items (bed, dressing table). The ability to create lines of almost any shape from plasterboard makes it possible to implement any design idea.
Multi-level suspended structures
Such ceilings of complex configuration with several levels are difficult to design and install. A beginner is unlikely to cope with such work. However, a multi-level ceiling will bring elegance, grace and beauty to the interior.
One of the most popular forms is a multi-level design, along the perimeter of which there is a first level with built-in lighting, and in the center of the main part there is a recessed circle, which also has its own lighting.
Advice. It is better to avoid bright colors when using multi-level ceilings. Give preference to light or muted shades. And remember that in a small bedroom, a complex-shaped structure can visually narrow the space, because in such an area elements of different levels will appear as a jumble of parts of different configurations.
In any suspended ceiling, especially a multi-level one, it is easy to hide communications and the flaws that the builders made.
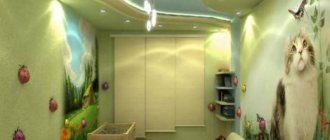
A hand-painted ceiling will look interesting in a children's bedroom. This way you can create a truly unique design that will fully correspond to the interests of the child.
How to choose a design and determine dimensions
When planning to make a flower from gypsum plasterboard on the ceiling, you need to choose the right dimensions of the decoration and decide on the shape.
You need to pay attention to the following points:
- If the room has a small ceiling height, you should not install a multi-tiered element: this will negatively affect the free space, reducing it and creating an unpleasant feeling of “squeezing.” With a height of up to 2.5 meters, a flat flower, the shape of which can be any, will look very beautiful. It is best if the petals have smooth shapes, and the element itself takes up from 30 to 50% of the surface. With a low ceiling, it is permissible to simply glue the flower using special mounting compounds.
- If the room has high ceilings (2.7 meters or more), you can install a multi-tier structure using a frame. It is important to ensure that the base surface is suitable for mounting such a product.
- In the room it is better to install a flower with rounded shapes, in the living room you can arrange a whole composition on the ceiling, and in the hall products with sharp tips of the petals look optimal.
- If you are planning to decorate the ceiling of a children's room, it is better to choose simple shapes.
Installation of plasterboard ceilings
Before work, you should design the design of the structure. It is also worth deciding in advance whether lighting mechanisms will be used inside the plasterboard layer. Then the height is marked. The horizontal line is marked using a level. Holes are made along the marked lines where dowels with guides are attached. After this, hangers are installed to which the main profiles will be fixed. Then the structures are further strengthened with the help of transverse elements, and electrical wiring is carried out. In this case, it is better to pass the wiring through a corrugated pipe.
Leveling the ceiling covering
The plates are cut so that the ends of the product fall on special supporting parts. The cuts are made with a sharp knife. Also at this stage all the necessary holes for lighting fixtures are made. The sheets are attached to the frame system both parallel and perpendicular to the supporting profiles. The joints of the sheets must be placed on the profiles.
Installation of profile structures
Then finishing work is carried out. Before applying putty, you should wait a couple of days for the structure to shrink. Then the surface is puttied. In this case, reinforcing tape is laid along all joints, which helps to avoid cracks in the coating. The frame system for drywall will take up a small gap from the height of the room. Therefore, multilayer structures are not suitable for low ceilings. It is worth considering that soundproofing materials are also located in the interceiling space.
With the correct selection and installation of the structure in the hall, you can use functional zoning, as well as visually increase the space of the room.
Watch this video on YouTube
Bar counter
Using drywall, you can create a bar counter and decorate it in some original way. Such decorative elements look good in a variety of places.
First you need to make a frame. To make the structure as rigid as possible, it is better to use a solid profile for the corners. Using crabs, secure the guides and cross profiles. The frame should be stable. Make sure it is strong and install drywall. Racks can be made with niches or completely smooth. It will be necessary to putty the places where there are fasteners and joints.
Then sand the product and apply a coloring compound to it. After this, you can begin installing the lighting (if you want to decorate the resulting bar counter in this way).
For more information on how to make a drywall bar counter, see below.
Beautiful DIY plasterboard construction: types
Plasterboard structures are a kind of box, lined with gypsum plasterboard sheets and decorated with decorative finishing. They are used for arranging interiors indoors. Let's take a closer look at their varieties.
Types of plasterboard structures:
- Ceilings. These designs can be simple single-level, which are used to level the surface, or complex multi-level with shaped elements, lighting, tension fabric, installation of various lighting systems, etc.
- Walls. A simple design is used to straighten curved walls before decorating them. More complex ones are, as a rule, decorative partitions for zoning a room with all sorts of shaped elements. Also, full-fledged walls are constructed from plasterboard to separate one room from another. They can be equipped with a door or a beautiful arch.
- Arches. According to the shape of the openings, interior or decorative arches can be classic (the most common type), romantic (with rectangular arches and rounded corners), as well as trapezoidal (with a trapezoid-shaped arch). The portal arch is rectangular in shape of the doorway, and modern is something between a portal and a classic, with a small radius of curvature. An ellipse arch, on the contrary, has a large radius of curvature, and a semi-arch is an asymmetrical structure, one side of which is made in the form of a portal, and the other is any of the above varieties. Arches and semi-arches are mounted both for zoning and as decoration.
- Furniture. Furniture structures made of plasterboard are most often all kinds of racks, shelves, niches in the walls, etc. It is also quite possible to use gypsum plasterboard to build a mini-wall for the living room for a TV, a wardrobe and a bar counter. Furniture made from gypsum plasterboard is beautiful, original and quite functional: the frame of the structure provides for the installation of doors for niches and tabletops. Moisture-resistant drywall is great for use in the bathroom and kitchen. With proper finishing, you can use it to assemble a niche for a washing machine, a stand for a bathroom sink, and even a kitchen work area (a table with a sink and storage sections).
- Decorative boxes. They are used to hide all kinds of communications: wires, pipes, cables, etc. Drywall is used to level door and window slopes after replacing windows and doors, and to sew up ventilation pipes when moving kitchens and bathrooms.
- Decor. Decorative partitions with geometric niches, figured structures on the walls and ceiling, false fireplaces and columns - all this is considered decor.
Drywall allows you to make a simple redevelopment of a studio apartment or a separate room. Thanks to the installation technology of this material, a wall, piece of furniture or decor can be built almost anywhere in the house.
Start of flower installation
If the product is flat and the surface on which the installation is to be made does not have any unevenness, you can use an adhesive composition and fix the structure directly to the ceiling. If there are protrusions, chips or cracks, the base surface is first repaired and puttied.
Multi-tiered elements are fixed using a frame, and the order of work will be as follows:
- Preparatory stage . It is necessary to make markings on the surface, marking the attachment points of the load-bearing parts and the guide profile. It is important to maintain the distance between the base ceiling and the suspended structure: it must be at least 10 cm in order to install lamps and ensure ventilation of the room.
- Frame installation. The profile is attached with an indentation, fastening is carried out using self-tapping screws. Fastening elements installed vertically are mounted in increments of 40-50 cm, guides are fixed on them along the perimeter and at the junction of individual elements of the flower. In order to make the structure as level as possible, it is necessary to check the location of the frame using a building level for any distortions.
- Installing a chandelier mount. If the lighting is made in the form of a strip of LEDs or light local lamps, it is not necessary to attach them to the base ceiling. To fix the tape, you can install a profile around the perimeter or at the joints of the petals.
Design of a plasterboard ceiling in the bedroom
When creating the design of a relaxation room, it is necessary to take into account that a suspended ceiling made of gypsum plasterboard should become part of the overall interior design and interact harmoniously with other elements.
Therefore, when thinking through the interior, you need to pay attention to all the details, including:
- the general appearance of the ceiling structure, the number of levels, their location and shape;
- the planned finishing coating for the ceiling, taking into account the location of the hanging elements, taking into account the combination of combined materials for decoration;
- color scheme in the context of the overall design;
- lighting and illumination, general concept and arrangement of lighting devices.
The interior of the bedroom should ensure spiritual harmony and peace, therefore, when creating a plasterboard ceiling in the bedroom, you must also adhere to some general rules:
warm colors not only have a calming effect, but also visually expand the room;
to create additional volume in a small room, it is recommended to use a white ceiling;
dark colors will be appropriate for the design of a room with high ceilings;
using smooth lines when creating levels will give the room a cozy feel.
However, the variety of styles in modern design allows for the use of various color combinations to decorate the bedroom, including bright shades, and the personal preferences of the room owner will, of course, be decisive.
We recommend watching the video: various design options for plasterboard ceilings in the bedroom.
https://youtube.com/watch?v=xPVZwFUS1ik
Dry and wet method of processing plasterboard
Creating shapes is often not limited to straight lines, and therefore we will often have to bend sheets to install them on the same bent profiles. In total, there are two ways.
Dry method of bending plasterboard sheet
Most often it is used in the case of thin plasterboard sheets - up to 6 millimeters. At the same time, it is important to understand that the plasticity of gypsum plasterboard still has limits, and it simply cannot be bent forever. The maximum outer radius to which this can be done is 1000 millimeters. As for the internal radius, it is 600 millimeters. Create all your figures taking into account these parameters.
The bending itself is done by making small cuts on the inner or outer sides of the plasterboard. In the latter case, we are talking about creating columns and other elements with right angles. The inner side is relevant for creating various concave surfaces. In this case, you need to attach the sheet to the frame as quickly as possible.
Wet method
The dry method is convenient in terms of simplicity and speed, but you need to understand that arched plasterboard used for these purposes is very expensive, and therefore, if savings are important, then it is better to use conventional gypsum boards and the wet method of bending them. The process itself is divided into several stages:
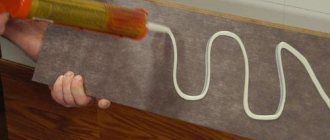
- The outer side of the sheet is wetted. For efficiency, it is recommended to use a roller soaked in water. Moisture penetrates the gypsum structure of the sheet, making it more pliable;
- The gypsum board is bent to the required shape, after which it is fixed in this position until it dries completely. Then you can carry out the installation itself;
- If you plan to bend the gypsum board to a radius of less than 600 millimeters, then before wetting the surface must be treated with a needle roller. This way the moisture will saturate the sheet with maximum efficiency.
Advantages and disadvantages of using plasterboard ceilings in the kitchen
Drywall is based on gypsum, on top of which a cardboard lining is applied, as a result of which this material is completely environmentally friendly. To completely install such a structure, it will take from one to three days, which depends on the size of the kitchen and the complexity of the design. However, in any case, the result will be a perfectly flat, beautiful and durable ceiling.
Advantages:
Using moisture-resistant drywall allows you not to think that humidity or temperature changes will harm it.
Plasterboard ceilings are resistant to temperature changes
Also, such designs are ideal for hiding various communications.
An uneven ceiling base can also be easily hidden behind a plasterboard ceiling and does not need to be leveled.
A plasterboard structure will hide all unevenness in the ceiling
The kitchen zoning procedure is simplified.
Heat and sound insulation can be installed in the niche between the plasterboard and main ceiling.
Easy to install. Drywall can be used to form absolutely any structure, as a result of which even the most daring design solutions can be implemented. In addition, the procedure for installing lamps in such ceilings is simplified.
Drywall allows you to make any design
Easy to maintain; if the need arises, it can easily be painted in a different color.
Resistance to mechanical damage. It is clear that heavy objects can cause damage to it, but the sheet can be easily dismantled and a new one installed.
Plasterboard ceilings are resistant to mechanical damage
Flaws:
It is not recommended to carry out the installation process yourself, since even a minimal error in the design can lead to the formation of cracks.
To hide the seams, the painting finish should be as neat as possible.
Owners of apartments in new buildings should refuse to install plasterboard ceilings in the kitchen and other rooms, since after the house shrinks, the ceiling frame may warp and cracks will form on it.
Therefore, it is quite possible to use plasterboard ceilings in the kitchen. In addition, they can be combined with other highly popular tension structures.
Assembly and installation of the flower
After installing the frame, which can be made of aluminum or plastic profiles, you need to assemble the decorative element itself.
The work is carried out in the following sequence:
- Attaching additional fixing strips to the hangers, checking the level.
- Installing flower elements using self-tapping screws. It is necessary that the step between the fasteners be 20 cm.
- If you want to make a curved or asymmetrical floral pattern, it is better to create the overlap of the side elements from arched sheets of plasterboard. It is necessary to make notches on the surface so that less putty is required during finishing; For this, a needle roller is used.
- If lighting is planned between the elements of the flower or in the center of the structure, the lighting fixtures must be installed after attaching the gypsum plasterboard parts. By making an indentation from the plasterboard ceiling, you can install an LED strip or spotlights, which will create the effect of a 3D surface. The ceiling flower looks especially beautiful, which is illuminated using decorative LED fixtures with colored lamps.
Partition marking
You will need two types of profile: PN
and
PS
. The first is cut with metal scissors and attached to the floor and ceiling. Before cutting and installing it, mark the floor. It is marked on it: the design thickness of the wall (based on the pieces of cardboard attached to the profile), the binding of the racks, window and door openings. A gap in the guide profile is provided between the pillars of the doorway.
Methods for marking the partition are given below:
3.1 Perpendicular marking (90° angle)
Most often, a plasterboard partition is built perpendicular to the existing wall, so it becomes necessary to draw a line at an angle of 90°.
This task can be accomplished in several ways, which we will discuss in detail below.
a) Egyptian triangle method
The Egyptian triangle is a triangle with an aspect ratio of 3:4:5
It is very important that the Egyptian triangle always has a right angle. For example, a triangle with sides 15 cm, 20 cm and 25 cm is Egyptian and, accordingly, rectangular
In order to set aside a perpendicular, we need to build an Egyptian triangle, one of the legs of which will lie on the load-bearing wall. An example of the construction is given below:
The figure above uses a triangle with sides of 1.5, 2.0 and 2.5 m. You may find it more convenient to construct a larger or smaller triangle. The main thing is to grasp the essence: we take a certain conditional length of the segment, for example, 0.5 m, then multiply this number by 3, 4 and 5, and thus get the lengths of the sides of our triangle: 1.5 m, 2.0 m and 2.5 m.
We carry out the construction: we put point “A” - the base of our perpendicular, then after 1.5 m along the tape measure we put point “B”. From point “B” we draw an arc with a radius of 2.5 m, for this you can use a nylon rope and a pencil, and from point “A” we similarly draw an arc with a radius of 2.0 m.
The intersection point of the arcs - “C” will be the third vertex of the Egyptian triangle. Segment AC will be perpendicular to segment AB, and accordingly to the load-bearing wall. Then, using a metal profile or a nylon cord, you can extend the speaker line to the opposite wall. Accordingly, straight line AD will be perpendicular to the load-bearing wall, which is what we need.
b) Perpendicular using a square
This method is less accurate than the first. This is due to the fact that the square is small in size and any unevenness of the wall can affect the final result.
To mark, we apply the square with the short side to the load-bearing wall, and draw a line along the long side, then this line is extended to the opposite wall.
This method is suitable for smooth walls and small marking areas.
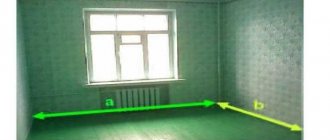
c) Perpendicular using a tape measure
We set aside equal sections from the existing wall, as shown in the figure above. This method is also not completely accurate, since existing walls may have flaws and may not be perpendicular to each other. However, you can combine the methods and check the perpendicular obtained using a tape measure with a square.
3.2 Transferring marks from the floor to the ceiling
After marking the base of the partition, you need to transfer these marks to the ceiling. There are also several ways to do this.
a) Using a plumb line
This method is clearly demonstrated in the figure below. The more points you transfer from the floor to the ceiling, the more accurate the final result will be. We draw a line through the transferred points using a profile; it is also very convenient to use a dyeing (tapping) cord.
b) Using a bubble level:
Using a bubble level, you can only transfer the extreme points located near the walls. The method is less accurate than using a plumb line.
Preparatory process
For large-scale work with gypsum plasterboard structures, you need to prepare:
- drywall - purchased depending on the room in which the structure will be located. If the room is damp, then green slabs are purchased, for other rooms - gray;
- profile;
- fasteners;
- pendants;
- serpyanka;
- putty.
In addition, you will need the following tool:
- hammer drill;
- construction knife;
- metal scissors;
- screwdriver;
- spatula;
- container for mixing the mixture.
Once everything is prepared, you can proceed to the next stage.
Making a beautiful design: laying plasterboard with tiles
Another idea for wall decoration is the use of tiles. Most often this is done in bathrooms and kitchens, where ceramics are applied to waterproof plasterboards. In these cases, sheets are often used to hide communication systems, such as pipes. They are simply covered with a plasterboard box, and tiles are applied on top: it turns out comfortable and beautiful.
In addition to ceramics, you can use any type of stone: there are many varieties on the market for decorating plasterboard walls. In some photos that reflect this type of decoration, it can be seen that the stone does not cover the entire surface of the wall, but is located around an arch, doorway, mirror or fireplace. This is a great way to inexpensively style a room or simulate full stonework.
Finishing with artificial stone: 1 - walls; 2 - arches; 3 - doorway; 4 - fireplace
Materials such as tiles and stone are applied to a decorative plasterboard wall using special glue, which is available in building materials stores.
In this case, it is important to calculate the dimensions and outline in advance how the finishing elements will fit. All work must be done very carefully and carefully control the tightness of the materials.
Painting walls and wallpapering
The simplest options that are very successful are applying paint or wallpaper. The main advantage of these methods is their low cost and ease of finishing: gluing wallpaper with your own efforts is usually not very difficult. In addition, on the market you can find this material in almost any color and with any pattern, so everyone can choose the coating to their taste. Many designers recommend using several types of wallpaper at once to highlight functional areas in the room and diversify the appearance of the room.
As for paint, there are even more options: you can use it to apply any pattern, either a template or one you come up with yourself. Decorative patterns on a plasterboard wall look impressive and are often used in the design of children's rooms: as the child grows, they can be replaced with others more appropriate to his age.
Applying these materials is not difficult: to apply wallpaper, you don’t even have to coat the walls with a primer. The surface of the gypsum boards is still cardboard, so the paper attaches well to them. The only thing that needs to be done here is to treat the joints between the sheets with putty.
There will be more worries with paint: when you see beautiful painted plasterboard walls in the photo, you can be sure that they have been carefully leveled before. To do this, putty is applied to the plasterboard (preferably in several layers), which is sanded with sandpaper. Only after this can you think about painting. In addition, if you apply paint directly to sheets of drywall, there is a high probability that it will quickly begin to crumble.
Design of partitions in the interior
Original design examples.
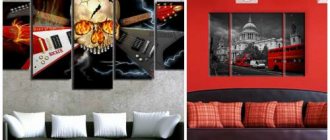
With TV
A well-designed place for a TV, which the whole family can watch from different points in the room, will provide an opportunity not only to compactly decorate the room, but also to create an interesting interior highlight in it.
The photo shows a false wall made of wood in the interior of a kitchen combined with a living room.
Stained glass
A double-sided stained glass pattern allows light to pass through, shimmers in an unusual way and paints the room in all the colors of the rainbow. This design does not create a feeling of enclosed space and creates a unique design.
Transparent
A transparent structure placed between the kitchen and living room allows you to increase the viewing angle, expand the boundaries of space and simply give the room additional charm.
With an aquarium
The kitchen and living room, separated by a partition with an aquarium, look especially impressive and impressive. Thanks to aquarium lighting, the room takes on a relaxing and slightly mysterious look.
Backlit
It is a delightful design solution that allows you to place stylish, interesting and bright accents and thereby dilute the monotonous design.
With shelves
This partition perfectly complements the interior, making it much cozier, more comfortable and more sophisticated. The shelves can also be used for storage and filled with numerous souvenirs, books, figurines or flowers.
carved
Carved models will not interfere with the penetration of natural light, will give the environment a more interesting and unique look and will perfectly perform functional zoning.
From laminate
Thanks to its impeccable appearance, countless options for colors and textures and excellent aesthetic qualities, laminate will create a finely tuned accent in the interior.
Drywall capabilities
Interest in plasterboard is caused not only by its use as dry plaster, leveling walls or as a material for installing interior walls. It mainly attracts with its capabilities, thanks to which, when working with it, you can make any configuration of wall structures.
Most often, gypsum boards are used to create beautiful arches, original figured partitions and other structures delimiting space.
Having seen photos of plasterboard walls, many are eager to install something similar in their home. All the more attractive is the fact that such a thing (wall, partition) can be built independently.
You just need to correctly calculate the amount of material and make sure you have all the necessary tools. Then making walls with your own hands will be easy. Especially if there is interest in the matter.
Features and advantages of the material
Drywall (or gypsum board) as a building material has many positive qualities.
The main advantages of such products:
- Environmental friendliness of the material. It contains no synthetic additives or toxic substances hazardous to health.
- The ability to provide fairly good sound insulation.
- Thermal insulation, the ability to absorb excess moisture and create an optimal microclimate in the room.
- Ease of installation. Drywall is easy to process and can be modified in various ways.
- This material is very well suited for masking various household communications, uneven surfaces, and so on.
- The front surface of the material does not require additional processing before applying the finishing coating.
- Price affordable for a wide range of consumers.
Unfortunately, with all its undeniable advantages, plasterboard also has significant disadvantages that must be taken into account when working with this material. The disadvantages are:
- The fragility of the material, the inability to withstand increased loads. Heavy shelves, cabinets or racks should not be hung on plasterboard walls.
- Instability to water. If there are serious leaks in a house or apartment due to prolonged exposure to liquid, the drywall will swell and be completely damaged.
For rooms with high humidity, it is better to choose special moisture-resistant plasterboard marked “VGKL”, which was created for use in special conditions. Remember that the right choice of building materials will save you from many unpleasant situations in the future.
Reasons for demand
Drywall is in great demand in the modern market, because it has many positive qualities. We can highlight the following most significant features of this material for consumers:
- safety (the material consists of sheets of cardboard and gypsum);
- ease of use (with the help of plasterboard sheets you can create niches, arches and much more);
- light weight. (the drywall is held on by self-tapping screws, it is attached to the frame precisely on them, after which you can immediately begin finishing work; in some cases, the frame is made of slats and bars, but it is still better to use a galvanized profile, as it is more reliable and convenient in application).
However, drywall also has a drawback: it is not resistant to high humidity. It is also worth noting that plasterboard sheets are more fragile than other materials. However, this does not make drywall less popular.
Decorative elements from gypsum plasterboard
You should carefully consider the shape and silhouette of decorative elements before starting work, make sketches and drawings. It is necessary that all interior details of the room correspond to the chosen style, including the ceiling, furniture and even wallpaper patterns.
To finish a plasterboard niche, you can use a mirror, light, stone and decorative plaster.
The following plasterboard structures are most often used for decoration:
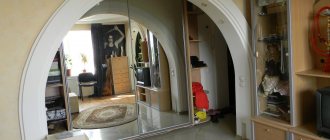
Niches in the wall. Square or rectangular openings are decorated with spotlights, illuminated stained glass windows, and LED strips. For finishing, natural or artificial stone, mirrors, decorative plaster, and photo wallpaper are used. The reception visually expands the space. For functionality, niches are often equipped with shelves on which you can place a flower, distribute books, trinkets, a collection of vases or porcelain figurines. Arches. Door and/or window openings can turn a room into a castle if you build a semicircular or pointed arch instead of the usual rectangular slopes. In addition to the opening, an arched shape can be given to a niche, for example, at the head of the bed
Stylish unity of lines is important for harmonizing space. But, as elsewhere, it is necessary to adhere to the golden mean: overloading decorating reliefs can achieve the opposite effect. False fireplaces
It’s rare that anyone can afford to build a real one - even the owners of private houses do not always want to have such a troublesome heat source in their home. A fireplace made of plasterboard is a budget option for decorating the interior with this element of bygone eras. A false fireplace can serve as both decor and a portal for an electric heater. Such solutions usually use models with lighting that imitates burning wood or coals. A large number of options for the shape of the portal and finishing material give room for imagination and the opportunity to decorate a room of any style with a false fireplace. Columns. In apartments, false columns are more often used - projections of a square or semicircular cross-section to disguise communications and separate zones (for example, into working and dining areas in the kitchen). In the large hall of a spacious cottage, you can use real columns. Drywall allows you to make both round and ribbed columns and install functional and decorative elements in the structure: an aquarium, a cat house, a shelf. Partition for zoning. When using this decorative element, you should proceed from the size of the room. A wall of a whimsical shape with many through and blind shelves will separate the library from the recreation area in the large hall. For a tiny kitchen, a small protrusion of a false column and a cabinet forming a bar counter will be enough - such an ensemble will not only decorate the kitchen, but also add functionality to the room.
When planning plasterboard decor on the wall, do not forget about other design participants: the shape of the reliefs of walls or partitions is best combined with similar lines on a two-level plasterboard ceiling.
Types of decor
When developing the design of a room using decorative elements made of plasterboard, it is necessary to clearly understand what function they will perform. Depending on this, the installation method, type of material and additional fastening devices will differ. We can conditionally distinguish between functional and purely decorative elements.
Functional decors, in addition to decorating the interior, can also serve as storage space; they can also be a demarcation structure or a way to hide communications.
Since the material can be given almost any curved shape, the design of the arch is limited only by the customer’s imagination. This element is used to decorate both doorways and individual sections of the wall, using part of the ceiling. Arches can be blind or with through openings for arranging vases, figurines and other decorative items.
Often, additional lighting is installed in a plasterboard structure, which is used as a separate light source or backlight for decorative elements.
It is not always possible or necessary to install separate cabinets or shelving in rooms. In this case, a technique such as installing a niche made of plasterboard will be useful. This design has a number of advantages over a traditional storage system.
- The niche is built as an inseparable part of the wall, which allows it to be integrated into the interior as organically as possible.
- The parameters are set by the customer; there are no restrictions on sizes and shapes.
- During the final finishing, you can decorate it in the same way as the walls of the room, then the structure will not stand out. This is true for small spaces. Thanks to this technique, the space will not be visually cluttered, but there will be room to place the necessary things.
- Another option is to make the niche a separate bright element of decor. To do this, you can paint it in a contrasting color, install mirror panels on the back walls, install lighting or lay out a mosaic pattern.
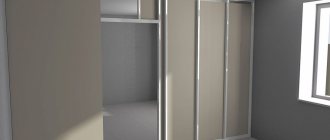
Shelving or false walls
Often, for zoning space, this type of plasterboard decor is used, such as small wall structures. With their help, you can highlight functional areas without burdening the interior.
In order not to deprive part of the room of a light source, false walls are often made through. In this case, you get a kind of rack that is suitable for arranging all kinds of objects: books, vases, figurines, photographs.
Designers also use drywall as a material to create various volumetric decorative wall or ceiling figures. Natural motifs are very popular. Using a rigid frame, drywall bends smoothly and takes on the shape of, for example, a flower, a butterfly or a cloud.
On the wall, such a figure is usually highlighted in a contrasting color, and on the ceiling, in order to avoid visual pressure, it is painted in a neutral tone, but backlighting is installed.
No. 3. Niches
Niches, recesses of any depth and shape are quite functional and highly decorative elements of the interior, and they can easily be organized using drywall. To create such a structure, even at the stage of installing the frame from metal profiles, an additional level is provided, with the help of which a niche will be created. It can be of any size; it is often decorated with built-in lighting. It is recommended to finish the walls of the niche in the same color as the main surface or a shade lighter so that there is no feeling of a hole in the wall.
Niches are used to place televisions, paintings, mirrors, aquariums and other things. In a niche you can organize a system of shelves using the same drywall.
Another interesting solution for organizing a niche is finishing the opening with colored glass and installing lighting.
Complex figures
Multi-level figures, the predominance of curves and complex shapes - all this allows you to create unique interior elements, ranging from arched to snake-shaped. The effect is complemented by the use of different colors and finishing methods. As a rule, they are made by professionals on individual projects, while among simple figures there are many standard solutions. It is recommended to create such figures yourself if you have the appropriate experience and an exact plan of what you are going to do. Otherwise, the result will be far from ideal and the photos that you see on the Internet are unlikely to be achievable.
Lighting and backlighting
Any lamps can be built into a plasterboard box: from classic chandeliers to the latest LEDs. There are three classic lighting planning schemes - along the perimeter, by zones or by design accents.
Chandelier
When installing pendant chandeliers, remember that drywall is a fragile material, so the fasteners must go into the concrete base. Use special extension pins or attach the lamps directly to the frame elements. Lightweight shades can be fixed to the sheet using butterfly dowels, which redistribute the load.
Spotlights
Spotlights can be of different shapes, configurations and brightness, open and closed, rotating and fixed. Even rows visually enlarge the room, light around the perimeter provides uniform diffused lighting, and a curvilinear arrangement emphasizes the design concept. For installation, it is enough to cut holes in the drywall with a special nozzle and secure the cartridge.
Recommendations from experts
To ensure everything goes smoothly, follow these recommendations:
- the width of plasterboard sheets for lightweight structures should be less than 12.5 mm;
- for complex designs, it is better to use sheets 9 mm thick;
- stick to the sketch plan;
- During installation, check the correctness of the drawn lines and installed profiles according to the building level.
By following these recommendations, you can easily create patterns on the wall of any complexity. With their help, you can decorate your room in an original way, make the nursery brighter, or highlight the interior of the living room.
How to make a greenhouse yourself using plasterboard profiles?
How drywall is made - the experience of an ordinary person