One easy way to renovate your bathroom is to plaster the walls. Special moisture-resistant compounds are suitable for this purpose. In this article we will look in more detail at how to protect walls and ceilings in wet rooms, and which plaster is best suited for this.
There are waterproof and hydrophobic plasters. Waterproof ones withstand high humidity well.
Compositions with hydrophobizing properties create a waterproof film on the surface that repels moisture.
Another type of plaster mixture for the bathroom is sanitizing (drying). These compounds are intended for finishing surfaces prone to efflorescence, mold and mildew.
Types of bathroom plasters and their characteristics
Modern manufacturers offer a variety of building mixtures that differ in composition, properties, and application. Most of them need to be diluted with water, although some, more expensive, are sold ready-made. Depending on the “relationship” with moisture, all types of plaster can be grouped as follows:
- Moisture-resistant plasters. They tolerate high humidity and short-term direct contact with water very well.
- Hydrophobic plasters. A durable film with a water-repellent effect is formed on the surface.
Cement plaster for bathroom
Cement plasters for bathrooms are traditional. Simple mortars are made on a cement base, the filler of which is sand. As a rule, this is a leveling mixture. The finishing touches for her have always been oil paints and tiles.
Ready-made SS (dry mixes) are produced by many companies. It is also possible to compose and prepare solutions yourself.
Less commonly, cement-lime and cement-polymer mixtures are used for the base.
Disadvantages of cement plaster
Applying cement plaster
With all the advantages of using cement plaster specifically for the bathroom, it also has a number of disadvantages:
- Long drying time. Cement-based plaster dries and becomes strong enough for further work only four weeks after its application. Ready-made dry mixtures reduce the period to one week, but here everything depends on the thickness of the layer and composition. As a rule, the instructions on the packaging indicate approximate deadlines.
- Cracks are the main drawback of cement mixtures for plaster. When drying, cement often shrinks, especially if there are large fluctuations in temperature and humidity in the room, which can cause cracks. Also, a layer of plaster can crack due to uneven drying of different areas or attempts to speed up the process using heating devices.
Important! Manufacturers of ready-made dry mixes successfully avoid this problem with the help of plasticizers, but when working with such plaster, you should remember that it must dry in a natural environment. Forced heating of the surface to speed up drying is unacceptable.
Can I use gypsum plaster in the bathroom?
When planning a renovation or intending to start decorating a new home, beginners ask themselves: is it possible to plaster the walls and ceiling in the bathroom with a gypsum mixture? Gypsum compositions are very easy to apply, durable, easy to install and tenacious. The catch is that gypsum is a substance that actively absorbs water from the environment.
Once saturated with water, gypsum loses strength. Therefore, while gypsum-based compositions were widely used for interior decoration, they were not used for bathrooms. In the Technical Recommendations for Moscow, only cements are indicated as plaster binders for bathrooms.
This situation has changed with the development of building materials, and gypsum plaster in the bathroom is now more common.
Therefore, to the question “can I use gypsum plaster?” – the answer is ambiguous. For leveling (followed by a hydrophobic coating), gypsum with modifying additives is suitable. For heavy tiled cladding – no.
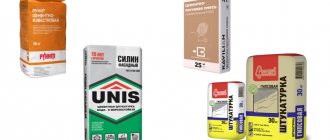
If you decide to use a gypsum composition, then it is better to purchase gypsum plaster for the bathroom from leading brands, for example, Rotband from Knauf or Unis Teplon.
Silicone plasters
Such mixtures are made on the basis of silicone resins, which literally repel water and are not afraid of fungus and mold. Silicone mixtures are applied without much difficulty, even a beginner can handle them. They do not accumulate dirt, do not deteriorate due to temperature changes or exposure to ultraviolet radiation, are extremely durable and can last for several decades.
Ready-made silicone mixtures can be tinted, so they often play the role of decorative plasters. The only disadvantage is the high price of the compounds and their inability to level large defects and deep cracks. Typically, silicone plasters are used as a finishing coating.
Facade plasters
In rooms with high humidity, facade (street) plasters can be used to level the walls. Such mixtures have many advantages: they do not deteriorate from temperature changes or contact with moisture, since they can withstand even precipitation and sunlight. Most facade mixtures are strong and durable.
The only downside is the roughness of such materials, which, for the most part, are represented by coarsely ground components. They are not suitable as finishing finishing because they do not fit well into the apartment interior. It is also important to clarify the composition of the plaster: some façade mixtures contain additives that are not 100% environmentally safe.
Silicate decorative plaster
Silicate plaster for the bathroom
The basis of this type of wall decoration is potassium glass, also called liquid glass. Walls covered with silicate plaster perfectly repel water and are resistant to the spread of fungus and mold. Moreover, this finish has high vapor permeability.
The choice of colors is unlimited: moisture-resistant decorative plaster for the bathroom based on silicate has more than 250 different shades. Among the disadvantages of this plaster, one can note the rather high price.
Mineral
Mineral plaster consists of cement and lime. It also sometimes contains marble particles to obtain texture. The depth of the relief depends on the size of the marble pieces. Thanks to its water-resistant components, this plaster is suitable for cladding walls in the bathroom.
In addition, mineral plaster has the quality of vapor permeability. This property of the material creates additional comfort. Finally, this material is durable and resistant to impacts and other mechanical influences.
Mineral plaster is the least elastic; it also does not withstand constant vibrations.
Acrylic
Acrylic plaster is a mixture whose main component is acrylic resin. Ash elements, ground granite, glass or marble are used as filler.
This plaster resists the passage of moisture, but it is worth considering that it is also vapor-tight, which is why acrylic plaster is more suitable for rooms with good ventilation. Its service life is up to 50 years.
Is it possible to paint silicate plaster with silicone paint?
If plaster has been applied to the facade, which has a tinting effect or textured treatment, silicate paint can be applied to the surface. It should be based on liquid glass and other fillers that act as binders. Silicone paint penetrates well into the plastered facade, creating a reinforced surface. This way you can solve the problem of chips and cracks, but not eliminate the ability of the base to breathe.
We recommend for review: Silicone paint for interior work
Recommendations for choosing formulations
Moisture-resistant plaster for the bathroom should be chosen taking into account what the finishing coating will be. Quite often, in rooms with high humidity, walls are lined with ceramic tiles. In this case, the first priority is the requirement for the strength of the material under constant exposure to moisture and ideal alignment of the walls. The color of the plaster and the appearance of minor cracks do not play a significant role, since it is masked by the tiles. Therefore, the use of cement-polymer and cement mixtures is justified.
A different approach is required when preparing walls for painting. With the help of paint it will not be possible to hide even the smallest defects; rather, they will appear more pronounced. Even the slightest cracking is unacceptable. Gypsum plaster fully meets these requirements.
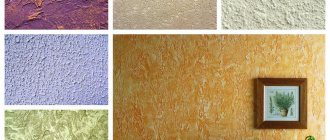
In recent years, preference has increasingly been given to moisture-resistant plaster for the bathroom, which does not require additional coating. This issue can be solved with the help of decorative plaster, which is also produced in a waterproof version. The decorative effect can be achieved in different ways: volumetric texture, different colors, imitation of natural materials.
In bathrooms, it is not recommended to apply a layer with deep grooves (for example, the so-called bark beetle plaster), since microorganisms can multiply in them. Of the ready-made compositions, moisture-resistant plaster for the Knauf bathroom has proven itself to be excellent (their price ranges from 350 to 730 rubles per 25 kg).
The combination of areas with decorative plaster and tiled cladding looks very original. When creating an unusual interior, Venetian plaster is often used today. To increase the reliability of such coatings, it is recommended to cover them with a protective layer. The most common are wax compositions, for example, “Optimist”.
Experts recommend that in rooms with high humidity, you should play it safe and use additional protection against the effects of moisture. This is achieved by applying a very thin primer layer of Aquastop.
It is necessary to carefully select moisture-resistant decorative plaster for the bathroom. Price is sometimes decisive, but you should not save on these compounds, since inexpensive mixtures from unknown manufacturers do not always guarantee high quality.
Gypsum compositions
Experts have different opinions about this material: some believe that it is not very suitable for finishing a bathroom, others argue that moisture-resistant gypsum plaster for a bathroom is good, but only if there is good ventilation in the room. The fact is that gypsum has one drawback - it actively absorbs moisture. Despite this, gypsum plaster is quite often used to decorate the bathroom, especially the ceiling.
Buyers are attracted by the whiteness of this material, which makes painting much easier, ease of application and leveling of the surface, and quick drying. In order to eliminate the main drawback, additives (for example, PVA glue) are used when preparing the composition and coating the plaster layer with a special water-repellent primer. The applied layer should be no more than 25 mm.
The application of moisture-resistant plaster in the bathroom (gypsum-based) is justified if compositions from well-known manufacturers are used. They produce mixtures with the addition of special ingredients. For example, moisture-resistant plaster for the bathroom (Knauf) Rotband, based on gypsum, is intended specifically for rooms where the humidity is very high. You can also note the ready-made moisture-resistant composition “UNIS Teplon”.
When do walls need to be plastered?
Master finishers know for sure that the base for the tiles should be level, without significant differences. Whereas to non-specialists any surface without noticeable defects may seem like this. You must understand that even if the walls are plastered or made of outwardly smooth concrete slabs, this does not mean that they are ready for cladding.
Mass construction with machine plastering does not involve leveling the surface. Beacons are not used here, which means that height differences can reach several tens of millimeters. This is a lot and will be very noticeable, for example, in corners where the cladding simply “does not fit” or at the junction of the edge of the bathtub and the wall.
Concrete slabs are rarely aligned strictly vertically. Often they are “filled up” by at least 10-20 mm. According to building regulations, this is a completely acceptable error, but for finishers it is too much. Thus, it turns out that alignment is necessary. To verify this, it is enough to take measurements by attaching a long rule to the base. If the differences are more than 2-3 mm per linear meter, you will have to level the surface before gluing tiles onto it.
Instagram shtukaturkarostov ru Machine plastering does not require perfect leveling, so the wall needs to be prepared for the tiles
Sometimes you can hear that unevenness in the base can be leveled out using tile adhesive. Indeed, by adjusting the thickness of the solution layer, you can level the base. But this should only be done for very minor differences. Firstly, leveling with glue increases its consumption, and this is not cheap. Secondly, the cladding laid on a thick layer of tile mixture will “float” and will not hold firmly enough. There is a high probability that it will fall off quickly.
How to properly plaster bathroom walls
The process of plastering walls in the bathroom is no different from classical technologies. It consists of several stages (let’s look at the example of a cement-sand mixture).
- Old finishing is removed (in newly built houses such a technological operation is not necessary).
- The wall is being repaired: loose bricks are removed, cracks, chips and potholes are sealed with repair mortar (“cement laitance”).
- The surface is degreased and then primed with a deep penetration primer (for concrete it is necessary to use “Betonokontakt”).
For reference: using “Betonokontakt” on other wall materials gives almost the same effect, but is much more expensive.
- The most protruding point on each wall is determined by hanging.
- 3 cm is added to the found convexity, after which the plane of the plaster layer is constructed. The boundaries of the plaster can be fixed with beacons, which is very difficult (this technology is discussed in detail in the work “Plastering walls using beacons with your own hands”) or with chalk on the floor, ceiling and adjacent walls (a contour is applied), which can be read in detail in the material “How to level walls without do-it-yourself beacons." Note that the small area of the walls allows even an inexperienced finisher to perform plastering work without beacons quite skillfully.
- The necessary building materials are purchased, tools and devices are prepared (the types and purpose of each tool can be seen in the work “How to properly plaster a brick wall?”).
- A spray solution is mixed with an equal ratio of cement and sand (proportion 1:1).
- The first layer of plaster, several millimeters thick (3-5), is applied (its task is to ensure good adhesion of the leveling layer of mortar to the wall).
- After the first layer has set, a leveling layer is applied (among plasterers it is called “primer”) with a solution with different proportions: Portland cement M500 (1 part) and sand (3 parts).
- The wall is first plastered in a small area in the corner. Then successively in small sections around the entire perimeter. The level and the rule control the plane of the plaster horizontally and vertically. The landmark is a contour drawn on the floor and walls. After the first row is looped, everything continues in the same sequence.
- For tiles, plastering work ends here. The final stages are carried out before painting: a finishing layer of plaster (2-3 mm), called “covering”, is applied, and then grouting is carried out.
- The process is completed by filling the surface with polymer compounds (they are not afraid of water), after which the wall is sanded with fine sandpaper (P100).
Is it possible to lay tiles on plaster?
To properly level the surface, it is best to plaster it using a suitable composition. But there is no need to apply putty, since the minor differences that it removes are leveled out by the tile adhesive. In some cases, the walls have already been leveled and, despite the fact that the plaster is old, the result is preserved. Doubts may arise whether such a base is worth covering.
First of all, you should carefully inspect the coating and assess its condition. It is best to take a hammer and methodically tap the wall. A ringing sound will indicate the normal state of the base, a dull sound indicates the presence of voids. In such areas, the plaster is removed. They also remove it where it crumbles and cracks. All defects are carefully sealed with a suitable solution.
It is somewhat more difficult if the plastered wall is painted. You should not lay the tiles on the paint, the adhesion will be very poor. It is optimal to remove the paint layer, but this is a very labor-intensive process. You can do the following: apply notches, which will significantly improve adhesion. They are made at a short distance from one another. They do the same with an unpainted smooth base if they want the cladding to last for a long time.
Instagram andrei.kodesnikov An insufficiently level wall must be prepared for tiles. All defects are carefully sealed with a suitable solution
Control inspection before applying tiles
Before starting finishing work, you need to once again check the geometric dimensions of the room and make sure that the walls are really vertical and rectangular. This is necessary so that the tiles fit correctly in the corners of the walls, as well as to avoid gaps between the bathtub and the walls.
Checking the geometric dimensions of the room
It is convenient to check the quality of plaster using a rule. A perfectly smooth surface is not needed here; the deviation from the plane should not exceed 0.5 mm. Remove any existing solution build-up. If depressions larger than 0.5 mm are found, it is better to level them, otherwise count on increased overuse of tile adhesive.
Defects in future tiles due to uneven walls
Stages of plastering walls
Before plastering the walls, remove the old coating and clean the surface with a brush. Then it is recommended to wipe the surface with a damp sponge, and wash heavy dirt with soapy water.
Be sure to measure the plane with a level or plumb line.
Before plastering it is necessary to apply a primer. As already mentioned, this will give the finish strength, moisture resistance and protection from mold. Prime with a brush, roller or spray in two layers.
The plaster mixture is applied in three layers. For each subsequent solution, the solution is made more liquid. Procedure:
- Before application begins, metal beacons are installed on the walls, which are attached to the surface using small portions of the solution.
- It is recommended to spray under the first layer of the wall with water from a spray bottle.
- Apply the solution with a spatula or paint bucket, starting from the bottom. Then it is leveled using the rule attached to the guides, lifting it up and moving it slightly from side to side.
- Crumbling walls are additionally reinforced with mesh, which is fixed in the first layer of plaster.
- After the solution has completely dried, it must be plastered again.
- For better adhesion to the finishing layer, notches are made on the fresh second layer with a notched trowel.
- The last layer is made from a decorative mixture or rubbed down if it is being prepared for painting.
Priming walls before plastering
Before applying the plaster solution, it is necessary to prime the walls. It is better to use a primer from the same manufacturer as the plasters. The type of primer depends on the base:
- For concrete and cellular concrete, a deep penetration primer is mainly used, for example Ceresit CT17, Optimist G103. In the case of using gypsum plasters, soil compositions of the “concrete contact” type are used.
- For brick walls, the choice of priming method depends on the type of plaster used. If the future plaster is cement-based, then a special primer is not required; instead, the wall is generously moistened with water immediately before applying the plaster so that moisture from the mortar does not escape into the brick. If gypsum plaster is used, then use acrylic primers, for example Rotband Grund.
Caring for silicone plaster
Silicone plaster after repairing the facade requires that the layer be maintained in its original form. Therefore, before starting the process, you should take into account that maintenance may become a problem, the more textured the surface. If you want the facade to remain attractive for a long time, you should not choose a mixture with fillers of an impressive fraction, because deep depressions form on the surface, which can be problematic to clean.
The plaster façade should be cleaned wet. This will have to be done up to 2 times a year, when you notice that the finish is dirty. It is best to carry out such work in autumn or spring. Washing can be done with ordinary water, using household sponges or a car washcloth. A paint roller also does an excellent job.
You can also use cleaning products, but they must have a neutral composition so as not to damage the decorative coating. If the façade is fairly dirty, you need to stock up on alkaline and acid-based cleaning mixtures. But before using them, you need to make sure that they are compatible with the type of plaster used. Different types of silicone compounds may respond to this effect in their own way.
A radical approach is to use the services of cleaning companies that will clean the facade with water supplied under pressure, using special equipment. Water jetting can have a detrimental effect on plaster. Everything will depend on the strength of the composition and whether it was applied correctly. It is believed that silicone plaster is able to repel dirt and is therefore easy to maintain. It can be cleaned during rain, so sometimes it does not require additional treatment to remove dirt. If paint and varnish were used for the finishing coat, the plaster can be cleaned with detergents.
Calculation of the amount of mixture
To make calculations, you need to know the area of the surface to be plastered and the mixture consumption rates indicated by the manufacturer. But these values are not enough - you should also take into account the curvature of the walls in the room, because a layer of plaster in the bathroom for tiling or painting, as provided for in design standards, is not always enough. Its final thickness is determined by the deviations of the wall from the vertical or horizontal plane. If the curvature exceeds 3 cm, installation of beacons and additional measurements will be required.
How and with what to plaster the walls in the bathroom under the tiles with your own hands: step-by-step instructions, video
At the end of this conversation, you will learn how and with what to plaster the walls in the bathroom under the tiles with your own hands , whether it is possible to plaster the walls with tile adhesive, what steps need to be completed.
This question is common and relevant, because now tiles are still popular when finishing the wettest room in any home. Plastering the wall under the tiles must be carried out. Doubts are inappropriate here. An exception may be flat surfaces with minimal differences in heights. In such cases, you can plaster the walls with tile adhesive yourself. But if the base is not level, the tile will fall into the frame. You will have to level each square and evaluate its position relative to other elements of the tiled covering. Everyone imagined how inconvenient, tiring and time-consuming it was.
Another important reason why it is imperative to plaster the walls under the tiles in the bathroom is poor adhesion. The tile does not adhere well to all surfaces and is retained for a long time. For example, tiles will not stick to whitewash and paint. We have dispelled your doubts about whether it is necessary to plaster the walls under the tiles? We hope so. With a clear conscience we can continue our conversation.
Preparation and application.
Waterproof plaster for the bathroom begins with proper preparation of the wall; the further appearance and quality of the work depends on this. It is imperative to remove any remnants of the previous paint and plaster compositions. As for new buildings, the presence of grease stains and dirt is inevitable, so new houses require especially thorough cleaning:
- The easiest way to remove remnants of old paint is by burning it with a blowtorch, however, this must be done while wearing a protective mask in order to avoid poisoning and possible minor burns of the mucous membrane. You can remove paint using folk ingenuity. Take 8 parts of lime mixture and mix with 2 parts of caustic soda - ready.
- It is advisable to treat walls with a too smooth surface by notching or slicing. Thanks to this action, the solution holds much stronger.
Important: along with the listed processing methods, sandblasting can also be used. Thanks to him, the work will go much faster.
Owners of brick walls with filled joints must make a notch in advance, scratching depressions about 1.5 cm deep. Any dust that appears must be eliminated. Those whose walls have unfilled seams can safely start applying, because the roughness will already be enough.
Spray.
Spraying is necessary to ensure the greatest adhesion of the mixture to the wall surface, by filling all sorts of cracks and other irregularities. The first thing that is important to do is, of course, spraying. For it, they use a liquid solution whose consistency resembles sour cream:
- First, the base must be thoroughly moistened with water.
- Then, using the usual “throwing” method, they cover the wall with the mixture. The thickness should be within 5 mm.
- The layer obtained by spraying should be left as it was.
Interesting: The wooden base requires more attention and the thickness can be increased to 9 mm.
Rough layer.
They cover the spray. For those who choose a lime-gypsum solution, it is enough to achieve a thickness of 7 mm; the cement mixture can be coated with a layer of 5 mm.- There are cases when the first application is not sufficient. This case requires applying the second, thickest one, immediately after the first has hardened.
- They work with the rough layer using a special trowel, with a length of 70cm to 1m. Any direction of movement is welcome, it does not have a huge role.
Finishing layer.
The finishing part can be divided into 2 types: treating the walls with a mixture for further finishing (occurs when plaster is needed for a bathroom under tiles), or using it as a decorative material. The key difference between these options is: careful selection of the substance and the thickness of the solution. Decorative plaster for the bathroom is applied with a thickness of 4-7 mm, when the usual one is less than 2 mm:
- First, it is important to wet the rough layer of plaster
- Then the professionals take a wide spatula, use the edge of which to scoop up the finished mixture and spread it on the wall in an even layer. Holding the spatula at an angle of 15-20 degrees will achieve the best effect.
- The layer that has not yet had time to set is rubbed using a grater. In a circular motion.
Important: When rubbing the protrusions, it is important to press the grater more firmly, while rubbing the grooves, squeeze out lightly.
- Those planning to use textured plaster in the bathroom should remember that the texture is applied to the rough layer with a narrow spatula (from 8 to 12 cm). With its help it is much easier to work, creating unique patterns and ornaments. It is necessary to move the spatula, however, the direction in this case plays a small role, so you can do it however you like.
Mandatory: Anyone who wants to turn their bathtub into a work of art undoubtedly needs to remember about their own health, otherwise there will be no one to admire it. Therefore, it is important to use gloves and a gauze bandage, especially if gypsum plaster is chosen in the bathroom.
Among other things, be sure to monitor the level of humidity and temperature, because it is obvious that at a higher temperature, waterproof bathroom plaster will dry much faster. Upon completion of all technological processes, the tools must be washed, and the remaining material must be put away in a convenient place, closed.
Step-by-step work execution
Reinforcing tape.
Plastering the walls in the bathroom under the tiles should be done on masonry that has undergone shrinkage. Otherwise, cracks will appear and the plaster may fly off. If work is carried out on the old base, determine whether the coating needs to be removed. The walls are tapped with a hammer - a dull sound indicates peeling, the plaster in this place is knocked off. Where it is kept, it is left. Surfaces with traces of rust or mold covered with paint are treated. The plaster is removed, remaining traces of rust are removed with acid, mold - with antifungal drugs.
The seams between the bricks are wiped with a wire brush. The cracks are expanded and sealed with cement mortar. If they are large, use reinforcing tape. Pay special attention to the corners where cracks appear more often. If the surface is too smooth, notches 2-3 mm deep are made to enhance adhesion to the solution.
Then the walls are finally cleaned of dust, after which a primer is applied. It provides better adhesion and does not allow moisture to enter the walls. Bricks have different porosities; depending on this, a primer is chosen. You can check the properties yourself. They drip water onto the brick: if it is absorbed immediately, there is greater porosity. Dries in up to 20 minutes - medium. Such bricks are treated with a universal primer. With high porosity - 2 layers of mineral.
Walls that are too uneven are reinforced. Special hooks are pressed into the seams and a mesh is hung. It is better to take a plastic one: it does not rust. Metal is treated with a special varnish to prevent rust from appearing.
Calculation of the amount of mixture
To calculate the required amount of plaster, determine the total thickness of the layer. Apply the rule to the wall in several places and measure the distance from the surface. The more measurements, the more accurate the calculations.
The values are added up and divided by the number of measurement points. For example, we measured at 5 points, the results were 1, 1.5, 1.8, 2, 2.4 cm. In total, 7.7 cm. Divided by 5, the average thickness of the plaster was 1.54 cm.
Read on the bag what the mixture consumption is per 1 m² with a thickness of 10 mm (most often this is indicated). As an example, let's take a flow rate of 15 kg/m². Multiply by the thickness of the required layer: 15 × 1.54 = 23.1 kg. To find out the total amount, the resulting value is multiplied by the surface area.
Calculations.
Calculate how many bags with a capacity of 25 or 30 kg will be needed. Example: area 20 m², packages of 25 kg. Total mixture needed: 23.1×20=462 kg. Number of packages: 462/25=18.48, i.e. 19 bags.
Installation of beacons
If the depth of the depressions on the surface is more than 10 mm, beacons are installed. These are perforated T-shaped slats. Length 2.5-3.0 m, height 6 and 10 mm. Depending on the surface area, they acquire the required amount, taking into account that the maximum distance between the beacons is 1.5 m, but less is better, especially for beginning plasterers.
Departing from the corner 10 cm, draw a vertical line. The same operation is performed in another corner. Prepare a solution and apply cakes from it along one line. They press in the beacon, check the level for verticality, and adjust it. A second profile is installed in another corner. Threads are pulled between them from below and above. They serve as a guide to fix the intermediate slats.
Applying a rough layer
Laying plaster.
Plaster is laid in several layers in different ways at intervals of time. Before applying the rough layer, the surface is moistened with water. Take the solution onto a trowel and spray the wall between the beacons, moving from bottom to top. The entire surface is filled with solution so that there are no voids left. Layer thickness - 2-5 mm.
The solution is made liquid, like kefir, to fill cracks and irregularities. Throw it from the trowel so that it sticks to the wall without splashing. The surface is not leveled; roughness will improve adhesion to the next layer.
Waterproofing compounds
Mixtures with waterproofing properties prevent moisture from penetrating into the wall material. Apply on a clean surface that is not prone to shrinkage. The application method depends on the type of mixture. Use a spatula, brush or roller.
There are the following types of waterproofing compounds:
- Plastering - includes cement and polymers, applied to concrete, brick, wood using a brush or roller. Consumption per layer - 1.5 kg/m². For waterproofing walls in the bathroom, mixtures of “Hydrostop-94”, “Waterplast”, etc. are used.
- Cast. Among them is liquid glass. Apply with a brush at a fast pace, as it hardens in a short time, forming a film. Other compositions: “Nippon Ice”, “Sofax”.
- Impregnating mixtures - penetrate deep into the surface, filling pores and cracks. Used mainly on concrete walls. Penetron and Hydrotex are in demand.
To use the formulations, follow the manufacturer's instructions.
Apply the base layer
Applying the base layer.
The application of the main layer begins after the first one has set. They level the surface. The required consistency of the solution resembles thick sour cream. Several layers can be applied intermittently, each no thicker than 7 mm. The solution is spread or thrown onto the wall.
Then it is leveled using the smoothing or cutting method. Smooth with a trowel, achieving uniform coating thickness. If the solution sticks to the tool, give the soil time to set.
Cutting is carried out as a rule. It is placed across the profiles from below, pressed firmly and moved upward in a zigzag manner. Excess solution remains on the board; it is removed with a trowel into a bucket. Stir periodically without adding water and fill the cavities. Before laying the tiles, it is enough to simply level the base; small errors are allowed.
If the surface is being prepared for painting, careful finishing is required. The finishing layer - the covering - is applied immediately over the leveled, still wet soil. The solution is slightly thinner than soil.
In order not to putty the wall, but to paint it right away, grout is done. It removes roughness from the surface. Use a sponge grater, which is rotated clockwise and back with pressure. Periodically, the grater is cleaned of adhering solution and washed. If the plaster layer is dry, moisten it with water.
Features of applying decorative plaster
In the process of applying decorative plaster, it is worth considering some nuances. If, for example, Venetian plaster is planned, then the base for its application should be perfectly smooth, and if this is a structural type of application, then small unevenness will not become a problem.
Before applying decorative plaster, it is necessary to prime the wall in the bathroom. It is best to use an acrylic-based primer with high adhesion.
Decorative plaster is applied with a wide spatula and then distributed over the entire surface. Further actions depend on the application technique: “bark beetle”, “fur coat”, Venetian or textured.
The best acrylic plasters
The following compositions have proven themselves to be excellent:
Profit
A cement-polymer mixture that has waterproofing properties. Shows good results when applied under ceramic tiles.
Consolid 540
Waterproofing plaster, which is a multicomponent composition based on a polymer-cement mixture.
Dufa Kratzputz aussen
Acrylic based plaster. It is used as a moisture-resistant plaster for the bathroom with a decorative effect. It has an original texture - “orange peel”.
Stuc Granito, Stuc Deco
Moisture-resistant mixtures containing polymer as a binder component. They have excellent decorative properties.
Nuances.
A solid foundation is an important part of any job and makes plastering your bathroom walls a pleasure. Having a wall cleaned of grease and wallpaper residues can add strength and stability to the beauty of the work.
You should always pay special attention to the initial work; in this case, it is extremely important to get rid of weak points in advance. Cracks in the walls, hated by many, play such an important role only in the case of waterproof plaster for the bathroom that you can gradually fall in love with them. In general, it is advisable to even deepen and expand them.
Those with unsightly efflorescence on the walls should be completely unceremoniously dealt with with a steel brush, and special efflorescences that have captured large areas can commit genocide with an angle grinder and a brush so that the wall of the house is left alone. 24 hours before plastering the walls in the bathroom, be sure to spray the wall; the activity is as useful as it is fun.
By the way, you should remember about the reinforcing mesh, because without it, some types of wall plaster in the bathroom will hold up very weakly, among which gypsum plaster can be distinguished. For those who are wondering which plaster is best for a bathroom, it’s easy to immediately answer that you can use any, but they try to avoid gypsum.
In general, tiles are rarely installed on gypsum plaster in the bathroom, because there is a danger of water getting between the seams and then you will have to redo it again. The liquid will simply “eat through” the entire gypsum layer.
When mixing the dry mixture, use clean, preferably drinking water. The permissible degree Celsius is between 15 and 20. Slowly pouring the mixture in portions and stirring at the same time will achieve the ideal consistency.
Based on the required layer thickness, the thickness of the mixture is adjusted. Adjustment is very simple, you just need to add water. By the way, it is advisable to prepare the finished solution within 20 minutes, since long inactivity will lead to a deterioration in quality and porosity.
Regarding brickwork, there is such a subtlety: first, the seams are hammered in, and then, immediately, they are covered with the main layer of plaster. The solution is applied in different ways; you can do it manually, or using special devices, in one or more passes.
It is imperative to ensure that the plaster dries; this process must be completed no earlier than 24 hours.
Criterias of choice
Among the key points when choosing plaster products for the bathroom are:
- hydrophobicity parameters of the solution. For rooms with special microclimate conditions, exclusively waterproof finishing options are used;
- The composition for plastering walls is selected depending on the base material. For example, when arranging wall blocks, the priority is a solution with a filler made of fine sand; in the case of brickwork, preference is given to the version made from coarse sand;
- it is necessary to make sure that the shelf life of the product corresponds, check the storage conditions, otherwise it is difficult to predict the results of finishing work.
When choosing plaster for a bathroom, you need to take into account the parameters of hydrophobicity.
Priority is given to offers from well-known brands in a competitive environment. Waterproof plaster for the bathroom in Moscow and other regions is represented by a number of domestic and foreign manufacturers. It is worth remembering that purchasing relatively inexpensive products from new companies risks questionable quality of the product, the need for new repairs and additional investments.
Recommendations and advice from experts
When choosing a plaster mixture for the bathroom, it is important to pay attention to the advice of experts who will tell you how to finish the walls with high quality.
- The mixture is diluted with clean water at room temperature.
- When mixing the plaster, the dry mixture is poured into water and mixed thoroughly.
- Each layer requires its own thickness of material.
- The composition is prepared half an hour before application, otherwise it will harden.
As you know, plaster mixtures can be different, so everyone independently chooses what type of finish to use. Regardless of the choice, it is important to treat the walls of the bathtub under the tiles with moisture-resistant plaster. This procedure will eliminate the need for regular cosmetic repairs.
Manufacturers and cost
There are many manufacturers of silicone plaster today, but several companies occupy leading positions in the market. Among them, Ceresit, which is produced by Henkel, should be highlighted. The supplier produces universal compounds that are suitable for external and internal application. Kreisel has done well with its products. It offers a wide selection of colors. This mixture is sold in buckets, which comes in 400 shades.
Among the sales leaders, Weber should also be highlighted. This company offers to apply plaster in different ways, decorating ceilings and walls. If you are a fan of domestic materials, you should choose Bolars plaster. It has excellent aesthetic characteristics, durability and resistance to mechanical stress. Mixtures from this company are suitable for kitchens and other premises. The compositions have a long service life - once you spend it, you will forget for a long time that you need to update the kitchen walls or repair the ceilings.
As for the cost, you can purchase decorative pebble plaster Ceresit CT 174 in a volume of 25 kg for 2,000 rubles. But KREISEL 030 BR in a volume of 15 kg will cost the consumer 1,800 rubles. Weber.Pas Silicone in the same volume costs 5,800 rubles.