Decorative plaster can easily be called one of the most practical coatings for walls and ceilings. Due to their high performance properties, plasters are used not only for interior work, but also for finishing facades.
Decorative plaster in the interior
The main advantages of coatings are elegance and presentability, durability and high resistance to various types of mechanical stress, hypoallergenicity and environmental friendliness. Applying the coating is not difficult; even a beginner can understand all the intricacies of the technology.
Venetian decorative plaster in the interior
There are so many options for textures and shades that it is very easy to choose the best option for any interior style. Decorative plaster combines favorably with materials such as artificial and natural stone, gypsum stucco, brickwork, tiles, porcelain stoneware and even wood.
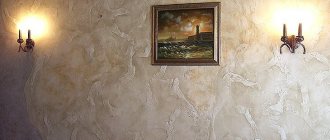
The ideal combination of decorative plaster with wood texture
There is huge scope for imagination when creating your own original design for an apartment, house, office or any other room.
Decorative plaster: varieties and composition
Plaster consists of a filler (silk and cotton fibers, stone chips, artificial mineral elements, etc.), binding components and a number of additional elements:
- solvents;
- thickeners;
- antiseptics;
- biocidal and water-repellent substances, etc.
Classification by types of fillers
On a note! You can make “decorative plaster” yourself even from ordinary putty. And if you apply the mixture correctly, paint the textured surface in 2-3 shades and cover it with wax, the external appearance of the coating will be almost indistinguishable from expensive Venetian plasters.
Factory-made mixtures are divided into two large groups based on the type of base: aqueous and non-aqueous.
- Non-aqueous plasters are made from polyurethanes and epoxy resins. Such compositions are very durable and resistant to aggressive environments. The coating has good adhesion to the base. The walls and ceiling can be washed.
- Water-based compositions contain acrylic, styrene-acrylic, polyvinyl acetate (PVA) or styrene-butadiene dispersions as binding components. The coating is easy to clean, does not fade, is vapor permeable, but at the same time waterproof.
Types of plasters by type of binder
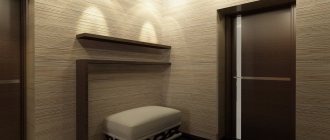
Wall decoration above the sofa
The design style and wall decor in the living room areas is determined by its functions. The interior layout should be carefully planned, this will help you feel cozy and comfortable in the living room.
Photo wallpaper above the sofa
For comfortable living conditions in the room, you should choose a comfortable, roomy sofa, which, as a rule, is installed along the wall. To decorate the wall above the sofa, you can use several design solutions:
- a decorative shelf for books that can be painted in a color that matches the interior. The shelf can be in the form of horizontal planks or in the form of a snake. This location is convenient for relaxing on the sofa, where in the evening you can read your choice of literature;
- placing family photographs in decorative frames. This solution will not only diversify the interior of the room, but will also serve as a pleasant memory for family members about past important events;
- You can fill the space between the sofa and the wall using decorative lamps with built-in dimmers, thanks to which the room will acquire the necessary light shades.
Decorative wicker plates
Shelves for decorative figurines and two pairs of lamps
↑ back to contents
Styles and shades of plasters: how to choose and combine
Decorative plaster is appropriate in any interior: from strict Classic to daring and dynamic Avant-garde. Let's look at the features of the five most popular styles.
Modern
Interior in Art Nouveau style
. Pastel color scheme. No bright spots. Shades of beige, gray, brown, green. Gold and chrome surfaces may be present. The interiors have a lot of floral ornaments, smooth curved shapes, and interlacing.
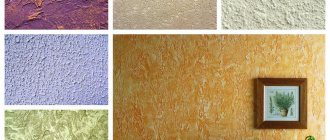
Golden mother-of-pearl plaster Greenish plaster with tints similar to natural patterns Mother-of-pearl coating with tints from golden to bronze
Classical
Classic style in the interior
Pastel shades, white ceilings. There is a clear symmetry in the interior. Ceilings can be decorated with stucco and wide baguettes. Too bright colors are not welcome, the main shades are beige, light yellow, light gray, light blue, soft pink. You can combine two types of plasters - smooth matte as the main background and textured as a panel in a baguette on the wall.
Gray plaster with faint streaks
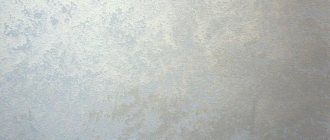
Smooth white plaster with light pearlescent tints
Fine beige plaster, matte
Art Deco
Bedroom decoration in Art Deco style
Bold French bourgeois style, incorporating elements of African and Indian exoticism, Egyptian art, and Empire style.
Dining room in Art Deco style
The color palette is contrasting, “seasoned” with metal surfaces. Main shades: black, white, brown, silver, beige. Additional shades in muted variations: burgundy, green, blue, gold. Patterns and bright accents are welcome.
Structural decorative plaster Smooth plaster in a soft pink shade, silk effect
Mineral plaster, “travertine” effect
Hi-tech
High-tech style in the interior
Modern style, which is characterized by geometricity and minimalism. Small patterns, floral patterns, and shapeless patterns are not welcome. The interior design is monochromatic and contrasting. The dominant colors are white and black, red and gray, rich blue, and less often green and brown as accents.
Dark blue plaster with small pearlescent tints and matte granules
Matte plaster, concrete imitation Deep blue coating with wet silk effect
Ethnic
Ethnic style in the interior
Original and unique in each individual interior. The main task of the style is to imitate the life and culture of a nation, for example, Japan, India, China, Africa, etc. Shades are chosen that are inherent in the national color.
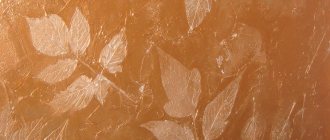
Panel on textured plaster
Red textured plaster
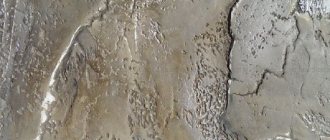
Plaster with cracking effect “craquelure”
Decorative coatings with a concrete effect are often used in Loft and Grunge interiors.
Concrete plaster in Loft interior
Restaurant interior in grunge style
Decorative plaster loft concrete
Textured plaster with a torn surface
Loft-Beton
Usually these are gray textured or smooth coatings. Plain colors, as well as with graffiti painted on top of the plaster.
Decorative decoration of walls with plaster mixtures that imitate a concrete surface is done by applying mixtures based on microconcrete and microcement. These materials are among the most used by designers specializing in modern interior design trends. Read more about decorative plasters for concrete on our website!
Painting the walls
Wall covering plays an important role in the further design of the room. The choice of colors depends entirely on the owners of the room and their taste preferences.
Neutral light gray wall color
A living room in gray or matte shades looks comfortable and will promote relaxation. Ivory (or pure white) will give the room freshness and cleanliness, and fresh floral arrangements will add a summer theme to the interior. Gentle blue shades will fill the interior with a pleasant tint that pleases the eye. Bright wall decoration is suitable with a minimum amount of furniture.
Important. To avoid evaporation and moisture accumulation, it is recommended to paint the walls in the living room with oil or enamel paint.
Painting the living room wall in 2 colors
In modern design, it is possible to use combinations of different styles, in which one wall is painted brightly, and the second is pure white or beige. This combination should be combined with interior items. This color will help expand the indoor area and add light.
Matte paint does not create glare
To create a homely feel, you can use pale orange or yellow colors, and you can also choose a carpet or lamps with a hint of yellow. To brighten up the interior, you can use wallpaper with discreet patterns in the form of hieroglyphs or flowers.
↑ back to contents
What to consider when choosing the shade of plaster
The color of the walls should not only fit into the overall style of the room, but also have a positive effect on the mood and state of mind of residents and visitors. Different colors can evoke certain sensations, for example:
- active shades have a stimulating effect, set the mood for positivity, but at the same time they can cause anxiety and restlessness. These include rich reds and oranges, yellows;
Decorative plaster in the bedroom - passive cool colors have the opposite effect. Improves performance, relaxes, calms. In rare cases, they cause sadness and melancholy. Passive shades include blue, violet, green, cyan;
Decorative plaster of a blue shade - White is considered neutral. The interiors, decorated in predominantly white colors, are filled with air, seem more spacious, but somewhat cold.
White plaster, craquelure effect
Black color absorbs light and is not suitable for small rooms. Goes well with all shades. Can be accentuating if light colors predominate. Black color is considered warm and gives a positive mood, although in some cases it causes melancholy and depression.
Black decorative plaster accents the wall behind the bed
When choosing interior design and colors, it is important to consider not only the dimensions of the room, but also the lighting. Decorative plasters tend to reflect light at different angles, shimmer, and look different from different angles.
Shiny plasters are smooth and reflect light in one direction. They appear bright from one viewing angle, darker from the opposite.
Textured plaster with bronze glaze
Golden decorative plaster
Matte plasters are rough, finely porous. Reflect light in different directions. The hue appears rich from any viewing angle.
Plaster “marble velvet”, matte
Textured matte plaster
Glossy surfaces - with weak reflections. The play of shades is interesting from different viewing angles. The glossy effect is more pronounced if the wall is illuminated by separate lamps.
Glossy finish
Shine on glossy Venetian plaster
On a note! The color on textured plasters always appears darker than on smooth surfaces.
Combinations of wallpaper with floors and ceilings
It is equally important that the ceilings and floors fit well with the wallpaper, since without them there will be no integrity and overall semantic completeness of the overall design picture. There are many interesting techniques and tips, following which you will definitely be able to find a successful combination of wallpaper with other surfaces of the room.
- Gradient. With this option, the combination of wallpaper and floor colors should create a smooth transition. For example, dark floors - slightly lighter wallpaper - white ceiling. This method will help balance the space of the room and make it more sophisticated. This option will be very successful for small kitchens, in which this combination of linoleum and wallpaper will help expand the room and make it brighter.
- Contrast. The combination of wallpaper and canvas, based on contrast with the color of the floor, will look catchy and bold. In this case, it would be better to decorate the floor in a dark shade: this way it will add depth and emphasize the color of the wallpaper.
- Dark bottom, light top. For rooms decorated with light wallpaper, it is good to use a combination of laminate with wallpaper, in which the floor will be much darker. This way you will emphasize the lightness and airiness of the room. The main thing is not to crowd it too much with furniture, so as not to lose that fresh atmosphere.
- Opposites. You can decorate a room very successfully by playing on opposites. For large rooms, dark floors and ceilings with light wallpaper look charming, but for small rooms, light bottom and top with dark walls are better suited.
Important! Dark floors combined with dark walls can visually reduce the height of the room, so this combination is not recommended for rooms with low ceilings.
How to apply plaster: a creative approach
To apply decorative coatings, spatulas, trowels, trowels, brushes, scrapers, applicators, sponges, stamps, palette knives and, of course, rollers of various shapes and sizes are used.
- Stainless steel trowels are used for applying Venetian plasters.
Trowel - Plastic trowels are indispensable when applying “fur coat” and “bark beetle”.
Plastic smoother - Decorative brushes are convenient for leaving scratches, pits, furrows, and “drawing” arcs and other patterns.
It is convenient to apply small parallel stains with a stiff brush - Textured applicators are convenient for recreating an imitation of a wooden surface.
Wood texture applicator - Palette knives are used by artists who create elegant bas-reliefs.
Palette knives - For linear effects, combs are used.
Comb - It's easy to create a marble effect with natural sea sponges.
sea sponge
We will separately consider different types of mittens and their use.
| Type of mittens | What effect does it give? | Surface texture |
| Cloudiness, linear textures, complex chaotic lines. It is also used for polishing Venetian coatings. | Small |
| Reptile skin, python skin, cloudiness, circular blurs, foam, linear and radial textures. | Average |
| Imitation fabrics - denim, jute, linen. | Small, smooth |
| Imitation of aged surfaces, brush strokes, blurriness. For applying metallized coatings like gold, platinum, etc. |
|
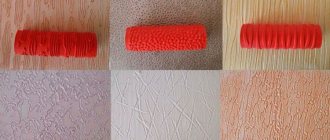
Rollers are used to create impressions on large-textured coatings and relief plasters.
Rollers for decorative plaster
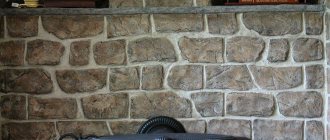
When using rollers, a repeating pattern is formed on the walls. Using a roller you can quickly create the effect of a brick wall for a Loft interior, a stone effect for an ethnic style, or a real wood effect for Country and Provence.
Stone imitation roller
Creating a brick wall effect with a roller
You can make rollers yourself, even from scrap materials.
- Roller made of rolling pin, foam rubber and wire. The gradient effect is achieved by pouring small amounts of paint in two different shades and rolling the roller over two shades at the same time.
Roller made of rolling pin, foam rubber and wire
Gradient effect - Roller made from an old woolen sweater. The roller roller is placed in the sleeve, the fabric is cut off with a margin. To prevent the cut sleeve from sliding off the roller and unraveling, it is better to secure the end with an elastic band.
Wool roller - Corrugated cardboard roller. The textured part of the cardboard is used. The roller is simply wrapped with a piece of suitable size. You can fasten the cardboard with double-sided tape, and the adhesive tape should be glued on the wrong side. The disadvantage of such a homemade product is that it wears out quickly. You will have to change the corrugated cardboard several times to get clear stripes.
Cardboard roller
Interesting surface effects can be achieved using homemade stamps.
- Stamp made from a block and rubber bands. Leaves short streaks on the surface of the walls. The main thing when working is not to dip the stamp deep into the paint.
Stamp made from a block and rubber bands - A stamp made from a regular sponge. The easiest way to imitate brickwork. The sponge is simply dipped in paint and “stamped into bricks” on the dried plaster.
Stamp sponge - You can replace the factory stamp with a crumpled plastic bag. It is simply dipped in paint and leaves chaotic spots and a light crumpled texture on the fresh plaster.
Stamp from a bag
Don’t forget about stencils for decorative plaster. They are thick sheets with slots. Using a stencil, you can apply the plaster mixture itself or just paint, for example, over Venetian coatings. To fix the stencil, use masking tape.
Stencils come in different sizes and shapes. The originality of three-dimensional stencil designs will highlight the individuality of the interior! Examples of using stencils in a small selection below (click on the illustration to enlarge).
Decorating walls with paintings
Choosing a painting or drawing that would highlight the interior of the living room is quite an important matter, the main thing in which is their correct placement. For this solution, designers suggest using the following methods of placing paintings:
- a small painting that hangs alone in the center of the wall;
- two paintings are hung horizontally on the wall. The paintings are placed next to each other on the wall, with the top and bottom edges of their frames being at the same level;
- two paintings of different sizes that will create a contrasting effect. They can be placed vertically, one in front of the other;
- triptych – three paintings with the same design, placed side by side. This solution will add brightness to the area where these paintings are located.
Painting with a world map
Paintings with a thematic collection of your hobby
Picture compositions can exist either separately or together, creating one whole canvas. Picture placement in the living room will serve as an ideal design solution that will emphasize the sophistication of the interior. The main rule is to select the color scheme of paintings with a suitable storyline.
A selection of photographs from the family archive
You can complement the interior space not only with the help of paintings, but also with the help of correctly installed designer figurines, dry compositions, and floral ikebanas. You can diversify areas of the living room with decorative flowers, paintings by famous designers, tall floor lamps with multi-colored handmade shades. To give a harmonious look and enliven the room space, you need to decide on the placement of accents and highlighting certain zones.
Designer items in shades of red, blue or purple will help give your living room an unusual look. To add luxury to the room, gilded figurines or gold-plated interior items are used. The right combination of colors and interior items will help give the living room homely comfort and coziness.
Was the article useful? Tell your friends!
Applying decorative plaster with your own hands
The first technique is stenciling. To reduce the overall cost of finishing work, the most common putty is used as the main material.
Stencil technology
Stencil technology
In the example under consideration, the walls are already prepared for applying a decorative coating. The surfaces are carefully leveled, a starting putty and a deep penetration primer are applied for better adhesion of the finishing coating to the base.
Step 1. Apply the first layer of interior finishing acrylic putty. The composition is already ready, you just need to mix it before use.
putty
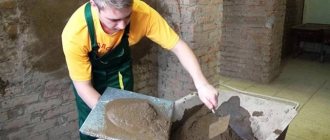
For application we use a spatula and a metal trowel. Using a spatula, take a little putty from the bucket and apply it to the edge of the trowel. Hold the trowel at an acute angle to the surface of the wall, distribute the mixture in a thin layer, making semicircular movements with your hand.
During the application of putty
We putty a part of the wall and immediately, without waiting for the applied mixture to dry, roll the surface with a long-haired roller. In this way we achieve the appearance of a light, uniform texture.
The process of creating a light texture
Surface after rolling
Step 2. Wait for the putty on the wall to thicken and dry a little. Smooth out the texture without pressing the tool too hard.
Texture smoothing
Step 3. Make markings on the wall. Find the center, draw a vertical line from floor to ceiling, using a long bubble level as a ruler. Then draw a horizontal line through the center with a pencil.
Advice! To ensure accurate marking and speed up the process, it is better to use a laser level.
Step 4. Take the stencil, apply the right edge to the vertical marking line, draw around the perimeter with a pencil.
Marking the stencil position
On a note! A custom-made stencil is used from stainless steel sheet (laser cutting).
We continue marking the position of the stencil until the entire wall is completely lined. We check that the stencil does not move along the axis during the marking process, and that the general marking lines are straight.
Step 5. Now we need water at room temperature and dry gypsum-based finishing plaster. The proportions are indicated on the packages. Pour the dry mixture into the water and mix with a drill with a mixer attachment at low speed. Continue stirring until the mixture is completely homogeneous.
Mixing the solution
Step 6. Apply the prepared solution through a stencil.
Advice! It is more convenient to carry out further work with an assistant.
In order not to often bend over to the bucket, we scoop the mixture onto the trowel with a spatula. We will gradually use putty from it.
Combine the stencil with the marking lines
Apply the stencil to the marking and spread the mixture with a spatula. First, apply a stroke from top to bottom, then move the spatula from right to left, removing excess mixture from the stencil.
Applying putty through a stencil
Carefully remove the stencil.
We continue to work.
Step 7. The resulting texture may have too sharp corners. Smooth them with a slightly damp roller when the mixture on the wall dries a little.
Smoothing sharp corners
Step 8. We continue working in a day, this is how long it will take for the gypsum putty to dry on the wall.
The putty has dried and can be painted.
Our main background is brown, and the second layer will be a pearlescent coating.
Pour the paint, tinted in advance and mixed until smooth, into a tray and evenly apply it with a roller onto the wall with patterns. Poorly painted areas are additionally painted with a brush.
Coloring
We wait until the paint dries.
The paint has dried
Step 9. Using a brush and a washcloth, glaze the wall with mother-of-pearl.
Lightly wet the washcloth with paint. Using a washcloth, take a little pearl-colored paint onto the brush; the bristles should be semi-dry. Apply pearlescent paint using cross-shaped movements.
Glazing
The next layer is applied in the same way, only now the “silver” shade is used. Our beautiful panel with a three-dimensional pattern is ready.
Result of work
Adviсe
- For beginners, it is better to use easy-to-apply mixtures, and create the relief with special stencil rollers that are rolled in a certain direction.
- “Bark beetle” is made with special granules, moved with a spatula.
- You can sculpt flowers, bas-reliefs and other three-dimensional decor from gypsum mixtures. But they set quickly, so the mixtures are kneaded a little and worked quickly.
- If you have no prior experience, it is better to work with the rough version on a small surface, for example, on the end wall of a balcony or in a toilet. But a silicone mixture is more suitable here, although it is considered relatively expensive.
Decorative plaster can be used to create completely different patterns
White decorative plaster looks very cool
See alsoFeatures of surface finishing with artificial stone, photo.