Andrey
25540 0 6
Andrey November 12, 2016Specialization: facade finishing, interior finishing, construction of dachas, garages. Experience of an amateur gardener and gardener. We also have experience in repairing cars and motorcycles. Hobbies: playing the guitar and many other things that I don’t have time for :)
Recently, one of the most popular methods of finishing walls and ceilings is decorative plaster, which allows you to obtain a wide variety of textures. Moreover, for decorative plastering it is absolutely not necessary to buy expensive compounds. In this article I will tell you how to make decorative plaster with your own hands from ordinary putty.
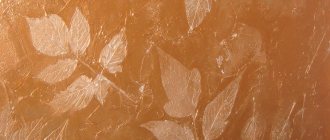
An example of finishing a wall with decorative plaster
What is decorative plaster and where is it used?
Features of facade plaster
Due to the fact that the material contains modern plasticizers, the plaster is flexible, which allows even a beginner to work with it. It is universal, it can be applied to almost any surface (foam concrete, drywall, brick).
Thanks to proper application, textured plaster allows you to give the building an expensive and presentable look. Therefore, working and creating designer masterpieces on the wall using ordinary putty is a pleasure.
Applying plaster is not difficult
Application technologies and rules
In order for the result to be truly what a person imagined, it is necessary to adhere to all the rules for applying textured plaster. There is no need to rush and violate technology here. This is fraught with rapid peeling of the decorative layer or, conversely, when you go to change the finish, it will be very difficult to deal with the plaster.
Calculate the composition and proportions of the solution
The first thing you need to do is purchase a sufficient number of components that are necessary to create the solution yourself. It is safer to buy ready-made mixtures, even in dry form. Since all components are mixed in production in certain proportions and the manufacturer recommends the amount of liquid to create a solution of the desired consistency.
In addition, the packaging must indicate the consumption of the mixture per square meter of a certain thickness, which allows you to more accurately calculate the required amount. In any case, it is better to take with a small margin, since defects may occur during the application of textured plaster. This is a mixture that has set before it is applied to the base.
It is important to consider the condition of the foundation initially. Are there strong irregularities, large differences horizontally and vertically? Then the rough layer will be thick, which means you will also have to buy reinforcing mesh and beacons for the plaster.
Creating a Base Layer
There is no need to create a perfectly smooth and even base for textured plaster. If there are small imperfections on such a surface, the texture will easily cover them. Therefore, prepare the base layer as follows:
- Remove the old decorative coating. If the old layer of plaster is crumbling, it is cleaned to a durable area. Otherwise, all the work will be done in vain.
- Deepen small expansions and cracks. Fill with mortar for rough plaster.
- If necessary, clean grease stains.
- Treat the wall with deep penetration soil.
- Apply a rough coating - cement-sand mortar.
- Wait until the previous layer has completely dried.
- Apply an additional layer of primer.
Advantages of textured plaster
If you decide to choose ordinary putty as a façade finish to create an intricate decor, you will have to work hard and practice applying the finish to get a really high-quality finish. But the result is worth it.
Decorative plaster is, first of all, a play of textures. And the color scheme plays the second part. It is important to understand when starting work that it is through texture and relief that you will achieve a complex texture on the wall.
Stone-like facade plaster
Textured plaster has the following qualities:
- easy to apply;
- is highly resistant to moisture and UV rays;
- can be applied to any surface (foam concrete, brick, etc.);
- allows you to give the wall an original style;
- does not require perfect leveling before application;
- it is possible to choose any color scheme;
- goes well with other finishing materials;
- has a long service life;
- environmentally friendly material;
- increases the thermal insulation and sound insulation properties of the room;
- you can create a complex texture.
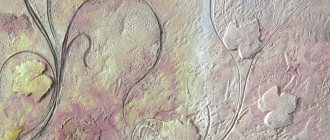
The possibilities of decorative plaster are not limited to creating an original texture. Decorative plaster can be used to create intricate patterns and paintings.
Decorative plaster at home
It is best to use silicone putty mixtures as a base. They are more elastic, allow you to achieve perfect texture and the necessary relief, and also have high resistance to mechanical damage. Despite the intricacy of the texture, this material is quite easy to care for. Dust and dirt can be easily removed with ordinary detergents.
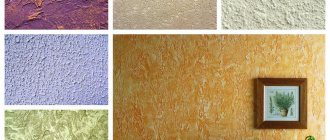
Types of decorative plaster
Decorative plaster
Today, a large number of different options for decorative plaster are used:
- Rock - texture repeating the section of basalt rocks
- Rain – imitation of raindrops
- Bark beetle - imitation of the passages of bark beetles in wood
- textured plaster to look like natural stone
- Venetian plaster
- compositions with marble chips
- compositions with silk effect
- processing walls with a textured roller
- And so on
- You can find various types of decorative plaster on the website.
The following describes in detail the application of the most popular types of decorative plaster.
Disadvantages of decorative plaster
Each known material used for interior decoration has certain disadvantages. For decorative plaster, this list includes the following aspects:
- The high cost of decorative plaster, which often limits the choice of buyers.
- The finished coating is quite difficult to dismantle. For this purpose, you will need strength, money and time.
- Not all types of decorative plaster can be applied perfectly with your own hands.
- A number of conditions are required to prepare the underlying surface. The walls must be clean, thoroughly free of dirt, remnants of old coatings, and construction dust.
Failure to comply with any of the requirements can lead to distortion of color and pattern (especially for Venetian plaster), the formation of unevenness and gross defects, and peeling of part of the decorative layer.
Materials for work
To create textured or Venetian decorative plaster, you will need the following compositions:
- Putty. Polymer (acrylic, silicone) compositions have good plasticity and are easy to apply, but their cost will be higher than that of conventional gypsum putty.
- Dye. The number of shades is selected depending on the planned result. Textured plaster involves the use of 1–2 colors, Venetian plaster - 3 colors.
USEFUL INFORMATION: How to plaster a wall with cement mortar with your own hands
Important! One of the colors is chosen as the main one, the rest are complementary. Before purchasing, it is better to study the palette of shade compatibility.
- Primer. An acrylic composition with deep penetration is suitable.
- Wax for decorative plaster or acrylic varnish.
- Glitter (shine) depending on the desired effect.
- Mother-of-pearl enamel (gold, silver).
The material is purchased depending on the type of decor that you would like to receive.
Applying decorative plaster to the wall
Type of decorative plaster
Let's take a closer look at the implementation of popular types of decorative plaster design.
Rock
Decorative plaster “Rock”
Rock
The method can be called simple. Even a novice builder can handle the “rock”. A special mixture is not needed to create such plaster; you can use regular finishing putty.
The procedure for making a “rock” can be as follows:
- The walls are pre-primed
- A bottom layer of finishing putty is applied to them. In this case, it is advisable to work in small areas (no more than 0.5 sq. m), applying a layer of 2-3 mm using a spatula-stroker
- The structural pattern is applied using a trowel: it is completely cleared of material and washed well
- After washing, the trowel is pressed against fresh putty on the wall
- The texture is created at the moment the trowel is lifted from the wall. You need to slightly lift its lower part, and then tear it off the wall completely, while making a downward movement
- The ideal option would be a tear in which the upper end of the trowel comes off the putty in the place where its lower end was originally located.
- After this, the iron is cleaned again and moves on to the next area. In order not to leave untreated sections of the walls, the next section overlaps with the previously treated
- The drying of the “finish” applied in this way lasts up to two days. Next you can start painting.
Actually, that's all. The relief pattern is created using small irregularities on the wall on the applied finishing layer. To create more interesting solutions, you can try different movements of the spatula or trowel at the moment of tearing.
The main thing is to separate the tool from the wall very smoothly. In this case, there will be no traces or too high protrusions of the material.
The peculiarity of this method is that the tool can be torn off in any direction and during any movements.
In addition, it is possible to re-process the same sections of the wall. This way you can get completely unique texture patterns - criss-cross, herringbone, etc.
For rooms with high humidity (bath, kitchen, etc.) you should use a cement-based finish.
Rain
Plaster “Rain”
Rain
A more complex method, however, its result looks more impressive and is more popular. Usually, the rain is applied at an angle, but this does not matter. As in the previous case, ordinary finishing putty is used as a building material.
Sequence of actions when applying “rain”:
- First, the walls are marked at an angle. Oblique lines are applied to them at an angle of 45°. You can also apply it at some other angle, for example, 60°; the main thing is that the angles of all lines are the same. The width of the lines is 3 times the width of the trowel
- Apply masking tape or tape to each line so that its bottom edge lies on the line
- The plaster is applied starting from the top corner: first, putty is applied with a thickness of 2-3 mm and a width equal to the width of the trowel for a length of about one meter
- To create a drop pattern, you need to lightly press the trowel onto the plaster, pulling it along the line in a slightly raised position
- Next, the steps are repeated until the entire stripe is painted over to the end of the line. Several approaches of 1 m length are performed
- Next comes smoothing out the applied stripe (since freshly applied rain is more like a hedgehog - its unevenness is too high). To do this, the spatula is completely cleared of material and lightly pressed against the surface. Then one edge of the spatula is lifted, tearing it away from the putty.
- You need to tear it off relatively quickly, because the slower the tearing process goes, the more uneven the surface will remain
- Then make the second strip in the same way. It needs to be applied with a slight overlap on what has already been done. After the second, the last stripe is applied and at this point the space between the two lines is completely filled
- The process is repeated for the next line until the entire wall is plastered
Applying putty and creating texture
Before creating textured wall decoration, you need to decide what effect you should get in the end. On the Internet you can find a large number of photos that show what kind of decorative plaster you can create from putty with your own hands.
Initially, it is worth familiarizing yourself with this kind of material not only in order to decide on the decor, but also so that it becomes more clear how you can achieve this or that relief.
You can create texture when applying putty in various ways. Almost all of them require a base layer of mixture. That is, initially, using a spatula, you need to apply a base layer of putty. This layer should be thin, only 2 mm.
Application
Then you need to apply a layer of putty of about 3 mm and using different tools you can create roughness on this layer.
You can use a special trowel to smooth out the putty. If you press it a little against the wet putty, it will leave small bumps that can look quite nice.
You can also level the putty mixture using a notched trowel. It will leave grooves that will also look interesting. You can level the composition in this way horizontally or vertically, or you can experiment with alternating directions.
Scales
Another way to create structural plaster from putty is called “Scale” because of the effect that is obtained after decorating the wall.
When the base layer of putty has been applied, you need to take a 10 cm wide spatula and apply even strokes with a slight whip so that you get a scaly texture.
Scales
After hardening, it is best to paint such a wall in a suitable shade to highlight the unevenness.
Cave wall
Cave wall. This is the name of the type of texture that is created in a simple way.
The putty mass, distributed over the surface, is decorated using a crumpled piece of polyethylene - it must be applied to the still damp wall and sharply removed so that it pulls the putty along with it.
Cave wall
A similar effect can also be achieved if you leave the covering film on the wall for a day, then remove it. With this method, it is necessary to achieve a putty consistency that will allow it to stretch, creating a needle-like texture.
Rock effect
A rock effect can be created by using a trowel to smooth out the putty. After the layer of putty that will be decorated has been applied, you need to attach a metal trowel to the wall so that one edge is raised.
Rock effect
It needs to draw straight lines, preferably at an angle, to make it look more impressive. The smoothing iron will slightly remove the top layer of the composition and you will get an interesting texture, similar to natural stone.
Venetian
There is a type of decorative plaster that has become quite popular due to its interesting texture and color scheme - Venetian plaster.
Its texture can also be created with your own hands from ordinary putty. Apply putty in a small layer using uneven strokes.
For more information about Venetian plaster, watch the video:
After a day, the surface should be sanded with fine-grain sandpaper. Only sharp corners should be ground; there is no need to achieve as smooth a surface as possible. After this, the wall must be primed. After drying, you need to paint it in the base color, apply a different color on top and wipe it off the convex parts with a damp rag.
Plaster is the basis; it can be used to get rid of uneven walls. By clicking on the link you can familiarize yourself with the different types of gypsum plaster.
When planning a renovation, it is important to take into account not only how much material is required for the work, but how long it will take. Here you will find out how long it takes for a floor screed to dry.
The exterior decoration of a house is one of the important components of renovation; thanks to it, it becomes more solid, its appearance can be changed beyond recognition, and a favorable atmosphere is created. Facade panels for exterior decoration of a house are practical, warm and aesthetically pleasing.
Venetian plaster, as a rule, shines; it must be coated with varnish or special wax . This type of texture is more complex and takes longer to execute than others, but if everything is done correctly and the paint colors are chosen harmoniously, a wall with such decor will look very expensive and elegant.
Venetian
There are quite a few ways to create textured plaster from putty with your own hands.
For decoration, you can use fabric with an interesting weave or pieces of textured leather. You can also create elegant designs using stencils.
If you walk over wet putty with a hard brush, you will get unusual textured effects. You can find a large number of videos on this topic that clearly show how to create an original decorative wall covering from ordinary putty.
Painting decorative plaster
Painting with a roller
It is believed that painting decorative plaster in one color and one layer is pointless. And there is a reason for this: with this approach, the texture of the material is very quickly lost. To ensure that the work on creating the decor is not wasted, and that the relief design stands out well against the general background, painting using two colors is recommended.
At the first stage, a long-nap roller is used. They paint the walls, that is, the background, the “back” of the picture. After 24-36 hours, after this layer of paint has dried, the wall is re-painted, but using a roller with medium-length or very short pile. In this case, only the prominent relief pattern will be well painted.
The color of the paint used in the second step should not be too different from the color used to create the background. It should be just a few shades lighter than the “background”.
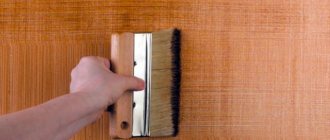
In some cases, it is recommended to protect the paint with varnish for greater safety. In this case, a water-based varnish is used. In order for the varnish to penetrate deeply into the decorative plaster, it is diluted with water in a ratio of 50% to 50%.
The varnish solution is applied to the surface using a wide brush. Application is carried out in two layers. The second is applied after the first has completely dried. It is also desirable that the layers are applied perpendicular to each other: if the first is applied from bottom to top, it is advisable to apply the second from left to right.
Alternative painting using dry brush method
Dry brush painting
The painting process can be significantly simplified (and accelerated), without losing the decorative quality of the coating, if you use an alternative painting method.
To do this you need to prepare:
- wide and flat brush;
- paint tray;
- cardboard
Painting decorative plaster
Sequence of actions when painting with a dry brush:
- A little paint is poured into the tray and the brush is immersed in it.
- The brush is wiped on the edges of the tray, and then on pieces of cardboard.
- The remaining paint on the brush is applied to the plaster. At the same time, the brush is held parallel to the wall so that it barely touches the surface of the wall. Brush movements are made in one direction
- As the paint is consumed, the process of renewing it on the brush is repeated.
The main thing in this method of painting is not to allow too sharp a transition of colors when moving the brush.
How to make decorative plaster with your own hands
Nowadays, you can easily prepare your own version of the decorative mixture, but this may require additional expenditure of money, effort and time. But if you want to decorate your walls with a beautiful decorative coating, you should pay attention to this. There are several ways and options to create a decorative composition; we will tell you about the most popular ideas.
Decorative plaster “1000 lines”. To make the lines even, the plaster is applied in fragments according to the markings.
Recipe with glue
If you want to repair the walls, you can use ordinary glue to prepare a suitable solution. To do this, pour 6 kg of ordinary plaster into a pre-prepared 10-liter container, and then add 2 liters of clean water at room temperature. The resulting mixture must be thoroughly stirred until it has a homogeneous structure. 200 grams of regular PVA glue are added to the solution.
Recipe with primer
The process of preparing a solution with a primer consists of mixing 6 kg of ordinary putty and primer until a homogeneous mass is obtained, the consistency of sour cream. Grout should be added to the resulting mixture. If you want to change the tone of the material, you can add colored dyes or use colored grout.
Gypsum based recipe
To prepare your own gypsum solution, study the method below:
- 6 kg of gypsum powder must be placed in a pre-prepared container (a clean bucket of paint or building materials).
- After this, 2 liters of water at room temperature are poured into the container, while the mixture is thoroughly mixed to give it a homogeneous structure.
- At the final stage, add 200 ml of PVA glue to fix the solution. Using the resulting composition you can plaster the walls.
The strokes are applied with a brush in a chaotic order, the relief effect is achieved by painting
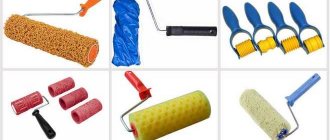
Tools for getting the job done
If you are a beginner in this field, you should take care of purchasing a suitable tool for interior work. Wall covering is carried out using various tools, each of which is designed for specific tasks. Next, we will consider the most popular options for tools used when working with decorative coatings.
The edges of the trowel should not be sharp, the corners should be rounded
Roller work
If you are new to this matter, you should use the roller application method. Step-by-step work using this tool is described below:
- Purchase a ready-made version with corrugation, which will allow you to decorate the surface of the walls in your home.
- There are several ways to make your own embossed roller. You should cut out figures from a standard roller with a knife; you can also attach a cord or wire to the nozzle.
- The composition should be distributed evenly and smoothly over the wall (layer approximately 2-3 mm thick).
- For convenience, ditches for rollers are used, which allow you to evenly cover the wall with the same layer of plaster.
Handy working tools
Homemade home remedies are perfect for decorating walls. Possible means of application include the following:
- Decoration is carried out using a simple comb. The comb is drawn along the coating to decorate the layer of plaster with unusual patterns.
- Wall decoration is done using a crumpled sheet of paper. To do this, a lump is formed from ordinary paper, which is applied to the putty on the wall to create patterns.
- Another idea is to use an old washcloth to create a porous coating on the walls. Instead of a washcloth, try using a small piece of foam padding.
- Finishing with a bag will allow you to put a decorative layer of putty on the wall.
Using a spatula or trowel
Laying the coating is possible using various tools; a convenient option is a spatula with teeth and a trowel. The application process consists of alternating retraction and pressing on the wall surface. Such movements will allow you to create an imitation of wood or stone on the surface. Using a trowel will allow you to create a wide variety of patterns on the walls; try changing the direction of movement of the tool, as well as the pressure applied. In the final stage, you can smooth out individual sections of the wall to create a structure that imitates a stone surface.
Using ready-made stencils and printing bases
This design option and creation of a unique design is suitable for interior wall decoration in order to create a three-dimensional pattern. You can find a suitable stencil or print for decorating surfaces. Working with a stencil involves applying putty into the recesses located inside the workpiece. The material can be applied to a dry wall; after the work is completed, the stencil is removed. If you want to use a print, you need to choose a pattern that will be continuously connected along the wall. The putty is applied by pressing the print against the wall to form a background pattern.
Types of tools by type of material for applying textured plaster to the wall or facade
To make the roller, materials of different hardness and composition are used. The choice of tool depends on the drawing and the expected result.
Rubber
Rollers with a rubber base are well suited for applying relief figures to the surface. When using them, images look sharpest. In addition, there are rollers made from porous rubber. They are used to obtain the required texture. This material is not suitable for creating figured drawings on walls. Working with a rubber roller requires experience.
Plastic
Plastic materials differ in hardness. Therefore, rollers made from them are divided according to their purpose. Tools made of hard material are suitable for applying figured patterns, while tools made of soft material are suitable for leaving light patterns on the surface.
Often the plaster mixture sticks to the plastic base, so it needs to be cleaned periodically. Other disadvantages are the risk of deformation of the working element and the appearance of cracks on it. Plastic tools are inexpensive.
Pile
The pile base of the roller is made of polyacrylic, synthetic or natural fur, and polyamide. The tool is used on fresh plaster mortar. The severity of the wall relief depends on the length and shape of the pile: the shorter it is, the smoother the surface will be.
Foam rollers
Foam rubber tools are used mainly for applying fine-grained plaster mixtures. In addition, a roller is used to create a pattern on the surface treated with fresh plaster mortar.
Leather
The material of the working part of the roller is artificial or natural leather. It may have a smooth or wrinkled surface. In the second case, the pattern will depend on the size and shape of the folds. If they are fastened well, the pattern on the wall will look regular. The mobility of the folds will give the pattern a natural look. Leather rollers are used to apply Venetian plaster to achieve the effect of a marble surface. Working elements made of genuine leather are more durable than those made of artificial material.
The following types of tools are suitable for facade work. If the wall area is large, the foam roller will quickly become unusable.
Decorative plaster of the facade
Finishing the facade with decorative plaster yourself is not a difficult task. The main challenge is working at height if your home is more than one story high. The very decorative plaster of a house outside is practically no different from the technology of applying decor inside a room. Let's look at decorative plastering of the facade of a house using the example of the most popular type: applying decorative bark beetle plaster.
How to apply decorative bark beetle plaster
First, prepare the surface as described above: level out large differences in height and clean. Then apply primer. It is better if it is soil with quartz sand. Prepare a mixture of decorative plaster. Apply a small layer of plaster with a trowel. Let the “bark beetle” dry a little and start decorating.
Move the trowel along the plaster using a rotating motion. Or you can only make vertical or horizontal movements. It all depends on what kind of drawing you ultimately want to get. Movements should be without strong pressure.
What tools will be needed for finishing?
To create a pattern you like on the surface, you can use both ready-made purchased tools and improvised means. It all depends on what kind of drawing a person wants to see as a result. Even an ordinary comb will help you make an original pattern.
Stencils and stamps
Such instruments are available for retail sale. Each of them has its own design on the working side. The seal is simply applied to the applied solution, which has set a little, and pressed a little. Thus, we get a beautiful drawing.
The price of stencils and prints is not low and buying at one time is not entirely cost-effective. You can ask friends who do this kind of thing regularly. Or still purchase the option you like best.
Using a Notched Spatula and Trowel
Here the drawing is created exclusively by the master. Therefore, it is desirable that the pattern on textured plaster be made by one person who knows exactly how to execute it. Controls the force of pressure and the trajectory of movements.
Using a roller
This tool also has a pattern. As you work, a repeating mark will remain on the wall. The applied layer must set a little so that the lines are clear. The buyer is offered a variety of patterns:
- simple geometry;
- floral motifs;
- fauna (birds and animals).
Available means
If you don’t have a special tool at hand or don’t want to practice for a long time to create a beautiful pattern on textured plaster, use whatever comes to hand. It could be:
- dish sponge;
- crumpled plastic bag;
- sackcloth;
- comb;
- brushes with different bristles;
- an old roller wrapped in fabric or thick threads.
In general, there are no restrictions here. Try several options and choose what looks most attractive.
What kind of putty can I use?
To create decorative surfaces, all types of gypsum putty are used. The ideal option is a finishing type Knauf Uniflot, Knauf Rotband, Ceresit ST127 or their analogues.
- A high-strength composition similar to adhesive, called Knauf Uniflot, is intended only for interior work. It has a low degree of shrinkage and is practically not susceptible to cracking.
- Knauf Rotband plaster is used for plastering concrete walls and ceilings - its adhesion (stickability) is excellent. The surface is very even and smooth. The mixture has a reduced consumption and is used even in rooms with high humidity.
- White polymer putty Ceresit ST127 is suitable only for interior work. It can be applied to many types of bases, including concrete, cement-sand and gypsum.
Acrylic, silicone and other types of polymer putties are well suited for creating decorative surfaces. Fillers (sand, flock, stone chips, etc.) introduced into them are distributed evenly. Cheaper cement-based plaster is used for finishing facades.
What is putty and what are its types?
Putty is a composition intended for leveling walls, ceilings, window and door slopes . It can be paste-like, that is, immediately ready, or powder, accordingly it needs to be kneaded.
There are two types of putty:
- Starting
- Finish
Starting
The starting mixture is intended to level the walls and get rid of large or small defects.
This putty has a rough structure and white color with a grayish tint.
Starting
Finish
The finishing putty is more flexible, soft and smooth.
This mixture can be used to create perfectly smooth glossy walls. It can also create texture, even intricate patterns.
Most often, starting putty is used as decorative textured plaster, since it is inexpensive in comparison with the finishing composition.
Finish
Based on its composition, putty is divided into three main types:
- plaster
- cement
- polymer
Plaster
Gypsum putty is mainly used as decorative plaster with a textured coating.
It is suitable for finishing walls in dry rooms, because it is not moisture resistant, since the basis of its composition is gypsum. This mixture is good because it dries quickly and does not shrink.
Plaster
Plus, it allows air to pass through perfectly, and mold does not threaten the walls under such putty.
Cement
Cement putty is good for cold rooms and places where there is usually high humidity.
She is not threatened by temperature changes. Most often this putty is used for building facades.
The disadvantage of the cement mixture is that it shrinks and this must be taken into account when applying it.
Cement
In addition, the putty, which is based on cement, is not at all elastic, and accordingly, after it dries, cracks may form. Of course, such putty is not suitable for decorating premises.
Polymer
Polymer putty, like gypsum putty, also dries very quickly and does not shrink.
Its use is possible on any surface, and it is very plastic, but this mixture has a clear drawback - its high price.
Polymer
Of course, it can be used as textured plaster, but is it worth the extra cost?
Recommendations for caring for decorative plaster
Like any material, decorative plaster requires some care so that the surface of the walls remains intact and beautiful for as long as possible.
In this matter, recommendations can also be divided by type of mixture:
- Plasters with imitation corduroy, velvet, silk, etc., applied to the walls in a fairly thin layer, must be cleaned as carefully as possible. A soft cloth soaked in warm water is suitable for this. For severe contamination, you can use a sponge and soap solution (without abrasive particles!), the main thing is not to rub the surface too hard.
- Mixtures containing quartz chips can be washed with a cloth or sponge soaked in warm water or soapy water. A soft brush will also work. To remove large amounts of dust, you can use a vacuum cleaner with a brush attachment.
- Textured plaster mixtures, the finishing coat of which is varnish or wax, are the easiest to clean - they are the most resistant to mechanical damage. A sponge and ordinary detergent will do.
- Venetian plaster is also coated with wax, which means it can be washed using a non-rough material and a soapy solution.
The main thing is not to forget that solvent-based products should not be used for any type of plaster! This can not only spoil the color of the surface, but also destroy the structure of the material.
Repair of decorative plaster
Decorative plaster periodically requires repair or restoration. Cracks, swellings, peelings and chips appear on it. It is not difficult to repair the damaged area with your own hands.
If you notice swelling of the plaster, go over the entire surface of the wall with a wooden hammer and listen to how it sounds. A dull sound will tell you which area has peeled off. This area of damaged plaster should be removed using a hammer drill, chisel, hatchet, etc. Then scrub the wall with a wire brush and prime. Before applying a new composition of decorative plaster, thoroughly moisten not only the cleaned area with warm water, but also the adjacent plaster for better adhesion of the materials to each other.
Try to apply decorative paint and repeat the pattern that was there earlier. To ensure that the difference in the pattern is not so noticeable, repair the plaster by knocking out a rectangular area.
After the plaster has completely dried, it must be repainted. This way you will mask the joints and heterogeneity of the layers.
Cracks in decorative plaster can be repaired in a similar way. The crack should be widened and all the measures described above should be carried out.
Homemade relief plaster
How to make textured plaster with your own hands? A variety of relief can be given to ordinary plaster in various ways:
Undulating relief. A pattern in the form of waves is suitable for decorating a coating made of plaster based on lime and sand. To make such a pattern on the wall, you need to cover it with an even layer of plaster and wait until it dries completely.
After this, you need to slightly moisten the surface, make notches, apply a second, thick layer of plaster and smooth it with a spatula, giving it a wave-like pattern.
Check it out here too!
DIY illuminated ceiling: 85 photos of the best options! Types of lighting: spots and features of their connection, LED backlight, diode backlight, “starry sky”Assembling a shower cabin with your own hands: assembling the tray, preparing and installing the walls, installing the portal. All stages of assembly with photos
How to make ventilation with your own hands - we ensure freshness in the house, create comfort yourself (photo + video)
"Traverine". To create a beautiful and unobtrusive “traverine” pattern on the surface, decorative plaster mixed with a color of the shade you like is applied in throws to the prepared and plastered surface with an even layer.
Do-it-yourself finishing with such textured plaster is quite simple, but at the same time beautiful and original.
Stone pattern. To make such a surface, you need to mix the plaster with the dye, apply it to the wall in a thick layer and, without leveling it, apply the pattern with the end of a hard brush or metal brush."Dune". Take a look at the photo of a similar pattern made with textured plaster yourself; it looks very impressive in the interior, and it’s not difficult to make.
Level the colored plaster on the wall with a trowel, and then, using the same tool, make a pattern in this way: press the trowel onto the wet plaster and tear it off the surface with a sharp movement.
"Furrows" This relief is created using a tile adhesive spatula, which is a spatula with square teeth.
Check it out here too!
How to make an arch from plasterboard: we make an interior arch according to photo instructions. 120 photos of arches in the interiorHow to make a balcony with your own hands - tips on how to make a balcony in an apartment beautiful. Step-by-step guide to the use of modern building materials + 70 photos of the best design options
Installing a compartment door with your own hands - step-by-step instructions for installing sliding doors and tips on choosing fittings (110 photos + video)
On a thick layer of decorative plaster, draw vertical or horizontal stripes with this simple tool.
"Fur coat". This pattern is made by spraying a composition with large particles with a broom or brush. Using a spray gun, you can spray smooth plaster over the surface.
Detailed video instructions for applying textured plaster with your own hands can be found on the Internet and are freely available.The use of decorative plaster in the interior of rooms
Decorative plaster in an apartment performs one of the main functions of room decoration. A correctly selected design of decorative plaster will make the interior even more beautiful and perfectly complement the style taken as a basis. Also, each room of the apartment requires an individual approach due to the peculiarities of its location and external characteristics.
- Decorative plaster in the kitchen.
Using this type of finishing material in the kitchen would be an excellent choice, as it is easy to clean and looks quite decent on the wall surface. Types of plaster used for decoration: Venetian, with imitation of marble or stone surface; imitation silk, plaster with small or large crumbs, etc.
The main thing that is worth emphasizing is that decorative plaster should be applied only to one wall of the room, so as not to make the kitchen too “heavy” and not spoil the design of the room.
- Decorative plaster in the bathroom.
Due to the characteristics of this room, it is recommended to use cement-based plaster or sanitizing plaster, which perfectly tolerates the general humidity of the room and is environmentally friendly.
Often, when finishing with decorative plaster, Venetian plaster or various textured types that are easy to clean are used for the bathroom.
- Decorative plaster in the corridor.
Decorative plaster in the hallway, as well as in the corridor, forms the main impression of the apartment’s design. Speaking about the types of decorative plaster in rooms of this type, we can name the main ones that best meet the requirements (resistance to cold, moisture and good operation): velvet and silk effect, “bark beetle” effect and Venetian plaster.
- Decorative plaster on the balcony.
Finishing the balcony with decorative plaster allows you to maintain the harmony of the design with all rooms of the apartment. Also, it performs an excellent heat-retaining function, is quite easy to operate and maintain, insulates sound and, at the same time, allows the walls to breathe. To decorate walls, various types of plasters are used, from textured plasters, with imitations of various plants and reliefs, to, for example, imitations of stone or brick.
What can it be made from?
In the previous paragraph it was mentioned that hand-made textured plaster is quite inexpensive. Therefore, now we will figure out what components must be available for everything to work out. Be sure to adhere to proportions.
If you do not take this fact into account, then the solution will either harden quickly and you will not be able to make a drawing. Or, on the contrary, a mixture that is too liquid for textured plaster will simply slide off the base, which is also bad.
From ordinary putty
The simplest and most inexpensive way to make a solution for decorative plaster can be made using commercial putty with various additives and additives. To do this, choose the composition that you like the most and add PVA glue. The method for preparing the mixture is as follows:
- Take in the liquid in the volume recommended by the manufacturer for preparing the putty solution, but subtract 10%.
- We bring it to the required volume with PVA glue.
- Mix the mixture thoroughly.
- Add the dry mixture in small portions and stir with a construction mixer.
The amount of glue can be reduced, but the more of this component, the stronger the layer will be. But you need to prepare for the fact that textured plaster based on glue and putty will take a long time to dry.
Cement-lime mortar
From the name it is clear that the composition includes cement and lime, but these are not all components. The proportions should be as follows:
- Cement – 1 part.
- Lime mortar – 1 part. Before adding to the general mixture, be sure to strain to avoid lumps that have not dissolved.
- Sand – 5 parts.
- Water. It all depends on how thick the solution should be.
Cement-sand mixture
This version of textured plaster can withstand high humidity well, which is why it is often used to decorate the facade of a house. The ratio of components is as follows:
- cement – 1 part;
- sand – 3 parts;
- water.
Limestone
To create such a solution you do not need many components. Only lime mortar and sand are used. Their number is related to 1 to 3. This plaster holds up well, but the base will have to be treated with a special primer, especially if there are metal elements. This will protect the parts from corrosion.
Lime-gypsum
There are also not many components in this composition, namely:
- Gypsum – 1 part.
- Lime dough - 3 parts.
Advice! Be careful when working with lime. Be sure to wear protective clothing, goggles and gloves. Lime quickly corrodes the skin.
In order to create the desired texture, marble granules or coarse sand are added to the plaster solution. Its amount should not exceed 11% of the total volume.