Due to various methods of applying decorative plaster, a room can be changed beyond recognition. The interior of the house can be kept in one style or it can be mixed.
A characteristic feature of plaster is the originality and uniqueness of the design, so each room will be original and unique.
Decorative plaster can be painted in any color. Therefore, a few years after the renovation, you can easily change the color of your plaster.
[contents]
One of the advantages of finishing walls with decorative plaster is its ease of use. Without professional experience, but following our advice, you can easily do all the work yourself without the help of specialists.
Below we will describe detailed step-by-step instructions for finishing with decorative plaster with your own hands.
Selection and application of decorative plaster for interior work
Unlike the facade, any environmentally friendly materials are used indoors. Their inertness to negative influences is a relative concept. After all, in a living room, bedroom or office, as a rule, there is nothing and no one to spoil the walls. At the same time, the kitchen and bathroom have a rather aggressive microclimate. Whereas the operation of a hallway, nursery or gym involves inevitable mechanical damage to the enclosing structures.
The main characteristics of materials usually depend on their composition. Therefore, decorative plasters for interior decoration can be classified according to this criterion:
- cement mortars are reliable, affordable, suitable for repair, but crude and primitive, not allowing much.
- gypsum mixtures are the easiest to apply, cheap, easy to process, but not very resistant to moisture and physical influences.
- polymer compositions are a common option, reliable, aesthetic, versatile, but more expensive than previous ones.
- Liquid wallpaper based on cellulose is environmentally friendly, repairable, and easy to apply. However, they are not particularly popular, apparently due to the combination of high price and low strength.
- acrylic coatings are expensive, but have unique characteristics. A striking example of such “decoration” is “Venetian” plasters that imitate marble.
- Silicone and silicate plasters are most often facade options. They are inert to most influences, but they are expensive and outwardly quite primitive.
Here, let everyone decide for themselves which decorative plaster for interior decoration, made with their own hands, is best suited.
The most popular interior coatings are gypsum, polymer, cellulose and acrylic. The decors created with their help imitate healthy or beetle-eaten wood, “rain”, marble, stone, “fur coat” or “lamb”.
Moreover, depending on the talents and skills of the master, the results can vary dramatically. Even when using the same material. Let's look at the most common design options in order of increasing complexity.
Advantages of textured plaster
The possibility of using textured plaster allows you to experiment with the decor of the room. It is suitable for any type of premises, regardless of their purpose. The obvious advantages of the coating include:
- Easy application method. To decorate a plane, you do not need to have specialized skills, so anyone, even a beginner, can cope with this task.
- The plasticity of the material allows it to be evenly distributed over the surface, applying layer after layer, and creating fancy and original designs.
- Properties such as strength and durability of use speak for themselves. Textured plaster is slightly susceptible to the influence of harmful and destructive factors, be it temperature, moisture or detergents. It retains its original appearance for a long time, which is easily maintained with the simplest care products.
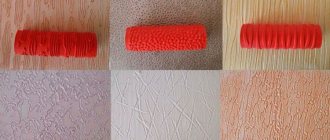
- Aesthetic appearance . Special additive materials in the composition play a decisive role in the formation of the unusual structure. Small stone chips and other various inclusions allow you to replicate the structure of a marble or sand coating. Recently, plaster has become increasingly popular, allowing you to recreate the structure of an orange peel or a surface that has been exposed to insects. The color palette is also quite extensive and will satisfy any customer request. In this regard, it is quite difficult to determine the final choice, so manufacturers have created catalogs with various structure options.
- Easy to care for. Walls decorated with textured plaster can be easily cleaned from various contaminants using detergents. They do not affect the appearance of the coating and do not worsen its condition.
- Affordable cost of material . If we compare with other types of finishing plaster, the cost of textured plaster is quite attractive. Installation costs are also low, since no complex or expensive devices or facilities are required.
Chaotic strokes texture
Applying plaster with chaotic strokes is a simple job for which any mixture will do. The result is a unique relief texture that reliably hides all the flaws of the base. Disadvantages - indistinctness, roughness, primitiveness of outline. Strength and moisture resistance depend on the properties of the material or the finishing method.
Stages of work:
- Preparation of the base - removal of weak particles, dust removal, degreasing and priming.
- The solution is prepared according to the instructions indicated on the bags with the dry mixture. Sometimes the material is immediately ready for use, such as acrylic or oil-adhesive putties in cans or bags.
- If a cement-sand mixture is used, the optimal ratio of sand and cement (for this purpose) is 2 to 1. It is advisable to add a plasticizer - PVA glue, washing powder, gypsum or liquid glass. Convenient consistency – “so that a spoon can stand”, but not thicker. The best composition is determined experimentally.
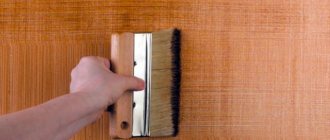
- The solution is applied using the “sweeping” method, that is, applied with slaps and smeared with a wide (30 cm) spatula (trowel, trowel). In this case, you should immediately determine the average layer thickness for yourself and stick to it.
- Having aligned a square “by eye”, without waiting for it to dry, they make chaotic strokes. Whether it is necessary to add a mixture depends on the chosen design. The same applies to the height of the relief, as well as the length, width and direction of the strokes. It is advisable to maintain uniformity in order to get at least some texture.
- Strokes can be made with any device - a brush, a roller, a specially prepared template, a notched spatula, etc.
The final finishing consists of painting or varnishing. Such primitive decors are usually carefully painted over two layers and left. Any paint is suitable - from water-based to oil-based. However, the characteristics of the room should be taken into account. Paints that are soiled and not resistant to moisture are applied, for example, above human height. If decorative plaster for interior work is applied with your own hands for the first time, then there is nothing easier than creating a “chaotic strokes” texture.
Experimentation is always useful. Treat some part of the wall and select a sample area to then repeat it over the entire plane.
Brickwork imitation device technology
The technology for applying decorative plaster under brick with your own hands can be divided into several stages:
- wall surface preparation;
- marking and marking the wall according to the size of the bricks and the seams between them, as well as gluing with masking tape;
- applying rotband plaster in separate sections of 1-2 m2 until the material hardens;
- painting the surface like a brick and the seams between them;
- coating the dried painted surface with a protective varnish.
The technology for simulating masonry does not require special skills to do it yourself. In this case, inexpensive materials are used - the approximate cost per square meter of finished brick plaster is 120-150 rubles.
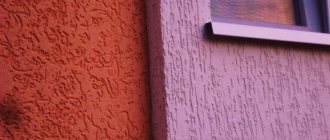
"Bark beetle"
Bark beetle plaster, as a rule, is a factory-made dry mixture. It can be based on cement, gypsum or a polymer binder. To obtain the desired effect, hard insoluble fractions of sand, marble or other material are added. Their size is usually uniform and can range from 0.5 to 2.5 mm. Select the mixture based on the thickness of the intended layer. The smoother the base, the thinner the layer. The result is a relief textured imitation of a beetle-eaten surface.
Stages of work:
- Preparation here usually includes not only strengthening the base, but also leveling it. There is no need to do it “for painting”, but differences of more than 4-5 mm per 1 m are usually eliminated. Ideally, plaster beacons are installed and the wall is plastered, obtaining an even vertical plane.
- The primer of the base for the bark beetle is very important, since excessive and uneven hygroscopicity is unacceptable. Therefore, you need to prime generously, and then you should wait until it dries completely - 1 day.
- Prepare the solution following the instructions, and the color is set by adding color.
- The mixture is applied “basically”, observing the average layer thickness, determined by the size of the fraction. It is necessary to train in a small, inconspicuous isolated area, for example, under a window, in a niche, etc.
- After applying the solution to the entire intended surface, without waiting for it to dry, begin grinding. To do this, use a wooden or plastic grater. Movements can be circular or directional. Uniformity of movements is very important to obtain a uniform, distinct texture.
- Having received a surface corroded by furrows, it is advisable (but not necessary) to smooth it with a spatula or gladicord
The finishing treatment of the bark beetle can be very interesting - due to the combination of tinted base mass and the application of a top coat. To prevent the inside of the texture from being painted over, use a hard roller, such as velor. If tinting was not done initially, you can paint over the structure with a “shaggy” roller and brush. And with a hard tool they pass after the first layer has dried, making the paint darker or lighter.
Please note: acrylic or other varnish will protect the “decor” from moisture.
If decorative textured plaster is used for interior wall decoration, it is usually bark beetle, because this material is the easiest to work with. It is not as refined as other mixtures, but it also requires much less effort.
Liquid wallpaper
Cellulose plaster masses became widespread in the nineties, when the range of finishing materials was somewhat limited. Then, with market saturation, the popularity of liquid wallpaper decreased. However, they are still valued by experts due to their properties.
The main feature of the material is softness with a layer thickness of 3 – 5 mm. It is this that determines the velvety feel and absorption of sounds by the wall covering. No less important is such a point as maintainability. After all, any plaster sooner or later loses its appearance, and cats and dogs are capable of ruining, it seems, even reinforced concrete. Moreover, a scratched “Venetian” cannot be restored so easily, unlike liquid wallpaper.
Stages of work:
- Preparation of the base here consists of creating a flat, uniform and uniform surface. There is no need for special smoothness, but differences from 3 mm to 1 m are advisable to be adjusted. It is preferable to use a special primer - tinting, but PVA glue diluted with white high-performance (high-pressure, acrylic or latex) paint is also suitable. It is applied in two layers, and the drying time is a day.
- While the primer is drying, you can make a mixture following the manufacturer's instructions. As a rule, dry cellulose is poured from a bag into a bucket, 4-5 liters of water are added, and mixed thoroughly. Using a drill with a mixer is not advisable, as the structure of the decor may be damaged. After mixing, the mass is put back into the bag and sealed tightly for a day.
- Ideally, you need to knead the amount of material that is enough for the entire room.
- Apply the solution with a wide (35 cm) facade spatula or a hard trowel, spreading it like putty. The thickness of the layer must be observed as precisely as possible, trying not to increase it unnecessarily.
- After “stretching” the material over the entire intended square, it is additionally smoothed with the same spatula or trowel. In this case, you should periodically change the direction of movement of the tool. Smoothing makes the surface not only more aesthetically pleasing, but also stronger.
Gaining maximum strength sometimes takes a month, but drying takes no more than a week. Only then can you begin the final stage of work - varnishing. Any varnish is suitable for this purpose: matte or glossy, transparent or tinted, acrylic or epoxy, etc. This coating may not add strength, but it will give the “decor” hydrophobicity and protect the colors from fading.
Repair of scratches or other defects is carried out by thoroughly soaking the damaged area with water and smoothing it with a spatula. If the method does not help, the area is cut out with a knife, dismantled with a spatula and a new mass is applied.
Brick surface painting
While the plaster is drying, you can prepare the required amount of paint for painting the plaster to look like brick. The dosage of red-brown, red, orange and black can be easily selected when painting a small sample, and then transferred in the required proportions to the entire volume of paint for the entire wall area. Before starting painting, it is necessary to prime the relief surface of the wall with imitation brickwork using a primer. You can use a roller or a wide brush. After drying the surface, you need to start painting the bricks with the prepared paint with the addition of the required color.
You can achieve a color scheme that absolutely matches the color of the ceramic brick. In this case, it is better to paint with a brush, although you can also use a roller. After painting the entire surface, all you have to do is wait until it dries and paint the seams.
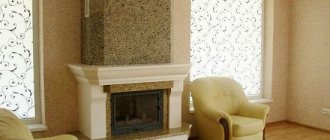
View of a finished wall made of plaster
For this purpose, it is a good idea to use Vetonit LR finishing putty. It is brought to the required consistency and a little black Tex is added. This thick putty is applied with a narrow brush, 3.5 cm wide, to all the seams between the bricks. The effect will be very original, no different from natural brickwork. All you have to do is wait for it to dry and apply a protective varnish. You can keep it simple and paint all the seams with white Tex paint. Those who are not satisfied with the red color of the brick can simply paint the entire surface with white acrylic paint.
"Venetian"
Venetian decorative plaster for interior wall decoration is an expensive and difficult mixture to work with. The usually expected result is an imitation of the glossy surface of marble, with veins, color variations, etc. Difficulties begin already at the stage of preparing the material, which should be tinted in several colors in advance. Therefore, 3-4 containers are used for work.
Stages of work:
- The preparation of the base for the “Venetian” is carried out carefully, as for painting. It should be even, smooth, plain (preferably white) and well-primed.
- The mixture is applied starting from a small, inconspicuous isolated area - a niche, box, etc. Starting from the corner, periodically changing color. The strokes are made chaotic, but monotonous, leaving no gaps and preventing thick layers. By changing the angle of the spatula to the wall, you can change the thickness of the layer and the “sharpness” of the color joints.
- Ideally, there should be a sample in front of your eyes - at least a photo.
- Having covered the entire intended area, it is left to dry for 10-12 hours and two more layers are applied in approximately the same way.
- After drying, the decor is carefully sanded with fine sandpaper or abrasive mesh No. 0. In this case, the use of a net holder and light directed from the side is very important. During the grinding process, all the flaws that have been made will become visible, which can be immediately eliminated.
- Then, using an artistic brush, color scheme or special paints, the marble veins are drawn, starting from the sample.
- If it was possible to achieve a result close to the expected one, proceed to polishing the surface. For this you need a special paste, an attachment for an angle grinder.
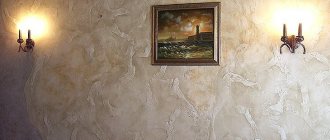
Varnish treatment will additionally protect the coating from moisture, fading, abrasion, and will also add flavor if the varnish is tinted. However, it should be remembered that acrylic is afraid of high temperatures, so it is not used near stoves, ovens, etc. In general, due to its high price, it is usually used for finishing some small interior elements - columns, niches, inserts, etc. etc. There are various options for decorative plaster of internal walls, but none of them is comparable in beauty and sophistication to the “Venetian”.
A well-made “Venetian” is practically indistinguishable in appearance from real marble.
Bas-reliefs
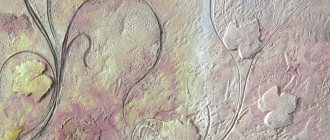
Relief “paintings” made directly on the surface of the wall, limited by a frame or baguette, are called bas-reliefs. They can have a specific plot, be neutral (like a still life) or, again, represent chaotic textures. For production, you can use any materials, but the most convenient is gypsum plaster. It is cheap, easy to apply, process, sets quickly, and is quite durable.
An experienced artist will create a bas-relief comparable in aesthetics to famous works of art. However, even without talents and skills, you can “create” a unique, interesting, rather serious picture. To do this, you just need to be patient, and no special financial expenses will be required. You will need gypsum decorative plaster for interior wall decoration to create a bas-relief.
Stages of work:
- The preparation of the base here is rather conventional. On the one hand, if it is even, smooth and monochromatic, it is easier to work. On the other hand, the flaws will be reliably disguised in any case. However, it won’t hurt to trim and prime in any case.
- Preparing a drawing depends on the availability of talents, because someone is able to draw something “cool” simply “by hand”. Others will need a template for this. To make a template, you need to choose a drawing as simple as possible and print it in the correct scale. If the wall area to be processed is large enough, the template may include 10, 20 or more A4 sheets.
- It is advisable to cut out the main lines of the drawing with scissors and transfer it to the wall, fixing the template with paper tape. Then the lines are completed looking at the sample.
- It is advisable to start “sculpting” with the most massive, simple areas, limiting them with tape glued along the lines.
- Plaster usually sets quickly - within an hour, maximum. Therefore, you can continuously add the solution until something begins to appear.
- The plaster can be applied with a spatula, a brush, a specially prepared template, or even with your fingers.
- The depth and other parameters of the relief usually correspond to the drawing. However, to simplify the work, you need to, having completed some part, choose a role model. The rest of the bas-relief is “adjusted” to fit the model area.
- Having plastered the main part of the picture, when the lines are no longer visible, you can leave it to dry for a day. Then the plaster will be well “sanded” with coarse sandpaper or mesh. By “sanding” the relief according to the drawing, you can get what you intended.
- Of course, you will have to apply the plaster more than once, each time bringing the result closer to the ideal.
If the craftsman is not satisfied with the resulting smoothness of the bas-relief surface, it can be filled with putty. Any polymer finishing putty is good for this. It is applied with a brush, and this work is simple, except for the subsequent “sanding” with a fine mesh. Treatment with varnish or paint will also increase the resistance of the result to aggressive influences.