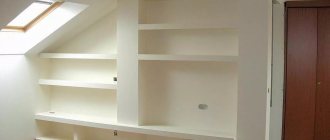
Options for using plasterboard on the ceiling
If the ceilings in your house do not exceed 2.5 m, multi-layer structures of complex configuration will greatly reduce the height of the walls. However, there is a way out. It is not at all necessary to lower the level of the entire ceiling.
Instead of the first layer, the existing overlap is quite suitable. You can level it by gluing HA sheets directly to the rough surface. No indentation. Or even level it with a plaster mixture and paint it.
What will this give us and where should we install the lamps?
This approach will allow us to keep the ceiling height in the center of the room. To visually increase the height of the walls and create the effect of floating clouds, it is enough to make small steps around the perimeter of the bedroom, going down from top to bottom.
It is in them that the spots are built in, and the wires are hidden there.
If the bedroom area allows, you can build false beams with built-in lamps. This move is suitable for ethnic design styles and loft.
In this way, you can maintain the existing ceiling height and create the appearance of a multi-level structure.
Step-by-step instruction
To do the work yourself, you need to prepare measuring and electrical tools. All kinds of measurements are carried out with a tape measure, a plumb line, a building level and upholstery thread. Mark the surface and make markings using chalk and a mechanical pencil. Cutting and slicing of material is carried out with a stationery knife, saw, or metal scissors. To fix the fasteners you will need a screwdriver, impact drill or hammer drill.
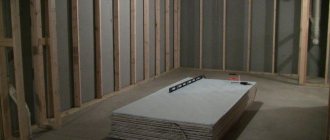
Construction material is purchased in the required quantity according to the scope of the proposed work. In addition to profiles and drywall, you will need reinforcing tape to seal the seams. Putty and primer are applied with a special roller and spatulas.
Advice. If the premises are small and the workspace is small, deliver building materials as needed.
Preparatory work
First of all, draw up a drawing that includes all structural elements and materials used. You will need to take measurements, and based on them, calculate the required amount of building and consumable materials. Next, clear the work area and begin beating horizontal and vertical planes. Using a tape measure, plumb line and level, mark lines for the profile guides.
Cutting the material
The next step will be cutting the galvanized metal profile to measured dimensions and cutting out the plasterboard sheets. Please note that vertical posts are cut 1 cm less than the height from floor to ceiling. If it is necessary to fasten along the entire perimeter, the profile guides must be securely sewn. The profile is secured using a hammer drill and dowels at a distance of 30–40 cm from each other.
Frame installation
We install into the grooves and fix the racks using a screwdriver and self-tapping screws. The pitch between the profiles is set according to the required strength and load-bearing capacity of the structure from 30 to 60 cm.
Important! The more the structure is subject to load, the more strength you give it, reducing the distance between the supporting profiles.
Sheet cladding
Having assembled the metal frame and installed the wiring cables, proceed to cutting and installing plasterboard sheets. First, carry out installation on one plane. The sheets are mounted with joints on the profile base and fixed with screws.
Advice. The fasteners are screwed until the screw head is completely immersed in the body of the plasterboard sheet.
Then mount the remaining planes of the partition. The areas after the fasteners enter are treated with sealant and the entire surface is primed. Reinforce the corners of the planes with a special corner. The gaps at the junctions of the wall with the ceiling and floor are sealed with plaster. The seams at the joints of the sheets are plastered with a special solution, and the surface is puttied with a starting mixture. Further processing is carried out with finishing finishing material.
To create a decorative plasterboard partition with your own hands, you will need a little effort, patience and a few necessary tools. Approach the process creatively, follow the step-by-step instructions, and the result of creating a partition for zoning your bedroom yourself will allow you to enjoy new comfortable living conditions.
Single-level
If you just want to level the ceiling and integrate lamps into it, you don’t have to build complex frames. You can get by with a simple single-level ceiling.
What does this give?
- Losses in room height are reduced.
- If you hire craftsmen, in this case the work will cost you less than multi-level structures.
- Economical use of material. Few scraps.
- If a single-level ceiling is not performed over the entire area of the ceiling, but only along its perimeter, then you will still get a multi-level effect.
Multi-level
In small rooms, complex multi-tiered frames should be avoided. At the same time, with the right approach and the right lighting, you can create an interesting play on two-level ceilings.
With the help of double structures, the visual perception of the bedroom is significantly improved.
The smaller the room, the smaller the elements on the ceiling should be. In a large area, divide the space into large sections. Zoning is welcome.
I would like to divide long narrow rooms with a transverse strip into more balanced zones. This can be done with an accent strip that starts at the head of the bed and flows smoothly to the ceiling. It can pass through the entire floor or cover part of it.
Interiors in which cornices for light muslin are attached to this element look interesting. This solution will fit perfectly into Mediterranean and colonial interiors, as well as various eclectic options that contain classical elements.
New design
Gray color is considered a cold shade, so it is not the most suitable option for small spaces. Still, gray color is very popular nowadays for finishing the ceiling.
This unusual solution will create an elegant decoration for any interior and give the room a look of severity. There are different new designs for bedroom ceilings, one of them is the use of decorative lighting.
Neat small lamps built into the ceiling will create a pleasant light when zoning the room, which will fill the room with coziness. The color goes well with bright highlight colors.
Bedroom designs are often based on pastel shades of color. Eco-friendly, natural materials would be appropriate for this room.
Beautiful ceilings
In order for the project to be as beautiful in real life as in the sketch, you need to take into account many nuances.
- Style . Try to choose a more or less universal solution that will suit most stylistic trends. For example, a simple backlit edging will look good in both folk and technical styles. But beautiful curls and clouds are suitable only for romantic trends like modern or shabby chic.
- Communications . Make sure that all wires are not simply fastened with clips to the ceiling, but are laid in a corrugated pipe. Yes, they will tell you that there will be no fire, that everything is reliably protected, etc. At the same time, if there is a need to change a wire, it is much easier to remove it from the pipe than to re-stretch the cable in an under-ceiling space 5 cm high. Lay hoods and other dimensional lines in false beams or edging strips.
- Color . Make a color palette and use it to select paints, textiles, wallpaper and flooring. Don't leave her even one step. This will help you keep the interior in the same style and create the desired comfort. If you doubt your design abilities, consult a specialist or find a ready-made color scheme online.
- Invoice . By mixing areas with smooth and rough surfaces you can achieve interesting results. The combination of gloss and matte areas also looks beautiful.
The combination of plasterboard with tension fabrics looks very impressive. The film fills the voids between the plasterboard elements, creating a kind of stained glass window on the ceiling. In addition, it can not only stretch in voids, but also fit protruding elements. With this approach, painting can be avoided.
Main design tasks: what to consider
When choosing suspended plasterboard ceilings for a bedroom, you need to be prepared for the fact that the design will have a certain impact on the interior. The designer’s task is to plan the placement and arrangement of the product in such a way as to mask defects in the existing subfloor, highlight the necessary areas of the room, and emphasize the features of the interior while maintaining the style direction.
Backlight
What are some ways to light up a bedroom? In addition to the traditional chandelier and spotlights, there are several other options that are worth using.
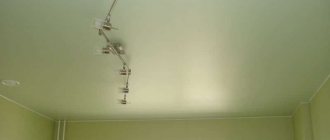
- LED backlight . It is good because it can be bent and bent as your heart desires. With its help, the same floating effect is created. To do this, the LED strip is laid along a specially made cornice, covered with tiny protrusions. You do not see the light source and it seems that the ceiling itself shines over its entire area. But in reality, you only see a thin strip of light.
Another undeniable advantage of diodes is the ability to change the color of the light flux. This means that you can use the remote control to change the color and intensity of the backlight at any time.
- Backlight hidden behind tension film . It is found quite often in combined designs. It looks very nice. It should be borne in mind that lamps tend to burn out. Therefore, it is necessary to provide the ability to change them easily and quickly. LEDs don't last forever either. Think through possible repair options in advance.
Suspended structures
The use of more complex designs involves a large number of shapes, lines and figures. There is an established opinion that convex or concave parts are luminous, structures bordered with lighting or decorated with eccentric lamps.
Having arranged the carved pattern of the lower level, you can feel the pleasant light breaking through it, placed on the first level.
Drywall can be used in combination with stretch ceilings of various colors and textures, thereby creating zones in a separate bedroom.
Lamp location
Now let's look at traditional lighting designs.
With chandelier
You get a powerful main light source. A chandelier can “take on” more powerful light bulbs or those that are not allowed for installation in a suspended structure.
Spots are used as additional lighting to create soft twilight.
- Chandelier in the center of the ceiling . LEDs dance around it or play the children's game "stream".
- Two chandeliers mark the centers of functional areas. This solution is suitable for spacious rooms. Sometimes chandeliers on a long pendant replace sconces near the bed.
Without chandelier
We will have to increase the number of spots to get the required 200 Lx, designated by sanitary standards.
- Spots around the perimeter of the room. In the corners, in the form of geometric shapes, etc. All lighting is concentrated around the perimeter of the ceiling.
- In the center. This can be a straight strip of one or several rows of lamps. Or a zigzag “snake”. There is only one point: to illuminate the central part of the room.
- In the corner . In small rooms, sometimes it is enough to place directional spots in one corner and distribute lighting to the sides.
- Matrix . By repeating the pattern of lamps (small diamonds, circles, etc.), you can get beautiful filling of niches in a multi-level design.
Types of zoning
There are two types of zoning:
With the open method, a wall structure of various geometries is constructed to delimit adjacent rooms or zones. Used in most cases for decorative purposes. The functional approach lies in the arrangement of hidden structural elements. With the closed version, a durable structure is built that complements the load-bearing wall with a geometric element.
Advice. To separate functional areas in the bedroom, select the necessary lighting fixtures, taking into account the required brightness in a particular place.
It is possible to highlight all the necessary zones in the bedroom by installing a plasterboard partition of the required shape, and using lighting to delimit them. This approach will change the perception of space, and with the use of geometric structures of different sizes, the sense of visual volume will increase.
The design solution for the design of the partition should not break the volume and disrupt the integrity of the space, or exclude the possibility of free movement around the bedroom.
For a one-room apartment, the separation of office, guest and sleeping areas does not require a complex main wall. The use of a lightweight design allows for the execution of all the necessary figured arches and niches. The separation of decorative levels at different heights will emphasize the smooth transition from one zone to another while maintaining the visual illusion of volumetric space.
If many hanging elements are required, the frame is reinforced during installation with additional metal profiles with stiffeners, and the niches are placed in a checkerboard pattern.
Advice. To achieve comfort, isolate the sleeping area into a long, non-passable part - closer to the window and away from the entrance.
When constructing a more complex volumetric frame, it is possible to obtain a number of space-saving solutions:
- niches for textile materials, linen and stored clothing;
- built-in decorative elements, aquariums and rockeries;
- arrange electrical appliances, TV or audio system;
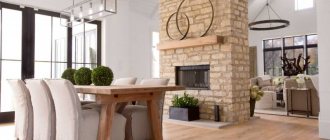
- build a special fireplace into the structure;
- hide communications and lighting fixtures.
Photo of plasterboard ceilings in the bedroom interior
As you can see, plasterboard makes it easy to create a beautiful ceiling and bring comfort to the family hearth. And in combination with other materials, you can use it to create a small miracle and feel like a wizard.
Advantages and disadvantages
Drywall is a universal building material with which you can achieve many goals: constructing interior partitions, leveling crooked walls, organizing the finishing of the ceiling surface, and so on.
Let's briefly describe the main advantages of plasterboard sheets:
- versatility - such material allows the designer to realize the most unusual and non-standard design ideas;
- environmentally friendly. Sheets are created from natural materials, so they have the ability to “breathe”. This forms the basis for the natural circulation of air masses in the room. And thanks to its high fire resistance and high sound insulation qualities, plasterboard becomes an ideal material for the bedroom of a country house or city apartment;
- unique ability to mask uneven bases;
- low cost and availability allows anyone to use such material when decorating a bedroom;
- Light weight and simple installation allow even an inexperienced person in construction to work with such material.
But there are also disadvantages to plasterboard sheets, as well as structures made from this material:
- the material demonstrates high sensitivity to water. If you live in an apartment building, and your upstairs neighbors forget to turn off the water when leaving for work, by the evening not only their apartment, but also yours will need repairs;
- A plasterboard structure is always solid, so if one section is damaged, the entire surface will need to be repaired. This can entail significant expenses if two-level ceilings need to be restored.