Gypsum 3D models are one of the new brands of building materials. Medium-sized gypsum slabs can be made in absolutely any shape. They are often positioned as a replacement for wallpaper, although this is not entirely true. Gypsum panels are not an analogue, but rather a new material, which, among its other capabilities, can imitate wallpaper. But thanks to the ability to use any shape and texture, the panels can take the form of fabric, wallpaper, wood or marble panels. Don't forget about abstract forms, which are extremely popular today.
General characteristics of the material
For the production of panels, the most common gypsum is used with the addition of plasticizers and other additives. Gypsum is very fragile by nature, so it would be impossible to create a strong material without additives.
The manufacturing process uses silicone molds mounted on vibrating tables. Constant vibration eliminates air bubbles. The panels themselves turn out to be very heavy and this must be taken into account when choosing a shape, since a three-dimensional pattern will add weight to the finish, and depressions, on the contrary, will reduce it.
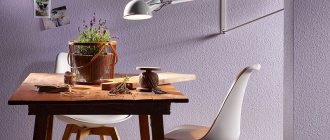
What do gypsum 3D panels look like?
In addition to its shape, the material also has color. As a rule, the manufacturer produces white panels, which the user can paint in any color or varnish to his liking.
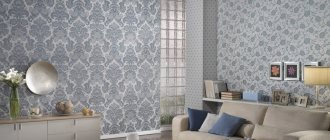
What are wall panels made of?
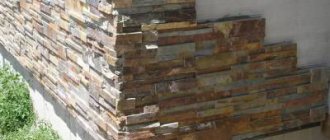
The idea for the production of 3D panels was inspired by ancient bas-reliefs. But if before this time a 3D pattern had been carved out on a finished stone wall for years, then, thanks to today’s developments, it is possible to create a three-dimensional wall texture in a couple of days or even hours. You can purchase wall panels made from the following material:
Layout of panels for walls.
Aluminum. The same 3D panels are the most popular. The pattern is applied to them by extrusion, and then, after making the texture, they are covered with a specialized film made of polymer materials.
Thanks to this coating, they are durable, do not rust even in rooms with high levels of moisture, and do not attract dust. Polymer materials (PVC plastic). All properties of PVC panels are similar to those of aluminum products, however, they are less durable and strong, and under the influence of direct rays of the sun over a long period of time, their color may acquire a yellow tint. Wood and wood-containing materials (MDF, chipboard, fiberboard). Such 3D panels are the most expensive of all, yet they are the least durable, heavy and cannot withstand the effects of humidity.
Their high price can be explained by the fact that for any series of panels a personal mold is formed. Gypsum. Gypsum wall panels are suitable for various types of premises, since after specialized finishing they are not afraid of moisture. The downside of this type of finishing is considered to be significant weight and difficulty during installation, and even a small selection of volumetric structures.
Advantages and disadvantages
There are many advantages to gypsum panels.
- First of all, this is the uniqueness of the design. No other material will offer you such a number of finishing options.
- Fire resistance. Gypsum does not burn and does not emit harmful substances when heated, like some types of plastic. At the same time, the integrity limit of gypsum is quite high, which allows partitions made from 3D slabs to remain exposed to temperature for quite a long time.
- Seamless connections. Indeed, with careful installation there will be no seams, and the picture made of gypsum boards will seem like a single canvas. It’s as if a whole stone was brought into your apartment.
- Possibility of changing the color scheme. Not only can the buyer choose any shape, but you also choose the color yourself. In addition, then after a few years, when you get tired of the color of the panels, you can simply repaint them
- Safety. Gypsum panels do not emit odors or harmful substances. Calmly tolerate exposure to moisture and temperature. That is, the material can be used to decorate a bathroom, kitchen or bedroom and it will not harm your health in any way, and gypsum boards last quite a long time.
- Easy to use. Wooden doors, despite their environmental friendliness, have to be sanded and varnished from time to time, otherwise they become unusable. Chipboards and wallpaper cannot always be washed without affecting the finishing, but gypsum can withstand any impact. Dust does not linger on it, so it is enough to sweep it from above once a week or month and forget about it until the next cleaning.
- Strength. Thanks to special additives, such a panel is very difficult to damage, which is a significant plus for owners of large pets. Even the biggest dog will not be able to ruin this finish.
- Longevity. Gypsum is a durable material, so the panels can serve you for up to 50 years. Large manufacturers have no problem providing a 15-20 year warranty, without any doubt in their products.
But no material is possible without disadvantages. Specifically for gypsum panels, it should be noted that most of the shortcomings are associated with poor-quality manufacturing and installation.
- Weight. Large weight is a problem that cannot be solved even with full compliance with the proportions during manufacturing and proper installation. A standard 50x50 cm slab can weigh up to 10 kg. This complicates installation and makes it impossible to use slabs for finishing plasterboard partitions or dilapidated internal partitions. Such fences may simply collapse under this weight. Therefore, you need to recalculate for lightweight enclosing structures, and it is better to simply use gypsum panels exclusively on strong internal or external walls.
- Incorrect manufacturing. If the slabs are made in artisanal conditions without the use of vibrating tables and careful weighing of additives, then numerous defects are possible that can spoil the appearance of the structure. These are various chips, mismatched patterns, and when using too many additives or adding unknown substances, unpleasant or even dangerous substances can be released.
- Incorrect installation. Installation on an unprepared wall or by an illiterate specialist will lead to chips or cracks between the slabs. The surface must be prepared, the finishing patterns must be put together into a single composition, and the few cracks must be carefully sealed with putty.
- Environmentally friendly. This material cannot be called eco-friendly or non-ecological. It does not emit harmful substances, but it also does not have a beneficial effect on health, like wood panels. Therefore, this material can be considered rather neutral, and for the 21st century this is a small, but still a minus.
What are 3D panels
In most cases, 3D panels are ready-to-use finishing materials in the form of elements of the correct shape (square, rectangular). If we consider in general terms the technology for manufacturing these elements, then most often it comes down to the fact that first a project (design) of future panels is drawn up, and based on this sketch, forms are made in which individual finishing elements will subsequently be formed. Well, at the end of the work, the panels are given a noble appearance, and they are coated with special compounds that prevent destruction due to moisture.
If we talk about source materials, currently 3D panels can be made from glass, plastic, wood, MDF and even metal. However, gypsum-based products are the most widely used, which is due to the low cost of this building material and its low weight.
Criterias of choice
There are several selection criteria. This:
- Qualities
- Price
- Drawing
Let's go through each one separately. How to check the quality of a 3D panel? First of all, never buy it online. With tactile contact it is very easy to check the presence of burrs, the quality of casting and the number of chips. First of all, you need to run your hand over the stove. There should be no pellets or unnecessary irregularities on the material. Anything that deviates from the mold you see in the catalog is uneven, and the back side of the panel should be perfectly smooth to make installation easier.
After this, you should carefully inspect the edges of the slab for chips and cracks. In handicraft production, many craftsmen carelessly remove the slab from the mold or do not allow the plaster to set. As a result, chips occur that nullify the design qualities of the painting.
Well, if everything is in order with the above, then do not hesitate to ask for quality certificates confirming the properties of the material. Pay attention to the organization that issued the certificate. Ideally, this should be a government agency or an independent laboratory.
After the certificates, you need to make sure there is a guarantee of at least 10 years. And only then buy slabs.
The price of gypsum 3D panels is approximately 2-3 thousand
The price of the slabs is a bit of a controversial issue. Designer items will not be cheap. You need to focus on prices in the region of 2-3 thousand per slab. This is the regular price of a certified manufacturer. If you buy any composition, you will have to pay more and for all the slabs from the set at once. You can make your design truly unique with designer slabs. But the price in this case will increase two to three times
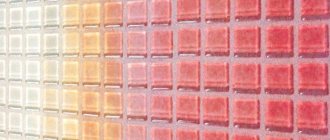
The drawing must be selected in accordance with the design of the room. Floral patterns will look great in the kitchen, fabric upholstery shapes can be used in the bedroom, and spherical bubbles in the bathroom. The color depends only on your preferences. What is important is that the pattern on different panels matches and matches the interior.
Choosing adhesive for 3D boards
Soft wall panels
The use of glue implies the absence of any other elements of adhesion between the slab and the wall. Panels glued to Moment glue will adhere well to a flat surface previously treated with putty. For a glue gun with liquid nails, it is necessary to prepare an absolutely flat and smooth surface.
If the walls have some minor errors, glue them with baseboard glue. When choosing such an adhesive base, it is recommended to pay attention to options that are resistant to temperature changes and high humidity.
Once all manipulations with the wall panels are completed, you can begin decoration.
It is not recommended to apply the topcoat to the slab without a primer - the composition will not adhere well and the coating will peel off in the near future. When choosing a topcoat, you should give preference to those colors and textures that predominate in the interior of the room.
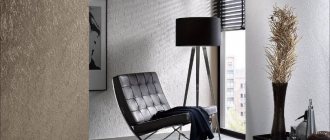
Scope of use
There are only three areas of use of finishing. The most common is the use of gypsum panels for finishing walls in rooms. Regardless of the purpose of the premises, you can select suitable 3D slabs or gypsum panels.
One of the newfangled options was the use of material for finishing the ceiling. The transition from one ornament to another looks unusual in the design. You can finish only the ceiling, making the walls neutral in color. So the ceiling becomes the main highlight of the space, increasing the room in size.
Some slabs are so massive that they can be used for zoning. It will not be possible to build a full-fledged partition in this way, but you can zone the room.
Any use of 3D gypsum boards adds a sense of depth to the interior space, visually expanding it.
Master class from Workshop M2
Bamboo panels
Workshop M2 offers another method of attaching gypsum 3D panels. Unlike ceramic tiles, attaching gypsum wall panels is much easier and faster, since their edge is made with a special “lock”, and the design of the slab means that you can’t go wrong with the overall pattern laid out from the panels:
- prepare everything necessary for installing the slabs: the panels themselves, the adhesive base, available tools;
- use glue to secure the panels with your own hands (the joints between the tiles are not filled with adhesive or a composition similar in principle of action);
- all irregularities are cleaned with abrasive sandpaper;
- If desired, the panels are decorated with special paint for gypsum panels.
Note. M2 specialists recommend using Bustilat glue for surfaces that have uneven surfaces. Installing 3D panels on a flat surface can be done with a regular adhesive or a gun with liquid nails.
Features and rules for self-installation
Self-repair requires initial skills in leveling surfaces and working with fastening materials. It is not difficult to secure the structure; the most difficult part of installation is sealing the seams. Ideally mounted panels look like a single whole.
Material calculation
How to calculate how many tiles you need on a wall? Measure the area of the wall, and then divide the area of the wall by the area of the slab. Panels of standard sizes are usually produced in the format 50x50 or 60x60 cm. The resulting number should be rounded up. An unnecessary piece of panel can be cut off with a fine-toothed hacksaw.
Gypsum 3D panels are usually produced in 50x50 or 60x60 cm formats
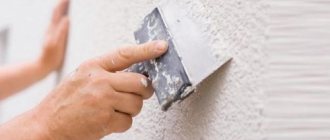
Surface preparation
First of all, the surface must be flat. Sometimes installers rely on glue. But leveling the surface with glue will be very expensive, so it’s better to just level the walls with plaster. Before applying glue, you need to prime the surface for better adhesion. The glue is applied with a notched trowel and spread over the entire surface.
Seam processing in 3 stages
Immediately after installing the panels, use the same gypsum putty to seal the seams between the panels with a rubber spatula. Try to create a smooth transition. Leave the panels for 24 hours. After drying, sand the seams with fine-grained sandpaper (grain 200), try not to sand the model itself; it is the seams and excess putty that need to be sanded during initial processing. Emphasize the details of the pattern. Apply again with gypsum putty to seal smaller differences and leave for another 24 hours. Finish with sandpaper.
Finishing is done with chalk finishing putty (usually a ready-made solution in jars).
Use contrast light to identify defects. Subsequent sanding is advisable. At first glance, everything should look very beautiful.
Panels can be painted with acrylic, latex, water-based paints, nitro enamels, as well as textured paints. The panels can be pre-primed to reduce paint consumption. Painting is done using a spray gun. Only lightly textured models can be painted with a roller.
Note: It is advisable to use high-quality and expensive materials for installation, but the hand of the master is the most important. We have seen in practice that you can easily achieve the desired result even with materials from the middle price segment. Choose materials according to your taste, what you are used to working with.
How to make panels yourself
There is absolutely no need to buy panels in a store. You can make them yourself. For 3D partitions, a cement-gypsum mixture is used.
Gypsum polymer recipe
The following components are used to prepare raw materials:
- water;
- lime;
- special gypsum (molding);
- cement grade M500;
- water repellent;
- matakaolin-pozzolan;
- plasticizers;
- fiberglass: 10% by weight of the mixture as a whole;
- polypropylene fiber.
By adding cement, the finished product will be stronger. The preparation procedure is as follows:
- In a large container, mix lime with fiberglass and soak them.
- The composition is thoroughly mixed with a construction mixer or a drill with a special attachment.
- Now you can add gypsum and mix everything again. To avoid lumps, the procedure lasts at least 10 minutes. The mixture should be viscous and uniform. At the same stage, all additives are added to the composition.
- Next, the solution is poured into the prepared form. At the same time, the container must vibrate so that the mixture is distributed correctly. After this, the mold is left for 40 minutes for the plaster to harden.
If fiberglass is not available, it can be replaced with sand. If possible, it is better to dry the molds in a special chamber.
Installation of panels on the wall
Depending on what 3D panels you purchased and how heavy they are, there are two ways to mount them on walls: gluing and attaching to a metal frame . It is easier to glue panels for walls, and the frame additionally reduces the room by several centimeters, but by installing in this way, you can additionally insulate the walls or increase sound insulation.
All types of panels can be glued using “liquid nails”. Installation in this way should only be done on smooth walls. If the walls are uneven, then you should opt for gypsum products and glue them with drywall adhesive. In this case, you can hide the curvature of the wall up to 70 mm. Before gluing, the surface must be cleaned of dirt and dust, greasy stains, and peeling plaster. The wallpaper on the section of the wall where you plan to place the panels also needs to be removed, but if your walls are painted with water-based paint and the plaster is holding well, then you don’t have to peel off the coating.
If you decide to mount the panels on a metal frame, then the surface of the wall does not need to be specially cleaned if the old coating does not peel off in pieces. The metal frame is made from a profile suitable for fastening drywall. Each panel is secured to the frame using special clamps, which allow this to be done in a hidden way. The exception is plaster, they are fastened with self-tapping screws through and through. After installation, the screw caps are masked with gypsum mortar.
It doesn’t matter which installation method you choose, the main thing is to leave the panels in the room for 2 days after purchase and delivery. This rule is most relevant for wooden products that get used to the humidity of the room, but it will also not be superfluous for aluminum, plastic and gypsum products. By spending a little time and adding 3D panels to your interior, you will give your home a new, original look.
Classification of gypsum
Depending on the ratio of the volume of dry suspension to the volume of water, these types of gypsum are distinguished with different densities
- 1.25:1 – light;
- 1.75:1 – normal;
- 2.25:1 – dense.
It is important to know!
- Average hardening time for gypsum: from 6 to 10 minutes. Therefore, you should not mix the gypsum mixture “with a reserve”, since it will not be possible to use it later.
- The final volume of the gypsum mixture is approximately equal to the sum of the volumes of water and dry gypsum powder.
- You should not adjust a ready-made mixture that has begun to harden by adding water or dry plaster to it. Otherwise, you will end up with defective material with low strength and astringent properties (“dead gypsum”).