Do I need to putty drywall?
Nobody wants to do extra work. In addition, putty is a long, difficult process that takes a lot of time. A reasonable question arises: why putty on the flat surface of plasterboard sheets. Maybe you can do without it during finishing? With some types of finishing it is possible, but not with all.
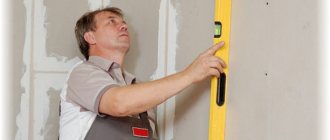
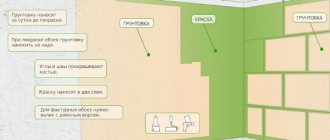
You should always seal sheet joints, corners and screw heads. For any type of finish. Be sure to putty the gypsum board before painting. The surface of the drywall is far from ideal, and new irregularities are added during transportation and installation. If you paint the surface without first leveling, they will all be clearly visible, especially if there is at least a slight degree of gloss.
Preparing drywall for wallpapering - you can only putty the seams, then prime the surface
The Knauf company, one of the leaders in the production of drywall, allows the entire surface of the sheets not to be puttied under tiles and wallpaper. Only joints, corners and screws. No one uses putty for laying tiles, but yes, for wallpaper. And all because wallpaper pasted without pre-treatment sometimes comes off along with the cardboard and sometimes even down to the plaster. So the second time, putty is simply inevitable.
You can avoid puttingty the entire surface of the sheet by using a primer. In this case, the primer is water-dispersed acrylic paint diluted with water. It creates a film on the surface with which the glue interacts well, but this film also prevents the cardboard from being damaged when the wallpaper is torn off.
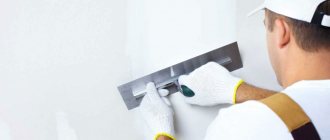
Before painting, it is necessary to putty the drywall completely, and until it is in perfect condition.
So, it is absolutely necessary to putty the drywall before painting, preferably before wallpapering (at least in one layer) and only seal the screws and seams under the tiles.
Primer for drywall: why, what and when
The primer performs two different functions. The first is that it improves the adhesion (adhesion) of two materials. As a result, when puttying, the chances of bubbles forming and material peeling are reduced. The second function is that it evens out absorbency. The result is less material consumption, and when puttying, a more even surface. So it is not advisable to skip the primer.
In theory, priming during finishing work should be done before each new operation. For example, before puttying, plasterboard sheets need to be primed to improve adhesion to the putty. Before painting or wallpapering - to reduce the consumption of paint and glue. You also need a primer before applying the finishing layer - the starting layer has to be leveled, which is why the surface turns out dusty. Without primer treatment, the finishing layer does not apply well, rolls off and may even fall off.
Primer for drywall from Ceresit is also suitable for interior work.
What primers are needed? Depends on the stage and the type of finishing material:
- Before puttying gypsum board (starting and finishing layers), use a deep penetration primer or for porous, highly absorbent surfaces.
- The same composition can be used before painting and wallpapering.
- The putty surface of the plasterboard under the wallpaper can be primed with wallpaper glue diluted with water. The proportions are indicated on the glue packaging.
- When painting, you need to look at the manufacturers' recommendations. Sometimes the primer is paint diluted with water. If there are no other instructions, use a deep penetration composition.
To summarize, it is worth saying that priming is a necessary operation. It allows you to get good results and reduce material consumption.
Technology: sequence of work
After the gypsum board sheets are fixed to the frame, it is time to prepare the drywall for finishing. Let's consider the case with a full cycle - for painting. In this case, the drywall must be puttied in at least two layers. For other types of finishing that are less demanding on surface quality, we simply remove unnecessary steps. The order of work is as follows:
- Coating with deep penetration primer.
- Sealing screw holes.
- Puttying joints using serpyanka mesh or special paper tape.
- Sealing corners - external and internal.
- Primer for drywall.
- Puttying the entire surface with the starting composition and sanding any uneven surfaces.
- Primer for gypsum board.
- Putty with finishing composition and putty of uneven surfaces.
- Primer coating for finishing.
Do-it-yourself drywall putty - learning the nuances
A few words about which putty is best to use for gypsum board. Any one will do - gypsum or polymer based (latex). Polymer putties are usually finishing - they provide a very thin layer and a smooth surface. There are both starting and finishing plaster ones. Difference in particle size. You can use any, as long as the quality is good.
There are two forms of drywall putty - dry in bags and diluted in buckets. Before use, dry mixture must be diluted with water in the indicated proportions and stirred until lumps dissolve. Compositions in buckets are already ready for use, but are more expensive. But they are guaranteed to have no lumps.
Necessary tool
To perform high-quality putty, you must have the following tools:
- Putty knife. Necessary for applying and spreading the paste over the surface. Finishers usually have several of them. Wide spatulas are used to treat areas, and narrow spatulas are used for hard-to-reach areas.
- Drill with mixer attachment. It will be much easier to obtain a solution of uniform consistency from a dry mixture.
- Bucket. For mixing the mixture and preparing a putty solution.
- Plaster float. Needed for leveling and polishing the surface.
- Roller or brush. Required for priming walls.
Primer coating
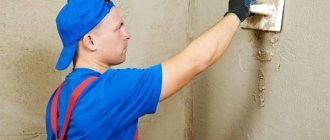
Before you putty the drywall, prime the surface. Any primer is applied to a dry, clean base. Therefore, we first remove dirt from the surface and remove dust (you can use a vacuum cleaner or a slightly damp cloth). After this, prepare the soil according to the instructions (sometimes you need to dilute it with water, sometimes you just need to stir it), pour it into a container and apply it with a brush or roller.
Applying a primer: choose a method convenient for you
Drywall primer is available for dry and wet areas. For the bathroom and kitchen, choose soil for wet rooms; for the rest, you can use any soil. When choosing soil, pay attention to the presence of antibacterial components. They prevent the development of mold and fungi. This is especially true for the kitchen and bathroom.
| Name | Consumption | Purpose | Drying time | Additional properties | Price |
| Penetrating primer Optimum (10 l) | 6-8 sq.m/l | For priming brick, concrete, plasterboard in dry rooms. | 30-40 min | 600 rub for 10 kg | |
| GLIMS Grunt (10 l) | 5 sq.m/l | For rooms with normal and high humidity | 30 minutes | Anti-fungal and anti-mold additives | 600 rubles for 10 l |
| Tex Universal acrylate primer | 5-14 sq.m/l | For priming porous surfaces, including plasterboard and putty surfaces | 30-40 min | For dry rooms and rooms with high humidity | 650 rubles for 10 l |
| Internal primer Prospector 10l | 5-10 sq.m/l | For priming porous surfaces, including plasterboard and putty surfaces | 60 min | Anti-fungal and anti-mold additives | 350-400 rubles per 10 l |
| Feidal Tiefgrund LF 10 l | 10 sq.m./l | For highly absorbent surfaces, including drywall | quick-drying | For indoor and outdoor use, frost-resistant | 850 rub for 10 l |
Usually, for priming drywall, it is enough to apply the composition in one layer, but in the kitchen or bathroom you can use two: to guarantee the result. After the soil has dried (the time indicated in the instructions), you can proceed to the next stage.
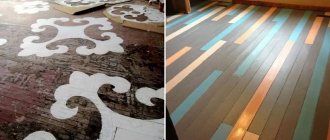
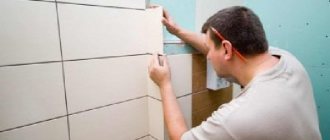
Why glue wallpaper onto plaster?
Any room decorated with wallpaper becomes cozy. The wallpaper will stick well to the leveled and primed plaster, and the resulting wrinkles will smooth out as they dry. Unlike painting, wallpaper peels off easily, and after removing it, you can cover the plaster wall with a new coating. Wallpaper comes in different textures and textures, but they are glued in dry rooms where the walls are usually plaster.
Wallpaper will not only decorate the walls, but will also hide small defects and irregularities.
Using wallpaper you can create an atmosphere of comfort and coziness in your home.
Sealing screws and seams
For seams there are special compounds Knauf-Fugen, Knauf Uniflot, Fugenfuller and their analogues. After the soil has dried, dilute the putty to the consistency of thick sour cream. Please note that these putties dry quickly, so dilute a small amount at a time.
We take a small spatula, apply the composition to the places where the screws are installed, and remove the excess. There should be just enough putty in this place so that the surface is even. This way we go through all the screws. They can be sealed parallel to the seams, or they can be sealed first. It doesn't matter.
The principle of working with putty is that a roller of the compound is placed on the edge of the spatula, then it is stretched in the right place
There are two types of drywall joints. Along the long side of the gypsum board, the edges are uneven - for easier sealing of this joint. But the sheets are also connected in height, where there are no ledges. You also have to cut the sheets and the joint is also end-to-end. Such connections require special technology, which will be discussed below.
Vertical joints
When puttingtying vertical joints of drywall with normal factory edges, they are first carefully filled and then glued.
After filling, while the composition is still wet, it is glued with a sickle mesh or paper reinforcing tape. This is necessary so that cracks do not form at the joints. If tape is used, it is torn into the required pieces and soaked in clean water for 10 minutes (while the seam is being filled).
The tape is recessed to the required distance
Having filled the seam, take out the tape, hold it between your fingers, remove excess water, and glue it to the seam. Then take a spatula 8 cm wide (this is a must) and press the tape below the surface of the gypsum board. She “sits” on one of the factory ledges. They begin to press from the middle to the edges. When pressed, the putty is squeezed out from under the tape; we collect it. As a result, if you apply a wide, hard spatula (at least 20 cm wide) to the surface, you can see that the tape is below the surface of the cardboard. Then they go through putty again, leveling the joint level with the surface.
Trimmed seams
It is better to putty plasterboard in places of horizontal joints - where two slabs are connected or on vertical ones, but without edges, after pre-treatment. First, the surface is moistened with water - dip the brush in water and coat the joint well. Walk several times until the plaster gets wet. Then use a sharp knife to cut grooves at an angle of 45°. These joints can be treated before priming. It's even more convenient.
Preparing seams for putty
We coat the prepared joints with primer. In this case, it is more convenient to use a brush. After drying, fill the seam with a composition for puttying drywall joints. It is more convenient to work with spatulas 10 cm wide and hard 20 cm. Apply the composition with a small one, and remove the excess with a large one. Fill well, pressing the composition into the seam. If you did everything correctly, a small roller will form, slightly protruding above the surface.
Once again we go through the seam, applying fresh putty about 0.5 mm thick, take the soaked reinforcing tape and glue it to this compound. Use a spatula 8 cm wide and press the tape well onto the surface, squeezing out the excess putty from underneath it.
Puttying of cut seams on gypsum boards
In this case, a wave of paper is formed (you can see it in the photo), we make sure that it does not wrinkle, we catch it to the end, where it straightens out. Remove excess solution into the tape and adjacent area of the sheet. And the last stage - again take the putty and coat the pasted tape on top with a thin layer. We make this layer as thin as possible, as they say - “to tear off”. Actually, we stretch the remaining putty in a very thin layer.
Second technology: first tape then putty
There is a second technology - first, serpyanka or paper reinforcing tape is glued onto the plaster, then it is puttied. This works faster, but the disadvantage is the voids that remain under the tape. In these places, the wallpaper may wrinkle or the putty or decorative plaster may crack.
This is how you stick serpyanka onto drywall
They also use sickle mesh instead of paper tape. Serpyanka is more difficult to work with - it is rigid and its edges often stick out from the mortar. To make it a little easier, the mesh is pre-glued, and after the glue has completely dried, it is puttied. In order not to think about glue and speed up the work, use a self-adhesive serpyanka (there is such a thing).
An example of puttying a seam with serpyanka
But, anyway, it’s more difficult to putty drywall - its surface is uneven, the spatula “jumps” on the fibers and you get a small wave that is not at all easy to smooth out.
What if it’s like this: first tape, then putty?
Some are chasing to save time and money by simply applying glue to the gypsum board or a self-adhesive mesh, or sickle tape, or paper tape. In this case, the junction remains unfilled. Such a connection will come out with warped wallpaper and cracks. In this case, saving is inappropriate. If you apply the right technology, then plasterboard walls will not let you down when wallpapering.
By the way, serpyanka and self-adhesive have significant drawbacks. Serpyanka cannot maintain the necessary rigidity, it is deformed and stretched. Fabric fibers interfere with finishing, sticking out with small wrinkles. The self-adhesive mesh comes apart immediately, without strengthening anything.
External and internal corners
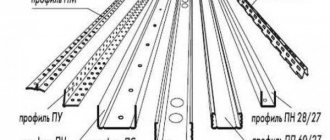
External and internal corners on plasterboard walls and partitions are made using:
- reinforcing paper;
- serpyanka;
- perforated aluminum corners;
- special metal corners Shitrok with paper.
There are different perforated corners, but it is more convenient to work with the metal corner Shitrok
Paper and serpyanka are most often used to decorate internal corners - the junction of walls, as well as walls and ceilings. The technology is similar to seam sealing. A certain amount of putty is applied to the corner, paper or sickle is glued onto it, the reinforcing strip is pressed into the composition with a narrow spatula, and excess putty is removed. After this, they go through the corner again, applying a thin layer of putty on top.
Perforated corners are used to design external corners - slopes, protrusions, etc. First, a piece of the required length is cut. The metal is very thin, it can be cut even with ordinary large scissors, but if you have metal scissors, the work is easier. Edges are cut at an angle of 45° or less, rather than at 90°. So, when puttingtying drywall, the edge will not curl up.
Decorating the outer corners of plasterboard walls using a perforated corner
Putty is applied to the outer corner on both sides in small islands approximately every 10 cm (can be done in a checkerboard pattern). A perforated corner is pressed into the solution, its installation is checked whether it is vertical or horizontal, and adjusted. Use a spatula to pick up excess mortar, aligning the edges in one plane with the surface of the sheet. The installed corner is left for some time until the putty dries, after which it is sanded and puttyed again if necessary.
What is different about the metal corner Sheetrock? Thin strips of metal are applied to a paper base. They are more rigid than simple reinforcing paper, but it is more convenient to work with them than with conventional perforated ones, since due to the presence of paper the transition to plane is smoother.
Recommendations for puttying
If you still doubt the need for puttying, then let us immediately note that this procedure is necessary. Moreover, you will have to adhere to all the subtleties of technology.
Recommendations:
- Pay special attention to the joint areas. Do not forget about the recesses that remain after installing the screws. Serpyanka tape is glued to the seams. Only after this do you start mixing the putty to treat the walls.
- Apply the mixture to the seams first. This area has the most unevenness. The putty is applied to the surface of the walls in even layers. Do not forget to carefully smooth the composition.
To achieve a smooth surface, finishing craftsmen recommend using ready-made putty compounds. The finished mixture has a consistency suitable for these purposes. There are no unwanted lumps in it, the presence of which spoils the appearance of the walls.
- After applying the composition, the putty is allowed to dry. When the layer is completely dry, grouting is done with sandpaper. Then a layer of putty is applied again.
- Grouting is carried out after the second layer has dried.
Serpyanka ribbon
- If the plasterboard frame has external corners, these areas are reinforced with perforated corners. Fastening is done with gypsum putty. Excess material that comes through the holes is removed using a spatula. To completely align the corners, another layer is applied on top, but only after the previous one has dried.
We recommend: Makroflex foam cement - features and scope of application
Sanding seams and corners
If the layer is well leveled when sealing seams on drywall, sanding can be kept to a minimum. Why is it better to sand less? Because firstly, it’s long, and secondly, it’s dusty. Moreover, the dust is very fine, floats in the air for a long time and rises again from any movement. To reduce the amount of flying dust, wet rags, wet sawdust, etc. can be placed on the floor. Doors leading out of the room are covered with a wet cloth; it should be larger than the size of the door - so that dust does not fly into other rooms.
To begin with, you can go over it with a sharp, even spatula and cut off all the most protruding irregularities. Next is the sanding process. Since corners and seams at this stage do not need to be sanded to perfect smoothness, take a sanding mesh with a mesh size of 180-200 and a wooden block. A mesh is attached to the block (you can use staples from a construction stapler, but the staples should not stick out). This device levels the surface. When working, it is advisable to highlight it with oblique light - this way all the irregularities are more visible. But you can’t putty plasterboard under wallpaper so carefully.
There are special holders for the mesh, but you can get by with a block
One thing - it’s better to grind in a respirator and safety glasses. Gloves will be a good idea. The dust is very fine and penetrates literally everywhere. After the seams and corners are sanded, the surface is primed again. Moreover, all of it, since dust has also settled on the untreated areas, and it worsens adhesion.
The most inconvenient places for puttying and sanding are the inner corners. For the secrets of fast, high-quality grinding of corners, watch the following video.
How to putty drywall: level the planes
To putty surfaces, you will need a large spatula - with a blade of 40 cm or more and a narrow one - 10 cm. The first layer is applied with starting putty. It is applied in a layer of about 5 mm (the maximum should be checked in the instructions for the specific putty) and hides all the unevenness. Dilute it with water until it becomes thick sour cream, stir thoroughly so that there are no lumps.
These spatulas are needed to putty drywall over the entire surface.
The technique for puttingtying the surface of drywall is simple: take a large spatula, at its end using a small spatula, lay out a roller of putty. We press the blade to the surface and stretch the composition. We repeat several times, filling some part of the wall or ceiling. Then we clean the blade and run it over the newly puttied surface, leveling it. You need to level it as carefully as possible - less time will be required for grinding.
When you have finished puttingtying the drywall, wait until it dries. Then you take a familiar tool - a block with a mesh - and smooth out all the flaws. Sanding is completed, remove the dust, and cover the surface again with a deep penetration primer. After drying, begin applying the second layer.
This is how you hold the spatula
Next, you need to putty the drywall with a finishing compound. As they wrote, it can also be gypsum-based, like the starter one, or it can be polymer-based. Both are suitable, but some are more difficult to work with - they quickly begin to roll and harden.
The finishing putty is made more liquid and applied in a thinner layer. The application technique is the same, nothing changes. Besides the fact that it is more difficult to work with, it spreads worse, but you need to stretch it in a thin layer and quickly level it. Everything is much better with a primer, but without it, the bottom layer quickly draws moisture out of the fresh plaster and it begins to roll off. After applying the finishing putty, wait until everything dries again, then begin leveling. But this time they do not use a mesh - it leaves noticeable grooves, but fine-grained sandpaper. It is not so convenient to work with - it clogs quickly, but the surface is smooth. If you are preparing the surface for painting, we light it from below or from the side and you can use an LED lamp rather than an incandescent lamp - all flaws are visible. Even very small ones.
It is difficult to describe in words how to putty drywall - the movements are difficult to describe. In the video you can see how to hold the spatula, how to move it, how to apply or remove the solution. See the video for more details on the technology.
And further.