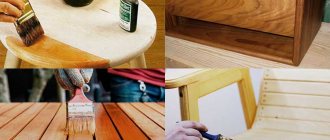
How to paint a countertop
Laminated chipboard is one of the most popular materials for making kitchen furniture, including countertops.
Among the advantages in comparison with other materials, it is necessary to highlight strength, maintainability, and long service life. But any furniture sooner or later loses its original appearance. Then all that remains is to either change it or repaint it. If you buy a new headset, you will have to dismantle the existing one and solve problems with removal and disposal. Additional investments and time will be required to visit furniture showrooms or workshops.
The second option does not require any special costs or experience. The main thing is compliance with the technology and preliminary preparation of the necessary materials and equipment. With a little effort, the result will be a unique tabletop. In addition, you can update the color regularly, taking into account your mood, the weather outside or seasonality.
Next, we will consider step by step how and with what to paint the tabletop. All steps are required. It is not recommended to skip them in order to get a perfectly smooth and even surface.
How to repaint laminated furniture with your own hands
The question “How to paint laminated furniture with your own hands?” worries those who have decided to update their interior and save money at the same time. And is it even possible to repaint furniture that is considered “disposable”? Furniture made from laminated MDF and chipboard is a budget option that can be easily replaced with a new one with a different color, texture and shape.
However, craftsmen easily take on the task of repainting laminated furniture with their own hands. And if you have the necessary tools and knowledge, this is not at all difficult to do.
Removing old coating
Furniture made from MDF, chipboard, laminated chipboard is covered on top with a thin layer of plastic (polyvinyl chloride, PVC). It is resistant to water and most solvents. Painting over such a film will not work. Even very expensive and high-quality paint will roll and run off. To prevent this from happening, the old coating is completely removed.
For this you can use:
- chemicals and reagents. When selecting a remover, it is important to take into account the type of old paint or other coating, so as not to completely ruin the countertop and not spend extra money;
- construction hairdryer The household power is not enough for these purposes. First, the coating is softened under a stream of hot air. Then you will have to work with a scraper.
Both options are quite labor intensive. But, if you want to get a new kitchen at minimal expense, you will have to work.
Preparing the base
Just removing the old coating is not enough. In order for the paint to lay perfectly evenly, you need to stock up on dishwashing liquid, sandpaper, a spatula and putty. If you have a sanding machine, don't put it far away. You will also need it. It is better to work with gloves and a protective mask.
Note! Complex structures are pre-assembled. This will make it easier to process surfaces. If the priority is to change the appearance of only the tabletop or facade, you don’t have to waste time on unwinding.
Preliminary preparation involves performing the following actions:
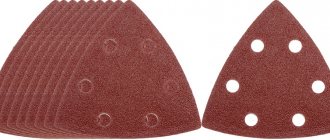
- sanding. First, the work is carried out with sandpaper with coarse grain, then with fine grain. If you have a sander, you can take it. The goal is to improve the adhesion of paint to a wooden base.
Important point! If a machine is used for grinding, it is necessary to work with equal pressure, periodically pouring water on the surface. Otherwise, the tabletop will turn out wavy and unpresentable. Don't forget about the protective mask. The finest dust contains components that negatively affect human health.
- degreasing. Not only chips are removed from the surfaces to be painted, but also possible grease contamination. It is not necessary to buy special medications. Dishwashing liquid and a sponge are enough. After treatment, the soap composition is removed, the countertop or facades are wiped with a clean dry rag and dried under natural conditions or with a hairdryer;
- alignment. Even after grinding, chips, cuts, and deep scratches could remain on the surface. They are carefully and accurately filled with latex or epoxy resin putty. Once the mass has become hard, the grinding process is repeated locally. If there were many defects, you can wash and dry everything again;
- padding. A thin layer of primer improves adhesion, the paint goes on smoothly and does not roll off. There will be no air bubbles, giving the chipboard tabletop a sloppy appearance. The cost of priming is small compared to the effect.
Additional Information! It is not necessary to purchase compounds designed for working with wood. You can use those designed for glass, auto repairs, and tiles. They come in cans and are extremely easy to use.
It is necessary to work in a mask and safety glasses. The primer must be dried. The specific period is indicated by the manufacturer on the label.
This completes the preparatory stage of painting the tabletop. You can proceed to choosing a coloring composition and further work.
What paint to buy to update your kitchen unit
The ideal option for updating laminated chipboard furniture is water-based acrylic paint. You can initially purchase a white composition and add pigments of the desired shade. The advantages of acrylic paints include the fact that they can be used for interior work without any problems. There is no sharp, pungent odor that lasts for weeks. The composition does not contain volatile components that cause allergies or skin rashes. If you don’t want to pick up a brush or roller, immediately purchase spray cans.
In addition to acrylic, thixotropic paint is also used for painting the facades of kitchen countertops. It fits well, the appearance of smudges is practically excluded. Once dry, the surfaces will look like sheets of plastic.
When working with laminated surfaces, buy latex or polyurethane paints, provided that they are intended for interior use. The desired color is obtained by adding pigment to a white base.
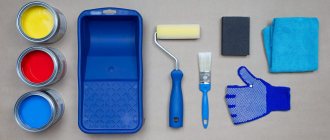
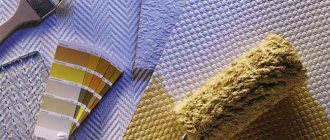
Required tools and materials
Only through the use of appropriate tools and high-quality materials can excellent painting results be achieved.
Basic tools used for repair work:
- Brushes – available with natural bristles (for working with oil, alkyd paints) and artificial fibers (for applying latex and acrylic compositions);
- Paint rollers make repair work much easier. Due to the simplicity of the design, no special skills are required. It is especially convenient to paint large areas of the surface with rollers (wood panels, facades). The only drawback is that it is impossible to paint small or narrow areas;
- Paint sprayers/paint guns allow you to apply paint evenly and get a smooth surface (sometimes difficult to achieve with a brush or roller). The time for repair work is also significantly reduced;
- Sandpaper, wire brush, masking tape, spatulas.
Various compositions are used for high-quality painting of objects.
When choosing paints, it is important to consider their features:
- Oil paint is created on the basis of drying oil, pigments, and various fillers. The opaque coating is quite durable and can be washed with detergents that do not contain abrasives. It is better to apply paint with brushes. A significant drawback is the long drying time of the painted surface and a strong unpleasant odor;
- Water-based compositions are characterized by harmlessness and quick drying. You can apply the paint with a roller - the layers are uniform. Water-based paints are even used for painting leather furniture (it is recommended to apply the composition with a sponge). The mixtures are vinyl (durable and easy to clean), acrylic (create a protective breathable layer), latex (form durable and strong surfaces). Acrylic paints are great for DIY coating of chipboard furniture. A very popular trend in furnishings is painting furniture with acrylic (photos are presented below);
- Solvent-based paints are used to create alkyd paints (ideal for painting garden furniture and outdoor terraces), silicone paints;
- The technology for painting furniture involves the use of a primer, which ensures adhesion of the paint/varnish and increases the durability of the furniture (disinfects and protects the material). Furniture primers are produced on different bases (acrylic, alkyd, silicone-acrylic, shellac, epoxy). According to their functional properties, they are antiseptic, deep penetration, and universal.
Oily
Water-based
Alkyd
Work order:
At first I wanted to paint it like this without removing the door, then I realized that it would be inconvenient. So I took a risk. and took it off. It turned out not to be difficult. True, worries about how to put them back on were present until the last moment. In the end, I also screwed it myself; I didn’t have the patience to wait for my husband))).
I pulled out the built-in lights and wrapped them in a suspended state with masking tape. The same tape was used to protect the walls on the sides of the cabinet, the floor, and the mirrors on the doors. Prepared the workplace. I decided to paint it. on the bed)))! I covered it carefully with polyethylene. And I have never regretted this choice. The bed was large and high, everything fit, there was no need to bend over and crawl on all fours. I prepared approximately equal stacks of books and wrapped them in cling film. They are needed as substrates so that the doors can be lifted and painted as if suspended; the painted edges will not come into contact with a flat surface.
Painting laminated chipboard shelves
I ended up with 5 shelves in a completely inappropriate color (my husband made them from leftover chipboard. Here they are!
The shelves were much needed, but the color! I don’t know exactly what it’s called, maybe alder, light red. It didn’t suit my living room and bedroom interior in any way. On the Internet I didn’t find anything specific about the type of paint for chipboard, except acrylic. The laminated chipboard is covered with a protective film, like varnish, on top, and the paints do not stick. Aerosol paint was the best option, but I already had negative experience using it in my apartment (I don’t have any other place to paint :). I painted chairs from Ikea with aerosol paint, then there was a coating of this paint everywhere (the baseboard in some places was never washed(()). Therefore, aerosol paint was immediately ruled out.
The idea itself was as follows: so that it would not be very expensive, so that the remaining paint after the renovation would be used, and so that it would have the effect of peeling paint. After some time of searching and calculating the cost, I came to the following decision: I use the remaining latex paint to apply the main color (ivory color), I will make the top layer a little shiny (I bought 1 liter of acrylic gold enamel for 342 rubles and 200 ml of pearlescent acrylic enamel for 132 ruble), and I will make the bottom layer black and gold (there was a little color).
The necessary tools were already there. So, to decorate the shelves we need:
– 1 liter of latex paint;
– 1 liter of acrylic (construction) gold enamel;
– sandpaper and sponge;
– 200 ml of mother-of-pearl acrylic enamel (construction);
Don’t look at the biggest jar (I’ll tell you about it a little later).
We carefully go through all the shelves with sandpaper. Three, three, three. We check with our hands whether the roughness of the surface is felt. I used 150-grit sandpaper (I think). Now I don’t remember exactly, I chose medium grain. For me this was the most difficult process. My hands were so tired that they simply couldn’t hold the sandpaper. By the way, in order to make it easy to rub, I adapted my daughter’s cubes. I wrapped 2 pieces in sandpaper and it was more convenient to rub. Here's the result:
Then I remembered that I have two old frames that don’t fit me anywhere and the watch (I brought it from work) is terrible :). And immediately the idea of creating a collection of items for my interior came to mind. I disassembled the frames and the clock, and sanded them well.
I also hadn’t painted the molding in the bedroom above the bed, so I decided to embellish it too - paint it with exactly the same paint (left over from painting the walls in the bedroom) that was in the big can in the photo.
The next stage: I apply the color that will be visible through the main one. To do this, I mix gold enamel and black color in an unnecessary jar to make black gold.
I make this color to match the pattern on my wallpaper.
I apply paint only where I need it. I don't paint the entire surface.
I leave it to dry. At this time I prepare for painting (skin and tape around the edges with masking tape) and paint the molding in the salon.
Features of painting the material
Not every craftsman will undertake repainting chipboard products at home. The difficulty lies in the fact that the common name unites several groups of materials that differ in processing. Each of them requires a special approach.
Types of chipboard
- Laminated. A film is applied to the base and processed under a heat press. The result is a durable protective and decorative layer. It is impossible to completely remove it before repainting.
- Lacquered. The base is decorated, after which several layers of varnish are applied to it. After drying, a very strong, smooth film is formed. It is almost impossible to repaint it; it is easier to polish it.
- Veneered. Veneer is glued to the board under high pressure. Only a few types of preparations are used for repainting, including stains and varnishes.
- Laminated. Paper decor is glued to the base. This is the most fragile design. Before repainting, you need to completely remove the paper and clean the parts from glue.
Types of paints for MDF
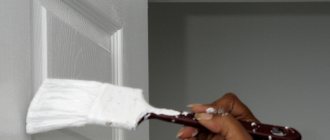
Painting kitchen facades made of MDF and solid wood is the most common. But the paint must always be of high quality, comply with operating standards and be applied according to the instructions.
There are many varieties of paints:
- Alkyd - plastic, durable, but not resistant to sunlight.
- Oil-based, which lie on almost any surface. But it is mandatory to use a primer.
- Silicone. Creates an elastic coating that is resistant to thermal influences. Such furniture fronts are used near the stove.
- Water-based - dissolves in water, is environmentally friendly and dries quickly. But the performance characteristics are not the best.
- Acrylic-silicone is harmless and durable, but one of the most expensive.
- Polyvinyl acetate may peel off if the application technology is not followed.
Of all paint and varnish materials, automotive enamel, which is an opaque glassy thin layer, is suitable for shiny facades. It is this that, when dried, becomes a beautiful gloss that does not change over the years.
There are two types of auto enamel:
- Acrylic. It is applied at once and after drying the facade immediately looks uniformly glossy. Using acrylic you can create color effects. For example, combining base enamel with acrylic, you will get a solid and expensive surface
- Alkyd. It is made from glycerin and resins, costs less than acrylic and dries quickly at room temperature.
What paint can be used to paint chipboard furniture?
In order not to completely ruin an old cabinet or table, you need to choose the right coloring agent.
Types of paints
- Oily. A mixture of vegetable or synthetic oils with pigments and other fillers. Covers the base well and forms a dense film. It has a pungent odor and takes a long time to dry.
- Alkyd. An analogue of oil enamel, but alkyd resins are used instead of oils. It dries faster and adheres better to the material.
- Acrylic. A type of water-dispersed paint. Bright colors, high hiding power, dry quickly, non-toxic, odorless. For smooth coatings, mixtures with increased adhesion are chosen.
Varnishes and stains are also used to paint chipboard furniture. The latter are good for tinting veneered boards. The varnish is used as an independent decoration or fixes the paint layer. Some formulations are available in the form of liquids and aerosols. For large surfaces, choose paint in a can; for small fragments or for touch-ups, it is better to take an aerosol.
Paint: which one to choose and how to apply it
Alkyd enamels and polyurethane paints are suitable for repainting over PVC film - it is best to buy a special paint and varnish material marked “for furniture”. There are many reports about home repainting of MDF and laminated chipboard with acrylic latex compounds - provided that a special primer is used.
Treat corners and hard-to-reach nooks and crannies with a brush with a beveled edge.
A professional approach is painting using a spray gun with paint consumption from 60 to 200 grams per square meter. The nozzle diameter and pressure will have to be calculated independently, taking into account the type of paint.
Stages of work
The painting process is quite complicated. To make the result pleasing, before painting chipboard furniture, you need to choose the right tools, buy suitable materials for processing and strictly follow the manufacturer’s instructions. It is better to work outside, since most solutions have a pungent odor, or on a loggia behind a tightly closed door. We will analyze all stages of work in detail.
Selecting materials and tools
In order for the new coating to be smooth and durable, in addition to paint, you will need a primer. It is better to have a close tone to the color that should be obtained in the end, or white. She prepares the base for painting. It is advisable to buy a composition that increases adhesion. It will improve the adhesion of the coloring agent to the slab. In addition, the use of a primer significantly reduces paint consumption. Therefore, the primer must be applied, preferably in two layers.
In addition, you will need a degreaser. Better in aerosol form with a convenient sprayer. You can buy a special product or make do with any solvent or white spirit. To treat the base before painting the chipboard at home, you will need fine sandpaper, rags and masking tape.
Furniture painting
There is a certain scheme according to which surfaces are traditionally coated with paint.
- First, a primer is applied, as already noted, and the number of treatments should exceed two.
- Next, the paint is prepared by thoroughly stirring.
- The mixture is sent into a convenient container that will fit the roller. Then the instrument is soaked in the solution and the excess is squeezed out.
- Then the dyeing process itself begins (from the middle). An important role is played by proper distribution of the mixture over the base so that the movements are parallel. You should also avoid forming a dense layer.
- After this, the base coat is applied using a similar principle.
- If you use a spray gun, you will need to dilute the composition.
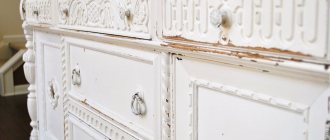
To make the interior more original, you can paint the fronts of the chest of drawers white and the front areas black. For this, glossy paint is used. Distressing by applying a darker paint over the base coat is also widely used.
Common mistakes
The technology requires appropriate humidity (no more than 50%) and temperature (no lower than 20°C and no higher than 24°C). Therefore, paint and varnish work should be carried out indoors using lung protection.
The easiest way to change is the light base of the surface. When using stain (for wood) or colored varnish, you will get a darker facade, but at the same time maintain the structure of the material. If your base is dark, then it is more difficult to emphasize its structure.
The easiest way to get the desired tone is by mixing the desired colors several times in different dishes. Check the result on test surfaces and when the paint has dried, you will be able to make a more accurate choice.