Most pieces of furniture can be transformed with a can of paint and some step-by-step instructions. You can do all this yourself at home. Painting furniture is also one of the best ways to give an old piece of furniture a new life.
But honestly, there is so much information out there on how to start painting that it can be difficult to understand at first. This guide will help you explain step by step what you need to know when painting and how to paint furniture correctly .
PREPARING FURNITURE FOR PAINTING
There are quite a few brands of furniture paint that claim that they do not require any preparation. This sounds amazing because who doesn't want to skip all the boring stuff and start coloring right away? It can be tempting to skip the preparation and get straight to the point, but don't do it! You're just asking for trouble if you start painting furniture right away. You won't get a nice, durable finish this way. And if it doesn't look nice, what's the point of doing it?
You may be interested in: Paint for wood: which one to choose and how to easily paint wood with your own hands?
Methods for restoring polished furniture
In Soviet times, polished furniture was an indispensable attribute of any apartment. It has a noble shine, but is completely unsatisfactory with its color parameters; as a rule, it has a boring brown tint. In addition, over time, the polish loses its natural shine, becomes dull and begins to “pucker” in places. The only way to save your favorite thing is to paint polished furniture.
Painted kitchen set
Stages of restoration of polished items:
- degreasing the surface;
- using a heat gun and a spatula, remove the old polish;
- cleaning the surface from polishing residues using sandpaper;
- Treatment of small cuts and chips with putty.
Painting furniture made from solid old wood requires priming to avoid drying out and to maintain its appearance.
Using a primer will prevent cracks in the wood and protect it from peeling, especially kitchen furniture. After the primer has been applied and dried, the furniture must be sanded and polished again. Only now can you start painting. Moreover, in this case it is better to use acrylic paints, which will give the furniture a well-groomed look and have excellent environmental performance.
Painting the dining table white
After complete drying, you can safely get creative and start decorating. This will give the product individuality, make it part of the interior, and simply revive it.
Original painting of the desk
WHAT PAINT SHOULD I CHOOSE?
Before painting laminated furniture (in artificial, wood-like veneer - the so-called laminate), a two-component primer (industrial primer used for MDF, HDF, wood, plywood, laminated boards) should be applied to the surface of the board. This is a product that has exceptional adhesion to any type of surface.
There are also products on the market that do not require pre-sanding of furniture, such as repair paints and chalk paints. Both products require only preliminary cleaning and degreasing of the surface. They can be used to cover various surfaces and, for greater durability.
Cabinet painting process
The most important stage is working with coloring compounds. It is advisable to paint chipboard in two layers. Squeeze the brush and roller slightly each time to prevent excess coating on the surface. Acrylic mixtures spread easily over a wood board. It is important to consider that chipboard has good moisture permeability; you cannot apply too much paint, as the chip base will swell. The painting process begins with treating hard-to-reach places and end surfaces. The second layer is applied after the first has partially hardened, the time is indicated on the label. On average it will take from 2 to 4 hours. Enamels take longer to dry. The acrylates that make up the material polymerize in air, becoming translucent and durable. A vapor-permeable film is formed, under which water does not accumulate when there is a temperature contrast. Some useful tips:
- Painting flaws are removed immediately. In liquid form, the coloring mixture is easily removed.
- Those who are not sure of success can be advised to purchase paint not in cans, but in spray cans. When working with aerosols, use personal respiratory protection equipment.
- It is not necessary to completely paint the inside; it is enough to give the desired color to visible parts of the wooden structure: the outer edges of the shelves, drawers.
- It is advisable to assemble the furniture after drying the parts for 24 hours to avoid the doors sticking.
Cabinet painting process
CLEANING
The very first thing you need to do before cleaning any piece of furniture is to give it a thorough cleaning. No matter what type of paint you use, it will not stick to grease, dust or other dirt. Another option is to just use warm water and dish soap because it's cheap, easy to have on hand, and amazing at removing grease and dust.
UPDATE
Once your furniture is clean and dry, it's time to give it a good update. If something is loose or needs repair, this is the time to do it. Fill all holes and deep scratches with wood filler . Remove any surfaces or fittings that you do not want to paint.
If you plan to replace drawer drawers or handles, check to see if the location of the screw holes will need to be changed. If so, fill the old holes with filler.
Where to start painting old furniture
When you complete the first stage of preparation, sanding the furniture, you can move on to the second - getting rid of deep scratches, chips and other damage.
To do this you will need wood putty. It is applied with a spatula, allowed to dry, and then the excess layer is removed with fine sandpaper.
Now you can move on to the third stage - applying the primer layer.
This point in the restoration of old furniture is not necessary, but experts recommend priming the product to save paint and even out the surface and its color. The primer also allows you to hide minor flaws and scratches on the base of the coating.
GRINDING
Most of the time, you don't really need to sand your furniture before painting it. If you are restoring furniture, you should first completely remove the old finish, but not the previous paint. This is certainly one of the reasons why painted furniture has become so popular lately - it's a much easier way to bring old furniture back to life.
Even if you don't need to remove the old finish, you need to make sure you have a good surface to start painting. If your furniture has any rough spots, you can sand them down. Additionally, if it also has a shiny, glossy finish, you will need to start by sanding it to rough it up a bit. After sanding, be sure to remove dust with a damp cloth.
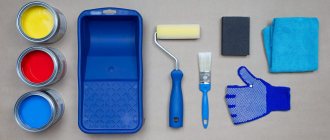
Necessary tool
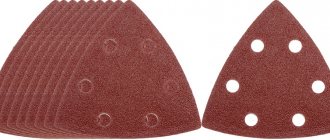
To paint old furniture, in addition to paint and varnish, you will need sandpaper of different grain sizes. The paint layer is removed manually or with a sander. For final sanding, choose 320-grit sandpaper. You will also need rags and a degreaser (alcohol, solvent). It is better to apply this composition with a spray nozzle and immediately remove it with a rag. What else is needed:
- New fittings will give the cabinet a modern look. Handles for Scandinavian interiors are chosen to be flat, without elaborate decor.
- You will need polyethylene to cover the floor of the closet.
- A set of screwdrivers if you need to remove the doors.
- Masking tape will be needed for stencil painting. If there are metal linings on the cabinet, they are also pre-closed.
It is better to choose synthetic brushes, as they will not shed lint. You will need two brushes:
- small size for processing edges and end surfaces;
- wide to quickly cover a large area.
For a large cabinet, it is more convenient to take a fur roller; the coating process will speed up. Of course, in this case you will need a paint tray.
Synthetic paint brushes
Roller for painting
PRIMER
Many furniture paint manufacturers also state that you can skip the primer. This is actually true...but there are some important exceptions.
If you are painting wood furniture with very dark or reddish wood, you should really start with a good oil primer. Wood furniture has tannins, which are natural oils in wood. When you paint wood furniture, moisture in the paint can cause the wood grain to open and release tannins. This is especially true for some types of wood that are often used for furniture, including redwood, cherry, and knotty pine. When you paint furniture white or another light color, these tannins will make your beautiful paint look yellow and mottled.
If you have raw, unfinished wood, it's also a good idea to use a primer first. In this case, any primer will do. Latex is a good choice because it's easy to clean using just water, but oil-based ones are also great.
White paint has very little pigment compared to other colors and usually requires many coats to get good coverage. Starting with a coat of white primer can really cut down on your paint use. This can be a big time and money saver since paint is typically much more expensive than primer.
Preparatory stage
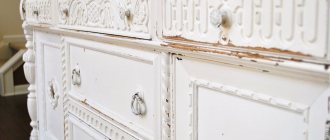
Often it is necessary to paint furniture made of wood, which was made in Soviet times. Its quality is excellent, it can stand for a long time, but its appearance is rather unpresentable.
Painting cabinet doors
Gray painted bed
New furniture also needs to be remodeled if it does not fit into the updated design at all. Painting furniture in the Provence style is especially relevant and quite interesting. But before you pick up a brush and paints, you need to carry out preparatory measures.
- Prepare a place, preferably a separate room for restoration. Please note that the process takes 2-3 days.
- Remove all metal parts, removable fronts and shelves.
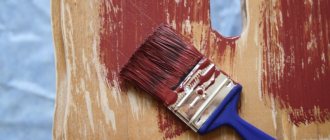
- Clean surfaces of old paint or varnish.
To paint wooden furniture successfully, you need to prepare fine and coarse sandpaper, gloves to protect your hands, wood putty, acrylic primer, rubber spatula, brushes for work and a roller.
Two-layer painting of wood
Turquoise painted table
DIY furniture painting
It's easiest to paint large, flat surfaces such as countertops and the sides of dressers. You can use a brush for small sections. It is important to use a good quality brush to paint furniture well and if you want a smooth finish. When painting furniture, be sure to use long, even strokes.
You will most likely need two coats of paint, but sometimes you may need more coats, especially if you are using a very light paint such as white or a very rich color. Be sure to let the paint dry thoroughly between coats
Whatever paint you choose, be sure to follow the instructions on the can. Some brands come with a brush, some with a sponge, and some with a rag.
Which furniture paint is suitable for children?
In the interests of healthy development of babies, choose furniture paint that is odorless and safe. What does it mean? This furniture paint should not contain solvents or ammonia. It is worth betting on a product recommended by the Society of Allergists - then you will be sure that it does not contain ingredients that cause allergies. Certified children's furniture spray paint works great.
Dye selection
Detailed instructions on how to paint a chipboard cabinet will begin with a description of the features of the coloring mixtures. Manufacturers offer all kinds of paint and varnish materials, expensive and not so expensive. But when choosing paint, they do not focus on cost. The cabinet can be repainted in a fashionable white color, or any other color, at low cost. Several types of paints and varnishes are used for painting wood and wood-based panels:
- Oil-based ones give a glossy shine, but take too long to dry and are not durable. Scratches will quickly appear on the coating, and the layer can “slide” under the influence of household chemicals.
- Alkyd enamels are produced in varying degrees of dullness: glossy, matte, and semi-matte wood coatings are available for sale. The coatings lie evenly on the surface. It is necessary to work with such paints and varnishes in a well-ventilated area; although the paint has a slight odor, it is very stable. You will have to remove textiles and remove upholstered furniture from the room, which absorbs the aromatic components of alkyd paints.
- Acrylic paints and water-based enamels differ from previous mixtures in their environmental friendliness. They are completely harmless. Here's what paint you should use to paint your cabinet. You can find basic white options for tinting. Pigment for water-based emulsion is added to the paintwork material. In the Scandinavian style, matte surfaces are preferable. Varnish will add gloss.
Pay attention to: How to correctly, quickly and beautifully paint different types of wallpaper on the ceiling and walls
From the wide variety of acrylic compositions, it is worth choosing those special for wood or wooden surfaces. Some manufacturers indicate recommended wood density. When choosing paint, pay attention to hiding power. The higher the indicator, the fewer layers will be required.
Oil paint
Alkyd enamel
Acrylic enamel
How to paint veneer furniture?
Veneered furniture (usually antiques) should be placed in the hands of professionals who will return it to its former elegance and quietly replace the loss of veneer. However, if the damage is minor and you have experience with painting, you can try to repair the worn parts of the furniture yourself. How to do it?
First of all, when repairing furniture covered with a layer of veneer, use adhesives made from natural resins (preferably so-called pearlescent glue). This condition is due to the fact that any actions performed on furniture using organic glue are reversible. If you make a mistake, your furniture will still have a chance to look its best. All synthetic glues (including popular wood glues from hardware stores) will make the damage permanent and permanently penetrate the wood. Veneer fragments that are wrinkled due to excessive moisture and protruding pieces - if you decide to leave them, carefully moisten them with water at the first stage of work.
But be careful: don't pour water on the furniture! The damaged veneer must be soaked by applying a moistened (wrung out!) cotton cloth or sponge to the selected fragment. Wet material should be left on the furniture for several hours. After this time, the veneer should gain plasticity, which will allow you to glue it in the right place without unnecessary damage to the original fragment. The veneer is glued dissolved and a heavy (preferably brass) object is pushed through the material, leaving it to dry for at least 24 hours.
And now you know how to paint furniture. You can be sure that your painted furniture will turn out beautiful and last for many years by following our recommendations.
Tips for painting furniture
In order to paint furniture, it is not necessary to seek the help of specialists. Using the tips and instructions below, you can easily do it yourself.
Primer, like paint, can be applied to the surface in various ways - with a brush, roller or sponge.
Before you start painting furniture with your own hands, the product should be placed at a comfortable height for you.
Working with a roller provides higher productivity, but the quality of the coating will be slightly worse than when painting with a brush. It is advisable to use a roller when painting large flat surfaces.
The technology for painting furniture is as follows: a roller soaked in paint is placed on the surface to be painted and, with slight pressure, rolled several times over the same place. Stripes of paint applied with a roller should overlap one another with an overlap of 30-40 mm. Applying the paint to part of the surface in this way, it is shaded using the same roller with uniform parallel movements.
When applying paint, the brush is held with a slight inclination to the surface; it is not completely immersed in the paint, but only half the bristles. Excess paint is removed from it using the edges of the can. The paint is applied to the surface in wide stripes, light strokes, without strong pressure on the brush.
In order to clearly see the whole process, watch how furniture is painted in the video: