What to put after Rotband?
After Rotband, do I need to prime the walls and apply a finish? If necessary, should I wait until the rotband dries or hardens?
It is very important to know what we are preparing the walls for.
If you decide to paint or paste over, for example, textile wallpaper, then you need a perfectly flat surface for these materials.
It turns out that we add finishing putty with sanding to Rotband.
There is wallpaper (for example, glass wallpaper)
As for all other issues, Rotband must dry completely, it is necessary to prime between layers, this must become a habit, that is, layer-primer, start-finish-primer.
Finish - wallpaper, primer and so on.
If necessary, should I wait until the rotband dries or hardens?
It’s better when the Rotband completely hardens and gains strength (about a week), but a lot depends on the timing of the work and on the layer of Rotband, if the layer is large, then we wait about a week, if up to cm, then you can putty a little earlier, but again you need to know clearly temperature and humidity in the room.
Temperature and humidity affect the drying time of Rotband.
In my opinion, one of the best universal plaster mixtures is, of course, Rotband. And I can say this even from my own experience). The question is very relevant.
I had to use this material for plastering walls, and my review of it is only the best. But there are a number of points that it is advisable to know.
Therefore, to your question about whether, after using Rotband, it is necessary to prime the walls and apply a finish, the answer will be positive - Yes. It is simply necessary to prime the walls. And after the primer has dried well, you will need to apply the finish.
When asked whether you need to wait until Rotband dries or hardens, I say again - yes, you need to wait for it. The plaster should dry well, changing its original color to light. The drying time of the Rotband mixture may vary. If the conditions are met - normal room temperature, the layer is not thick (up to two centimeters), the ventilation in the room is excellent, then the drying time of the layer is from three to five days. In rare cases - a week with a maximum thickness of three centimeters.
Next we do the finish. If the walls have a lot of unevenness, then I recommend using Fugenfüller Knauf.
I want to make one important addition. If you use gypsum in a room where the humidity is off the charts, for example, a bathroom, then the finish is not necessary.
We used tiles, which look great in the bathroom, and we also applied a water-repellent primer to the Rotband (you can choose the same Ceresit CT 10 or Litoplast). Next we used waterproof paint. The result was excellent. I've been happy for almost four years now.
And if you are preparing walls for the same vinyl wallpaper, then the finishing is also not needed here.
Therefore, whether to do the finish or not depends on these points.
Source
Wall Leveling Tools
In order to make it comfortable to work and to obtain high quality repaired walls, you need to have a set of tools and devices. When preparing walls for leveling, you also have to do dusty work - cutting off humps of plaster on the walls, chipping off protruding bricks and cement mortar with a chisel, treating the plastered surface with emery cloth. Therefore, first of all, you need to take care of personal protective equipment - goggles, a respirator and gloves.
After freeing the walls from wallpaper or layers of paint and peeling plaster, it is necessary to evaluate their deviation from the vertical and flatness. To assess verticality, you can use a plumb line or water level. You can buy a plumb line in a store, but it’s easy to make with your own hands; just tie a weight weighing 100-200 grams to a strong thread or rope with a length equal to the height of the ceilings. The weight will, thanks to the force of gravity, pull the thread down strictly vertically and it will be easy to check the verticality of the wall.
To secure the plumb line to the wall, you need to drive a long nail into the wall near the ceiling or, if it is impossible to drive it in, drill a hole in the wall and tighten a self-tapping screw of such length that the weight of the plumb line does not touch the wall. Now it is enough to use a ruler to measure the distance between the plumb line and the wall. The difference between the values read at different heights will be the deviation of the wall surface from the vertical.
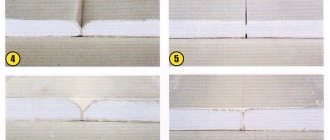
As you can see in the photographs, at the bottom the distance from the wall to the thread was 29 mm, and at the top – 18 mm. The deviation from the vertical at a distance of 2.5 m was only 11 mm. Such a wall can be considered vertical and there is no point in leveling it. It is still impossible to notice such a deviation by eye.
But if you need to level a horizontal surface, for example a ceiling or beam, then it’s difficult to do without a construction ruler with a water level. The longer the construction ruler with the level, the more accurately it will be possible to level the ceiling.
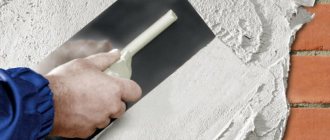
To apply and level the rotband and putties, use a trowel and spatulas of different widths. There is a special tool for aligning internal and external corners.
In the photo on the left is a leveler for external corners, although it is easier to make good corners using a special beacon profile. On the left in the photo is an internal corner leveler, which allows you to make ideal corners when leveling walls. In the background is a trowel with teeth. With its help, the evenness of the walls can be brought to ideal. If necessary, it allows you to leave grooves on the surface for high-quality application of the second layer of plaster or when laying tiles.
It is best to purchase trowels and spatulas whose blades are made of high-quality stainless steel.
When preparing solutions from dry mixtures, it is necessary to maintain the proportion of water and the mixture itself. For this, it is advisable to have measurements, for example, I use a tin can for water, and a plastic scoop for mixtures. For one can of water you need two heaped scoops of the mixture.
You can’t do without a flat, hard brush and a bucket of water when renovating an apartment. Water and a brush will be needed when peeling off wallpaper, wetting dry walls before applying mortars, and cleaning trowels and spatulas from mortar residues when performing work on leveling and plastering walls. Always have a damp cloth at hand.
When leveling walls, a small amount of mortar may be necessary to fill potholes, holes and other defects. In this case, it is convenient to have small trays with straight sides on hand, which are good for removing the remaining solution from the spatula.
Sometimes there are bumps on the walls that protrude beyond the level of the door frame, making it impossible to level them. You have to cut off such protrusions. If the mound is located on a larger wall, then to level it it will be necessary to cover a large area with plaster and use up a lot of material. It is better to cut off such irregularities.
The photograph shows a partially cut hump from a section of the wall protruding beyond the level of the door frame. I had to remove cement about 10 mm thick from a fairly large area, but there was no other way out.
The limestone part of the plaster was easily cut off with a hard spatula, but the protrusions of brick and cement had to be removed using a chisel, chisel and hammer.
To level the surface until it is ready for wallpapering or applying finishing putty, you will need grout. The photo shows homemade grout made from foam packaging.
I have listed the main tools needed for leveling the walls; you will also need all kinds of slats and boards for forming corners and for beacons, screws and dowels of different sizes, all kinds of screwdrivers, emery cloth and many other things that are difficult to list. To work at height, you will also need a stepladder or a table for repairs.
Is it necessary to putty the walls plastered with Rotband, and if necessary, then with what?
We do repairs, level the walls and ceilings with Rotband.
Everything seems smooth and neat, do you need to putty using Rotband, or can you paint it, glue wallpaper, lay tiles right away?
Plaster (and Rotband is gypsum plaster) differs from putty in its grain size (fraction).
Plaster is a coarse-grained mixture and is intended for preliminary leveling of the surface.
But the putty makes this surface perfectly flat and smooth.
Rotband can be used as a starting (basic) putty, but in order to bring the walls to perfect zero, this is not enough, finishing putties are needed.
Preparing Rotband gypsum plaster for work
Since the lifetime of the prepared Rotband solution is limited to 20 minutes, then first of all it is necessary, based on the specific consumption and complexity of the work, to determine the required amount that can be applied to the wall. When leveling walls locally, this is not an easy task, and it is almost impossible to accurately determine the required amount of plaster. Therefore, you should think in advance where to place the remaining solution.
Based on the portions of plaster, the volume of the container for its preparation is selected. The container should have rounded corners or a round shape so that the entire volume of “Rotband” can be mixed to a homogeneous consistency with a construction mixer. A plastic bucket of water-based paint works well as a container.
First, the required amount of water is poured into the container, at the rate of 2 parts of the volume of water to 3 parts of the volume of dry plaster. It is better to pour a little less of the mixture and, if necessary, add it at the end of mixing. The water and container must be clean. It should be noted that the lower the water temperature, the longer the gypsum plaster solution will remain suitable for work.
It is best to mix the solution using a construction mixer clamped in the chuck of an electric drill with speed control. When the mixture becomes homogeneous, turn off the drill and remove the mixer. The consistency is considered normal if the solution does not fall off the inverted trowel.
Otherwise, you need to add a little more dry mixture and stir the solution again until smooth.
The resulting solution must be kept for 5 minutes to mature. Then another stir is done and you can get to work. After Rotband has matured, it is not allowed to add water or dry plaster to the solution according to the manufacturer’s instructions.
"Rotband" has very high adhesion and sticks to everything it comes into contact with. Therefore, all tools must be washed with water as quickly as possible, otherwise contaminated areas will have to be scraped off with great difficulty. The mixer can be washed well if, immediately after stirring the solution, without removing it from the drill, you dip it in water and turn on the drill.
As you can see, the working part of the construction mixer is almost completely clean in 10 seconds.
The history of the creation of this plaster
Rotband is translated from German as “red ribbon”.
Before its production, the brands “Green Ribbon”, “Golden Ribbon”, “Blue Ribbon” were announced on the market. This is where the concept of “cigar bands” came from, which went on sale back in 1854. This made it possible to accurately identify the manufacturer and rely on his reputation. The first products of the brand were manufactured in West Germany in 1962 . The company itself was originally located in the German town of Perl. The first mine for the extraction of gypsum stone was commissioned back in 1938. In 1972, for the first time in the German provinces, plasterboard sheets began to be produced. After World War II, it was decided to move the head enterprise to the American zone of occupation.
Material cost
If we talk about the cost of the mixture of this brand, then it is completely justified by the highest quality. Some people think that the price is a little high due to the famous brand, but hardly anyone can argue with the quality of the products. The popularity of the manufacturer has led to the emergence of many counterfeits on the building materials market.
When purchasing Knauf Rotband putty, you must check the relevant certificates. If, after opening the package, you see sand in the mixture, then this is a counterfeit product. The same time stamped on the packages also indicates a fake, since on machines the clocks are updated automatically. A certified product must have a hologram of the manufacturer.
Specifications
The Rotband mixture is universal and environmentally friendly in its composition . The main binder is gypsum, which regulates the microclimate of the room, absorbs excess evaporation, and releases moisture. When purchasing a dry mixture, just dilute it with water and mix thoroughly.
It is applied in one layer, which is very economical. It is enough to give the desired surface characteristics. The thickness of the applied layer is approximately 30 mm. Rotband dries at the rate of 1 day - 1 mm. The mixture is sold in packages of 5, 10 and 30 kg. Packed in paper bags.
The color is not uniform and depends on the batch of minerals included in the composition .
Binding components can be produced in different shades (gray, pink, beige or white). Color does not affect the quality of the mixture in any way. Per 1 sq.m. consumption is about 8.5 kg. Layer thickness is about 15 mm. On average, such a layer will require 12.75 kg of putty. For a reserve, you need to increase the resulting figure by 10%. For plastering 1 sq. m you need to mix 14 kg. This value must be multiplied by the area of work and divide the resulting value by 30 (for a bag weighing 30 kg), by 5 (5 kg) or by 10 (if 10 kg).
Marking walls for alignment
Not only the final result of the work on leveling the walls, but also the amount of “Rotband” that will need to be laid depends on the accuracy of measuring the deviation of the wall from verticality and flatness. So this is perhaps the most critical stage of the work.
Marking old walls for leveling should be carried out only after removing their covering (wallpaper, panels) and poorly adhering old plaster. There is a rule: everything that moves on the wall, regardless of size, must be removed before alignment. Next, for marking, you need to determine the geometry of the wall. To do this, you need to drive four long nails into its corners, if possible, or tighten four self-tapping screws, which is what you usually have to do.
Threads are tied to the self-tapping screws with good tension to prevent sagging along the perimeter of the wall and crosswise. The threads connecting the self-tapping screws vertically, using a plumb line or a construction ruler with a level, are shifted so that they take a strictly vertical position. The threads should not touch the wall surface. The remaining threads are moved along the screws to the attachment point of the vertical threads. As a result, the threads form a horizontal plane, relative to which, using an ordinary ruler, it is easy to determine the unevenness of the wall and install beacons.
Next, using a simple ruler, the most protruding section of the wall is determined and a decision is made on the advisability of cutting it. How much you can save "Rotband" even if you cut off only 1 mm of the protruding section of the wall and the cost for leveling you can calculate using the online calculator below.
| Online calculator for calculating the required amount of Rotband gypsum mixture for leveling walls | |
| Width of leveled surface, m: | |
| Height of leveled surface, m: | |
| Average thickness of the leveling layer, mm: | |
Then all the threads on the screws are moved the same distance. If necessary, they are shifted so that their plane touches the most protruding point of the wall. This will be the vertical plane that the leveled wall should occupy. Now, using a ruler, you need to determine the average thickness of the leveling solution to calculate the Rotband consumption on the calculator.
Instructions for use
Preparation of the solution
You can familiarize yourself with the rules of operation and use of the Rotband mixture on the product packaging itself. Scheme for preparing the solution:
- For 30 kg of mixture you need to take 18 liters of water. The temperature of the liquid should be at room temperature. If it is cold or too hot, lumps will form and the solution will set quickly, which is undesirable.
- Fill the container with the mixture poured into it with water. You need to knead in small portions. For the entire work, more than 3 portions in a row should be mixed. It is necessary to carefully pour water into the solution and stir it vigorously.
- To knead, use a drill or a construction mixer. This tool will create the correct consistency, reminiscent of thick sour cream.
- Leave the mixture for 10–20 minutes to improve the elasticity of the plaster, and then knead again.
- When preparing the solution, you should not pour water twice, as the adhesive characteristics of the composition will decrease, and such plaster will be applied unevenly.
- The temperature regime in the room where Rotband is prepared should be observed. The air temperature should be from +5 to +30 degrees. Humidity - no more than 60%.
Surface preparation
Before starting work with Rotband putty, you need to thoroughly clean the walls of the old coating. The concrete base is completely cleaned so that even greasy stains from the previous finish are not visible on it. It is necessary to create a flat and uniform surface. If there are metal elements left in the wall, they are treated with an anti-corrosion compound.
After cleaning and leveling the wall or ceiling, you need to prime the surface to ensure uniform application and adhesion of the plaster to the base. Typically, the priming procedure is performed several times in a row. Each new layer of soil should be applied to the previous one after it has completely dried.
When the primer has dried, you need to begin installing the beacons. This is an important step that will help to apply the plaster layer evenly. Depending on the size of the beacon profiles (6 or 10 mm), their number is selected.
How to carry out the work: tools
To work with Rotband putty you will need the following tools:
- brush or roller for applying primer to the surface;
- a plumb line or level to correctly measure direction and slope;
- metal profiles 6 or 10 mm wide at your discretion;
- rule for leveling the mixture and directing it along the plane;
- wide spatula (for applying putty) and narrow (for applying a small amount of mixture to a wide tool);
- a construction mixer or drill for uniform mixing of gypsum particles and water;
- metal rail;
- a hard sponge or grater on a metal base.
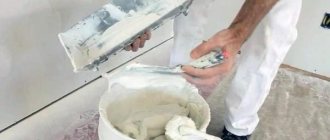
How should I putty?
Using a wide spatula, apply a small amount of the composition to the base. Movements should be directed from top to bottom. The distance from one beacon to another must be covered at one time. The width and height between the beacons must be maintained at a distance of about 1 meter. You need to actively straighten the layer using a large rule with a convenient holder.
To do this, the rule is pressed quite tightly against the beacons and the applied mass is pulled out with zigzag movements. The excess that remains on the instrument is removed with a narrow spatula and again distributed over the surface. The characteristics of Rotband plaster are quite plastic .
It can easily slide under its own weight, so after finishing leveling you need to once again apply the rule from bottom to top along the entire base.
Why putty the walls after plastering?
Putty on plaster, when required, worries many who want to carry out repairs. First, we should explain the peculiarity of the putty; the composition uses fine particles that help to repair the smallest flaws in the surface. In this case, the application results in a smooth base on which no flaws will be present.
The plaster mixture, on the contrary, consists of large fractions that cope with the filling of large irregularities, but this makes the surface uneven, the fractions are not smooth, but convex. For this reason, the plaster will stand out through thin materials; painting directly over the plaster layer will result in an uneven coating that emphasizes defects, the effect will be questionable.
Thus, the main difference between plaster and putty is the size of the included fractions.
As a result, we can say that puttying the walls after plastering is always necessary, except for choosing a tile material for finishing, or thick wallpaper, through which the surface roughness will not be noticeable.
Among the positive properties of putty the following are also noted:
- Helps increase the reliability of the plaster; the material will not fall off over time;
- Creates a layer that has a high level of adhesion to finishing materials;
- Reduces the consumption of wallpaper glue and surface painting products.
Putty helps to increase the reliability of the plaster; the material will not fall off over time.
After what time can it be applied?
An important point is how much puttying of the walls after plastering is allowed. The period depends on the type of plaster mixture that was applied to the base.
New material can be applied over the cement-sand plaster layer after 7 days, despite the fact that complete drying takes 28 days. But within a week it acquires the required level of grip.
Indicators may differ depending on the brand of the composition; the manufacturer most often writes the terms on the packaging. Thus, plaster for facade finishing based on Knauf Unterputz cement requires waiting 7-10 days.
New material can be applied over the cement-sand plaster layer within 7 days.
Gypsum-based products are distinguished by their quick-drying properties, but we are talking about initial setting; the process takes 40-60 minutes, but the optimal degree of drying also lasts a week. Keep in mind that humidity and low temperatures increase the drying time, which can reach 10 days.
That is, the time when you can putty after plastering depends on the temperature and humidity indicators for interior work. The thickness of the application layer is also important. It is not recommended to use artificial acceleration of drying; this will reduce the service life of the coating. The liquid will evaporate unevenly.
Gypsum-based products are distinguished by their quick-drying properties, but we are talking about initial setting.
Can it be used on drywall?
Many people are interested in the possibility of applying Rotband plaster to a plasterboard wall.
GCR is often used for any construction and finishing work. Rotband is used for processing moisture-resistant drywall . The primer is taken with the same characteristics so that the putty layer is well and evenly distributed over the surface. The coating formed with Rotband putty on plasterboard is very durable and withstands minor mechanical stress.
Despite its moisture-absorbing properties, it should not be used in rooms with very high humidity. On drywall under such conditions it can get wet and fall off.
You can putty Rotband on any surface: concrete, wood, metal or plasterboard. It is important to know the amount of mixture required for work and to prepare tools for puttying.
Consumption per 1 m2 for plaster
The consumption of the putty mixture depends not only on the thickness of the applied layer, but also on the type and density of the composition. You can find out the exact number on the packaging:
- heavy and dense cement putties for facade and interior decoration are used the least economically: with a layer thickness of 1 mm they will need 1.2-1.5 kg/m2 of plastered wall;
- the consumption rate of gypsum putty on plaster will be 0.8-0.1 kg per 1m2;
- Polymer-based putty is considered the most economical - consumption per 1 m2 is only 600 g.
The better the walls are leveled with plaster, the smaller the layer of putty is needed after it. Much depends on the manufacturer:
- "Wide." Compositions for interior work of this brand are used very economically: on average, with a thickness of 1 mm per 1 sq. m will require only 0.68 kg; the only drawback is that the company packages its products in very large containers, which is not always convenient;
- Vetonit sells both facade plaster and mixtures for interior work; in the first case, the consumption will be 1.2-1.5 kg, and for finishing the premises you will need 1.2 kg; The company also produces high-strength oil-adhesive compositions, but they are per square meter. m will need up to 3 kg;
- Knauf products for interior work, made on the basis of resinous substances, are of very high quality, but not very economical: it will take 1.7 kg to finish a square meter.
Advice! Unlike plaster, which can be applied in a thicker layer, the starting putty layer should be no more than 3 mm, and the finishing layer should be no more than 1 mm. If re-correction of the surface is required, it must be thoroughly dried, and only then a new layer must be applied.