How to line walls with wallpaper
- Concrete walls. If there is slight curvature, it is not necessary to use special mixtures to level the walls - ordinary putty will do. The wall is cleared of debris, primed and several layers of starting putty are applied. After complete drying, the surface is primed again and covered with a finishing layer. If the walls have significant curvature, it makes sense to use drywall for leveling.
- Wooden walls. The surface must be cleaned of old paint and varnish, and bumps. The recesses are sealed with a special solution. The wood is treated with an antiseptic. Next, the wall is covered with shingles (wooden strips up to 5 mm thick). After this, you can apply plaster. At this stage, the unevenness of the wall is eliminated. After the finishing layer has dried, proceed to wallpapering.
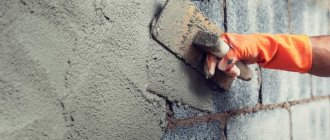
- Brick walls. This surface has more flaws compared to concrete, so leveling will require much more putty. For convenience, the solution is prepared in a basin, stirring it with a drill with a special attachment. If the intended layer is thick, the brickwork is additionally treated with starting putty. Application is carried out in several layers: each subsequent one is applied only when the previous one has dried. The best option is a three-layer structure with the last finishing layer. When the material is completely dry, it is sanded with sandpaper.
Leveling with plaster
Before leveling the walls yourself, it is advisable to find out the prices for this service from professionals. It is quite possible that the cost of plastering work is not so high and there is no point in bothering with it yourself, risking wasting time without achieving the desired result. In addition, specialists have the opportunity to use a mechanical method of applying the plaster composition, which is practically inaccessible to a single master. By the way, machine plastering will cost 30–40% less than manual plastering. Approximate prices for work in Moscow and St. Petersburg. - at the end of the article.
To avoid unpleasant surprises and get the desired result when contacting professional builders, it is important to draw up a contract correctly. It specifies not only the price, but also GOST tolerances when performing wall leveling work. When drawing up a contract, you can rely on the requirements of SNiP 3.04.01-87.
If you decide to edit the walls yourself, then at the first stage you should assess the scale of the work ahead:
- If the unevenness of the wall does not exceed 5 mm, then it is quite possible to get by with just putty.
- Differences of up to 5 cm can be leveled with either gypsum or cement plaster mixture.
- The layer of cement-based plaster can reach 10 cm when using reinforcing mesh.
USEFUL INFORMATION: Plastering walls using special equipment
The use of gypsum-based plaster is also limited by the microclimate of the room: it cannot be used in rooms with high humidity, such as the bathroom, toilet and even the kitchen.
- If the wall is completely crooked, a very large layer of plaster may be required. In this case, a more economical way would be to use a frame structure made of plasterboard.
It is important to choose a high-quality dry mixture for the job from a well-known leader. It has proven itself well in the Russian market. The Rotband gypsum plaster produced by it is ideal for renovation of apartments in terms of price/quality ratio.
How to line bathroom walls under tiles
- Concrete walls. The most effective method of leveling bathroom walls under tiles is using beacons. Using this method, the walls are very strong, since the beacons are not removed from the wall, but support the plaster. Special squares will allow you to create ideal angles. The plaster itself is applied using the “throwing” method. Using this principle, a small section of the wall is applied using a trowel. Areas that extend beyond the beacons are cut off and can be reused to prepare the solution. After the plaster has dried, it is primed and the tiles can be applied.
- Wooden walls. The walls are treated with an antiseptic, after which roofing felt is laid and the frame is mounted, taking into account the curvature of the wall. A metal mesh is installed on the frame, onto which a layer of cement and plaster is applied. Next, lay the tiles in the classical way. An alternative option is to lay tiles on leveled walls using gypsum plasterboard.
- Brick walls. Leveling is carried out using the same technology as for concrete walls, except that a larger amount of starting putty will be required to level the masonry.
Advantages and disadvantages of wall panels for interior wall decoration
Before you start talking about the types of wall panels, it’s worth stopping at a description of their pros and cons. Knowing both of these sides of the material, you can easily understand whether you should choose a panel type of finish, or look for other options
Wall panels have the following advantages:
- ease of installation, it will not be difficult to install the plates on the walls yourself, while saving on the involvement of specialists;
- does not require spending time and money on carefully leveling the walls;
- durability, easy maintenance;
- diversity of species;
- acceptable price;
- with their help, all communications are hidden, which will also improve the decorative appearance of the room.
But the plates also have disadvantages:
- since they are installed using lathing, they take up part of the area;
- some types are easily deformed under mechanical stress.
With their help, all communications are hidden, which will also improve the decorative appearance of the room.
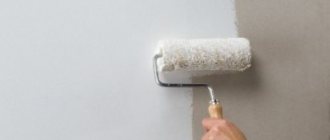
Leveling walls for painting
- Concrete walls. The surface is cleaned of old putty and debris. The first layer of starting solution, 2 mm thick, is applied in a strip. For painting, it is better to use a reinforcing mesh with a mesh size of 2 mm, which is pressed onto the mortar with a spatula. After the material has completely dried, a layer of finishing solution 1-2 mm thick is applied. To achieve maximum effect, the surface is sanded and treated with a primer, after which painting begins.
- How to level walls in a wooden house? To do this, they are cleaned of old paint or varnish. Irregularities are sanded, and small recesses and knots are filled with a special grout. The wood is treated with an antiseptic and, if necessary, covered with stain. Next, proceed to painting or varnishing.
- Brick walls. Depending on the degree of unevenness of the masonry, they are leveled using gypsum board or plaster. In both cases, the surface is carefully primed with a finishing solution - it is ideal for painting, as it has low absorbency.
Installation work
For people who are interested in the practical application of all the tips that we discussed in this material, we offer step-by-step instructions on how to install cement plaster.
Here it looks like this:
First, the surface is cleaned of old finishes and dirt.
- First, we clean the wall of all old coatings. We also remove hoops, stains, and dirt. We repair all serious defects and cracks (they are usually present on the surface). The surface must be impregnated with a primer. It is important to choose a deep penetration primer for the job;
- Next, you need to take a metal mesh (it must be galvanized or coated with polymer paint) and put it on the wall. To do this, use dowels with wide caps. There must be at least 15 fastenings for every meter of area; as a result, the mesh should not sag - that is, there must be a certain tension.
Self-tapping screws are screwed into the wall
- They are screwed into the upper corners of the wall being treated using self-tapping screws, and plumb lines are hung on them. A pair of self-tapping screws are also screwed into the lower corners - it is on them that the place where the plumb line will come into contact with the thread will be marked. Next, in this place you should tie the thread - this is done to the bottom screw. Further, in those places where there are fastenings of vertical threads, tie horizontal ones - they will connect the lower and upper screws (that is, in pairs). It is important to ensure that the distance between the horizontal threads and the wall is at least 150-200 mm;
- Beacons are placed along horizontal threads; the beacons themselves are usually made of metal profiles. They are fixed with alabaster or cement mortar. The step between the beacons is 150 cm, and the distance between the first beacon to the corner and the last is 300 mm;
- Now you need to prepare the solution, throw it on the wall so that you get a continuous layer. For such work, a regular trowel or a special ladle is used. If the layer does not reach the beacons, you need to wait at least six hours and add a second layer. It is leveled with a rule: they simply pass it from bottom to top along the beacons - the main thing is not to do this very quickly. That is, the solution must have time to level out. All excess material is simply removed and thrown into a container with the solution.
At the beginning of work, cement plaster can simply be thrown onto the surface
- Once the base coat has been applied and leveled, wait approximately six hours. Then you can apply the finishing layer - a trowel, grater or spatula will help you here. The work is done in the same way as with putty - the material is simply rubbed into the main surface. If we talk about increasing the thickness, then everything should be done minimally; the main task is to fill all the depressions, pores and irregularities;
- When 100-150 cm of the surface has been covered with finishing, you can start grouting. A grater is used in this work. The damp, clean working surface of the tool is simply pressed against the surface to be finished. Next, you need to perform zigzag and rotational movements. This way you will rub out all scratches, pores, defects, pits, and other irregularities. The edges of the grater will cut off the protrusions, due to this you will get a really smooth, perfectly flat surface. Of course, not immediately, but after a certain time.
When working with smooth surfaces that have poor adhesion, you can apply special notches on them and then spray the walls with a special cement hammer (sand and water in one to one proportions - so that a liquid consistency is obtained).
When working externally, cleaning the base is also required.
Simply dip a broom into the solution, then hit it on a stick - this will cause splashes to fly onto the wall. This is exactly what we need.
Ways to level walls
Leveling walls with plasterboard (dry method)
An effective and inexpensive method for walls with large curvature.
- Leveling walls with plasterboard with a profile frame. For this purpose, a frame is made. It can be made of timber or a metal profile (guide and rack). First, guides are screwed to the ceiling and floor. They should be parallel to each other. Next, guides are installed every 40-60 cm, taking into account the width of the drywall sheet. If necessary, at this stage the walls are insulated with foam plastic or mineral wool. Once the frame is ready, begin screwing the drywall with self-tapping screws. Their cap should be slightly recessed into the leaf.
- Leveling walls with plasterboard without frame. It involves direct gluing of sheets to walls using plasterboard adhesive, and the walls must first be plastered. The disadvantage of this method is that it is impossible to properly level walls with serious defects.
Leveling walls with plaster (wet method)
It is advisable to use if the curvature of the walls is 30-50 mm. If the walls have a large curvature, it is not economically profitable to use plaster to level them. This method allows you to save useful space, but is very labor-intensive.
Leveling walls with Knauf Rotband plaster
Leveling walls with Knauf putties
Is it possible to level walls with tile adhesive?
When starting an apartment renovation on their own, many home craftsmen believe that leveling the walls with tile adhesive is acceptable. But it is impossible to say unequivocally that this is correct, since situations can be different. To clearly understand this process, you need to analyze all the technological characteristics of tile adhesive, and weigh all the positive and negative aspects of plastering the surface with tile adhesive.
Method of leveling walls with plaster
In order for the plaster to adhere well, the walls are cleaned and primed - this will improve moisture resistance and prevent delamination of the material. A laser level for leveling walls allows you to achieve a perfectly flat surface, but leveling walls along beacons gives an equally high-quality result. Special aluminum beacons for leveling walls are mounted into the wall and are used to guide them in the future. So, if the top of the wall is blocked, the beacon is installed below. The gap at the top of the wall is measured using it, which will later be filled with rotband or other filler.
To install beacons, slats are mounted on the ceiling and floor, and the beacons themselves are attached to the slats with building plaster or self-tapping screws. A thread is stretched between the beacons, the verticality of which is controlled using a level. The installation step of the beacons is 50 cm, but it can be varied depending on the size of the tool that will be used to apply the plaster. Next, they begin to apply the solution between the beacons.
A separate question is how to align the corners of the walls. A corner trowel and a level will help with this. This is a painstaking process that requires some experience and skill.
Properties and composition of cement plaster
Plaster cement mixture is a material that belongs to the category of the same products that are used to level walls.
It is not at all difficult to prepare such a composition with your own hands - it requires three components: water, sand, and cement itself.
And now in more detail:
- The function of the binding component in the plaster mixture is performed by Portland cement. The brand of cement for plastering walls is selected depending on the purpose of the material. Namely: for indoor work you can always choose M200-M400 cement, and for facade finishing, it is better to choose M500.
If you are going to plaster any room where there is a high level of humidity, then it is better to choose a brand that is more durable. M400, for example, will do just fine.
- Quarry sand works well as a filler (the main thing is that it is washed). The material of the middle fraction shows excellent results. In addition, “hog sand” is also often used - it is easy to recognize by its characteristic yellow tint. For such purposes, it is better not to use river sand, as well as material that contains silt, clay or dusty impurities;
- The mixture of sand and cement is mixed with water. For this task, use only clean water (purified from silt, dirt, debris, and other mixtures). Simple tap water is suitable, as well as spring water, well water, and industrial water.
Plastering walls with cement will help here.
This simple composition is enough - the solution will be a strong, reliable and durable coating in the future, which will ideally last for decades (perhaps even longer). The main thing is to correctly follow the preparation recipe first, and then the application technique.
You can also plaster walls with cement in facade work - the material is not afraid of frost, and it is also not afraid of moisture. Characterized by exceptionally high wear resistance and strength. It cannot be said that the surface quality will be the highest, but taking into account the fact that the technology is usually used for rough leveling, the result is definitely acceptable - this should not be denied.
Additives to the classic composition
To improve the quality of the future surface and increase adhesion to the base, certain additives are often added to the composition of the classic solution, which we will now talk about:
- Gypsum
- thanks to this material, the hardening time of the solution is reduced and the surface quality is increased. It is used to finish ceilings; it is also used to treat hard-to-reach places, where the speed of setting of the solution is of great importance; - Lime
– helps to increase the quality of the surface and affects the abrasionability of the coating. Thanks to this additive, the weight of the finishing layer is also lighter, which is important. Vapor permeability improves. Lime should be added to the plaster mortar in a slaked state - usually in the form of an aqueous solution or in the form of a dough. We are talking about small quantities - 0.1-0.8 of the total volume of cement; - PVA glue
– increases the ductility, strength and adhesion of the material. The coating will be strong and monolithic. Its characteristics will correspond to polymer cement plaster - this is a very good result; - Liquid soap
- used in cases where it is necessary to increase the plasticity of the solution and increase adhesion to the base. By using liquid soap, you can safely apply thicker layers, since the solution flows less with such an additive and sticks to the base much better. In addition, it should be noted that the surface is smoother and more even; - Factory-produced plasticizers and additives
- depending on the composition, these additives can be used to increase frost resistance, moisture resistance, ductility, strength and other properties of the solution. In addition, among these additives you can easily find antifungal and antiseptic drugs, which also have a beneficial effect on the quality level of the plaster.
The classic plaster cement composition is often supplemented with additives to improve quality
If we talk about the characteristic properties of cement mortars, we can mention their shrinkage. It is much more pronounced compared to lime and gypsum compositions. So, you are unlikely to be able to get a perfectly flat surface without the appropriate finishing coating.
Which plaster is best for leveling walls?
A faster way is to use so-called mechanized plaster, in which the solution is applied to the wall using special equipment. But such technology is not always at hand. It will take longer, but no less efficiently, to level the wall manually with cement or gypsum mortar. The first option is suitable for rooms with high humidity, for example, a bathroom or kitchen. The second option is used in normal microclimate conditions, for example a bedroom. It is important that the prepared solution has a normal consistency - too thick will be difficult to apply, and too thin will slide off. After the material is applied to the wall, it is pressed with a rule against the beacons and leveled to the desired level.
As you can see, you can level the walls yourself - the main thing is to stick to the technology. Although this process is labor-intensive and painstaking, the result will be obvious - you will get perfectly smooth walls that can be covered with any finishing material.
Tools and materials for work
Before you level the walls in your apartment with your own hands, it is important to take care of the appropriate tools and materials. List of materials:
- beacons for leveling walls;
- paint brush;
- dry building mixture: putty for leveling walls, plaster;
- primer;
- container for preparation (bucket, basin);
- mesh for plastering walls (made of metal, plastic or fiberglass).
Tools:
- roller, large and small;
- a set of spatulas of different lengths;
- trowel, rule;
- tape measure, marker, level, plumb line;
- perforator;
- construction mixer;
- graters and other tools for stripping and sanding.
Now everything is ready and you can consider how to properly level the walls with plaster.
Removing the old coating: preparing the wall for tiles
First, of course, the wall must be completely freed from the ceiling to the floor from the old coating. After which the surface is cleared of dust. First of all, you need to carefully examine the walls of the bathroom - where to start, how easy it is to do it. Old tiles must be removed with a chisel. It is pryed off with this tool and removed from the wall, and then you still need to remove the glue or other solution that held the tile in place.
It is recommended to remove the glue/mortar with a spatula, but it does not always help. It happens that the glue is literally firmly ingrained into the wall, and then you need to take out the grinder. But even after using the grinder, go over the wall with a spatula.
But let’s say the walls in the bathroom were simply painted. If this paint is already peeling, take the same spatula, and everything will come off quite easily. But often the paint does not want to come off on its own, then purchase a special composition that removes the old paint. Apply it to the surface with a brush, and after some time the paint itself will begin to come off. And if the paint layer is too thick, you will have to use a hair dryer. Under the influence of hot air, the old paint will definitely soften, and then everything will be cleaned off with a spatula.
Stages of work
After determining the curvature of the surface, you can decide on the necessary material and calculate the approximate costs of its acquisition. In some cases, in order to achieve a good basis for repair work, it is not at all necessary to completely plaster them.
It will be enough to correct some areas of the wall where this is very noticeable. The area behind the furniture may not be treated so thoroughly, although on the other hand, if after a while you decide to rearrange it, all the unevenness will become visible.
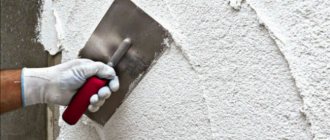
- Prepare all the tools you will need for the job. In order to level the walls with plaster under wallpaper or other finishing material, you will need a spatula for stirring, applying and smoothing the solution, a construction mixer, a plaster falcon;
The plaster falcon significantly facilitates the process of applying plaster. You don’t have to constantly carry a bucket of solution with you or bend down to get it. The object is a shield, in the middle of which there is a handle made of metal or wood. The required amount of material is applied to the falcon and used for its intended purpose.
- Remove old finishes, traces of rust, soot, etc. from the wall. Any defects found must be eliminated mechanically. Some types of stains will require special active compounds. If you decide to level old plastered walls, tap the surface to find out if there are voids;
- Finishes that do not hold well must be removed from the surface in order to then apply a solution to this place;
It is unacceptable to carry out finishing work on a wet surface. If this is, for example, leveling a concrete wall with plaster, all damp spots or spots need to be dried and then treated with a primer. It is precisely due to the fact that the primer penetrates well into the surface that it significantly improves the adhesion of the plaster to the wall.
- During the preparation process, cover the floors with paper or cardboard to avoid unnecessary cleaning in the future;
- Take the spatula in your right hand and the falcon in your left. Fill the device with the required amount of mortar, throw it on the wall and begin leveling. You can spread the solution directly from the falcon, placing its contents against the wall and moving from bottom to top.
If you do not have experience, it will be difficult to get a smooth surface the first time, since a good result also requires accuracy and perseverance. You can use the already mentioned beacons, and the slats that will be fixed with mortar will serve as a guide.
Plastering occurs according to the following scheme: distribute the solution with a trowel and apply the rule from bottom to top. So much solution must be added so that the layer reaches the level of those very beacons. At the end of the process, the slats are removed, and a solution is applied to the resulting space.
The resulting corners at the junction of walls or ceilings with walls must be made exemplary straight. Alignment must occur both level and plane. If you are preparing an area for wallpaper, then it is better to improve the corners according to the level. Other types of finishes allow flat alignment.
If the material used to level the corners is a gypsum mixture, the beacon is installed in the corner, and the corner is tightened according to the rule. The width of which will determine the transition from the wall to the corner. And it will be less noticeable the longer the rule is. It is recommended to work with starting gypsum putty, as it will not sag.
It will be possible to make internal corners more perfect using reinforcing tape.
- Wet the spatula with water and apply the material to the corner on both sides. The surface must be evenly covered with the material, and the applied layer must be of sufficient thickness. The area that will be captured as a result of the work will be about 50 mm;
- Wet the tape well and fold it into 2 halves. Place it on the corner and press firmly, pressing it into the putty. Then level it, straighten it;
- Now wet the spatula again and move it along the corner, bringing the tool itself closer to the bend. It is necessary to apply so much force so that the solution appears from under the tape;
- Irregularities are removed with a dry spatula, but sandpaper cannot be used;
- Apply putty until the area is level;
- The last layer should be applied with a fairly wide angled spatula.
For those who are looking for information on how to properly level walls with plaster under wallpaper, we recommend that you pay attention to leveling the wall with plasterboard, which is fixed to a special frame. This material is much easier to work with than dry mixes. In addition, you will not rack your brains over how to line the plastered walls with wallpaper.
The same applies to those who do not know how to level plastered walls in a wooden house. It is drywall that again becomes indispensable when carrying out repair work in a wooden house.
Leveling a wall in a wooden house with plaster is also acceptable. In the case of new buildings, you will need to wait 1.5 years for the house to shrink.
Before leveling the walls in a wooden house with plaster, you will need to carry out all the same preparatory work as for other surfaces, then apply three layers of plaster.
Waterproofing: preparing walls for tiles in the bathroom
Then you engage in additional protective measures. That is, waterproofing. Usually, a special hydrofilm is used for these purposes, but liquid formulations can also be used. This will help the tile lay better. It is believed that liquid waterproofing is more suitable for walls, and film for floors.
But you can do it differently: you simply add a waterproofing compound or PVA glue to the main tile adhesive. These measures will not change the structure of the glue, but what will be the effect? But add carefully so that the consistency of the glue remains the same.
Preparing the base
To perform plastering efficiently, the following preparatory work is carried out:
- Elements of the previous finishing are removed from the base plane: wallpaper, poorly fixed areas of old plaster, knocking down protrusions.
- De-energize and then disassemble the sockets. The wires are hidden in grooves or enclosed in cable channels.
- All elements used to fasten suspended structures are removed from the wall: nails, screws, hooks.
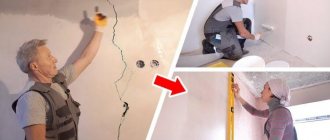
- Deep cracks are widened using a chisel, filled with cement mortar, and then sealed with putty.
- The entire surface of the wall is cleaned of dirt and dust.
Primer: treating bathroom walls before laying tiles
Separately, I would like to say about the choice of primer. If the main goal you want to achieve with a primer is good adhesion of the tile to the surface, then contact concrete is suitable. It can be used even when there is still paint on the wall, but the wall is durable.
And if you need to fix a surface that is not the most durable, you need an impregnation primer. In this case, there may be 2-3 primer layers. Well, the thickness of the layer depends on what the walls are covered with.
So, the calculation will be as follows:
- For cement mortar, layer – 5 mm;
- For lime and gypsum, layer – 7 mm;
- Well, the final thickness of the soil should not exceed 17 mm.
And remember the golden rule of repair - only after the previous layer has completely dried can the next one be applied. Otherwise, all the work may go down the drain.
It happens that the adhesive solution just doesn’t want to come off - and this is the most difficult part of this repair. If you do not accept drastic measures such as an angle grinder, you can persistently moisten the walls for several hours after cleaning the seams. Then the solution softens, and when you drive a chisel under it, the tile will most likely be removed along with the solution.
Technological sequence of repair work
Any unevenness and roughness of surfaces cannot be ignored. They immediately catch the eye and significantly worsen the design of the room. Therefore, the walls of the apartment must be perfectly smooth. Only in this case will the paint adhere well to them or the wallpaper will stick securely.
There is a generally accepted algorithm for apartment renovation:
- leveling the floor in the room;
- marking and preparing the wall surface;
- installation of internal communications: electrical wires with switching devices (sockets, switches, distribution boxes), water and heating pipes, ventilation ducts and other building systems;
- plastering door and window openings;
- direct alignment of walls.
Depending on the specific state of the surface, one of two methods can be chosen:
- plaster - leveling the surface using adhesive mortars;
- plasterboard coating - installation of gypsum plasterboard sheets on the walls to ensure a uniform wall plane.
They differ in the materials used, cost and time spent on repairs.
To choose any of these construction methods, you will need to clearly decide on two questions:
- how much the real wall is deviated from the ideal vertical plane:
- how to ensure electrical safety during repair work.
Recommendations for using construction tools to determine the position of a vertical surface are set out in the article “How to draw a vertical line.” We recommend you read it.
Electric current, and even ordinary household tools, carry risks of various injuries. It is necessary to ensure safety when using it. This requirement becomes especially relevant when working in rooms with electrical equipment and live wiring. It's best to turn it off.
Why level the walls in a room before gluing tiles: is it necessary?
It is possible to avoid preliminary leveling only if the unevenness on the base does not exceed 1 cm.
Preparation before applying decorative tiles not only prevents visual errors, if detected, the work will need to be repeated, but also contributes to better adhesion to the surface.
High-quality and responsible preparation of the area for tiles or tiles will become the basis before creating repairs at a professional level.
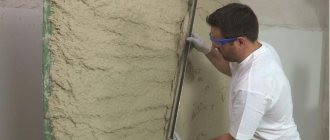
Applying plaster mortar to the wall
For plastering today, ready-made mixtures are sold packaged in packages of various sizes. They must be diluted and used following the instructions from the manufacturer. Such ready-made mixtures are very easy to use, flexible, and durable.
Tools for work are a spatula, trowel, rule . First, the wall must be moistened, then the prepared plaster solution must be applied with a trowel and spatula. The layer of which should protrude 2 cm above the level of the beacons.
The solution is leveled using a rule, resting it against the beacons, evenly, with movements from bottom to top. In places where a thick layer needs to be applied, first apply the first plaster coating and allow time to dry. Then apply a second layer on it, which is leveled along the beacons. If you used wooden profiles instead of metal ones, then after the solution dries, they are removed, and the recesses are sealed with the solution and leveled.
How to level walls after old tiles with your own hands
Before removing the old cladding, clean the seams between it well, moisten them generously with water and leave for 2 hours.
Dismantling of old material should be carried out:
- indoors;
- having previously removed all interior items, plumbing fixtures and furniture from it;
- turn off the power using a portable lighting device;
- cut off the water supply;
- cover the floor with film or perforated cardboard;
- During work, a mask or respirator is used to protect the respiratory tract from dust.
Plastering process
Having taken the necessary tool, perform the plastering operations step by step:
- The mixture is diluted in a container, following the manufacturer’s recommendations. For mixing, use a construction mixer or a drill with a special attachment.
Plaster, especially gypsum, hardens quite quickly. Therefore, you should not mix a large volume at once: it is difficult to work with a thickened solution, and some of it may simply disappear.
- Using a spatula or trowel, spread the plaster between two beacons so that it protrudes slightly above their surface.
USEFUL INFORMATION: How to make a bas-relief on the wall with your own hands: master class
- The most important and time-consuming stage: the rule is to level the plaster from the bottom up, pressing it tightly with your hands to the beacons. At the same time, smooth turns of the tool are made to the right and left, evenly distributing the mixture throughout the entire filled volume.
- If there are small depressions left on the surface, carefully add the solution to them and smooth them out with a spatula.
- So, step by step, all the niches between the beacons are filled with plaster.
- After allowing the solution to set, remove the profiles or slats that serve as beacons. Then the holes from them are leveled and smoothed with a grater.
Some craftsmen prefer to leave beacons in the wall, covering them with a thin layer of mixture on top.
All stages of applying plaster are shown in detail in the training video.
A complete step-by-step guide can be found here.
How to properly level walls in a new building
Typical new buildings mostly have smooth walls - either painted or concrete, without finishing materials and without any special flaws.
In any case, before cosmetic repairs, you should check the walls for unevenness and, if any, level them.
Tile adhesive can serve as a leveling method if the unevenness does not exceed 0.7 - 1 cm in size.
Leveling with tile adhesive is used on almost any surface.
The best way to level: a tool for leveling under tiles
Tools are prepared in advance and selected in accordance with the specific work performed. When plastering, you will need more tools.
Tools used:
- solution container;
- long rule from 1 m long and short;
- wide and narrow spatula;
- building level;
- beacons for marking;
- measuring tape;
- brush for working with primer;
- chisel and hammer;
- chisel when working with a concrete surface;
- grater with the option of using sandpaper;
- construction mixer.
Depending on the leveling method, you should consult with a hardware store salesperson and take advice from professionals when purchasing tools for a more accurate selection.
How to choose a starting mixture for leveling
If the unevenness exceeds 1 cm, it is necessary to plaster the prepared area.
When processing the base manually, before applying the tile adhesive, it is enough to level the layer of plaster with a spatula, without achieving perfect smoothness, since the adhesive compensates for roughness.
In this case, the difference between the absorbent mixture is the uneven setting of the layer, and therefore a deep penetration primer is used before laying the facing material.
Pre-treatment of the surface with the mixture helps:
- uniform distribution of tile adhesive and its savings;
- absence of shrinkage of tile adhesive when applying its minimum layer;
- with the exception of shifting of the pasted decor after drying.
Preparing the coating before applying the cladding contributes to its high-quality installation, preventing visual defects in the finished form.
What plaster to plaster uneven walls with a large gap
If a gap of more than 6 cm is detected, the surface of the base will need to be leveled by plastering.
It is necessary to determine the problem area and its size.
The mixture composition is selected:
- in accordance with the material of which the wall is made;
- taking into account the properties of high moisture resistance, as well as resistance to temperature fluctuations.
The best option is a cement-sand mortar.
A cement mixture with the addition of sand is suitable for application to both brick and concrete walls. In addition, such a plaster mixture is inexpensive, helping to save your budget.
However, cement-sand mortar is a rough layer, suitable for areas with complex defects and will require additional materials to be applied over it.
What mixture should I use to level the tiles in the toilet?
Work on leveling the surface in the toilet room is carried out using special sheets of plasterboard that are resistant to moisture.
Work with plasterboard sheets:
- fixing drywall using a metal profile;
- processing the seams between the sheets using foam and putty.
It should be remembered that when repairing using plasterboard sheets, the room will decrease in size.
Toilet treatment by plastering is carried out in a standard way using building mixtures that are resistant to high humidity.
How to strengthen plaster
To work you will need:
Instructions for strengthening cracked, peeling or crumbling plaster:
- To avoid such defects, the plastered surface must be strengthened with a primer. Such a coating is an important condition for performing finishing and repair work of good quality. It is used to finish the surface of walls and ceilings before applying paint, wallpapering and tiling. A primer is a mixture of a solvent, a binder component and various additives that determine its properties. The dried material creates an opaque film of one thickness, increasing the adhesion or adhesion of subsequent layers of coating.
- According to their purpose, primers are divided into:
- metal surfaces;
- wooden surfaces;
- universal, having an acrylic base. Acrylics are used for concrete, cement and gypsum plaster, wood and fiberglass wallpaper. Such compositions dry quickly and do not have a pungent odor.
- The impregnating composition is applied with a roller, in one layer or with a wide paint brush.
- When finishing rooms with high humidity: bathrooms, showers, special compounds are used, they create a layer of waterproofing. For example, Aura Primer is suitable for dry rooms and high humidity. The mixture is diluted with water immediately before use in a ratio of 1:4. The degree of dilution can be reduced to 1:6, this will increase protection against moisture.
- Cheaper strengthening of plaster can be done with wallpaper glue. This method is often used before wallpapering. With high-quality glue, the adhesion is strong, and the wallpaper and putty will not come off. But this option does not apply to heavy vinyl wallpaper.
- An unjustified savings is the use of PVA glue for primer, especially in rooms with high humidity. The adhesive contains dry components; they are capable of absorbing moisture, which after painting can contribute to the appearance of matte spots due to uneven paint absorption.
How plaster is strengthened with impregnations
Today, manufacturers produce high-quality “strengthening” impregnations in plastic containers. Before use, the liquid is poured into a convenient container, then applied to the plaster with brushes or rollers.
Some types of compounds penetrate more than a meter into plaster and concrete. At the same time, they close the pores at the chemical level, transform the material, and bind even microscopic particles together.
After strengthening the plaster with impregnations, cracks will not form and the coating will no longer crumble. Using this method with your own hands to strengthen the surface is quite simple.
When can follow-up work be carried out?
After applying a layer of plaster mortar, it should be allowed to dry for at least 2 days, depending on the temperature in the bathroom.
The room temperature should not fall below +5 and rise above +25 degrees.
Then, after cleaning, the treated areas are primed again. The drying time of the primer is from 2 to 24 hours, depending on its type, selected for the last layer.
After the primer has dried, the wall is ready to apply decorative tiles.
Carefully following the stages of preparing and leveling the walls for applying decorative tiles will ensure long service life for several years.
What are the reasons for plaster crumbling?
Plaster can crumble due to high humidity in the room if the technology was violated during its application or a low-quality solution was used. To ensure that the plaster holds firmly, it is better to entrust the work to an experienced craftsman.
If the walls of a home are plastered with old cement-sand mortar (see Let's look at how to plaster with cement-sand mortar), which begins to crumble at the touch of a spatula, or you are not sure whether it is possible to putty on the old coating without damaging the mortar, the plaster should be:
- Strengthen. This method is used if the coating is just crumbling. In this case, before starting puttying, it is enough to apply a deep penetration primer to the old plaster or treat the wall surface with concrete contact, which should fix the surface well in cases where the primer cannot cope with this.
- Use a more radical method - completely remove the coating . This method is used if the plaster is crumbling. This usually occurs due to non-compliance with the technology when applying it or due to incorrect temperature conditions, when the room temperature is very low.
Installing drywall using the frame method
It is advisable to install the lathing in case of significant curvature of the walls, and also if it is planned, along with leveling, to insulate the room or increase its sound insulation. Wires are hidden in the space under the plasterboard surface, enclosing them in fireproof corrugations or cable ducts.
The leveling technology is as follows:
- Minimal surface preparation is carried out: wallpaper and poorly adhering parts of the old coating are removed.
- A line is drawn on the ceiling indicating the outer edge of the future wall surface.
- Using a plumb line, it is transferred to the floor.
- The locations of vertical posts and attachment points for direct hangers, which serve to adjust their position, are marked on the surfaces. The racks are placed in increments of 60 cm: this way, each sheet of drywall will be fixed on three racks - two are located at the edges, and the third is in the middle. The suspension mounting step is 60 cm.
The frame is designed so that the joints of the plasterboard sheets are located on the surface of the profile.
- Damper tape is glued to the guides, after which they are attached to the ceiling and floor with dowel nails in increments of 30–40 cm.
- Holes are drilled in the wall and hangers are attached with dowels.
- Vertical racks are installed. They are cut 1–2 cm less than the distance between the floor and ceiling, inserted into the guides and fixed with metal screws. Some craftsmen prefer to use a cutter for this purpose.
- Controlling the position of each rack with a level, it is secured to straight hangers with self-tapping screws. The protruding parts of the suspensions are bent to the sides.
- If necessary, horizontal jumpers are installed. They are required in places of horizontal joints of sheathing elements. In addition, jumpers will add rigidity to the frame.
USEFUL INFORMATION: General principles for preparing mortar for plastering walls
- GCR is cut into pieces of the desired shape and size. Holes for sockets and switches are drilled, and chamfers are made at the joints with a plane at an angle of 45˚.
- The drywall elements are screwed to the frame with self-tapping screws in increments of 25–30 cm. The heads of the screws are slightly recessed into the material.
For this operation, a special screwdriver bit designed for fastening drywall will be very useful. It will prevent you from turning the screw too deeply and denting the surface of the gypsum board.
Detailed instructions for assembling the frame, installing gypsum boards and pre-finishing are in this article.
Leveling walls using drywall
Plasterboard sheets are ideal for creating a flat surface. To do this, you just need to assemble the frame correctly. This is done using UD and CD profiles and special U-shaped brackets (the frame is installed on them).
First you need to set and attach UD profiles to the walls, floor and ceiling. This creates a frame. Fastening is done using dowels and screws. The frame is set strictly according to the level with mandatory control of right angles in three dimensions. If the room area is small, a frame is enough to securely fasten the drywall.
Next, after installing the UD profiles, the wall is marked for installation of U-shaped brackets. The markings are parallel lines with a pitch of 30 cm. Holes are made along these lines and brackets are attached. The calculation is made in such a way that there are 4 CD profiles per sheet of drywall. In this case, each last element must be the starting element for the next sheet. Drywall is attached to the profiles with small self-tapping screws, and they, in turn, are attached to the brackets with special small self-tapping screws - “fleas”.