What is cement-sand screed made of?
The main components of the mixture, as is clear from its name, are cement and sand. Cement provides the screed with strength and hardness, sand acts as a filler, reducing both cement consumption and the stresses that arise in the layer during hardening.
Online articles often recommend a cement to sand ratio of 1:3. In this case, the proportion is not justified in any way and is not consistent with the purpose of the screed. However, is it worth spending cement on a mixture that can support a truck if no one heavier than a person will walk on it?
From Table 1 it can be seen that a 1:3 ratio with PC 400 cement gives a mortar of grade 150. This means that a product made from this mortar can withstand a compression of 150 kg/cm2.
Is it a lot or a little? Judge for yourself:
For a person weighing 80 kg, there is approximately 0.16 kg per centimeter of shoe sole area. This means that in order to crush a grade 150 screed, he needs to “get better” by increasing his weight... 940 times!
Based on the design strength and purpose of the screed, in most cases a solution of M75 and even M50 is sufficient, respectively, the ratio of cement to sand is 1:8.
But here another problem emerges. The solution at this ratio turns out to be very hard. It’s not easy to make an even, smooth layer with it, and where a thin layer of 4-6 millimeters is needed, it’s generally unrealistic.
To get out of this situation, we add a special additive to the composition - a plasticizer. For home repairs, cheap CMC glue is suitable. A more expensive option - PVA emulsion will not only increase plasticity, but also make the mixture less brittle. This is useful for screeds that are laid over a layer of insulation, a reflective screen and other relatively “soft” layers.
You can also use regular washing powder as a plasticizer. True, in this case the screed will lose strength, so the amount of cement should be increased by about 3-5%.
I recommend: How to install a sink in a window sill, the window sill refrigerator has been removed
In practice, exactly how much plasticizer to add can be determined experimentally. First, use a small amount of the mixture.
The minimum amount is 3-5% for dry additives and 6-8% for liquid additives, counting the percentage of the weight of water in the solution.
All of the above applies to leveling screeds laid on a rigid base - rough concrete preparation, concrete slabs. But as for screeds laid over a layer of bulk or slab insulation, SNiP clearly require the use of a grade not lower than M200. Why? We'll talk about this a little later in the section on laying screeds on soft foundations.
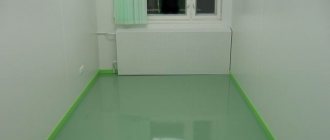
Features of the material and its advantages
Before laying the final covering on the floor, it is necessary to make a cement-sand floor screed. It can be used in both residential and non-residential buildings.
In addition, in the latter, the screed may not be covered with finishing materials. For example, if such a floor is made in warehouses or in a garage.
The leveled base will be a good base for any floor covering or installation of heated floors
To do this, you will need to level the surface as much as possible, and for maximum strength, the screed must be additionally reinforced. It follows that such a screed is necessary for the following purposes:
- Improve the thermal insulation properties of the building.
- Level the surface.
- Strengthen the base of the floor.
- Mask communications.
- Give the required level of inclination.
- Reduce the height of the building.
The big advantage of the screed is that it allows you to retain heat and not let it out of the room. Leveling the floor and strengthening it are the main parameters when using this technology. Sand and cement can be laid not only on ready-made concrete or slabs. It can also be poured onto a special pillow, which is made of crushed stone and sand, directly onto the ground.
An important advantage of such a screed is its indifference to water. The dry type is performed much faster, cleaner and with less load on the floor, but such a pillow will suffer from moisture, especially when a puddle of water forms.
In general, we can say that a screed made of cement and sand will last as long as the building itself will stand.
For household needs, use M200 cement.
To mix a cement-sand screed solution, you will need to use sand and cement. The proportions directly depend on the brand of cement used, as well as on the final strength of the floor.
In a room where people will live, a screed marked 200 will be an ideal option. After gaining strength, such a solution can withstand approximately 200 kg of mass per 1 square meter. cm.
Marking the base for the screed using non-removable beacons
The quality requirements for the leveling screed are, as a rule, dictated by the subsequent layer, or its absence. So, the screed on the insulation in the attic can be aligned by eye; there is no need for special precision.
As for leveling ties, the requirements are much stricter. The clearance under a two-meter lath placed on a screed anywhere in the room should not exceed 4 mm. And the deviation from the design plane should not be more than 0.2% of the maximum size of the filled area.
Deviation from the plane does not always mean deviation from the horizontal. Often the screed is made with a slope, for example when → installing a soft roof.
Let's look at how to achieve this quality using beacons made of galvanized profiles. Unlike reusable ones or, as they also say, “inventory” ones, they are not removed after the screed has hardened, remaining in its body, which makes the work more technologically advanced.
In cross-section, the non-removable beacon looks like an inverted letter “T”. Along its “leg”, when leveling the mixture, a plaster “rule” - a flat strip of aluminum - slides like a rail.
To get perfect floors in a room, we have to install rows of lighthouse strips over its entire area. In this case, the main thing is that the upper edges of all beacons, without exception, lie in the same plane.
Doing this is not as difficult as it might seem. We will need a hammer drill with a 6 mm drill, a laser level with a function for constructing planes (now almost any laser level has it), a regular Phillips screwdriver, a marking cord, a tape measure and, of course, beacons. Typically, a profile with a height of 10-12 mm is used for floors.
For fastenings we will purchase plastic plugs - dowels, screws and special fastening washers. You can make them yourself from ordinary tin, or purchase ready-made ones. Such a washer is a small strip of tin, on the side of which there is a slot or hole slightly more than 4 mm wide to fit the washer onto the self-tapping screw.
I recommend: How to install electrical and communications in an old screed
Let's call someone to help, hold the end of the marking cord. With its help, we will mark the lines along which the beacons will be located. These lines should be approximately parallel (accuracy “by eye” is sufficient), and at a distance of no more than 2/3 of the length of the rule we will work with.
Exactly along the marked lines, every 30-40 cm we drill holes into which we insert dowels.
We install the laser level in such a way that the rays form a plane above the floor surface lying at the height of the future screed minus the beacon’s own height.
Now screw in the screws until the head of each of them is in the light plane of the level. The red laser light on the cap will let you know about this. If the height of the screed is lower than the plane of the laser beam, then we use a ruler or tape measure, measuring the same distances from the laser plane to the screw head.
All that remains is to place the beacons on the screw heads and secure them with washers (Fig. 1).
Floor level markings
The floor screed is set up with your own hands, starting with determining the location and number of beacons on the floor along which the cement-sand mortar will be leveled. I recommend choosing a distance between beacons of 1-1.5 m, but no more. Of course, the greater the distance between the beacons, the less labor intensive their installation, especially over a large area. But in practice, with a large distance between the beacons of the order of 2 m, there is a greater chance of making a mistake and making a screed with significant curvature.
The figure shows a practical example of the location of beacons for a room measuring 2.8x3.7 m. As you can see, to install the floor in the room, three beacons are used with a distance between them of 1.2 m. In this case, the beacons should be located at a certain distance from the walls, approximately 20 -30 cm. Next, the floor level is marked. That is, marking the perimeter of the wall along which the beacons will be installed. This can be done as follows: choose an arbitrary corner in the room and secure a nail or draw lines at the level where the floor screed will end. When choosing the height of the screed, take into account the thickness of the coating that will be on it, for example: - for ceramic tiles it is 15 mm; — for laminate 10 mm; - for linoleum 5 mm. Next, using a building level, marks are made along the entire perimeter of the wall in those places where the beacons will be located.
It is convenient to mount beacons on alabaster mortar. Unlike cement-sand mortar, which must harden for at least a day, alabaster mortar without additives of retarders hardens in 10-15 minutes. However, given the fast setting time of alabaster without retarders, it is advisable to knead in small portions of 100-200 grams. Typically, installing beacons takes considerable time.
The place on the base where the alabaster solution of creamy consistency is applied is first cleaned of dust and moistened with water. If you need to make a thick layer of screed (as in the photo) and reduce the consumption of alabaster, you can place any stone of suitable size on the alabaster mortar.
The distance between the beacon attachment points approximately corresponds to the distance between the beacons. More frequent fastening is not necessary, since the beacons are fastened well enough so as not to move when laying the mortar. However, it is advisable to additionally place various stones, for example, broken bricks, under lighthouses where there are large spans, so that the lighthouse bends less under pressure from above.
Installation of beacons on the solution
Another way to install beacons is to install them on a cement-sand mortar. The method is suitable in any case; which one to use is up to you to decide in each specific situation. Everything is almost identical to installation with self-tapping screws, but instead of self-tapping screws there are cakes made of cement-sand mortar with a non-liquid consistency, or continuous strips of the same mortar. If the installation is carried out on flat cakes, then after the mortar has dried, before laying the screed, you need to fill the voids along the entire length of the beacons, securing the beacon to the base of the mortar. Beacons are set either using a laser level, using a regular ruler, or as a rule, at least 2 m long with a level.
How to make a high-quality subfloor: choosing systems and technologies
Screed is an integral part of the floor structure, a leveling layer for the floor covering. The durability and performance characteristics of PVC and carpets, tiles, parquet, laminate, polymer floors and other materials used for finishing largely depend on the quality and reliability of the screed.
In this part of the training course we will talk about how to make a screed and avoid mistakes in its manufacture.
We will answer the following questions:
- How to make a screed without cracks and delaminations.
- What materials and additives should be used in the manufacture of screeds.
- How to properly care for freshly laid screed.
Nuances and features of screed manufacturing
When preparing the base for laying flooring, various technologies can be used. If significant mechanical loads are expected in the room (for example, in production), then, as a rule, the base plate is the surface for laying the finishing coating. If the loads are insignificant (floor in a living room), or the quality of the surface does not meet the necessary requirements, additional leveling is performed. Those. - a screed is made.
Peter SmirnovProduct Engineer at SIKA
The availability of modern materials and technologies allows us to improve the quality of work, increase the speed of installation and, ultimately, by reducing the cost, produce a structure with the best characteristics.
One of the main requirements for a screed is the evenness of its surface. Modern floor coverings - ceramic tiles, laminate, engineered wood, linoleum - will last a long time and look great only when they are laid on a surface with the correct geometry. Potholes, cracks, and significant elevation changes will lead to a decrease in the performance characteristics of the finishing coating, which will subsequently lead to the need for expensive repairs.
In accordance with SNiP 3.04.01-87 “Insulating and finishing coatings”, the clearance (in no more than two places) between the control two-meter strip and the surface of the screed for laying linoleum, tiles, parquet, laminate, polymer self-leveling floors should not exceed 2 mm.
When making a screed, every stage is important, from choosing the material to following the installation technology.
The main causes of cracks in screeds and how to eliminate them
Peter Smirnov
Practice shows that often problems when installing a cement-sand screed (the so-called “wet type”) arise due to an excess of mixing water, which is added to the solution to give it greater mobility and to increase its life time during the laying process.
As a result of a violation of the water-cement mixture ratio (W/C), the screed has low strength, the likelihood of cracking increases, the screed takes a long time to gain strength and dry out. As a result, the timing of finishing work increases, and due to possible subsequent repairs of the screed, the construction estimate is exceeded.
This can be avoided by adding special additives to the solution that increase the mobility of the mixture, increase the time of working with the solution, reduce the likelihood of cracking and significantly reduce the time for the initial strength gain and drying of the screed.
In addition, special additives make it possible to extend the construction season and make a high-quality screed in conditions of low temperatures or in the absence of heating at the site.
With the introduction of such additives, the amount of mixing water required to start the chemical reaction process in the cement-sand mixture (hydration) is significantly reduced.
The use of such additives requires strict adherence to the manufacturer's recommendations.
The required thickness of the screed layer and methods of its reinforcement
There is an opinion among builders that reinforcing screeds does not require highly qualified workers, and the work can be done simply by placing a metal mesh on the base. This approach is wrong and dangerous. Cracks in the screed can form even when reinforcing mesh is used.
The screed reinforcement technology depends on its thickness and further operating conditions.
Peter Smirnov
Reinforcement of the screed is carried out when its thickness is not less than 40-50 mm. The protective layer between the surface and the mesh must be at least 20 mm. Accordingly, taking into account the thickness of the mesh and the thickness of the protective layer on both sides, errors when laying the mesh, it is advisable to reinforce the screed with metal mesh with a thickness of 50 mm or more.
The key condition for the operation of reinforcement in a screed is the location of the mesh. The mesh should be located in the thickness of the structure, and not just lie on the base. To ensure the required distance, the mesh is placed on special supports, for example, made of mortar or plastic. When installing a water heated floor system, the thickness of the screed should be 45 mm greater than the diameter of the pipes.
For screed thicknesses up to 40 mm and for more reliable volumetric reinforcement, it is better to use reinforcing fiber, which is added to the dry mixture.
When making bases from cement-sand mortars of small thickness - 20-40 mm, it is necessary to ensure that they work together with the base. Simply put, you need to glue the screed. For such purposes, a mixture of cement and sand is used in a 1:1 ratio with the addition of a special latex-based additive.
Apply an adhesive solution to the wetted surface of the base and immediately lay the leveling screed. This method is called “wet on wet”.
Before pouring the screed, the base surface must be cleaned of construction debris, dusted and, if there are cracks, repaired with cement-sand mortar or epoxy resin if structural repairs (gluing) are required.
If the screed is poured over waterproofing or over a separating layer of polyethylene film, then the rolled material must be wrapped around the entire perimeter of the room on the walls.
Primer and adhesion layers
Often, ready-made building mixtures are used to prepare the base. All necessary special additives have already been added to the composition of such materials, and the amount of mixing water has been strictly calculated. But such mixtures with a small thickness of the poured layer must be laid over an adhesive layer.
Peter Smirnov
When making screeds, it is difficult to achieve a surface evenness that would satisfy the requirements for the finishing coating. To obtain a high-quality surface, ready-made self-leveling mixtures are used.
Such mixtures can be used not only for final leveling, but, at the same time, to create a thin-layer leveling screed with the required surface quality.
Such mixtures must be applied to a sanded, dust-free and primed surface. The primer layer is necessary to improve adhesion to the base, as well as to reduce the absorption of the base. The solution spreads well and does not dry out even before it gains strength. Special care for such bases is not required. But on the first day there should be no drafts, direct sunlight or excessive heating of the room.
Screed care
When making concrete and cement-sand screeds, regardless of whether special additives were used in their production or not, it is necessary to ensure proper care of the freshly laid screed.
To preserve moisture and prevent its rapid evaporation from the surface, the screed must be covered with plastic film or special water-dispersion solutions must be applied to the surface, which during the drying process form a film that retains moisture.
As a result, the process of strengthening and shrinkage of the base occurs evenly throughout the entire thickness, without causing significant internal stresses and, as a result, cracks do not form in the screed. Before laying topcoats, the resulting surface should always be sanded and thoroughly vacuumed to remove dust.
By following these recommendations, you can get a high-quality and reliable screed without cracks or peeling from the base.
Preparing the base for cement-sand screed
After drilling the holes, a lot of dust and crumbs remain, which deteriorate the quality of the screed. To remove this debris, sweep the room with a damp broom. It would be even better to use an industrial vacuum cleaner.
Laying the screed is a “wet” process, which means that if there is a risk of flooding the neighbors below, or getting the insulation wet, waterproofing is required. It is made continuous, or in places of possible leakage (joints of floor slabs, seams in places where the floor meets the walls).
We make waterproofing from ordinary translucent polyethylene film 100-150 microns thick with an overlap of strips of at least 15 cm. We glue the joints with tape.
We place the edges of the film on the walls, 10-12 cm. This will prevent water from penetrating into the cracks between the walls and the floor, and at the same time protect the walls from splashes when laying the mixture.
We will tighten the screws and install the beacons after installing the waterproofing.
Cement-sand screed on a soft base
As we have already said, one of the tasks for which a screed is used is protection against damage to a less durable material. Such material can be insulation, a sound insulation layer, a heated floor system, etc.
I recommend: Is it possible to putty concrete walls with gypsum mounting adhesive?
In all such cases, the screed needs to be especially strong, since, in accordance with the formulas of the strength of materials, it will experience not only compressive, but also bending loads. In this case, as we have already written, we take a solution from M200 or more. Layer thickness is at least 30 mm.
Additionally, we strengthen the screed with reinforcement. There are two ways to do this. Moreover, use these methods together or separately:
1) We reinforce the screed by laying a mesh of 1.5-2 mm wire or fiberglass over the insulation.
2) Add polypropylene fiber at the rate of 1 kg per cubic meter of screed mixture.
Damper tape: why and when you need it
Damper tape is a strip of polyethylene foam 6-8 mm thick. It serves to compensate for the temperature expansion of the screed laid according to a “floating” pattern, when the screed does not have a rigid adhesion to the base.
The tape is laid in places where the screed adjoins the fixed elements of the room (walls, columns, ramps, etc.), as well as on expansion joints.
The absence of a damper tape can cause deformation of the coating when installing a heated floor, at expansion joints.
In other cases, of course, it will not be superfluous, but its absence will not cause problems. And if the screed is laid as a leveling layer on a solid base (without a continuous separating layer), the use of a damper tape is generally a waste of money.
Advice
! For home repairs, expensive polyethylene tape can easily be replaced by ordinary polystyrene foam, cut into strips 8 mm thick.