Creating a relief surface
The first roller was invented in 1940. It was originally used for painting walls and other structures. Later, the tool began to be combined with stamps used in the office, printing house and kitchen. This made it possible to create patterns of any complexity on the plaster.
The tool consists of the following elements:
- handle – represented by a plastic handle and rod;
- cylindrical base - has a through hole in the center and is put on the rod;
- surface jacket - made of different materials and fixed to a cylindrical base.
The design is collapsible, which allows you to replace damaged elements.
Types and characteristics
The roller for textured plaster is divided according to the following parameters:
- what material is the surface jacket made of;
- geometric dimensions;
- design features of the handle;
- pattern type.
By size, textured rollers are divided into the following types:
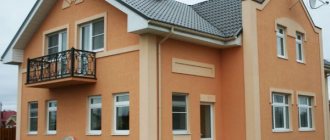
- Long. The length of the working surface is 50 cm or more. Used for facade treatment. Professionals can work with them. The main disadvantage is that the shirt absorbs a lot of paint and plaster, which is why it has a lot of weight.
- Average. Base length – 30-50 cm. Used for wall finishing by professionals.
- Short. The length of the roller is no more than 30 cm. It is used for processing difficult corners, protrusions on the wall and hard-to-reach places. They are used to process structures of a small area.
The diameter of the base of the relief roller for plaster is 15-80 cm. The length of the handle does not exceed 50 cm. If the work is done from the ground, extensions and telescopic handles are used, allowing you to process structures at height.
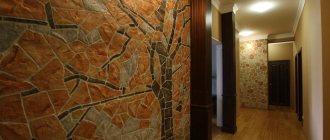
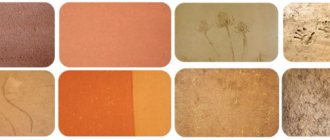
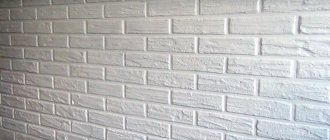
Types of coatings with imitation brickwork
There are 2 ways to imitate brick using decorative plaster:
- gypsum tiles;
- drawing an image.
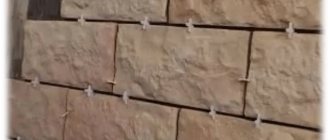
How to make gypsum tiles?
Gypsum brick tiles can be created at home or purchased ready-made. This method of masonry is distinguished by increased noise absorption, vapor permeability, and low thermal conductivity. More suitable for interior work. The service life is from 10 years, it is easy to update and dismantle. Features of gypsum masonry:
- It is more economical to make it yourself by pouring the solution into a silicone mold with 20–30 cells, which can be purchased at the store.
- You can create the formwork yourself from plywood, timber and plexiglass; for relief, lay a substrate under the laminate.
- Corner tiles are created using formwork or by sawing elements at an angle of 45 degrees.
- Material consumption is calculated according to preliminary markings, which are transferred to the wall with a pencil, simulating brickwork.
- Dry gypsum is poured into water and mixed with a construction mixer.
- It sets quickly. To reduce the rate of hardening, citric acid, vinegar, and professional retarders are added to the solution.
- The solution hardens in the mold for about 24 hours, the tiles are removed and dried for another 2–4 days.
- To make it easier to remove from the mold, it is lubricated with soapy water, a professional release agent, and wrapped in cling film.
To create a medium-fraction tile for 30 cells, it takes about 3 liters of water and 3.5 kg of gypsum. The mixture is made quite liquid, reminiscent of pancake batter in consistency. Installed using liquid nails, tile adhesive or white cement. The composition is transferred to the inside with a notched trowel 5–7 mm thick. The optimal tile thickness is 1–2 cm.
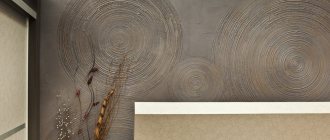
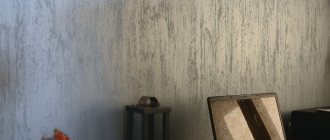
Classification by pattern texture
Using textured rollers for decorative plaster, the following types of patterns are obtained:
- Depressed. After processing, protrusions are made on the shirt. The pattern is obtained in the form of a unique indentation.
- Convex. They create relief figures that stand out above the surface of the structure. Obtained after deepening the shirt.
If we talk about texture, then the following tools are distinguished:
- Structural rollers. They are used to apply a recognizable pattern or design to brickwork. The work involves certain materials and techniques. The figures and patterns have clear features. Rollers are made of silicone, rubber, plastic or wood. The work will require special knowledge and skills. The process is carried out carefully and slowly.
- Textured rollers. They create an imitation of material on the wall surface. The cylinder contains certain elements that depict geometric and floral patterns. The tool creates an imitation of brick, stone, wood or fabric. Apply the solution or paint over it with a roller. The choice is very varied.
The tool is chosen depending on the needs. Skills in the field of decorating structures are taken into account.
Renewed old roller with your own hands
Making a modernized decorative roller is not difficult, especially if you have an old foam roller lying around the house; you have a simple cord, a clothesline (50 cm is enough), a plastic bag, scissors, a knife and tape. On a separate section of any of the walls, after covering it with decorative plaster, you can try the following options and choose the appropriate one:
- To improve the appearance of the plaster and create a decorative pattern on it, a cord and clothesline are wound around an old roller. The type of pattern will depend on their thickness. A distinct rhythm will appear on the wall. Its regularity can be controlled by the number of passes, frequency of turns and direction. An unusual pattern appears from the depressions on the roller.
- An old foam roller will also come in handy. With its help you can make a patterned design with bulges. First, cuts are made with a knife, then with scissors, cuts of any diameter are made. A wide bulge will appear from the thickness of the cutout, which will build the pattern.
- The roller will look textured if you put a soft sleeve on it, rewound with thread.
Using any of these rollers, you can add a beautiful shape, attractive depth to the walls on the finishing layer of plaster, or completely change the interior of your house or apartment. If there is no old roller, you can easily make a new one with your own hands.
Shirt material
Rollers are made from different materials. The cost of the tool and the quality of the applied pattern depend on this. The first rollers were made of wood. The following materials are currently used for them:
- Rubber. Chemically resistant and safe material that is durable. Craftsmen choose this option because the tool leaves clear marks. They make elegant impressions. The work will require skills and experience. Large-porous models are used for applying plaster, which has a certain texture.
- Plastic. For manufacturing, plastic of any hardness is used. There are curly, soft and gas-filled products. Curly rollers leave impressions, while soft rollers leave an unobtrusive, light embossed pattern. Hard products should not be used, as during the process of applying the pattern they drag the mixture along with them. The roller must be periodically cleaned of the solution.
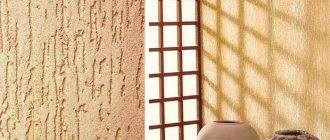
- Pile. The roller has a fleecy surface. Application over fresh mortar allows you to obtain the popular “lamb” or “fur coat” textured surface. The shirt is attached to the cylinder. Made from natural or faux fur. In the second option, polyamide, polyester or polyacrylic is used as raw material. The shape and length of the pile vary. Shirts are sold separately and can be changed as needed. Long pile creates elongated fringed protrusions on the mortar. Its value determines how smooth the surface will be.
- Foam rubber. A universal tool used for applying paint, plaster and other decorative coatings. Texture products are often used to decorate structures. Used to apply a fine-grained composition or “coat”. Decoration is carried out using fresh plaster mortar.
- Leather. To create the instrument, artificial or natural leather is used. The first ones are more attractive because they are relatively inexpensive. The shirt is attached to a cylindrical base in a straightened or wrinkled state. The second option has characteristic folds that create an original print. When securely fastened, they leave a regular impression. To create a natural impression, use a cylinder with a crumpled fur coat. Leather rollers are used to create a delicate Venetian texture that imitates marble.
When selecting a roller, the desire to obtain a specific design and skill are taken into account. Some tools are difficult to use.
Other necessary tools
You can apply the pattern using other devices:
- Master OK
. With it, like the most ordinary spatula, you can create an original, unusual pattern using chaotic movements. - Stencil
. It is appropriate to mention this tool as well. They can produce not only simple abstract patterns, but also almost paintings and bas-reliefs. The stencil can be attached to the wall, or it can be made in the form of a paperweight - it is used to create a pattern or picture. Before you get ready to apply any image, you need to make a precise choice and purchase the right stencil. - Putty knife
. The material and shape can be very diverse: stainless steel, plastic. There are a variety of coating techniques. It all depends on your imagination and taste. A notched trowel, for example, will make it possible to make parallel lines in a checkerboard pattern.
How to make a roller yourself using improvised materials
To make a textured roller with your own hands, scrap materials are used for plaster. This allows you to solve the problem when it is not possible to purchase the necessary tool.
For this, different options are used:
- Using a sticky roller. Many people have a Velcro roller at home for cleaning clothes. After use, it is easy to make a decorative roller out of it. In addition to the main element, you will need thin polystyrene foam, superglue and twine. Patterns are cut out of foam tiles and glued to the roller. Twine is used to complement the pattern.
- Rolling pin base. It's easy to make a shaped plaster roller from an old rolling pin. Plastic products are adapted to multiple print changes. You will need glue and rubber cords. All elements are available at the hardware store. The cords are cut into pieces, which are glued to the base in any order. Rubber wire does not need gluing. Just wrap it tightly around the rolling pin.
- Roller from a sleeve. The base is made from paper towel or toilet paper rolls. Decoration is carried out with cord, cardboard or foam. The elements are attached to the base with glue. The details of the pattern are cut out from scrap materials. They are glued to the bushings. It turns out to be a roller for plaster without any investment. A homemade tool solves any problem. To protect the product from getting wet, it is coated with a layer of varnish.
Homemade decorative rollers are made from various available materials. The advantage of this method is originality.
Decorative plaster from ordinary putty
Of course, one should not discount simple types of finishing, which are quite attractive in appearance, using the most ordinary putty, both starting and finishing. How to make textured plaster with your own hands? Very simple, and this option has been widely used lately. “Branded”, ready-to-use putty costs about three times more than regular putty, and making it yourself is not difficult.
Materials for decorative putty plaster:
- PVA glue - 200 g.
- Gypsum-based mixture - 6 kg.
- Water - 2l. First we apply a layer, which is called the main one - this is done with a wide spatula. When this layer dries, we begin decorating. The methods for creating a textured surface are varied. You can apply the composition with spatulas of various sizes and textures - from smooth to jagged. They can be combined.
You can do this with one spatula, applying strokes in different directions. Even the most ordinary broom, as already mentioned, is used to create a pattern, and the result is achieved when impressions are made on the plaster with a broom - from chaotic to strictly directed strokes.
There are many application methods, you either need to choose the one you like.
Applying paint with a textured roller
It is better to test the finished roller, made by yourself, on a small area of the surface. If you are satisfied with the result obtained, then you can begin the process.
Apply paint with a textured roller, following these recommendations:
- Do not press the device too hard against the surface;
- Before each application, roll the tool in a container with paint;
- make all movements carefully, without haste;
- start a new path from the border of the previous pattern;
- press the instrument near the ceiling;
- Do not apply the pattern overlapping;
- Treat corners and narrow joints with a brush;
- Apply textured paint in a thick layer to create the required relief.
Applying decorative putty
Each of us would like to get the beautiful appearance of our own home at minimal cost. One of the easiest methods to get what you want is to buy finishing putty. Precisely the finishing one, if the purpose of finishing is a soft texture.
There are many ways to get a beautiful surface when using decorative putty for walls. Let's give one of them, quite popular.
- Mack brush.
- A napkin or trowel rolled into a cone.
Prime the surface with primer or primer paint. It is advisable that the putty be more or less the same color as the future paint job.
- We bring the finishing putty to a creamy state. If desired, you can add PVA glue. We prepare the composition in small quantities, usually (if you work alone), up to 1 kg.
- Using a trowel with rounded corners, apply stains of various sizes and shapes to the surface of the resulting mixture, using claps without much effort, touching the wall with the entire surface of the trowel; carefully pull the trowel towards you, thus undermining the putty.
- Smooth out the mixture after it dries. The movements are easy, smoothing is done in different directions.
- Completely dry.
- Padding.
- Paint with a roller or brush in two layers.
- Use a plastic spatula to gently rub the paint over the wet surface.
- Varnish or wax. This technique is especially relevant if finishing is done in the hallway, bathroom, or kitchen. In other cases, this item can be omitted, especially if you prefer a matte surface. It’s still better to work together, because you need to do everything quickly, not allowing the mixture to dry out prematurely, so that transitions are not visible. After all, one of the main advantages of this finish is the absence of joints on the surface.
Of course, this option is far from the only one. It's all about your personal preferences and taste. Your imagination should work for you!
Different application methods
- The plaster is dried before painting.
- If there is such a need, it must be treated with fine-grain sandpaper.
- Paint is applied in two layers. The base layer - a dark shade - is applied with a long-haired roller.
- After complete drying - a lighter color. Short-hair roller.
Blur method. The technique exists for drawing with concave elements. A more complex style than the next one. It takes much more time and effort to get the desired effect. A darker one is applied on top of the base layer. After drying for a short time, it is wiped with a wet cloth, as a result of which the paint will remain in the concave part of the design. If more paint is removed than necessary, you need to apply it again.
- Dry application method
. Dry brush painting accentuates raised elements. It fully lives up to its name, since during operation the brush is really almost dry - there is a minimum of paint on it. The paint is applied in chaotic, even careless, light strokes, wiping off the excess on the protrusions. The presence of bold strokes and sharp transitions is normal when using this technique. Everything will depend on the drawing. In any case, the background paint is applied in two layers. After finishing the work, two layers of varnish are applied.
Of course, a homemade composition is simple to make, and gypsum-based mixtures are inexpensive, but they will not 100% replace branded decorative putty for walls, which contains marble and granite chips. In no case should it be compared, for example, with Venetian plaster, which is applied only by masters, and even then not by everyone. But nevertheless, the option described above is available to anyone who wants to add variety to the interior of their home. It will give both wallpaper and painting a head start both in appearance and in the durability of the coating.
Source