Today we will look at a budget and relatively quick way to imitate brickwork on the interior walls of a room. The method is suitable for those who dream or are thinking about decorating a wall like a brick, but don’t have enough money for expensive clinker tiles or don’t have enough time to create gypsum tiles using special molds. So let's get started.
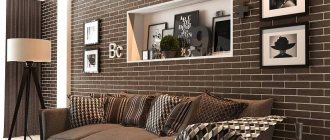
Decorative bricks in the interior of an apartment
When it comes to finishing, questions always arise related to what material to choose. The most popular solution is wallpapering or painting. Another fairly simple option is to create a brick wall from putty. This option has a lot of advantages, is inexpensive, and can be used in almost any room.
More details about decorative putty in the video:
On the balcony
Using plaster decor on the balcony is a good solution. With its help, you will be able to finish the walls in a short time, giving them a spectacular look. The bricks are painted. It is allowed to leave the decor in the original color. This solution is especially suitable if the ultimate goal is to create a loft style.
Living room
In the living room it is allowed to decorate all 4 walls with white brick. A fairly popular solution is to allocate a separate area (for example, an area in which a TV or sofa is located). For decoration, you will need to carry out preparatory work first. Putty is applied only to a leveled base.
Kitchen
In the kitchen, it is recommended to arrange an apron in this way. There are many different options for decorating the kitchen area. Choosing imitation putty allows you to get an attractive design object without spending a lot of time and money.
Bedroom
To transform the interior of the bedroom, you can use different materials. Brick decor goes well with both wallpaper and paint. You can select an area above the bed. Elements created from putty are painted in a color that matches the design.
Bathroom
The use of imitation brick in a bathtub is acceptable, but you will need to use a special putty that is resistant to high humidity. The end result will look cohesive and attractive. This option looks especially good in a room with a large area. Traditionally, the color of bricks is white. If desired, you are allowed to combine decor with tiles.
Examples of a brick wall in interior design - photos and videos
Living room with a brick wall Source domoholic.ru
Monochromatic bedroom colors Source i.pinimg.com
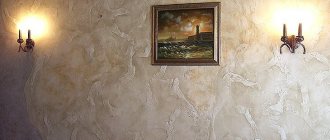
Decorating a brick wall with paintings Source deecor.ru
Evenly painted brick wall in the hallway Source carelladesign.it
Brick wall in the kitchen Source st.hzcdn.com
Brick wall and plaster Source i1.wp.com
The beauty of rough finishing Source architonic.com
Advantages of imitation putty
Among the main advantages of using putty to imitate brickwork are:
- availability;
- low time and material costs;
- attractiveness;
- durability;
- environmental friendliness.
A minimum set of tools is required for work.
To create an imitation using putty, you do not need many tools. After studying the technology, you are allowed to move on to work. Many successfully cope with finishing, even if they have not previously had experience in such work.
Important! To obtain a high-quality result, it is necessary to use certified building materials. Putty with the required characteristics can be purchased at any hardware store.
We use decorative plaster
Of course, this material simply perfectly conveys the features of the brick relief, but it will cause serious difficulties even for a trained person.
- requires special molds;
- DIY production takes an incredibly long time - you are unlikely to be able to cast more than 10 tiles per day;
- It is not always possible to achieve the desired consistency of the gypsum solution, which is why the resulting fragments become very fragile and unreliable.
The best way out is to purchase ready-made bricks in the store, pre-cast according to all the rules. They are even cheaper than ceramic tiles.
In order to secure the plaster to the wall, you will need an adhesive. Laying - similar to tiles:
- apply glue to the back side of the brick with a spatula and press it against the wall;
- check the vertical and horizontal levels;
- for greater naturalness and creating a displacement effect, a new row begins with half of one brick;
- in order to create seams, use small pieces of tiles, which can be easily removed after the glue has set.
Difficulties during the work process
Among the most difficult stages of work are:
- preparing the base for coating;
- drawing the boundaries of the seams of the future imitation;
- painting bricks.
Preparation can take quite a lot of time.
It is worth noting that if the base is level, the procedure will take place without any difficulties. Deep leveling of surfaces is required only for pronounced defects that are visible to the naked eye. Small irregularities and cracks do not need to be repaired, as they will be disguised by decorative elements.
The work can be done alone. The help of professional builders is necessary if the wall is in poor condition. To gain the necessary skills, it is recommended to practice, for example, on the balcony.
Step-by-step instructions for tile production
There is some consistency in making tiles with your own hands. It should be followed.
- Pouring the mixture.
- Drying the tiles.
- Painting in the desired color.
Watch the video for instructions on how to make gypsum tiles yourself.
Fill
Initially, the mixture is prepared. For this:
- take 6 portions of gypsum;
- you need to add 1 portion of slaked lime or citric acid;
- For 1 part of gypsum, 0.7 water is required.
If the color of the tile was chosen in advance, then paint is immediately added to the solution. But, if the color is supposed to be the same, but the tone is different, then it is better to paint it after making the tiles. All components of the solution should be mixed into a single consistency. You can use a construction mixer for this. But using the mixer should be at low speed so that there is no air in the mixture. The solution should be like sour cream. Pouring the mixture into the mold After mixing, carefully and slowly pour the mixture into the mold. Leveling is done using a spatula. If you mix the solution and then prepare the mold, the mixture will set. It cannot be diluted with water.
Drying
The form should be on a flat surface. After pouring, it is not recommended to expose the mold. You can tap it a little with a spatula to release the bubbles. If a vibrating table is used, then this should not be done.
The gypsum solution will thicken in 15-20 minutes. But, it will take 12 hours for complete hardening, provided that the room is warm and dry.
After the time has passed, the slab should be removed from the mold. This must be done carefully, because gypsum is a strong but fragile material. The tile is left to dry further. Drying gypsum tiles In order to speed up the process, you can use a heater. But contact with sunlight should be excluded.
Tile painting
After drying, gypsum tiles are white, even like bricks, unless dye has been added to the solution. For coloring you will need a water-soluble dye. There are several types of tile painting:
- Adding dye to the solution.
- Painting the form. Before pouring the solution, the form is painted with a brush. Then the tiles have an uneven color tone, but with highlighting bright stripes at the borders of the textured pattern. Painting gypsum tiles
- After the gypsum tiles have dried, use a brush or spray to paint the surface of the tiles and apply varnish on top.
Return to contents
What you need to create a simulation
Among the materials that will need to be purchased for successful decoration are:
- primer;
- masking tape;
- paint;
- plaster;
- putty;
- varnish
In addition to materials, you need to buy tools. Among the devices that will definitely be needed during repairs are:
- putty knife;
- paint roller;
- tape measure and pencil;
- bucket for mixing the solution;
- paint container;
- stationery knife.
The method of simulating brick decor determines what materials and tools will be needed. If additional devices are required during the repair, they can always be purchased. It is recommended to first provide yourself with the essentials.
Preparatory work for applying plaster with your own hands to imitate brick
Before making a brick wall, you must:
- select finishing materials and tools;
- clean the surface;
- level the base, etc.
What is needed for brick-like plaster for interior and facade decoration
To work you will need:
- set of spatulas;
- rule;
- containers;
- masking tape;
- cutter;
- yardstick;
- brush;
- trowel;
- Master OK;
- laser level;
- construction mixer;
- roller;
- brushes;
- cord for marking;
- rags;
- sponge;
- pencil or marker;
- polyethylene film for protecting furniture and floors.
In accordance with the method of simulating bricks, a stencil, scraper, textured roller, or metal strip may be required. Work is performed in a respirator and protective gloves.
How to prepare a wall for decorative plaster work
Before making a wall in the form of imitation bricks, you need to prepare the surfaces.
The work is carried out in stages:
- old finishing materials (ceramic tiles, paint, wallpaper) are cleaned off;
- the level of curvature of surfaces is checked;
- if necessary, level the wall with putty or gypsum mortar;
- cracks and chips are covered with a composition of putty and fillers;
- surfaces are treated with a primer to increase adhesion and dried.
Choosing a material to create a do-it-yourself imitation from plaster
You can make an imitation of a brick surface using different solutions.
Standard requirements for the plaster mixture:
- high strength;
- good adhesion to different base materials;
- ease of application, high elasticity;
- slight shrinkage;
- wear resistance after hardening;
- the material must be environmentally friendly.
Creating the effect of brickwork on the wall, in the openings of arches, is done with a solution of gypsum plaster. The coating is dense, matte, easy to process, suitable for living rooms, offices, bedrooms, hallways. The material does not shrink, is easy to apply, and is environmentally friendly. Gypsum plaster is applied in a layer of 1-2 cm, the mixture consumption per 1 m2 will be about 8-10 kg. Modifiers (polymer, mineral components) are added to the gypsum composition to improve the adhesion qualities of the plaster.
Additives can reduce the consumption of plaster composition, accelerate the hardening of the coating, increase resistance to humidity, and extend the service life. However, it is not recommended to add cement adhesive to the gypsum-based mixture to prevent the formation of cracks on the surfaces.
Gypsum plaster is used for processing reinforced concrete slabs, silicates, foam plastic, bricks, etc. The permissible layer thickness is 5 cm, the coating hardens in 1-3 hours.
A plaster composition made from acrylic putty with the addition of fine sand is also used as a textured base to imitate bricks. Manufacturers produce ready-made mixtures with binding ingredients in the form of silicone and silicate polymers. Plasters are easy to apply due to their good ductility; after hardening, they acquire strength, moisture-resistant characteristics, and have good adhesion. The mixtures contain antifungal additives that prevent the formation of mold.
Depending on the wall material, mineral plaster can be used. The material is strong, durable, affordable, and has good vapor permeability. However, when applying, it is important to observe the temperature and humidity conditions in the room to prevent cracking of the surface. Mineral coatings can be with natural additives in the form of mineral, quartz chips or with safe artificial dyes.
Manufacturers produce dry formulations that are diluted with water before application. Mineral plasters are used for finishing foam block, aerated concrete, and concrete walls.
The compositions are offered untinted and tinted. To give the mixture a rich brick shade, you will need to add color.
Acrylic plasters are durable, have good elasticity, with a wide palette of shades and different textures. Acrylic plaster compositions are suitable for treating surfaces in the kitchen and bathroom, because... have moisture-resistant characteristics. It is optimal to treat small areas under brickwork with acrylic materials, because... The vapor permeability of the material is low.
Silicate plaster is made with the addition of liquid glass and is sold only in ready-made tinted form in containers. The coating has a service life of up to 25 years. Silicate plasters can be used for exterior and interior decoration. The material has high vapor permeability, is easy to apply, coatings harden quickly, can be cleaned with detergents, and do not fade from ultraviolet rays.
The mixture has good hydrophobic and antiseptic characteristics. However, the solution is prepared in small portions, because the mixture hardens quickly. Before applying the composition, mandatory priming will be required. Silicate material is more expensive than mineral mixtures. The composition is universal and can be used for walls made of different materials (foam concrete blocks, concrete, stone, etc.).
Silicone plasters are characterized by increased elasticity and, after hardening, acquire strength. The material has good vapor permeability and water-repellent characteristics. The coating is durable, wear-resistant, optimal for finishing the plinths of country houses. However, the cost of the material is high.
Polymer-cement plasters can be used to imitate bricks. The material is vapor permeable, resistant to cracks and deformations, offered at an affordable price, environmentally friendly, and safe to use. Polymer-cement plaster has good vapor permeability and can be used for interior decoration of brick walls. The coating is fire-resistant, durable, and repairable.
Mosaic plaster can be used to finish brick surfaces. Polymer components are used as the basis of the mixture; the filler is stone chips (granite, marble), which tint the composition to the required shade. Manufacturers produce the composition in finished form (tinted, with thickeners). The mass is easy to apply, evenly distributed over the base, and can be used to level surfaces, correct cracks, and chips.
After drying, the coating acquires moisture-resistant characteristics and abrasion resistance. Mosaic plaster is used for finishing surfaces made of concrete, particle boards, plasterboard, cement, etc. Mixtures have been developed for facade and interior decoration. The cost of plaster with the addition of natural stone chips is high.
You can prepare the plaster composition yourself using different recipes.
The list of available examples includes a mixture of cement and sand in proportions of 1:3; tile adhesive is added to the composition at the rate of 2 liters per 1 bucket. First, the dry ingredients are mixed, then water and the selected color are added. The mixture is prepared using an electric mixer.
Preparing the base
If the base is level, and in the future it is planned to apply a thin layer of putty, then the first step should be a thorough primer. Due to this, it is possible to increase the adhesion (cohesion) of the layers. This way the putty will adhere much better. Priming is carried out in several layers.
The primer is applied with a roller
To level a very crooked concrete wall, plaster will be required. Typically, alignment is performed using beacons. The plaster dries within a few days. After preparing the rough surface, priming and marking are performed.
Drawing seams with a scraper
In the first case, the plaster brickwork is painted after applying the mortar. A rule or level (1.5-1.8 m long) is applied to the dried surface of the decor. The seams are marked with a sharp plate (the optimal width is somewhere around 0.5-1.0 cm).
The masonry “pattern” you like is done based on your own preferences. Marking on the wall should be done with bandaging of the seams. It is necessary to take into account the dimensions of classic bricks (250x 65x120 mm). Today, elongated or almost square wall materials are produced. There are also relief, textured, specially chipped and various non-standard products. You cannot draw random seams on the wall, otherwise the imitation of brick from plaster will not turn out natural.
After this, you should take a scraper, a narrow chisel or some homemade tool and carefully follow the drawn lines, removing the plaster. This is how seams are formed, the depth of which is 3-6 mm. It is not very convenient to do this work with a simple chisel. Excess mixture on the seams forms a “fringe”; it should be constantly removed.
To carefully form the seams, you can use jointing; it gives a convex or concave relief. A brick wall made of plaster is drawn starting with horizontal lines, and then short vertical ones are made. After the decor has gained strength, all imperfections in the design should be removed. Excess mixture formed on the bricks after the formation of the seams must be immediately removed with a dry cloth. You can walk along the edges with a damp sponge.
It is important to have time to apply the design before the plaster is completely dry. Otherwise, the “bricks” can be damaged. Therefore, it is recommended to treat the surface in sections. After complete drying, the decor should be painted:
- First, the entire surface is tinted.
- Then you should carefully go through the seams with a narrow brush.
Marking
The easiest way to mark is to use thin masking tape. You will first need to draw the masonry with a marker. Tape will be glued along the finished lines. If you don’t want to waste time gluing tape, then it is recommended to purchase ready-made brick wall templates for interior decoration. They are sold in many hardware stores. The template is also worth considering if you plan to decorate a large room.
After the markings have been applied, you can proceed to applying putty. It is worth remembering that the final result will depend on the accuracy of the markings.
Important! When using adhesive tape, you must leave the ends of the adhesive tape free so that it can be easily removed after drying.
Making a mold for casting brick tiles from plaster
An imitation of brick for interior decoration in an apartment or house can also be cast: you can make gypsum tiles in the form of bricks yourself. To do this, an impression is taken from interesting specimens of bricks (a mold is made to form an artificial finishing stone), and then a gypsum solution is poured into it. The resulting tiles are used for wall decoration. This technology is good because it allows you to prepare several molds in which you can make bricks of different colors for different rooms.
We find bricks of interesting shape and several almost ordinary ones, but with various minor defects. We will use them to cast the mold. It is desirable that there be at least a dozen of them, or better yet, more. “Artificial brickwork” will be more varied.
The result can be very similar to real masonry
On the side that we will “multiply”, apply grease or heated wax mixed with kerosene. This is necessary so that the silicone does not stick to the surface. When everything is dry, apply a layer of silicone sealant to the treated side. The layer thickness is 1-1.5 cm. Leave until the silicone is completely polymerized (the time depends on the type, it is written on the package).
You can also make the following shapes: imitation brick with marine motifs
When the silicone has hardened, take the foam and coat the mold without removing it from the brick. After the foam has hardened, remove the brick and level the bottom of the mold so that it stands level. Can be used by filling with gypsum mortar. It sets quickly; if you have a dozen molds, in 2-3 days you can make tiles for a couple of squares simulating a brick wall. By the way, gypsum mortar can be painted in bulk. Then new cracks and chips are not a problem - just like a brick.
Applying decorative putty
The product is applied in a small layer, but at the same time covering the previously applied markings.
When preparing the solution, mix thoroughly. Its consistency should not be too dry or liquid. The ideal solution is one that has a plastic shape, but does not flow down the wall.
Use smooth movements to spread the mixture over the entire surface.
Application is carried out with a spatula. The putty spreads evenly over the entire surface. It is important to wait for the material to dry completely. Only after this is it possible to delete the template or markup.
Form
Molds for gypsum tiles are sold on the construction market. You can also make it yourself, then it will be original. There are molds made of silicone or polyurethane on the market. Their cost varies from 990 rubles to 7 thousand rubles. It all depends on the size, material, textured pattern. Mold for making gypsum tilesTo produce gypsum tiles, the mold must be dry and clean. To prevent plaster from remaining on it after work, before pouring the mixture, the mold is lubricated with a solution of soap or shampoo.
Return to contents
Formation of individual bricks
While applying the mixture, you can do separate work with the bricks. If you want to give them a rough surface, then after spreading the putty you need to use a special texturing roller. You can also add roughness with a simple sponge.
If a high-quality stencil was used, then there will be no need to shape the bricks in any way. The masonry will form on its own when the template is peeled off. When using adhesive tape, certain disadvantages may arise. If somewhere you get a weak seam, you can refine it using a regular scraper.
Wood bricks
You can make bricks for walls with your own hands from wood. The step-by-step instructions are as follows:
- Material is purchased, in this case wood, plywood, chipboard can be used to create artificial brick.
- The wooden material should be marked into the required rectangular pieces, similar to bricks, and cut to size. All parts should be made identical; cardboard is used as a layout.
- The front part of each brick is sanded with sandpaper.
Wall marking
- Next, the markings are applied to the wall to obtain the necessary pattern for laying bricks.
- Wooden bricks are laid according to the markings. The beginning is carried out from the bottom of the wall, in opposite corners. Each brick is installed at the same interval from each other so that the thickness of the seam is correct. The optimal size is 2-4 cm.
- You need to glue it with silicone or glue. At the end of the work, transparent varnish or paint is used; gouache can be used if the bricklaying was carried out in a children's room. You can decorate with a spray can or other paints. To create a specific pattern, it is better to use a stencil.
Options for laying decorative bricks
The interior appearance of such bricks will be excellent. The facing material is cheap, but the decorative brick is environmentally friendly and has an unusually long service life. Of course, it is not recommended to use this brick for walls outside.
Finishing
Finishing involves removing visible imperfections to give the wall the most attractive appearance. Typically, the following actions are performed:
- sharp protrusions and sagging are eliminated;
- the seam becomes more pronounced;
- grind off the protruding points using sandpaper;
- painting is done.
To give the decor the desired color, you need to paint the bricks. It is better to paint the surface before removing the markings. If the marking has already been removed, you will need to protect the seam with masking tape.
Before painting, the imitation will need to be primed again. The paint can be applied with a roller. To obtain a monotonous color, most often only 2 layers are required. After the paint has dried, a varnish coating is applied, which protects against adverse external influences and fading.
For better coloring, you can use a brush
The seams can also be painted to give them a more attractive look. It is necessary to use tape if different colors are used.
How to prepare a wall for painting
Before you begin finishing, the wall should be prepared. This work takes place in 2-3 stages:
- Cleaning the walls. This is done with detergent or a metal scraper. Contaminants are washed off with water. Old paint and whitewash are removed using a solvent.
- Elimination of efflorescence. If salt deposits appear on the wall, it should be cleaned. A stiff brush is suitable for this. After the procedure, the walls are left for several days. If the salt appears a second time, the surfaces are treated with ammonia or acid.
- Removing cracks. To seal small cracks, use alkyd or latex paint. To get rid of larger ones, cement is used. First, the walls are cleaned of remnants of old cement and dust, then a solution is applied. After the surfaces are leveled with a brush, the excess is cleaned with a spatula. The drying time for the wall after sealing large cracks is 10 days. It is not recommended to start work earlier than 7 days after washing the walls. The moisture must completely leave the brick.
- Applying primer. Helps solve several problems at once: increase the durability of the coating, reduce the consumption of finishing materials, and ensure water resistance. The surface should be primed in 2-3 layers. Each new layer can be applied only after the previous one has dried.
How to paint brick trim
The paint must be chosen correctly. Among the available options that can be applied to putty are:
- acrylic paint;
- latex compounds;
- water-based paint.
The color is selected individually to suit the planned design of the room. The most popular shades are white, red-orange and brown. Almost all types of plaster can be finished well with paint, so the end result will be high-quality and effective.
Before painting, you need to clean the surface of debris and dirt.
If bricks are painted in several layers, then you need to wait about 5-7 hours before applying a new layer. The result will depend on the quality of the painting. Be sure to apply varnish at the end to protect and increase the life of the decor.
Decor and painting of brickwork
If you are tired of the too “New” look of a brick wall, or you want to make “Secret Drawings” on old brickwork.
Brick designs are becoming more and more popular. The Loft style has long been known to many, but painting can bring this style to perfection, adding mood and personality. Moreover, the painting can be both miniature and large-scale! We also decorate various brickwork, including tiles that imitate bricks.
Here are a couple of simple miniatures, the plot was chosen randomly, you can take any pictures.
Materials: acrylic paints and brushes, wall primer, rotbow, glissal and decorative varnish (optional)
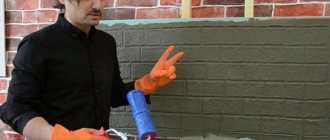
First, using a sprayer, apply the diluted primer to the brick wall. We wait for it to dry.
We dilute a little rotbant with water, and using a spatula, thoroughly coat the seams, the more carelessly, the better.
The brick can also be sanded down with sandpaper and tinted with diluted acrylic paint.
Using chalk or a simple pencil, draw the outlines of the figure. In our case it is a mouse and a bird. Next we outline with acrylic paint. Darken the background around the picture.
Thank you all for your attention! There is no limit to your creative imagination! I wish you good luck and creative inspiration!
How long does it take to make bricks from plaster?
It will take about 3 days to finish an entire room with decorative plaster. In this case, most of the time will be spent waiting for the materials to dry. After applying the mixture according to the template, it is enough to wait 8-12 hours. After this, you can proceed to the final stages of finishing.
Using decorative masonry indoors is a popular and easy way to give your interior an attractive look. It is permissible to use putty in both insulated and cold rooms, for example, on a balcony or loggia. External finishing of private houses can be done using similar technology.
It will be difficult to make an imitation yourself if you approach this procedure responsibly. The work should be divided into several stages. Be sure to start by preparing a plan. After this, the required amount of building materials is purchased. Finishing should only be applied to the prepared coating. If the basic rules are followed during repairs, the finished decorative surface will last at least 5 years.
Learn more about finishing the inside of an apartment using putty in the video:
Materials and tools that will be needed.
- Reinforced tape 15 mm or 30 mm thick (it does not get wet from wet mixtures and does not tear when removed from the wall)
- Gypsum plaster
- Spatula or metal float for decorative plasters (optional)
- Waterproof paint or paint + water-based acrylic varnish (preferably matte varnish) to protect the plaster from moisture, especially in damp rooms.
- Container for mixing plaster
- Primer
- Level
- High pile roller or brush.
- Gloves