Repairs carried out quite often leave walls in the apartment that need to be filled and decorated with something. Designers offer many options, and one of them is a fresco on the wall. Used since ancient times, and now experiencing a “new revival,” this option for interior decoration is becoming increasingly popular.
So what is a fresco? This is a drawing made on wet plaster. Over time it dries and the image becomes part of the wall. Previously, palaces, temples and rich houses were decorated this way. Many of the greatest artists and icon painters made frescoes.
However, having survived the peak of development during the Renaissance by the 20th century, frescoes lost their relevance. Until now, in the modern world, they have not attracted the attention of designers.
True, it is worth noting that the concept of fresco in the modern sense has become broader. This is due to the development of new technologies in construction, finishing, and paints.
Fresco on canvas
It is also not a cheap or simple technology. Handmade canvas is coated with special compounds and paints based on natural pigments.
Artificial aging is used. The fresco is also covered with special protective agents, and in general this type of fresco requires regular and constant care.
Stages of painting your own image on the wall
- At the first stage, it is necessary to clean the wall surface from the old coating and plaster. Then level them by plastering again. The leveling material is suitable on a sand-cement base. To avoid cracking, it is better to add a binder component to it.
- Next comes the primer. There are many types of plaster on the market, including white, paintable and colored. The choice can be made based on the invented design. During the work process, you must strive to ensure that the surface is perfectly smooth.
- Now you should wait for the wall to dry completely and finally begin creative work.
- For painting, it is better to use water-based acrylic paints, which can be purchased at an artist store. It should be remembered that high-quality paints are quite expensive. You will also need two natural brushes with hard bristles and one artificial one.
- When all preparations are completed, you can transfer the previously created sketch to the wall. To do this, its reverse side is completely painted over with a wide stylus, which is sold in the same place where paints are sold. After this, you need to press it against the wall and draw all the lines that, using the layer applied on the back side, will be imprinted on the wall. But in addition to this, they also need to be scratched so that when painting the surface with paint they do not disappear completely.
- At the next stage, the plastered wall is wetted and a background is applied to its entire area. Afterwards you need to wait for it to dry and then continue to paint on the dry field;
- The finished, dried image must be covered with a protective layer. Varnish or wax are suitable for this, and the second is preferable to the first due to many remarkable properties, the main one of which is environmental friendliness. But if there is no wax, but there is varnish, then it is quite possible to use it.
Self-adhesive mural
This mural is very similar to textured wallpaper or wall mural. A layer of fine river sand is applied to its base, imitating plaster. It is very easy to glue, which is its big advantage.
However, its main advantage is a very rich selection of designs that you can select yourself and print on a special printer. The disadvantages include the fact that this fresco is very thin. Therefore, it can only be glued to a leveled surface.
Little tricks
When decorating a wall with a fresco yourself, it is also worth remembering some little things that will help you achieve an even more positive result.
- To make the surface of the fresco matte, you need to apply 1 layer of strengthening varnish on top.
- To achieve a glossy effect, the finished drawing is varnished in 3-4 stages.
- The aging effect is achieved by applying craquelure. Important! This should be done only after the paint has completely dried.
- Decorative elements in the form of sparkles or multi-colored powder are applied to a slightly wet surface.
Non-woven fresco
The fresco on a non-woven base is very easy to glue yourself using glue for non-woven wallpaper. After this, the surface is coated with varnish, which makes it much more durable.
In addition, the presence of a variety of designs and decorative elements allows it to be used in a wide variety of interiors. Especially often used over large areas.
What types of wall frescoes are there?
Not everyone can afford a fresco done in the classical way. However, this technology is still used today. In addition to it, there are several improved and inexpensive ways to decorate walls. Here are the main ones:
- on canvas
- on a rigid basis
- based on flexible plaster
- non-woven base
- on a self-adhesive basis
Classic technology is still used today.
In technique on canvas
The basis of this type of fresco is canvas. It is first thoroughly primed, and then the image is applied using digital printing. They are then artificially aged, creating paint smudges or cracks using craquelure varnish.
Finally, the work is covered very thinly with a protective layer of wax. This fresco cannot be rubbed or washed. It belongs to the elite finishing segment. This is influenced not only by the high cost of materials, but also by the use of handmade work and exclusivity.
A fresco on canvas is glued to the wall using wallpaper glue or very carefully stretched onto a stretcher and inserted into the frame.
This fresco cannot be rubbed or washed.
On a rigid basis
Here the base is a ceramic or plastic plate. On which the artist paints with his own hands using acrylic paints. To create an aging effect, the base is first sanded and chipped.
It is heavy, so it is impossible to find works taller or longer than three meters in length on sale. This expensive type of decor is mounted on the wall like paintings.
Gluing cannot be used as a method of fastening. The glue may not be able to withstand the weight of the product.
This expensive type of decor is mounted on the wall like paintings.
Based on flexible plaster
This method is more similar to traditional manufacturing technology than others. The difference lies in the use of a special long-drying composition instead of plaster.
The finished product is fixed to the wall using a mounting grid. This frame increases service life. There is no need to worry about cracks occurring. Due to the painstaking handwork, such finishing has a high cost, but also does not look cheap.
As a rule, decor based on flexible plaster is used to decorate the living room, where its beauty can be admired by a large number of people.
Decor based on flexible plaster is used to decorate the living room.
Non-woven base
With this method, a thin layer of plaster is applied to a non-woven base. Then the image is printed on an interior printer, which is constructed and covered with protective compounds.
The finished fresco can be pasted on the wall like regular wallpaper. Unlike which, it has a larger width. The absence of joints only enhances the effect of high-quality decoration.
The finished fresco can be pasted on the wall like regular wallpaper.
Self-adhesive
For a small budget, this method comes in handy. A fresco on a self-adhesive base is an ordinary photo wallpaper, where a composition with tiny sand particles is applied on the front side. The desired design is printed on it. The product must be glued by first removing the film from the reverse side.
This must be done on a completely level surface. Otherwise, the canvas may not lie very nicely. Flaws in the wall can ruin the entire effect of the fresco.
The fresco on a self-adhesive basis is an ordinary photo wallpaper.
Flexible plaster fresco
A very popular type of fresco. Thanks to natural dyes, it is very similar to the classical form in beauty and technology. For its production, a special elastic plaster is used.
It takes a very long time to dry and harden, which increases the working time significantly. It is so convenient that people who have at least some skills in finishing and drawing make them themselves.
Installation of frescoes and photo wallpapers
Preparatory work
- The surface must be smooth, dry and primed, uniform white in color. Choose acrylic primer or paint in light colors (preferably white) to avoid the wall color showing through.
- Before starting work, a vertical line is marked on the wall (using a plumb line or level), which serves as a guide for gluing.
- When installing a large canvas, make sure you have enough space to lay it out on the floor.
- It is recommended to carry out installation under lighting that will subsequently be used indoors when using the wallpaper. Also use additional lighting to carefully inspect areas of possible folds.
- To install frescoes and photo wallpaper, dilute glue for heavy non-woven wallpaper in accordance with the instructions.
Installation of frescoes and photo wallpapers in one sheet
Installation of frescoes and photo wallpapers produced in one sheet and cut into rolls.
Installation is carried out according to the principle of gluing frescoes in one sheet, only first you need to lay out all the rolls on the floor in order in accordance with the picture.
Installation of very large frescoes produced with a joint
Attention
- The product cannot be mounted on wallpaper.
- In the packaging, frescoes and photo wallpapers can be stored for 6 months, maintaining all their characteristics.
- If exposed to low temperatures during transportation, products must be kept at room temperature in closed packaging for 24 hours.
- If the product is installed in wet areas (bathroom, swimming pool), the wall should be pre-treated with an antifungal compound to prevent the formation of mold on the wall.
- Be sure to apply glue both to the back of the product and to the walls.
- After applying the glue to the back side of the canvas, you should let the glue soak in and wet the base of the product for at least 5-7 minutes.
- During installation of the product and during the drying period, windows and doors in the room must be closed.
Installation of Affresco frescoes on the ceiling
For convenient and neat installation, we recommend using plastic film of the same size as the fresco (you can use film for repairs).
Attention
- The product cannot be mounted on wallpaper.
- Affresco fresco can be stored in packaging for 6 months, maintaining all its characteristics.
- If exposed to low temperatures during transportation, products must be kept at room temperature in closed packaging for 24 hours.
- If the product is installed in wet areas (bathroom, swimming pool), the wall should be pre-treated with an antifungal compound to prevent the formation of mold on the wall.
- Be sure to apply glue both to the back of the product and to the walls.
- After applying the glue to the back side of the canvas, you should let the glue soak in and wet the base of the product for at least 5-7 minutes.
- During installation of the product and during the drying period, windows and doors in the room must be closed.
Installation of facade frescoes (Sabbia)
The Affresco factory has developed a special material for frescoes for facades - Sabbia (Sabbia) facade.
Facade frescoes are reinforced with a special reinforcing mesh, which prevents cracks and ensures durability, and thanks to a special varnish, facade frescoes are not afraid of exposure to wind, humidity, frost and ultraviolet rays.
Attention
- Facade frescoes are intended exclusively for the exterior!
- When installing façade frescoes, it is necessary to use water-dispersed acrylic adhesive for tiles and linoleum!
- Installation must be carried out at a temperature of at least 15 °C without direct sunlight and rain.
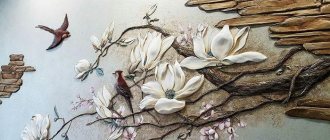
Fresco on a rigid base
To make this fresco, a rigid base (wood, plastic, ceramics) is used. It is easy to apply various effects and techniques to such coatings (cracks, imitation chips, aging).
Well, the most important thing is the ability to create volume and depth of the image. True, such frescoes are very massive and, as a result, are made in small areas.
Pasting frescoes
- Rewind the frescoes from the tube into a separate roll with the image inside.
- Place the roll of murals vertically in the place where you plan to start gluing the murals.
- If you plan to paste over two walls with one common corner, then you need to start gluing both canvases alternately from the corner.
- Unroll the roll to a length of 1-1.5 m.
- Press the fresco canvas against the wall on which the glue is applied, so that 2.5-5 cm remain above and below the intended edge of the frescoes for further trimming.
- Smooth the fresco canvas using a rubber wallpaper roller. Do not smooth the frescoes with your hands or a rag.
- Make sure that the efforts to smooth the frescoes are uniform across the entire width and height.
- After gluing and smoothing the entire canvas, you must carefully roll the entire surface of the frescoes using a rubber wallpaper roller (roll the wallpaper until the characteristic clicks from smoothing air bubbles disappear).
- When gluing seamless frescoes, door and window openings are sealed, followed by cutting out the excess along the contour of the openings. The trim around the doors must be removed in advance.
Thematic component of the frescoes
Modern technologies make it possible to use a wide variety of themes and styles in fresco images. However, when choosing a pattern, it is still necessary to take into account the features of the room and the general appearance of the apartment. The design of the wall mural should be appropriate.
- DIY artificial flowers - the best original home interior design ideas
Volumetric paper flowers - diagrams, templates, decor options and DIY decorations
Scandinavian style sofa: photos of beautiful design and successful placement in the interior
It is difficult to single out any particularly popular styles of wall frescoes. Their variety is very great: classic, baroque, kitsch, minimalism, etc. It all depends on the desire of the owner. The main thing is that the theme of the fresco is combined and merges with the overall interior. Maintain harmony.
For living rooms, the most common are classic themes, since it is the center of the house (apartment). But in the bedroom it would be better to have something calming and soothing, for example, flowers, seascapes. By the way, a great idea for a mural on the wall is a photo from your own vacation.
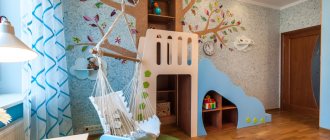
The children's room is decorated with simple and understandable things for a child: fairy-tale landscapes, cartoon or comic book characters.
When making a fresco in the bathroom or kitchen, it is also necessary to take into account such criteria as practicality, moisture resistance, and resistance to temperature changes.
Pros and cons of wall murals
Like any other material, fresco has both positive and negative qualities. Its main advantage can be considered nothing more than its attractive appearance. A fresco is not just a facing material, it is a separate decorative element.
Thanks to the huge variety of colors and textures, frescoes can highlight the individuality of any room. In addition, they perfectly complement almost any interior style.
Frescoes are suitable for decorating all parts of the room. This could be a ceiling, wall, arch, window or doorway. With the help of a fresco, you can visually enlarge the room and make it deeper.
Another advantage of the fresco is its ease of installation. You can buy ready-made canvases and simply glue them using special glue. Or you can arm yourself with paints and a brush and create your own individual masterpiece. You don't have to be an artist, you just need to have a great desire and inspiration.
As for the negative qualities, here first of all you should pay attention to the high cost of the material. In particular, we are talking about ready-made frescoes made with the addition of craquelure or cotton-based canvases.
The disadvantages of such a coating also include the fact that any defects that arise on it are quite problematic to correct on your own. Most likely, you will have to resort to the services of specialists, which can be unpleasant for your wallet.
Photo of murals on the wall
Instructions for making a fresco yourself
It is still advisable to seek the help of professionals. This can be avoided if your canvas fresco is already ready, and also if you are using a stencil fresco.
First of all, you must decide on the technique of applying the fresco. This is determined by your personal preferences. As well as material for use. Based on these parameters, the fresco is already applied. As mentioned earlier, the fresco is applied to fresh plaster. This is done with a brush. Work must be carried out promptly so that the plaster does not dry out. The pigments are pre-immersed in water.
If you still decide to paint the fresco yourself, follow a number of rules:
- Prepare the work surface for application;
- Marking of the future fresco is made;
- You can start applying the pattern. Apply it from top to bottom;
- First, large elements are drawn, and then small details;
- After completion of the work, the fresco is varnished.
Fresco in the interior
Fresco is not the most standard solution. However, it gives your room the most original look. Due to their size (usually, frescoes are placed over the entire wall area) they attract attention. Thus, murals automatically fulfill one of the main purposes of accent walls. Of course, such a solution will create an accent in the room. In addition, a fresco can help you delimit the space into the required number of zones.
Frescoes can be introduced into the interior of a variety of rooms. After all, now there are a large number of variations of images. The fresco should not be perceived as something conservative. The fresco should “blend” into the existing interior.
As a rule, frescoes can be seen in living rooms, bedrooms, and large halls.
Imitation of a fresco, or Unusual use of decoupage cards
Now, in the midst of summer, the issue of repairing and updating dachas and apartments is relevant. Maybe my modest work will serve as an impetus, an example for a new decor for your home.
This master class is intended for those who have worked with a spatula, are familiar with paints and have heard about the decoupage technique 
I think that for a beginner it won’t be too difficult to repeat my idea in the hallway, or maybe on any other free wall in the apartment.
We make markings on the plastered wall. We use a level. The first rectangle is the size of the rice paper motif. The second is a frame - “passepartout” and the third, a large rectangle, which will be framed with a baguette.
In place of the frame-baguette between the frescoes and future wallpaper we glue wide masking tape.
We tear off the edges of the rice paper.
Using a metal spatula, place the putty on the wall with chaotic movements at the place where the rice card was glued. The layer is thin, smooth the edges.
Let the putty dry slightly and glue the rice paper (PVA + water). Not with a brush! Use a wide rubber spatula (see 6-8), moving from the middle to the edges.
Use a rubber spatula to smooth out the rice paper using gentle movements, being mindful of the uneven surface underneath.
We glue all three pictures sequentially.
By marking the small frame with a spatula, we frame the drawing with putty. The idea of a “passepartout”. We shade the drawing with texture and color.
We select acrylic paints to match the shades of rice paper for a smooth transition, blending with the putty.
These can be ready-made paints, or white acrylic + color. The putty absorbs moisture well. Add water to the paint; it should not be thick.
We paint the passe-partout and try to remove the borders. We work with one color alternately on three fragments.
We do not wait for the putty to dry completely, we sand it and highlight the texture of the “fresco”.
We are waiting for the drawing to dry completely. We check by touch whether the putty underneath is still wet. We sand it lightly with zero polish and wipe it with a slightly damp cloth (without effort or fanaticism). Until we cover the drawing with a protective layer of varnish, the rice paper can easily be damaged!!!
We finish the work with the “passepartout”. Apply putty with a spatula (3-4 cm wide), lightly sand, tint with paints, and sand again. We stop if we have achieved the desired color result.
Using arbitrary, chaotic movements, apply Rough Putty over the entire area.
We skin the dried skin. We tint and sand again.
in a wet state. has already dried up.
We tint with ocher diluted with water. We skin it.
Let me summarize the scope of work: the first layer of ROUGH putty mixture with a metal spatula. Dried out. Sand with coarse sandpaper. Tint with liquid acrylic. Next, two or three layers of acrylate universal putty or a thin finishing mixture with a smaller rubber spatula. Dry. Tint. We skin it.
and when finished:
Using a wide brush, I paint the entire area with diluted acrylic.
I cover the drawing with several layers of matte varnish. And the entire area of the “frescoes” is covered with liquid wax. You can buy it at a hardware store. Rub with a soft cloth, in a circular motion, 3-4 layers.
All that remains is to frame the fresco in a baguette. It sticks to liquid nails.
This could be the end of the story. But... we made the console ourselves, and it is a continuation of the theme. Therefore, I will definitely arrange a second master class. It won't be so tediously long. What if it comes in handy?!
Thank you for your attention!
I wish you creative success and inspiration! Best regards, Natalia Antonova!
Tips for working with a fresco
The fresco, made by hand according to the Byzantine tradition, is considered one of the most expensive.
So, when applying a fresco to a surface, you need to take into account the degree of personal artistic inclinations in order to decide exactly how you will apply the image to the wall.
If you have drawing abilities, even small ones, you can show your imagination and draw an image by hand. In this case, you yourself choose the level of complexity of the image and its specific details. You can choose a plot and copy it from some source, and then add a few design details of your own. Even if the drawing turns out to be imperfect, it will be yours in any case, and this indicates its uniqueness.
If you do not have sufficient creative abilities in terms of fine art, then you can make a fresco yourself in a simpler way. It consists of applying a digital fresco onto the plaster as a stencil. In this case, the image is simply transferred to the surface from special paper. Then you yourself can give it colors and shades along the contours, and pay more or less attention to small accents. But first you need to either purchase a stencil of this type in a special store, or make it yourself using a computer and large-format printing.
Now you can decide which way to apply a beautiful painting is easier and more convenient. Any image can be applied to the plaster, from a simple drawing to a complex photograph of a real person. It will only be a matter of cost and labor. But, as practice shows, any fresco will not cost too much.